check engine LINCOLN MKZ HYBRID 2014 User Guide
[x] Cancel search | Manufacturer: LINCOLN, Model Year: 2014, Model line: MKZ HYBRID, Model: LINCOLN MKZ HYBRID 2014Pages: 445, PDF Size: 3.8 MB
Page 150 of 445
The keyless starting system has three
modes:
•
Off: Turns the ignition off.
• Without applying the brake pedal,
press and release the button once
when the ignition is in the on mode,
or when the engine is running but
the vehicle is not moving.
• On:
All electrical circuits are
operational and the warning lamps and
indicators illuminate.
• Without applying the brake pedal,
press and release the button once.
• Start:
Starts the vehicle. The engine
may not start when the vehicle starts.
• Press the brake pedal, and then
press the button for any length of
time. An indicator light on the
button illuminates when then
ignition is on and when the engine
starts.
STARTING A GASOLINE ENGINE
When the engine starts for the first time
on your drive, the idle speed increases,
this helps to warm up the engine. If the
engine idle speed does not slow down
automatically, have your vehicle checked
by an authorized dealer.
Before starting the vehicle, check the
following:
• Make sure all occupants have fastened
their safety belts.
• Make sure the headlamps and
electrical accessories are off.
• Make sure the parking brake is on.
• Put the transmission in
P . Note:
Do not touch the accelerator pedal.
1. Fully press the brake pedal.
2. Press the button.
Note: The green ready indicator
illuminates letting you know that the
vehicle is ready for driving. Since your
vehicle is equipped with a silent key start,
the engine may not start at the time of the
vehicle start.
See Hybrid Electric Vehicle
(page 152).
The system does not function if:
• The key frequencies are jammed.
• The key battery has no charge.
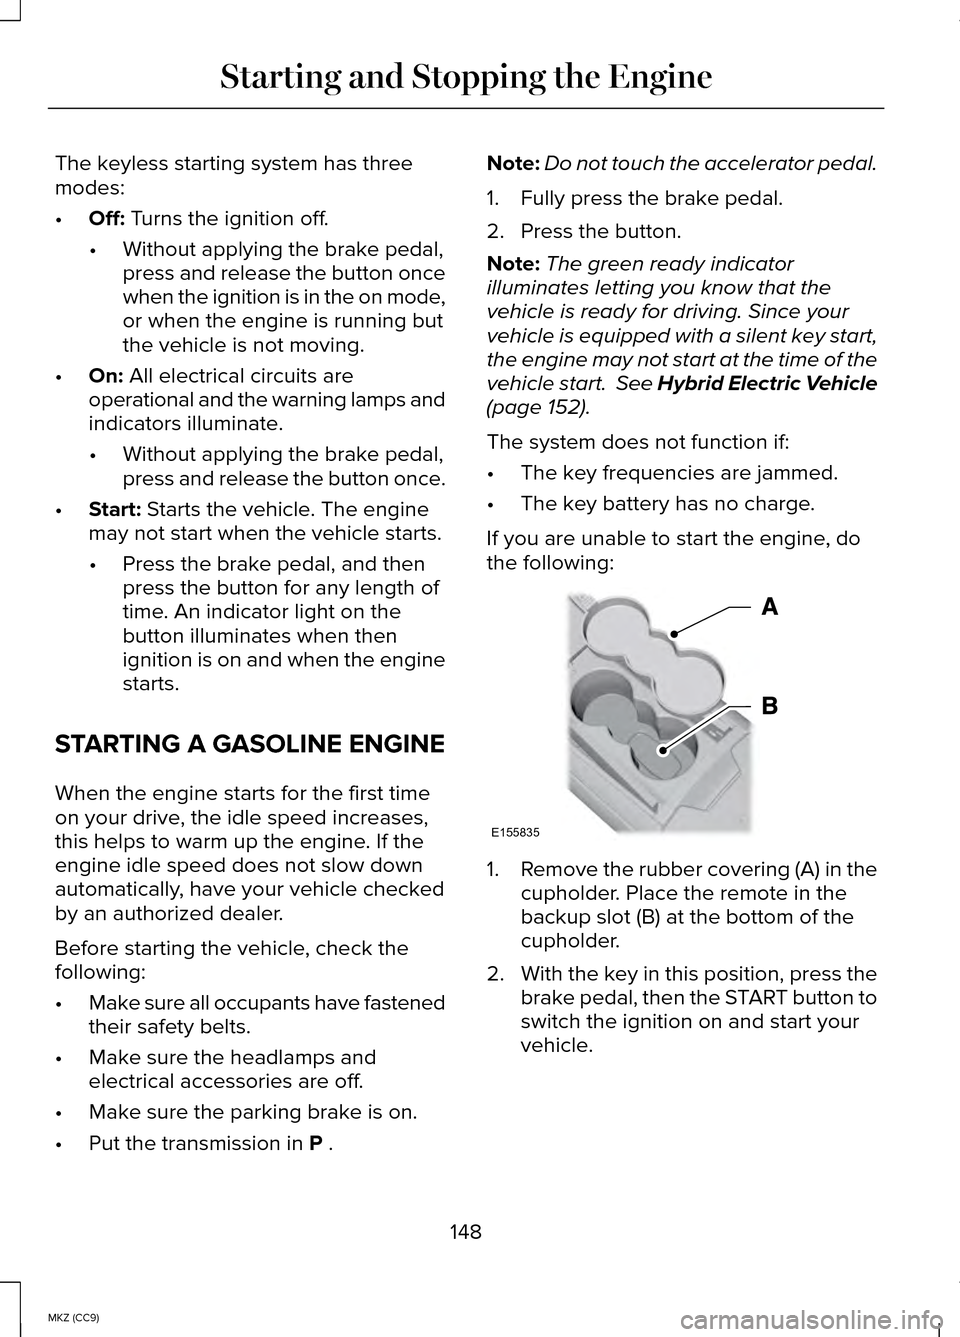
If you are unable to start the engine, do
the following: 1.
Remove the rubber covering (A) in the
cupholder. Place the remote in the
backup slot (B) at the bottom of the
cupholder.
2. With the key in this position, press the
brake pedal, then the START button to
switch the ignition on and start your
vehicle.
148
MKZ (CC9) Starting and Stopping the EngineE155835
Page 152 of 445
Switching Off the Vehicle When It Is
Moving
WARNING
Switching off the engine when the
vehicle is still moving will result in a
loss of brake and steering assistance. The
steering will not lock, but higher effort will
be required. When the ignition is switched
off, some electrical circuits, warning lamps
and indicators may also be off. 1.
Put the transmission in position N and
use the brakes to bring your vehicle to
a safe stop.
2. When your vehicle has stopped, put the transmission in position P.
3. Press and hold the button for one second, or press it three times within
two seconds.
4. Apply the parking brake.
Guarding Against Exhaust Fumes WARNING
If you smell exhaust fumes inside
your vehicle, have your vehicle
checked by your authorized dealer
immediately. Do not drive your vehicle if
you smell exhaust fumes. Carbon
monoxide is present in exhaust fumes.
Take precautions to avoid its dangerous
effects. Important Ventilating Information
If you stop your vehicle and the leave the
engine idling for long periods of time, we
recommend that you do one of the
following: •
Open the windows at least 1 inch (2.5
centimeters)
• Set your climate control to outside air.
ENGINE BLOCK HEATER (IF EQUIPPED) WARNINGS
Failure to follow engine block heater
instructions could result in property
damage or serious personal injury. Do not use your heater with
ungrounded electrical systems or
two-pronged adapters. There is a risk of
electrical shock. Note:
The heater is most effective when
outdoor temperatures are below 0°F
(-18°C).
The heater acts as a starting aid by
warming the engine coolant. This allows
the climate control system to respond
quickly. The equipment includes a heater
element (installed in the engine block) and
a wire harness. You can connect the
system to a grounded 120-volt AC
electrical source.
150
MKZ (CC9) Starting and Stopping the Engine
Page 153 of 445
We recommend that you do the following
for a safe and correct operation:
•
Use a 16-gauge outdoor extension
cord that is product certified by
Underwriter’ s Laboratory (UL) or
Canadian Standards Association (CSA).
This extension cord must be suitable
for use outdoors, in cold temperatures,
and be clearly marked Suitable for Use
with Outdoor Appliances. Do not use
an indoor extension cord outdoors.
This could result in an electric shock
or become a fire hazard.
• Use as short an extension cord as
possible.
• Do not use multiple extension cords.
• Make sure that when in operation, the
extension cord plug and heater cord
plug connections are free and clear of
water. This could cause an electric
shock or fire.
• Make sure your vehicle is parked in a
clean area, clear of combustibles.
• Make sure the heater, heater cord and
extension cord are firmly connected.
• Check for heat anywhere in the
electrical hookup once the system has
been operating for approximately 30
minutes.
• Make sure the system is unplugged
and properly stowed before driving
your vehicle. Make sure the protective
cover seals the prongs of the block
heater cord plug when not in use.
• Make sure the heater system is
checked for proper operation before
winter. Using the Engine Block Heater
Make sure the receptacle terminals are
clean and dry prior to use. Clean them with
a dry cloth if necessary.
The heater uses 0.4 to 1.0 kilowatt-hours
of energy per hour of use. The system
does not have a thermostat. It achieves
maximum temperature after approximately
three hours of operation. Using the heater
longer than three hours does not improve
system performance and unnecessarily
uses electricity.
151
MKZ (CC9) Starting and Stopping the Engine
Page 168 of 445
Your vehicle may not pass the I/M test if
the service engine soon indicator is on or
not working properly (bulb is burned out),
or if the OBD-II system has determined
that some of the emission control systems
have not been properly checked. In this
case, your vehicle is not ready for I/M
testing.
If the vehicle
’s engine or transmission has
just been serviced, or the battery has
recently run down or been replaced, the
OBD-II system may indicate that the
vehicle is not ready for I/M testing. To
determine if the vehicle is ready for I/M
testing, turn the ignition key to the on
position for 15 seconds without cranking
the engine. If the service engine soon
indicator blinks eight times, it means that
the vehicle is not ready for I/M testing; if
the service engine soon indicator stays on
solid, it means that the vehicle is ready for
I/M testing.
The OBD-II system monitors the emission
control system during normal driving. A
complete check may take several days. If
the vehicle is not ready for I/M testing, you
may need to perform the following driving
cycle consisting of mixed city and highway
driving:
Drive on an expressway or highway for a
steady 15 minutes, followed by 20 minutes
of stop-and-go driving with at least four
30-second idle periods. Allow the vehicle to sit for at least eight
hours without starting the engine. Then,
start the engine and complete the above
driving cycle. The engine must warm up
to its normal operating temperature. Once
started, do not turn off the engine until the
above driving cycle is complete. If the
vehicle is still not ready for I/M testing, you
will have to repeat the above driving cycle.
166
MKZ (CC9) Fuel and Refueling
Page 176 of 445
GENERAL INFORMATION
Note:
Occasional brake noise is normal.
If a metal-to-metal, continuous grinding or
continuous squeal sound is present, the
brake linings may be worn-out. Have the
system checked by an authorized dealer.
If the vehicle has continuous vibration or
shudder in the steering wheel while
braking, have it checked by an authorized
dealer.
Note: Brake dust may accumulate on the
wheels, even under normal driving
conditions. Some dust is inevitable as the
brakes wear and does not contribute to
brake noise. See Cleaning the Alloy
Wheels (page 272). See
Warning Lamps and
Indicators (page 91).
Wet brakes result in reduced braking
efficiency. Gently press the brake pedal a
few times when driving from a car wash
or standing water to dry the brakes.
Brake Over Accelerator
In the event the accelerator pedal
becomes stuck or entrapped, apply steady
and firm pressure to the brake pedal to
slow the vehicle and reduce engine power.
If you experience this condition, apply the
brakes and bring your vehicle to a safe
stop. Move the transmission selector lever
to position
P, switch the engine off and
apply the parking brake. Inspect the
accelerator pedal for any interference. If
none are found and the condition persists,
have your vehicle towed to the nearest
authorized dealer. Brake Assist
Brake assist detects when you brake
heavily by measuring the rate at which you
press the brake pedal. It provides
maximum braking efficiency as long as you
press the pedal. Brake assist can reduce
stopping distances in critical situations.
Anti-lock Brake System
This system helps you maintain steering
control during emergency stops by
keeping the brakes from locking.
This lamp momentarily
illuminates when you turn the
ignition on. If the light does not
illuminate during start up, remains on or
flashes, the anti-lock braking system may
be disabled. Have the system checked by
an authorized dealer. If the system is disabled, normal
braking is still effective. If the
brake warning lamp illuminates
when you release the parking brake, have
your system checked by an authorized
dealer.
Regenerative Braking System
This feature is used to simulate the engine
braking of an internal combustion engine
and assist the standard brake system while
recovering some of the energy of motion
and storing it in the battery to improve fuel
economy. The standard brake system is
designed to fully stop the car if
regenerative braking is not available.
During regenerative braking, the motor is
174
MKZ (CC9) BrakesE144522 E144522
Page 179 of 445
Manual release
WARNING
If the brake system warning light
remains illuminated or flashes after
you have released the parking brake, there
could be a problem with you braking
system. Have the system checked by an
authorized dealer as soon as possible. You can manually release the electric
parking brake by turning the ignition on,
pressing the brake pedal and then
pressing the electric parking brake switch.
When the electric parking brake is
released, the brake system warning lamp
will turn off.
Automatic release - drive away release
Note:
You must close the driver's door and
you must fasten the driver's safety belt
before this feature will operate.
Note: If the electric parking brake warning
lamp stays illuminated, the electric parking
brake will not automatically release. You
must release the electric parking brake
using the electric parking brake switch.
Note: The engine must be running and
you must press the accelerator pedal
before the drive away release feature will
operate.
Note: On hybrid vehicles, the vehicle must
be Ready-to-Drive as indicated by the
green Ready indicator light.
The brake system warning lamp will go off
to confirm that the electric parking brake
has been released. Note:
The electric parking brake drive
away release makes starting on a hill
easier. This feature will release the
parking brake automatically when the
vehicle has sufficient drive force to move
up the hill. To assure drive away release
when starting uphill, press the accelerator
pedal quickly.
Battery With No Charge WARNING
You will not be able to apply or
release the electric parking brake if
the battery is low or has no charge. If the battery is low or has no charge, use
jumper cables and a booster battery.
HILL START ASSIST
WARNINGS
The system does not replace the
parking brake. When you leave your
vehicle, always apply the parking brake
and put the transmission in park (P). You must remain in your vehicle
once you have activated the system.
During all times, you are responsible
for controlling your vehicle,
supervising the system and intervening, if
required. If the engine is revved excessively,
or if a malfunction is detected, the
system will be deactivated. The system makes it easier to pull away
when your vehicle is on a slope without
the need to use the parking brake.
177
MKZ (CC9) Brakes
Page 211 of 445
Note:
The CTA system always switches
on whenever the ignition is switched on.
However, the BLIS system will remember
the last selected on or off setting.
One or both systems cannot be switched
off when MyKey is used. See General
Information (page 313).
One or both systems can also be switched
off permanently at your authorized dealer.
Once switched off, switching it back on
must also be done at your authorized
dealer.
STEERING
Electric Power Steering WARNINGS
The electric power steering system
has diagnostic checks that
continuously monitor the system to ensure
proper operation. When a system error is
detected a steering message will appear
in the information display. The electric power steering system
has diagnostic checks that
continuously monitor the system to ensure
proper operation of the electronic system.
When an electronic error is detected, a
message will be displayed in the
information display. If this happens, stop
the vehicle in a safe place, and turn off the
engine. After at least 10 seconds, reset the
system by restarting the engine, and watch
the information display for a steering
message. If a steering message returns,
or returns while driving, take the vehicle
to your dealer to have it checked. WARNINGS
Obtain immediate service if a system
error is detected. You may not notice
any difference in the feel of your steering,
but a serious condition may exist. Failure
to do so may result in loss of steering
control. Your vehicle is equipped with an electric
power-assisted steering system. There is
no fluid reservoir to check or fill.
If your vehicle loses electrical power while
you are driving (or if the ignition is turned
off ), you can steer the vehicle manually,
but it takes more effort. Extreme
continuous steering may increase the
effort it takes for you to steer. This occurs
to prevent internal overheating and
permanent damage to your steering
system. If this should occur, you will
neither lose the ability to steer the vehicle
manually nor will it cause permanent
damage. Typical steering and driving
maneuvers will allow the system to cool
and steering assist will return to normal.
Steering Tips
If the steering wanders or pulls, check for:
•
an improperly inflated tire
• uneven tire wear
• loose or worn suspension components
• loose or worn steering components
• improper vehicle alignment
A high crown in the road or high
crosswinds may also make the steering
seem to wander or pull.
209
MKZ (CC9) Driving Aids
Page 215 of 445
•
Electronic stability control and traction
control maintain your vehicle control
in adverse conditions or high
performance driving.
• Electronic throttle control enhances
the powertrain response to your inputs.
These systems have a range of modes
which you can choose from in order to
customize your ideal driving experience:
• Comfort – Provides a more relaxed
driving experience, maximizing
comfort. Your steering effort decreases
and the suspension movement is more
fluid. Comfort mode is ideal when you
desire enhanced traveling comfort.
• Normal – Delivers a balanced
combination of comfortable, controlled
ride and confident handling. This mode
provides an engaging drive experience
and a direct connection to the road
without sacrificing any of the
composure demanded from a luxury
vehicle.
• Sport – Provides a sportier driving
experience. The suspension stiffens,
with an emphasis on handling and
control. The engine responds more
directly to your inputs and takes on a
more powerful tone. Sport mode is
ideal for use during more spirited
driving.
Using Lincoln Drive Control
You can configure which of the Drive
Control modes are active when your
vehicle is in Drive (D) or in Sport (S). The
configuration remains active until modified
from the main menu on the information
display. To change your vehicle
’s Drive Control
settings from the main menu on the
information display:
1. Choose Settings.
2. Choose Vehicle.
3. Choose Drive Control.
4. Select the shift position you would like
to configure, either D or S.
5. Choose from Comfort, Normal, or Sport
modes as your preferred setting in
D.
6. Choose from Normal or Sport modes as your preferred setting in S.
Note: Lincoln Drive Control has diagnostic
checks that continuously monitor the
system to ensure proper operation.
Certain types of system errors will gray
out the mode selections within the
information display, preventing you from
changing states when the gear position
is changed. Other types of errors will
produce a temporary message that states
Drive Control Malfunction. If either
condition persists for multiple key cycles,
have your vehicle checked by an
authorized dealer.
213
MKZ (CC9) Driving Aids
Page 229 of 445
Do not attempt to push-start your
automatic transmission vehicle. Automatic
transmissions do not have push-start
capability. Attempting to push-start a
vehicle with an automatic transmission
may cause transmission damage.
Preparing Your Vehicle
Note:
Use only a 12-volt supply to start
your vehicle.
Note: Do not disconnect the battery of the
disabled vehicle as this could damage the
vehicle's electrical system.
1. Park the booster vehicle close to the hood of the disabled vehicle making
sure the two vehicles do not touch. Set
the parking brake on both vehicles and
stay clear of the engine cooling fan
and other moving parts. 2.
Check all battery terminals and remove
any excessive corrosion before you
attach the battery cables. Ensure that
vent caps are tight and level.
3. Turn the heater fan on in both vehicles
to protect from any electrical surges.
Turn all other accessories off.
Connecting the Jumper Cables
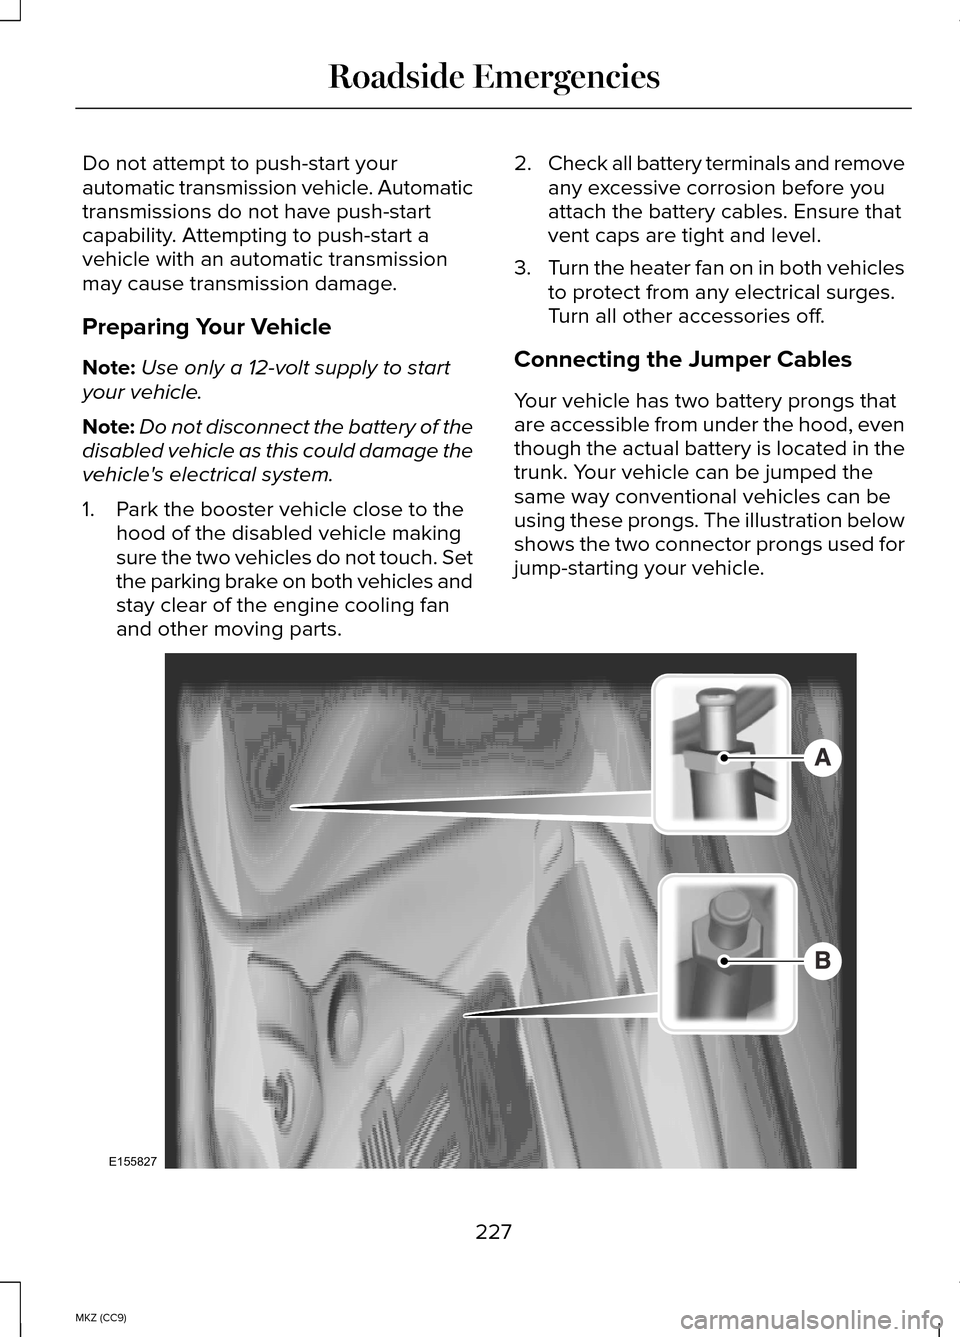
Your vehicle has two battery prongs that
are accessible from under the hood, even
though the actual battery is located in the
trunk. Your vehicle can be jumped the
same way conventional vehicles can be
using these prongs. The illustration below
shows the two connector prongs used for
jump-starting your vehicle. 227
MKZ (CC9) Roadside EmergenciesE155827
Page 230 of 445
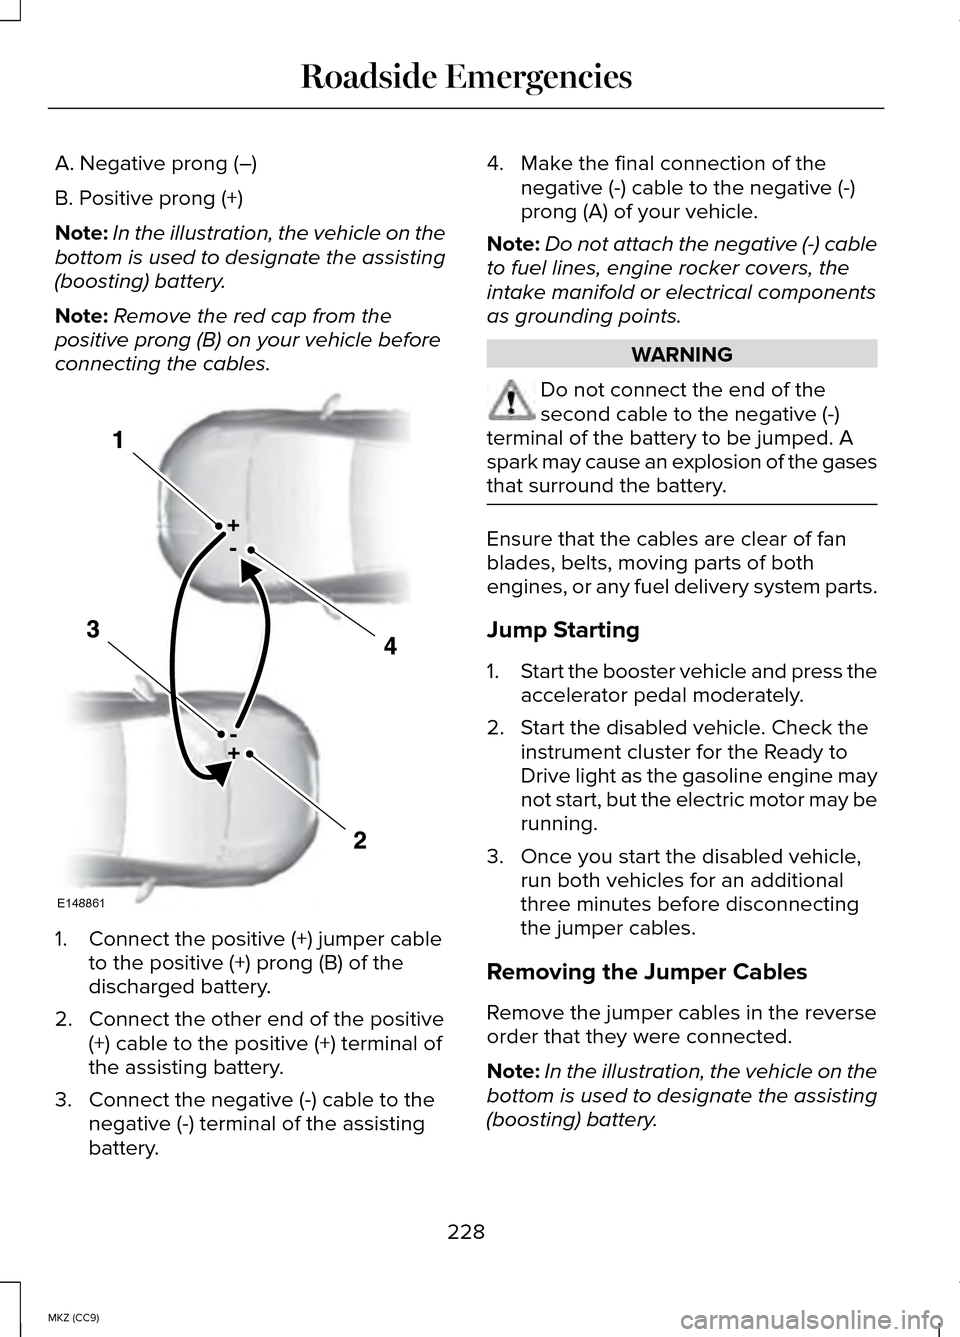
A. Negative prong (–)
B. Positive prong (+)
Note:
In the illustration, the vehicle on the
bottom is used to designate the assisting
(boosting) battery.
Note: Remove the red cap from the
positive prong (B) on your vehicle before
connecting the cables. 1. Connect the positive (+) jumper cable
to the positive (+) prong (B) of the
discharged battery.
2. Connect the other end of the positive (+) cable to the positive (+) terminal of
the assisting battery.
3. Connect the negative (-) cable to the negative (-) terminal of the assisting
battery. 4. Make the final connection of the
negative (-) cable to the negative (-)
prong (A) of your vehicle.
Note: Do not attach the negative (-) cable
to fuel lines, engine rocker covers, the
intake manifold or electrical components
as grounding points. WARNING
Do not connect the end of the
second cable to the negative (-)
terminal of the battery to be jumped. A
spark may cause an explosion of the gases
that surround the battery. Ensure that the cables are clear of fan
blades, belts, moving parts of both
engines, or any fuel delivery system parts.
Jump Starting
1.
Start the booster vehicle and press the
accelerator pedal moderately.
2. Start the disabled vehicle. Check the instrument cluster for the Ready to
Drive light as the gasoline engine may
not start, but the electric motor may be
running.
3. Once you start the disabled vehicle, run both vehicles for an additional
three minutes before disconnecting
the jumper cables.
Removing the Jumper Cables
Remove the jumper cables in the reverse
order that they were connected.
Note: In the illustration, the vehicle on the
bottom is used to designate the assisting
(boosting) battery.
228
MKZ (CC9) Roadside EmergenciesE148861