LINCOLN MKZ HYBRID 2014 Owners Manual
Manufacturer: LINCOLN, Model Year: 2014, Model line: MKZ HYBRID, Model: LINCOLN MKZ HYBRID 2014Pages: 445, PDF Size: 3.8 MB
Page 221 of 445
Examples: For a 5000 pound (2268
kilogram) conventional trailer, multiply
5000 by 0.10 and 0.15 to obtain a
proper tongue load range of 500 to
750 pounds (227 to 340 kilograms).
For an 11500 pound (5216 kilogram)
fifth wheel trailer, multiply by 0.15 and
0.25 to obtain a proper king pin load
range of 1725 to 2875 pounds (782 to
1304 kilograms). WARNINGS
Do not exceed the GVWR or the
GAWR specified on the Safety
Compliance Certification Label. Do not use replacement tires
with lower load carrying
capacities than the original tires
because they may lower the vehicle ’s
GVWR and GAWR limitations.
Replacement tires with a higher limit
than the original tires do not increase
the GVWR and GAWR limitations. Exceeding any vehicle weight
rating limitation could result in
serious damage to the vehicle and/or
personal injury. Steps for determining the correct
load limit:
1. Locate the statement "The
combined weight of occupants and
cargo should never exceed XXX
kg or XXX lb." on your vehicle ’s
placard.
2. Determine the combined weight
of the driver and passengers that
will be riding in your vehicle. 3. Subtract the combined weight of
the driver and passengers from
XXX kg or XXX lb.
4. The resulting figure equals the available amount of cargo and
luggage load capacity. For
example, if the “XXX” amount
equals 1,400 lb. and there will be
five 150 lb. passengers in your
vehicle, the amount of available
cargo and luggage load capacity
is 650 lb. (1400-750 (5 x 150) = 650
lb.)
5. Determine the combined weight
of luggage and cargo being loaded
on the vehicle. That weight may
not safely exceed the available
cargo and luggage load capacity
calculated in Step 4.
6. If your vehicle will be towing a
trailer, load from your trailer will be
transferred to your vehicle. Consult
this manual to determine how this
reduces the available cargo and
luggage load capacity of your
vehicle.
The following gives you a few
examples on how to calculate the
available amount of cargo and
luggage load capacity:
*Suppose your vehicle has a
1400-pound (635-kilogram) cargo and
luggage capacity. You decide to go
golfing. Is there enough load capacity
to carry you, four of your friends and
all the golf bags? You and four friends
average 220 pounds (99 kilograms)
each and the golf bags weigh
approximately 30 pounds (13.5
kilograms) each. The calculation would
219
MKZ (CC9) Load Carrying
Page 222 of 445
be: 1400 - (5 x 220) - (5 x 30) = 1400 -
1100 - 150 = 150 pounds. Yes, you
have enough load capacity in your
vehicle to transport four friends and
your golf bags. In metric units, the
calculation would be: 635 kilograms -
(5 x 99 kilograms) - (5 x 13.5 kilograms)
= 635 - 495 - 67.5 = 72.5 kilograms.
*Suppose your vehicle has a
1400-pound (635-kilogram) cargo and
luggage capacity. You and one of your
friends decide to pick up cement from
the local home improvement store to
finish that patio you have been
planning for the past two years.
Measuring the inside of the vehicle
with the rear seat folded down, you
have room for twelve 100-pound
(45-kilogram) bags of cement. Do you
have enough load capacity to
transport the cement to your home?
If you and your friend each weigh 220
pounds (99 kilograms), the calculation
would be: 1400 - (2 x 220) - (12 x 100)
= 1400 - 440 - 1200 = - 240 pounds.
No, you do not have enough cargo
capacity to carry that much weight. In
metric units, the calculation would be:
635 kilograms - (2 x 99 kilograms) -
(12 x 45 kilograms) = 635 - 198 - 540
= -103 kilograms. You will need to
reduce the load weight by at least 240
pounds (104 kilograms). If you remove
three 100-pound (45-kilogram) cement
bags, then the load calculation would
be: 1400 - (2 x 220) - (9 x 100) = 1400
- 440 - 900 = 60 pounds. Now you
have the load capacity to transport the
cement and your friend home. In
metric units, the calculation would be:
635 kilograms - (2 x 99 kilograms) - (9
x 45 kilograms) = 635 - 198 - 405 = 32
kilograms.
The above calculations also assume
that the loads are positioned in your
vehicle in a manner that does not
overload the Front or the Rear Gross
Axle Weight Rating specified for your
vehicle on the Safety Compliance
Certification Label. The label shall be
affixed to either the door hinge pillar,
door-latch post, or the door edge that
meets the door-latch post, next to the
driver's seating position.
220
MKZ (CC9) Load Carrying
Page 223 of 445
TOWING A TRAILER
WARNING
Never tow a trailer with an MKZ
Hybrid. This powertrain is not
designed to tow. TRANSPORTING THE VEHICLE
If you need to have your vehicle towed,
contact a professional towing service or,
if you are a member of a roadside
assistance program, your roadside
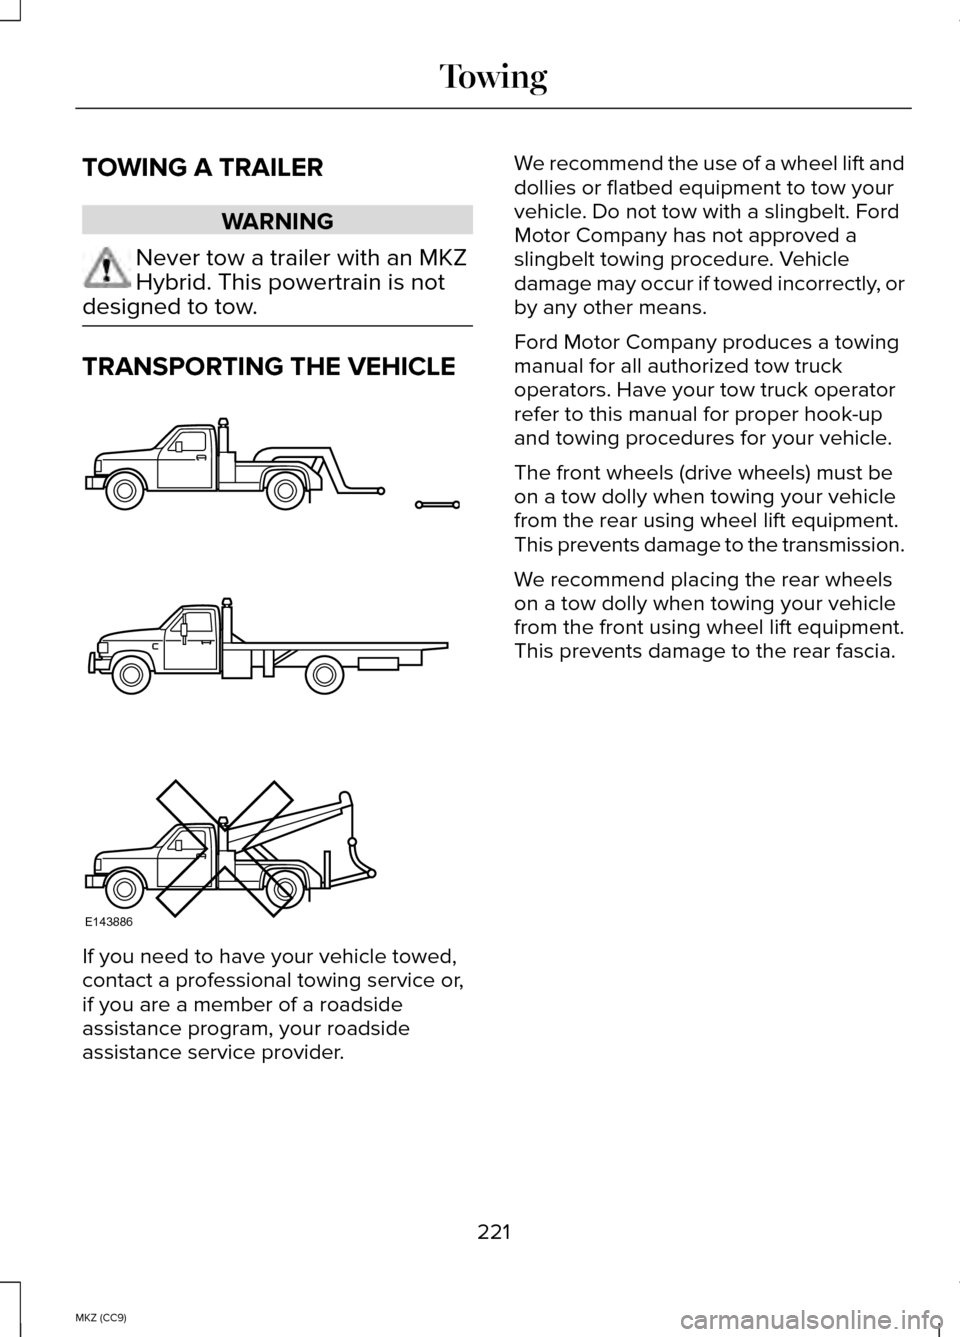
assistance service provider. We recommend the use of a wheel lift and
dollies or flatbed equipment to tow your
vehicle. Do not tow with a slingbelt. Ford
Motor Company has not approved a
slingbelt towing procedure. Vehicle
damage may occur if towed incorrectly, or
by any other means.
Ford Motor Company produces a towing
manual for all authorized tow truck
operators. Have your tow truck operator
refer to this manual for proper hook-up
and towing procedures for your vehicle.
The front wheels (drive wheels) must be
on a tow dolly when towing your vehicle
from the rear using wheel lift equipment.
This prevents damage to the transmission.
We recommend placing the rear wheels
on a tow dolly when towing your vehicle
from the front using wheel lift equipment.
This prevents damage to the rear fascia.
221
MKZ (CC9) TowingE143886
Page 224 of 445
TOWING THE VEHICLE ON FOUR
WHEELS
Emergency Towing
In the event your vehicle becomes
disabled (without access to wheel dollies,
car-hauling trailer, or flatbed transport
vehicle), it can be flat-towed (all wheels on
the ground, regardless of the
powertrain/transmission configuration)
under the following conditions:
•
The vehicle is facing forward so that it
is towed in a forward direction.
• The transmission gear shift lever is
placed in position N. If the transmission
gear shift lever cannot be moved to
position N, it may need to be
overridden. See Automatic
Transmission (page 170).
• Maximum speed is 35 mph (56 km/h).
• Maximum distance is 50 miles (80
kilometers).
Recreational Towing
Note: Put your climate control system in
recirculated air mode to prevent exhaust
fumes from entering the vehicle.
See
Climate Control (page 124).
Follow these guidelines if you have a need
for recreational (RV) towing. An example
of recreational towing would be towing
your vehicle behind a motorhome. These
guidelines are designed to ensure that
your transmission is not damaged. Your vehicle can be towed with all four
wheels on the ground using the Neutral
Tow feature, or with all four wheels off the
ground using a vehicle transport trailer. If
you are using a vehicle transport trailer,
follow the instruction specified by the
equipment provider.
Neutral Tow
If you tow your vehicle with all four wheels
on the ground:
•
Tow only in the forward direction.
• Release the parking brake.
• Place the vehicle in Neutral Tow mode
by doing the following:
•Put the ignition in accessory mode
(ignition on, engine off ).
See
Keyless Starting (page 147).
• Select
Neutral Tow in the
information display.
• When prompted by the information
display, press the brake pedal and
select Neutral on the transmission.
Make sure the parking brake is off.
If done successfully,
Neutral Tow
Engaged appears in the display.
• Shut the ignition off.
See Keyless
Starting (page 147). If the process
is completed successfully, the N
on the transmission slowly blinks
and "Neutral tow engaged"
appears in the information display.
• Do not exceed 70 mph (113 km/h).
• Start the engine and allow it to run for
one minute at the beginning of each
day. With the engine running and your
foot on the brake, shift into position D
and then into position R before shifting
back into position
N.
222
MKZ (CC9) Towing
Page 225 of 445
BREAKING-IN
You need to break in new tires for
approximately 300 miles (480 kilometers).
During this time, your vehicle may exhibit
some unusual driving characteristics. The
engine also needs to break in. Avoid hard
accelerations and driving too fast for the
first 1000 miles (1600 kilometers). If
possible, avoid carrying heavy loads up
steep grades during the break-in period.
ECONOMICAL DRIVING
Fuel economy is affected by several things
such as how you drive, the conditions you
drive under and how you maintain your
vehicle.
There are some things to keep in mind
that may improve your fuel economy:
•
Accelerate and slow down in a smooth,
moderate fashion.
• Drive at steady speeds.
• Anticipate stops; slowing down may
eliminate the need to stop.
• Combine errands and minimize
stop-and-go driving.
•When running errands, go to the
furthest destination first and then
work your way back home.
• Close the windows for high-speed
driving.
• Drive at reasonable speeds. (Traveling
at 65 mph/105 kph uses about 15% less
fuel than traveling at 75 mph/121 kph).
• Keep the tires properly inflated and
use only the recommended size. •
Use the recommended engine oil.
• Perform all regularly scheduled
maintenance.
There are also some things you may want
to avoid doing because they reduce your
fuel economy:
• Avoid sudden or hard accelerations.
• Avoid revving the engine before
turning off the car.
• Avoid long idle periods.
• Do not warm up your vehicle on cold
mornings.
• Reduce the use of air conditioning and
heat.
• Avoid using speed control in hilly
terrain.
• Do not rest your foot on the brake
pedal while driving.
• Avoid carrying unnecessary weight
(approximately 1 mpg [0.4
kilometers/liter] is lost for every 400
lbs [180 kilograms] of weight carried).
• Avoid adding particular accessories to
your vehicle (e.g. bug deflectors,
rollbars/light bars, running boards, ski
racks).
• Avoid driving with the wheels out of
alignment.
DRIVING THROUGH WATER
Note: Driving through deep water above
the recommended levels can cause
vehicle damage.
223
MKZ (CC9) Driving Hints
Page 226 of 445
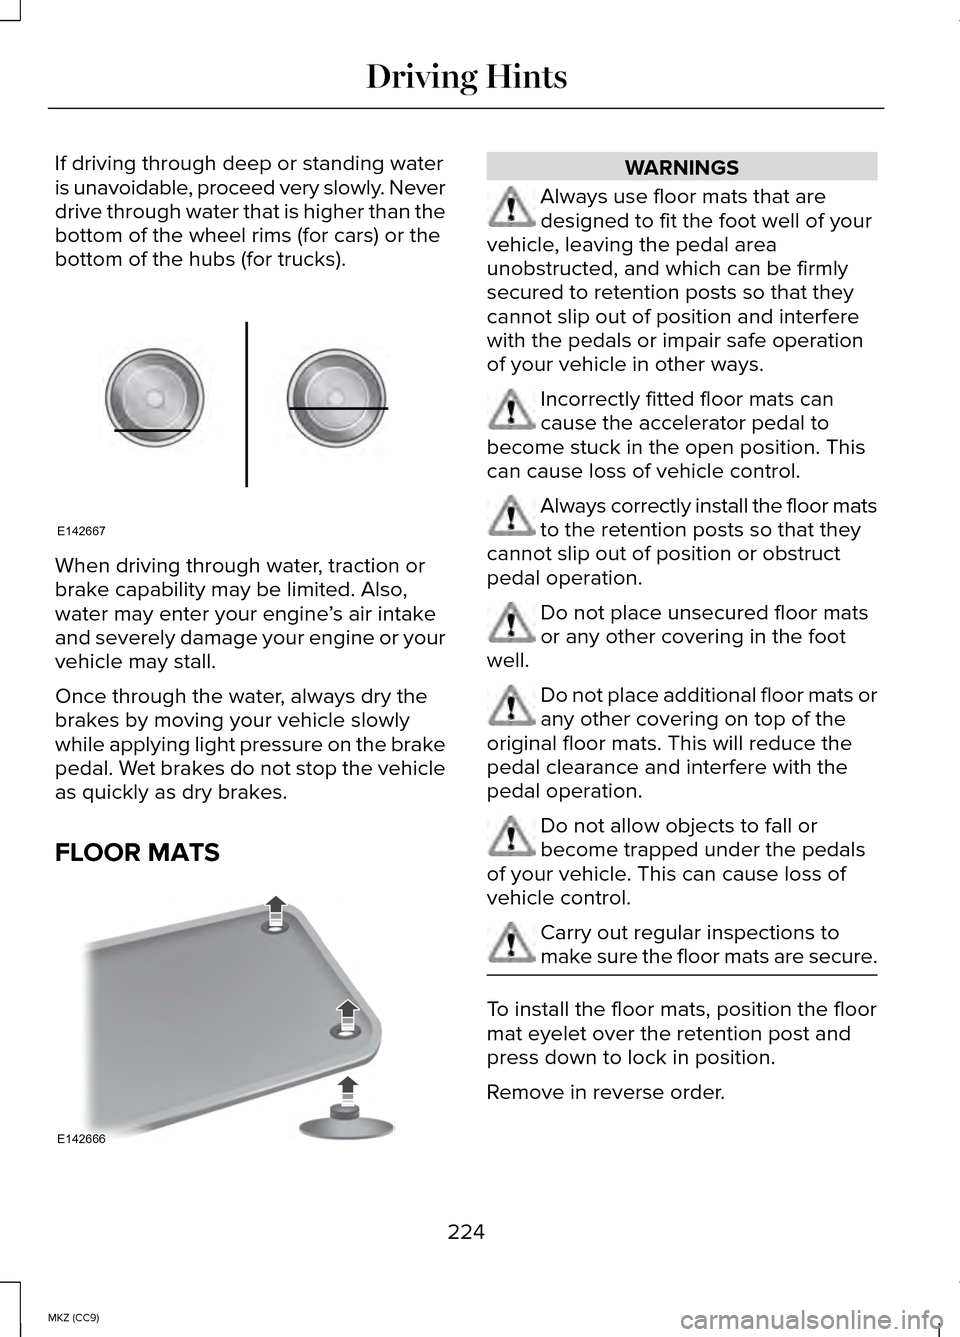
If driving through deep or standing water
is unavoidable, proceed very slowly. Never
drive through water that is higher than the
bottom of the wheel rims (for cars) or the
bottom of the hubs (for trucks).
When driving through water, traction or
brake capability may be limited. Also,
water may enter your engine
’s air intake
and severely damage your engine or your
vehicle may stall.
Once through the water, always dry the
brakes by moving your vehicle slowly
while applying light pressure on the brake
pedal. Wet brakes do not stop the vehicle
as quickly as dry brakes.
FLOOR MATS WARNINGS
Always use floor mats that are
designed to fit the foot well of your
vehicle, leaving the pedal area
unobstructed, and which can be firmly
secured to retention posts so that they
cannot slip out of position and interfere
with the pedals or impair safe operation
of your vehicle in other ways. Incorrectly fitted floor mats can
cause the accelerator pedal to
become stuck in the open position. This
can cause loss of vehicle control. Always correctly install the floor mats
to the retention posts so that they
cannot slip out of position or obstruct
pedal operation. Do not place unsecured floor mats
or any other covering in the foot
well. Do not place additional floor mats or
any other covering on top of the
original floor mats. This will reduce the
pedal clearance and interfere with the
pedal operation. Do not allow objects to fall or
become trapped under the pedals
of your vehicle. This can cause loss of
vehicle control. Carry out regular inspections to
make sure the floor mats are secure.
To install the floor mats, position the floor
mat eyelet over the retention post and
press down to lock in position.
Remove in reverse order.
224
MKZ (CC9) Driving HintsE142667 E142666
Page 227 of 445
ROADSIDE ASSISTANCE
Vehicles Sold In the United States:
Getting Roadside Assistance
To fully assist, if you have a vehicle
concern, Ford Motor Company offers a
complimentary Roadside Assistance
program. This program is separate from
the New Vehicle Limited Warranty.
The service is available:
•
24 hours a day, seven days a week.
• Throughout the life of the vehicle for
original owners.
• For six years or 70,000.0 mi
(112,654.08 km) (whichever comes first)
within the extended powertrain
warranty coverage period for
subsequent owners.
Roadside assistance will cover:
• A flat tire change with a good spare
(except vehicles supplied with a tire
mobility kit).
• Battery jump start.
• Lock-out assistance (key replacement
cost is the customer's responsibility).
• Fuel delivery — independent service
contractors, if not prohibited by state,
local or municipal law shall deliver up
to
2.00 gal (7.57 L) of gasoline or
5.00 gal (18.93 L) of diesel fuel to a
disabled vehicle. Roadside Assistance
limits fuel delivery service to two
no-charge occurrences within a
12-month period. •
Winch out — available within
100.0 ft
(30.48 m) of a paved or county
maintained road, no recoveries.
• Towing — Lincoln eligible vehicles to
the client's selling or preferred dealer
within
100.0 mi (161 km) of the
disablement location or to the nearest
Lincoln dealer. If a client requests a
tow to a selling or preferred dealer that
is more than 100.0 mi (161 km) from the
disablement location, the client shall
be responsible for any mileage costs
in excess of
100.0 mi (161 km).
Roadside Assistance will include up to
$200 coverage for a towed trailer if the
disabled eligible vehicle requires service
at the nearest authorized dealer. If the
towing vehicle is operational but the trailer
is not, then the trailer does not qualify for
any roadside services.
Vehicles Sold In the United States :
Using Roadside Assistance
United States Lincoln vehicle clients who
need Roadside Assistance, call
1-800-521-4140.
If you need to arrange roadside assistance
for yourself, Ford Motor Company will
reimburse a reasonable amount for towing
to the nearest Lincoln dealership within
100.0 mi (161 km). To obtain reimbursement
information, United States Lincoln vehicle
clients, call 1-800-521-4140. Ford Motor
Company will ask clients to submit their
original receipts.
Vehicles Sold In Canada : Getting
Roadside Assistance
Canadian clients who need roadside
assistance, call 1-800-665-2006.
225
MKZ (CC9) Roadside Emergencies
Page 228 of 445
Vehicles Sold In Canada : Using
Roadside Assistance
Canadian Roadside coverage and benefits
may differ from the United States
coverage. Please refer to your warranty
information or visit our website at
www.ford.ca for information on Canadian
services and benefits.
Canadian customers who need to obtain
roadside information, call 1-800-665-2006
or visit our website at
www.ford.ca.
HAZARD WARNING FLASHERS
Note: If used when the vehicle is not
running, the battery will lose charge. There
may be insufficient power to restart your
vehicle. The hazard warning button is
located on the instrument panel.
Use it when your vehicle is
creating a safety hazard for other
motorists.
• Press the button to turn on the hazard
warning function, and the front and
rear direction indicators will flash.
• Press the button again to turn them off.
FUEL SHUTOFF WARNING
Failure to inspect and, if necessary,
repair fuel leaks after a collision may
increase the risk of fire and serious injury.
Ford Motor Company recommends that
the fuel system be inspected by an
authorized dealer after any collision. In the event of a moderate to severe
collision, this vehicle is equipped with a
fuel pump shut-off feature that stops the
flow of fuel to the engine. Not every impact
will cause a shut-off.
Should your vehicle shut off after a
collision, you may restart your vehicle by
doing the following:
1. Turn the ignition off.
2. Turn the ignition to crank.
3. Turn the ignition off.
4.
Turn the ignition on again to re-enable
the fuel pump.
For vehicles equipped with a push button
start system:
1. Press the START/STOP button to turn
the ignition off.
2. Press the brake pedal and press the START/STOP
button (crank attempt).
3. Remove your foot from the brake pedal
and press the
START/STOP button
(ignition off ).
4. Press the
START/STOP button again
to re-enable the fuel system.
JUMP-STARTING THE VEHICLE WARNINGS
The gases around the battery can
explode if exposed to flames, sparks,
or lit cigarettes. An explosion could result
in injury or vehicle damage. Batteries contain sulfuric acid which
can burn skin, eyes and clothing, if
contacted. 226
MKZ (CC9) Roadside Emergencies
Page 229 of 445
Do not attempt to push-start your
automatic transmission vehicle. Automatic
transmissions do not have push-start
capability. Attempting to push-start a
vehicle with an automatic transmission
may cause transmission damage.
Preparing Your Vehicle
Note:
Use only a 12-volt supply to start
your vehicle.
Note: Do not disconnect the battery of the
disabled vehicle as this could damage the
vehicle's electrical system.
1. Park the booster vehicle close to the hood of the disabled vehicle making
sure the two vehicles do not touch. Set
the parking brake on both vehicles and
stay clear of the engine cooling fan
and other moving parts. 2.
Check all battery terminals and remove
any excessive corrosion before you
attach the battery cables. Ensure that
vent caps are tight and level.
3. Turn the heater fan on in both vehicles
to protect from any electrical surges.
Turn all other accessories off.
Connecting the Jumper Cables
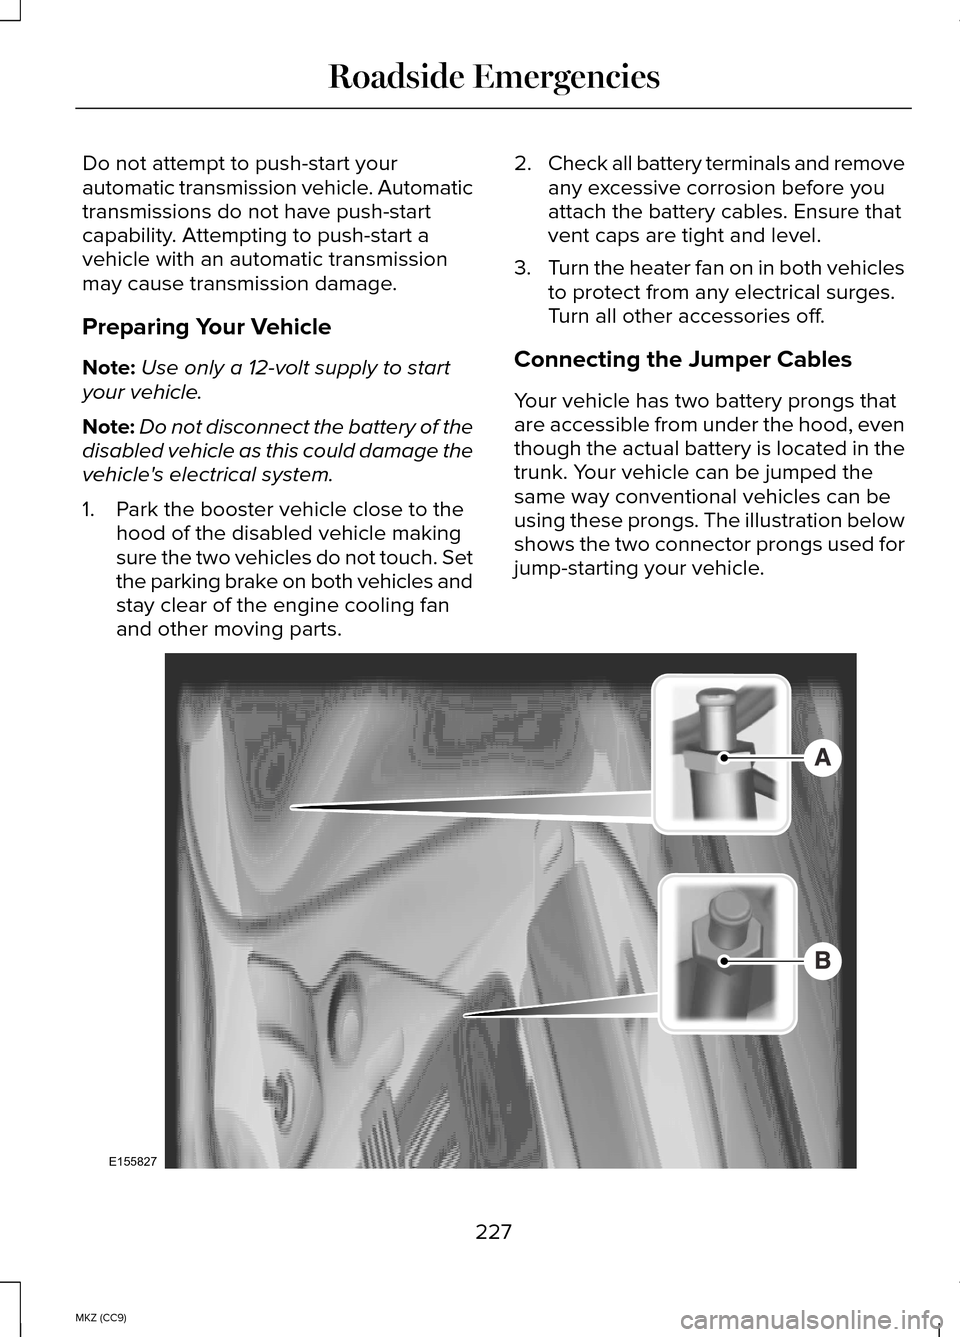
Your vehicle has two battery prongs that
are accessible from under the hood, even
though the actual battery is located in the
trunk. Your vehicle can be jumped the
same way conventional vehicles can be
using these prongs. The illustration below
shows the two connector prongs used for
jump-starting your vehicle. 227
MKZ (CC9) Roadside EmergenciesE155827
Page 230 of 445
A. Negative prong (–)
B. Positive prong (+)
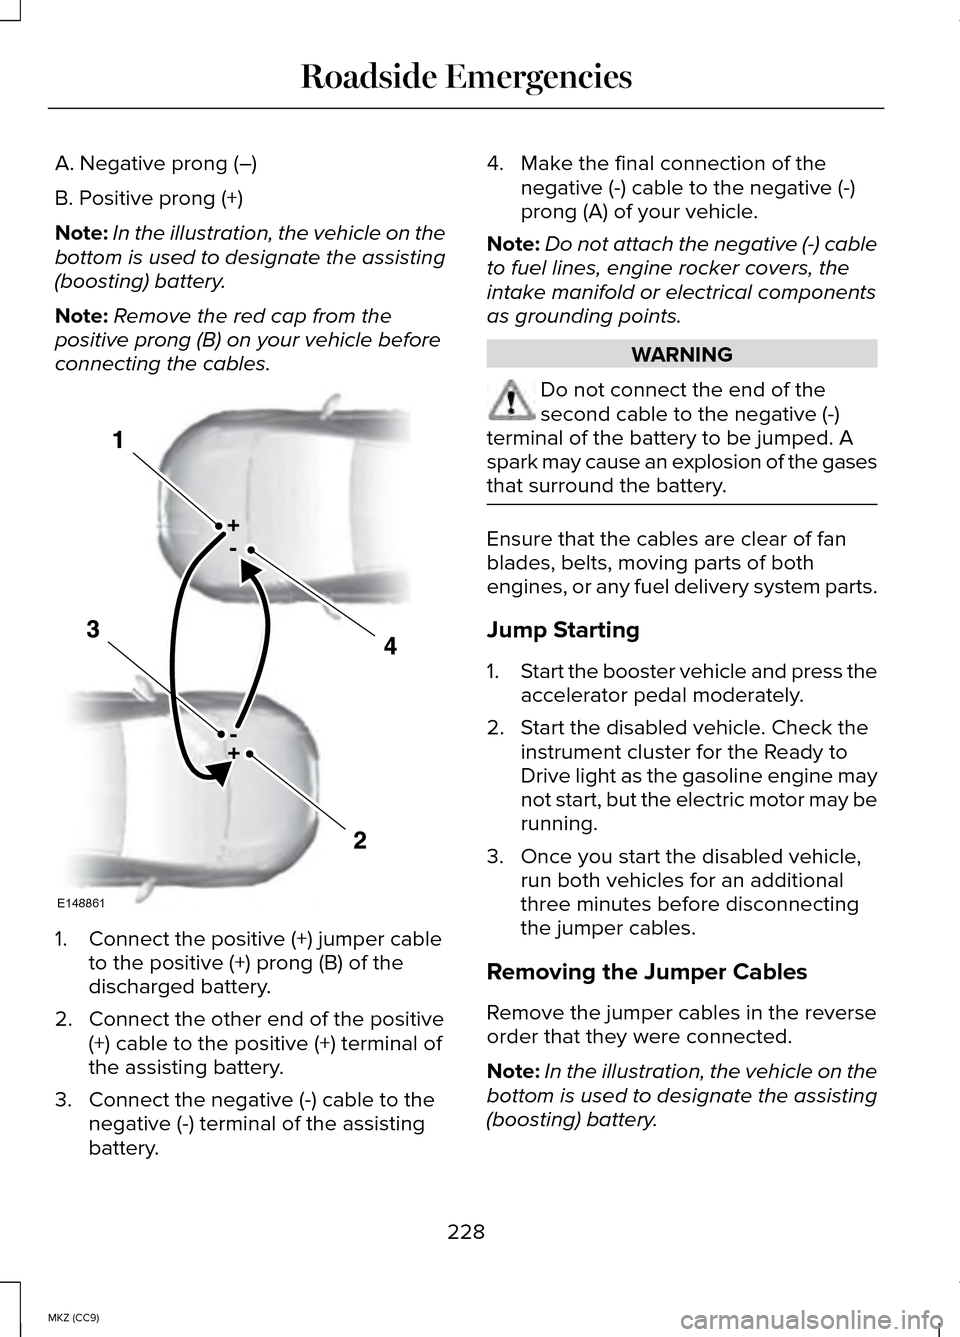
Note:
In the illustration, the vehicle on the
bottom is used to designate the assisting
(boosting) battery.
Note: Remove the red cap from the
positive prong (B) on your vehicle before
connecting the cables. 1. Connect the positive (+) jumper cable
to the positive (+) prong (B) of the
discharged battery.
2. Connect the other end of the positive (+) cable to the positive (+) terminal of
the assisting battery.
3. Connect the negative (-) cable to the negative (-) terminal of the assisting
battery. 4. Make the final connection of the
negative (-) cable to the negative (-)
prong (A) of your vehicle.
Note: Do not attach the negative (-) cable
to fuel lines, engine rocker covers, the
intake manifold or electrical components
as grounding points. WARNING
Do not connect the end of the
second cable to the negative (-)
terminal of the battery to be jumped. A
spark may cause an explosion of the gases
that surround the battery. Ensure that the cables are clear of fan
blades, belts, moving parts of both
engines, or any fuel delivery system parts.
Jump Starting
1.
Start the booster vehicle and press the
accelerator pedal moderately.
2. Start the disabled vehicle. Check the instrument cluster for the Ready to
Drive light as the gasoline engine may
not start, but the electric motor may be
running.
3. Once you start the disabled vehicle, run both vehicles for an additional
three minutes before disconnecting
the jumper cables.
Removing the Jumper Cables
Remove the jumper cables in the reverse
order that they were connected.
Note: In the illustration, the vehicle on the
bottom is used to designate the assisting
(boosting) battery.
228
MKZ (CC9) Roadside EmergenciesE148861