lock LINCOLN MKZ HYBRID 2020 Owners Manual
[x] Cancel search | Manufacturer: LINCOLN, Model Year: 2020, Model line: MKZ HYBRID, Model: LINCOLN MKZ HYBRID 2020Pages: 544, PDF Size: 5.26 MB
Page 317 of 544
5. Run the engine until it reaches normal
operating temperature. While the engine
is warming up, complete the following:
Reset the clock. See Audio Unit (page
382). Reset the power windows
bounce-back feature. See Power
Windows (page 95). Reset the radio
station presets. See Audio Unit (page
382).
6. Allow the engine to idle for at least one minute.
7. Drive the vehicle at least 10 mi (16 km) to
completely relearn the idle trim and fuel
trim strategy.
Note: If you do not allow the engine to
relearn the idle and fuel trim strategy, the
idle quality of your vehicle may be adversely
affected until the engine computer
eventually relearns the idle trim and fuel trim
strategy.
Note: Certain features may not operate if
the battery monitor system is not reset with
a scan tool following a jump start or battery
replacement. Normal electrical accessory
operation should resume after your vehicle
is left undisturbed for 8 hours. Make sure that you dispose of old batteries
in an environmentally friendly way. Seek
advice from your local authority about
recycling old batteries.
If storing your vehicle for more than 30 days
without recharging the battery, we
recommend that you disconnect the battery
cables to maintain battery charge for quick
starting.
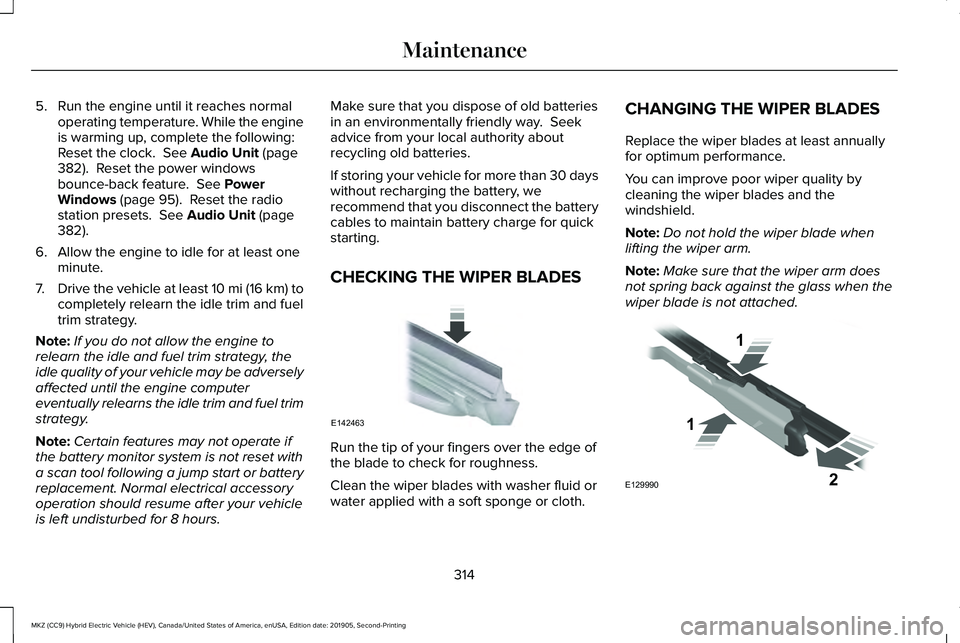
CHECKING THE WIPER BLADES
Run the tip of your fingers over the edge of
the blade to check for roughness.
Clean the wiper blades with washer fluid or
water applied with a soft sponge or cloth.CHANGING THE WIPER BLADES
Replace the wiper blades at least annually
for optimum performance.
You can improve poor wiper quality by
cleaning the wiper blades and the
windshield.
Note:
Do not hold the wiper blade when
lifting the wiper arm.
Note: Make sure that the wiper arm does
not spring back against the glass when the
wiper blade is not attached. 314
MKZ (CC9) Hybrid Electric Vehicle (HEV), Canada/United States of America, enUSA, Edition date: 201905, Second-Printing MaintenanceE142463 E129990
1
1 2
Page 318 of 544
1. Pull the wiper blade and arm away from
the glass. Press the locking buttons
together.
2. Slightly rotate the wiper blade.
3. Remove the wiper blade.
4. Install in the reverse order.
Note: Make sure that the wiper blade locks
into place.
ADJUSTING THE HEADLAMPS
Vertical Aim Adjustment
The headlamps on your vehicle are properly
aimed at the assembly plant. If your vehicle
has been in an accident, the alignment of
your headlamps should be checked by your
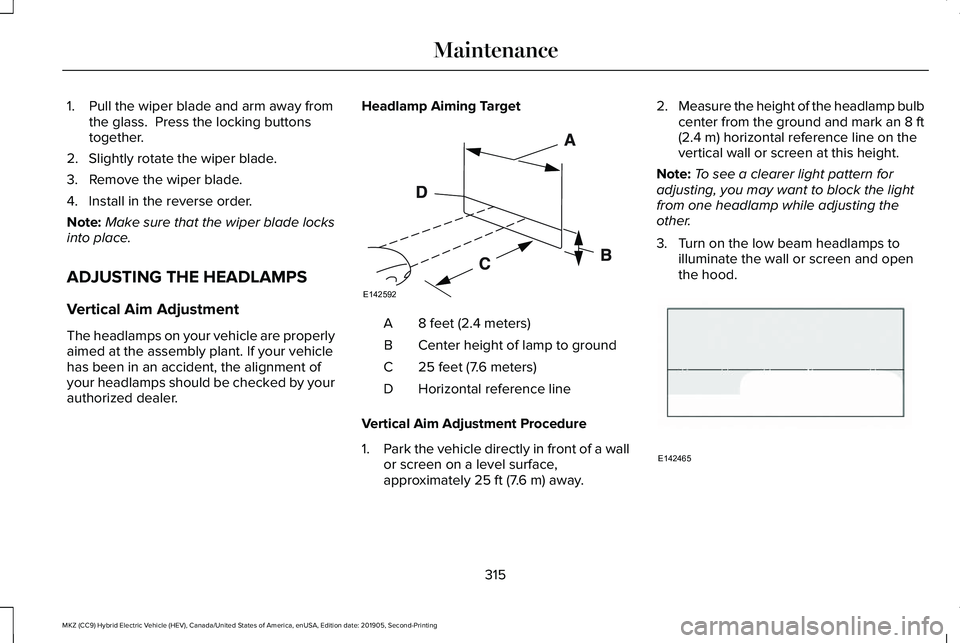
authorized dealer. Headlamp Aiming Target
8 feet (2.4 meters)
A
Center height of lamp to ground
B
25 feet (7.6 meters)
C
Horizontal reference line
D
Vertical Aim Adjustment Procedure
1. Park the vehicle directly in front of a wall
or screen on a level surface,
approximately 25 ft (7.6 m) away. 2.
Measure the height of the headlamp bulb
center from the ground and mark an 8 ft
(2.4 m)
horizontal reference line on the
vertical wall or screen at this height.
Note: To see a clearer light pattern for
adjusting, you may want to block the light
from one headlamp while adjusting the
other.
3. Turn on the low beam headlamps to illuminate the wall or screen and open
the hood. 315
MKZ (CC9) Hybrid Electric Vehicle (HEV), Canada/United States of America, enUSA, Edition date: 201905, Second-Printing MaintenanceE142592 E142465
Page 319 of 544
4.
On the wall or screen you will observe a
flat zone of high intensity light located at
the top of the right hand portion of the
beam pattern. If the top edge of the high
intensity light zone is not at the horizontal
reference line, the headlamp will need
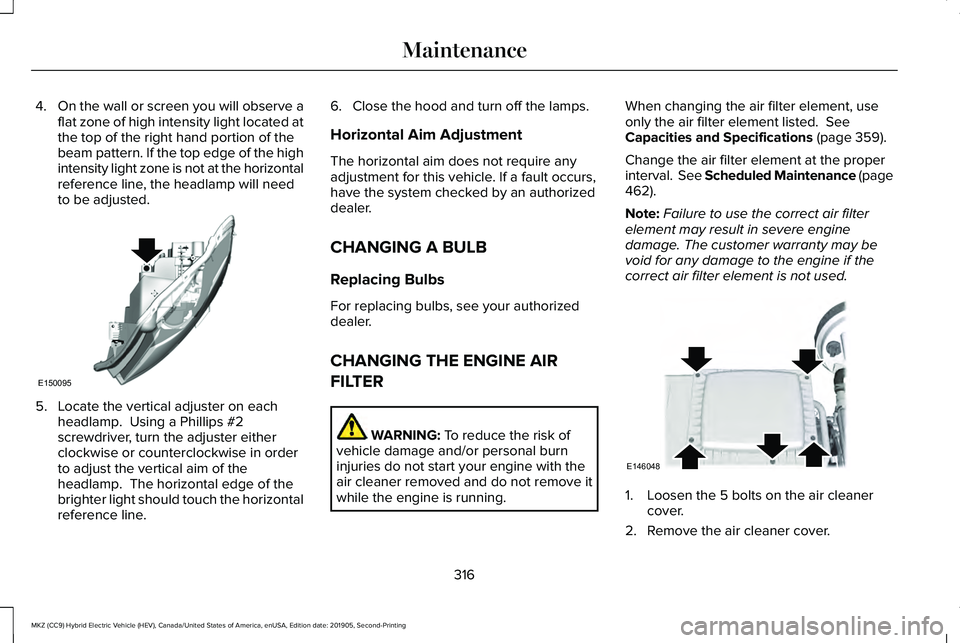
to be adjusted. 5. Locate the vertical adjuster on each
headlamp. Using a Phillips #2
screwdriver, turn the adjuster either
clockwise or counterclockwise in order
to adjust the vertical aim of the
headlamp. The horizontal edge of the
brighter light should touch the horizontal
reference line. 6. Close the hood and turn off the lamps.
Horizontal Aim Adjustment
The horizontal aim does not require any
adjustment for this vehicle. If a fault occurs,
have the system checked by an authorized
dealer.
CHANGING A BULB
Replacing Bulbs
For replacing bulbs, see your authorized
dealer.
CHANGING THE ENGINE AIR
FILTER
WARNING: To reduce the risk of
vehicle damage and/or personal burn
injuries do not start your engine with the
air cleaner removed and do not remove it
while the engine is running. When changing the air filter element, use
only the air filter element listed.
See
Capacities and Specifications (page 359).
Change the air filter element at the proper
interval. See Scheduled Maintenance (page
462
).
Note: Failure to use the correct air filter
element may result in severe engine
damage. The customer warranty may be
void for any damage to the engine if the
correct air filter element is not used. 1. Loosen the 5 bolts on the air cleaner
cover.
2. Remove the air cleaner cover.
316
MKZ (CC9) Hybrid Electric Vehicle (HEV), Canada/United States of America, enUSA, Edition date: 201905, Second-Printing MaintenanceE150095 E146048
Page 324 of 544
•
Do not allow wax to come in contact with
any non-body (low-gloss black) colored
trim. The wax will discolor or stain the
parts over time.
•Roof racks.
• Bumpers.
• Grained door handles.
• Side moldings.
• Mirror housings.
• Windshield cowl area.
• Do not apply wax to glass areas.
• After waxing, your car's paint should feel
smooth, and be free of streaks and
smudges.
CLEANING THE ENGINE
Engines are more efficient when they are
clean because grease and dirt buildup keep
the engine warmer than normal. When washing:
•
Take care when using a power washer
to clean the engine. The high-pressure
fluid could penetrate the sealed parts
and cause damage.
• Do not spray a hot engine with cold water
to avoid cracking the engine block or
other engine components.
• Spray Motorcraft Engine Shampoo and
Degreaser on all parts that require
cleaning and pressure rinse clean. In
Canada, use Motorcraft Engine Shampoo.
Note: If your vehicle has an engine cover
remove the cover before application of
Motorcraft Engine Shampoo and Degreaser.
Immediately rinse away any over spray.
• Never wash or rinse the engine while it
is hot or running; water in the running
engine may cause internal damage.
• Never wash or rinse any ignition coil,
spark plug wire or spark plug well, or the
area in and around these locations.
• Cover the battery, power distribution box,
and air filter assembly to prevent water
damage when cleaning the engine. CLEANING THE WINDOWS AND
WIPER BLADES
Car wash chemicals and environmental
fallout can result in windshield and wiper
blade contamination. Dirty windshield and
wipers will result in poor windshield wiper
operation. Keep the windshield and wiper
blades clean to maintain windshield wiper
performance.
To clean the windshield and wiper blades:
•
Clean the windshield with a non-abrasive
glass cleaner. When cleaning the interior
of the windshield, avoid getting any glass
cleaner on the instrument panel or door
panels. Wipe any glass cleaner off these
surfaces immediately.
• For windshields contaminated with tree
sap, chemicals, wax or bugs, clean the
entire windshield using steel wool (no
greater than 0000 grade) in a circular
motion and rinse with water.
• Clean the wiper blades with isopropyl
rubbing alcohol or windshield washer
concentrate.
321
MKZ (CC9) Hybrid Electric Vehicle (HEV), Canada/United States of America, enUSA, Edition date: 201905, Second-Printing Vehicle Care
Page 330 of 544
Fuel system
•
Fill the fuel tank with high-quality fuel
until the first automatic shutoff of the fuel
pump nozzle.
Cooling system
• Protect against freezing temperatures.
• When removing your vehicle from
storage, check coolant fluid level.
Confirm that there are no cooling system
leaks and that fluid is at the
recommended level.
Disconnecting Your 12 Volt Battery
• Check and recharge as necessary. Keep
connections clean.
• If storing your vehicle for more than 30
days without recharging the battery, we
recommend that you disconnect the
battery cables to maintain battery charge
for quick starting.
Note: It is necessary to reset memory
features if you disconnect the battery cables. Plugging in Your HYBRID
We recommend the following options for
your plug-in vehicle (PHEV) :
•
Leave your vehicle plugged in. The 12
volt battery maintains power if left
plugged in. However, this periodically
uses electricity from the household
outlet.
• Connect a battery charger to your 12 volt
battery and leave it on a continuous, slow
charge.
• Disconnect the 12 volt battery. If your 12
volt battery is located in the luggage
compartment, do not fully shut the
luggage compartment after
disconnecting the 12 volt battery. Only
leave the luggage compartment open if
your vehicle is stored in a locked
location.
Brakes
• Make sure the brakes and parking brake
release fully. Tires
•
Maintain recommended air pressure.
Miscellaneous
• Make sure all linkages, cables, levers and
pins under your vehicle are covered with
grease to prevent rust.
• Move vehicles at least 25 ft (7.5 m) every
15 days to lubricate working parts and
prevent corrosion.
Removing Vehicle From Storage
When your vehicle is ready to come out of
storage, do the following:
• Wash your vehicle to remove any dirt or
grease film build-up on window surfaces.
• Check windshield wipers for any
deterioration.
• Check under the hood for any foreign
material that may have collected during
storage such as mice or squirrel nests.
• Check the exhaust for any foreign
material that may have collected during
storage.
327
MKZ (CC9) Hybrid Electric Vehicle (HEV), Canada/United States of America, enUSA, Edition date: 201905, Second-Printing Vehicle Care
Page 334 of 544
What to do when a Tire Is Punctured
A tire puncture within the tire's tread area
can be repaired in two stages with the kit:
•
In the first stage, the tire is reinflated with
a sealing compound and air. After the tire
has been inflated, you need to drive the
vehicle about 3.7 mi (6 km) to distribute
the sealant in the tire.
• In the second stage, you need to check
the tire pressure and adjust, if necessary,
to the vehicle's specified tire inflation
pressure.
First Stage: Reinflating the Tire with
Sealing Compound and Air WARNING:
Do not stand directly
beside the tire while the compressor is
operating. This could cause personal injury
if the tire bursts.
Note: If the tire does not inflate to the
recommended tire pressure within 15
minutes, stop and call roadside assistance. WARNING: Watch the sidewall of the
tire when inflating. If any cracks, bumps or
similar damage appears, switch the
compressor off and let the air out by means
of the pressure relief valve. Do not
continue driving with this tire. This could
cause loss of vehicle control. WARNING:
Do not run the engine
when operating the air compressor unless
the vehicle is outdoors or in a
well-ventilated area.
Preparation: Park the vehicle in a safe, level
and secure area, away from moving traffic.
Turn the hazard lights on. Apply the parking
brake and turn the engine off. Inspect the
flat tire for visible damage.
Sealant compound contains latex. Use
appropriate precautions to avoid any allergic
reactions.
Do not remove any foreign object that has
pierced the tire. If a puncture is located in
the tire sidewall, stop and call roadside
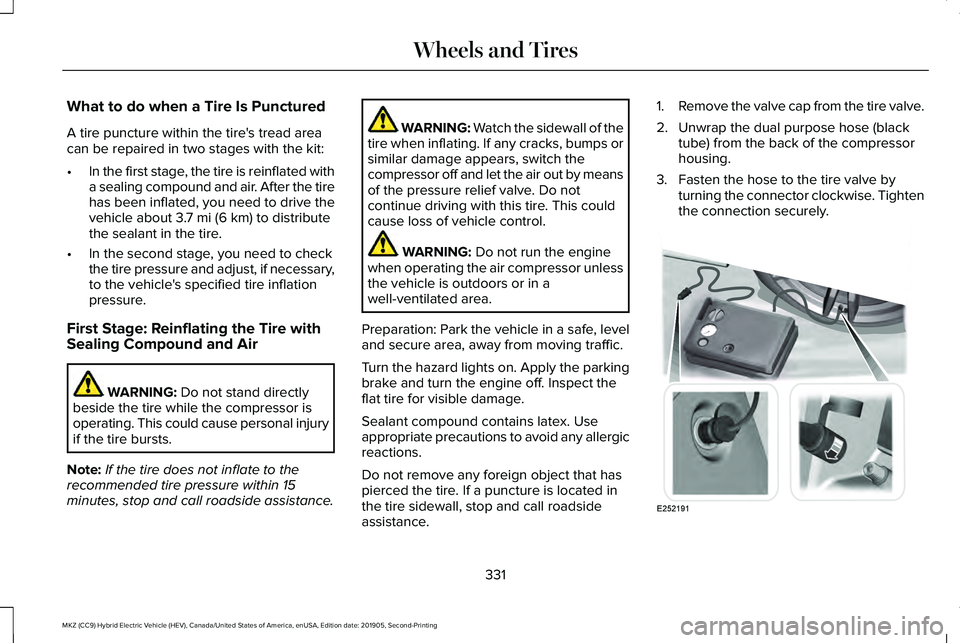
assistance. 1.
Remove the valve cap from the tire valve.
2. Unwrap the dual purpose hose (black tube) from the back of the compressor
housing.
3. Fasten the hose to the tire valve by turning the connector clockwise. Tighten
the connection securely. 331
MKZ (CC9) Hybrid Electric Vehicle (HEV), Canada/United States of America, enUSA, Edition date: 201905, Second-Printing Wheels and TiresE252191
Page 335 of 544
4. Plug the power cable into the 12-volt
power point in the vehicle.
5. Remove the warning sticker found on the
casing/housing and place it on the center
of the steering wheel.
6. Start the vehicle and leave the engine running so the compressor does not
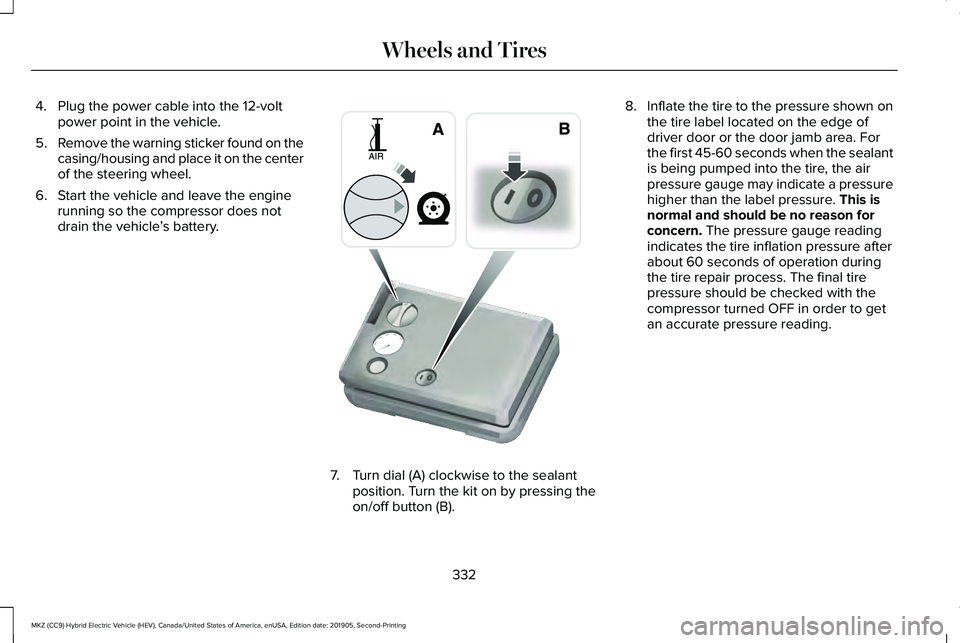
drain the vehicle ’s battery. 7. Turn dial (A) clockwise to the sealant
position. Turn the kit on by pressing the
on/off button (B). 8.
Inflate the tire to the pressure shown on
the tire label located on the edge of
driver door or the door jamb area. For
the first 45-60 seconds when the sealant
is being pumped into the tire, the air
pressure gauge may indicate a pressure
higher than the label pressure. This is
normal and should be no reason for
concern.
The pressure gauge reading
indicates the tire inflation pressure after
about 60 seconds of operation during
the tire repair process. The final tire
pressure should be checked with the
compressor turned OFF in order to get
an accurate pressure reading.
332
MKZ (CC9) Hybrid Electric Vehicle (HEV), Canada/United States of America, enUSA, Edition date: 201905, Second-Printing Wheels and TiresE175981
Page 336 of 544
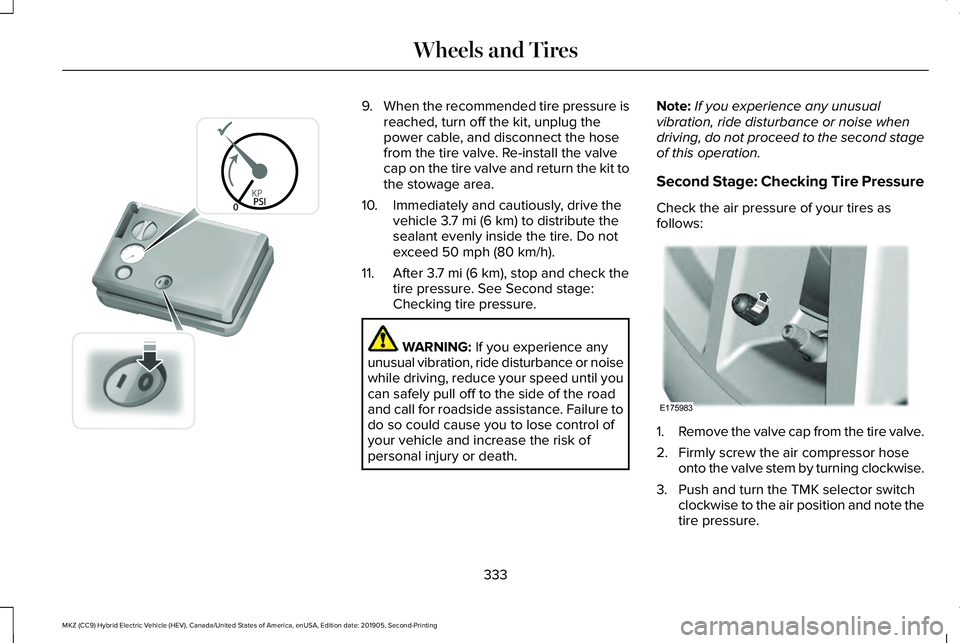
9.
When the recommended tire pressure is
reached, turn off the kit, unplug the
power cable, and disconnect the hose
from the tire valve. Re-install the valve
cap on the tire valve and return the kit to
the stowage area.
10. Immediately and cautiously, drive the vehicle 3.7 mi (6 km) to distribute the
sealant evenly inside the tire. Do not
exceed
50 mph (80 km/h).
11. After
3.7 mi (6 km), stop and check the
tire pressure. See Second stage:
Checking tire pressure. WARNING:
If you experience any
unusual vibration, ride disturbance or noise
while driving, reduce your speed until you
can safely pull off to the side of the road
and call for roadside assistance. Failure to
do so could cause you to lose control of
your vehicle and increase the risk of
personal injury or death. Note:
If you experience any unusual
vibration, ride disturbance or noise when
driving, do not proceed to the second stage
of this operation.
Second Stage: Checking Tire Pressure
Check the air pressure of your tires as
follows: 1.
Remove the valve cap from the tire valve.
2. Firmly screw the air compressor hose onto the valve stem by turning clockwise.
3. Push and turn the TMK selector switch clockwise to the air position and note the
tire pressure.
333
MKZ (CC9) Hybrid Electric Vehicle (HEV), Canada/United States of America, enUSA, Edition date: 201905, Second-Printing Wheels and TiresE175982 E175983
Page 374 of 544
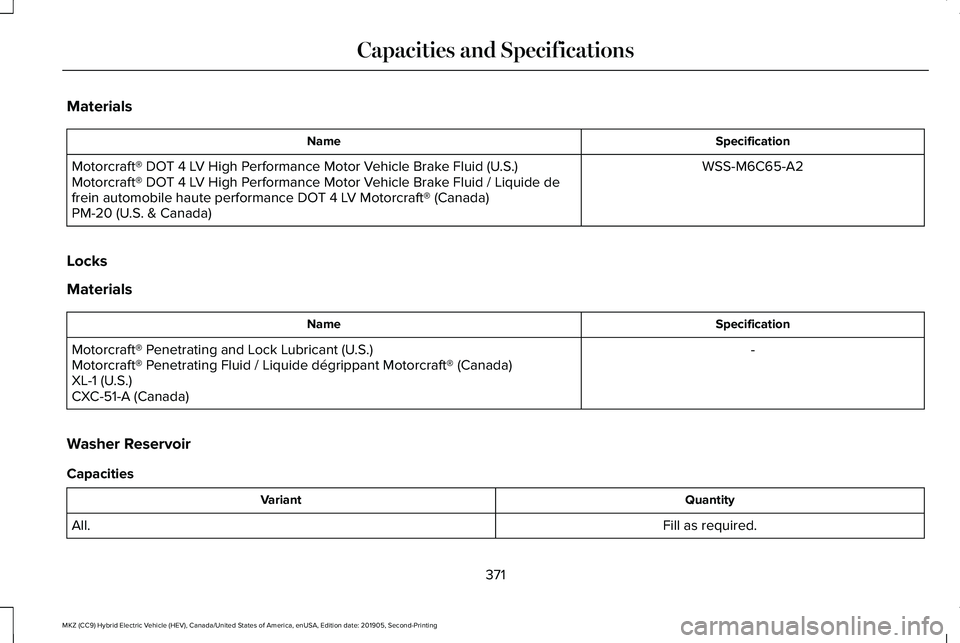
Materials
Specification
Name
WSS-M6C65-A2
Motorcraft® DOT 4 LV High Performance Motor Vehicle Brake Fluid (U.S.)
Motorcraft® DOT 4 LV High Performance Motor Vehicle Brake Fluid / Liquide de
frein automobile haute performance DOT 4 LV Motorcraft® (Canada)
PM-20 (U.S. & Canada)
Locks
Materials Specification
Name
-
Motorcraft® Penetrating and Lock Lubricant (U.S.)
Motorcraft® Penetrating Fluid / Liquide dégrippant Motorcraft® (Canada)
XL-1 (U.S.)
CXC-51-A (Canada)
Washer Reservoir
Capacities Quantity
Variant
Fill as required.
All.
371
MKZ (CC9) Hybrid Electric Vehicle (HEV), Canada/United States of America, enUSA, Edition date: 201905, Second-Printing Capacities and Specifications
Page 378 of 544
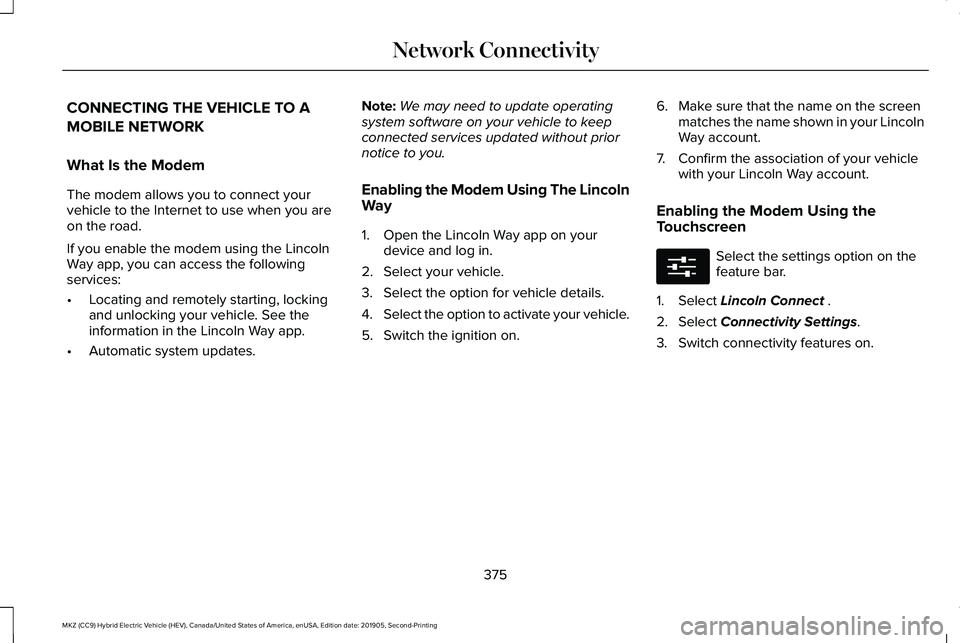
CONNECTING THE VEHICLE TO A
MOBILE NETWORK
What Is the Modem
The modem allows you to connect your
vehicle to the Internet to use when you are
on the road.
If you enable the modem using the Lincoln
Way app, you can access the following
services:
•
Locating and remotely starting, locking
and unlocking your vehicle. See the
information in the Lincoln Way app.
• Automatic system updates. Note:
We may need to update operating
system software on your vehicle to keep
connected services updated without prior
notice to you.
Enabling the Modem Using The Lincoln
Way
1. Open the Lincoln Way app on your device and log in.
2. Select your vehicle.
3. Select the option for vehicle details.
4. Select the option to activate your vehicle.
5. Switch the ignition on. 6. Make sure that the name on the screen
matches the name shown in your Lincoln
Way account.
7. Confirm the association of your vehicle with your Lincoln Way account.
Enabling the Modem Using the
Touchscreen Select the settings option on the
feature bar.
1. Select Lincoln Connect .
2. Select
Connectivity Settings.
3. Switch connectivity features on.
375
MKZ (CC9) Hybrid Electric Vehicle (HEV), Canada/United States of America, enUSA, Edition date: 201905, Second-Printing Network ConnectivityE280315