engine coolant LINCOLN NAUTILUS 2021 User Guide
[x] Cancel search | Manufacturer: LINCOLN, Model Year: 2021, Model line: NAUTILUS, Model: LINCOLN NAUTILUS 2021Pages: 579, PDF Size: 6.9 MB
Page 344 of 579
CHECKING THE COOLANT
When the engine is cold, check the
concentration and level of the coolant at the
intervals listed in the scheduled maintenance
information. See Scheduled Maintenance
(page 459).
Note: Make sure that the coolant level is
between the minimum and maximum marks
on the coolant reservoir.
Note: Coolant expands when it is hot. The
level may extend beyond the
MAX mark.
If the coolant level is at or below the
minimum mark, add prediluted coolant
immediately.
Maintain coolant concentration within 48%
to 50%, which equates to a freeze point
between
-29°F (-34°C) and -35°F (-37°C).
Coolant concentration should be checked
using a refractometer. We do not recommend
the use of hydrometers or coolant test strips
for measuring coolant concentration. Adding Coolant WARNING:
Do not remove the
coolant reservoir cap when the engine is
on or the cooling system is hot. Wait 10
minutes for the cooling system to cool
down. Cover the coolant reservoir cap with
a thick cloth to prevent the possibility of
scalding and slowly remove the cap.
Failure to follow this instruction could result
in personal injury. WARNING:
Do not add engine
coolant when the engine is on or the
cooling system is hot. Failure to follow this
instruction could result in personal injury. WARNING:
Do not add coolant
further than the MAX mark. WARNING: Do not put coolant in the
windshield washer reservoir. If sprayed on
the windshield, coolant could make it
difficult to see through the windshield. Note:
Do not use stop leak pellets, cooling
system sealants, or non-specified additives
as they can cause damage to the engine
cooling or heating systems. Resulting
component damage may not be covered by
the vehicle Warranty.
Note: Automotive fluids are not
interchangeable.
It is very important to use prediluted coolant
approved to the correct specification in order
to avoid plugging the small passageways in
the engine cooling system.
See Capacities
and Specifications (page 407). Do not mix
different colors or types of coolant in your
vehicle. Mixing of engine coolants or using
an incorrect coolant may harm the engine or
cooling system components and could void
the vehicle Warranty.
Note: If prediluted coolant is not available,
use the approved concentrated coolant
diluting it to 50/50 with distilled water.
See
Capacities and Specifications (page 407).
Using water that has not been deionized
may contribute to deposit formation,
corrosion and plugging of the small cooling
system passageways.
340
2021 Nautilus (CD9) Canada/United States of America, enUSA, Edition date: 202011, First-Printing Maintenance
Page 345 of 579
To top up the coolant level do the following:
1. Unscrew the cap slowly. Any pressure
escapes as you unscrew the cap.
2. Add enough prediluted coolant to reach
the correct level.
Note: We do not recommend the use of
recycled coolant.
3. Replace the coolant reservoir cap. Turn the cap clockwise until it contacts the
hard stop.
4. Check the coolant level in the coolant reservoir the next few times you drive
your vehicle. If necessary, repeat step 2.
If you have to add more than 1.1 qt (1 L) of
engine coolant per month, have your vehicle
checked as soon as possible. Operating an
engine with a low level of coolant can result
in engine overheating and possible engine
damage.
In case of emergency, you can add a large
amount of water without engine coolant in
order to reach a vehicle service location.
Service your vehicle as soon as possible. Water alone, without engine coolant, can
cause engine damage from corrosion,
overheating or freezing.
Do not use the following as a coolant
substitute, as they can cause engine damage
from overheating or freezing:
•
Alcohol.
• Methanol.
• Brine.
• Any coolant mixed with alcohol or
methanol antifreeze.
Do not add extra inhibitors or additives to
the coolant. These can be harmful and
compromise the corrosion protection of the
coolant.
Severe Climates
If you drive in extremely cold climates, you
may need to increase the coolant
concentration above 50%. Note:
A coolant concentration of 60%
provides improved freeze point protection.
Coolant concentrations above 60% decrease
the overheat protection characteristics of
the coolant and could cause engine
damage.
If you drive in extremely hot climates, you
may need to decrease the coolant
concentration to 40%.
Note: Coolant concentrations below 40%
decrease the freeze and corrosion protection
characteristics of the coolant and could
cause engine damage.
Coolant Change
Change the coolant at specific mileage
intervals. Refer to the scheduled
maintenance information.
See Normal
Scheduled Maintenance (page 463).
Note: Dispose of used coolant in the
appropriate manner.
Follow your community's regulations and
standards for recycling and disposing of
automotive fluids.
341
2021 Nautilus (CD9) Canada/United States of America, enUSA, Edition date: 202011, First-Printing Maintenance
Page 346 of 579
Fail-Safe Cooling
Fail-safe cooling allows you to temporarily
drive your vehicle before any incremental
component damage occurs. The fail-safe
distance depends on ambient temperature,
vehicle load and terrain.
How Fail-Safe Cooling Works
If the engine begins to overheat,
the coolant temperature gauge
moves toward the red zone:
A warning lamp illuminates and a
message may appear in the
information display.
If the engine reaches a preset
over-temperature condition, the engine
automatically switches to alternating cylinder
operation. Each disabled cylinder acts as an
air pump and cools the engine.
When this occurs, your vehicle still operates,
however:
• Engine power is limited.
• The air conditioning system turns off. Continued operation increases the engine
temperature, causing the engine to
completely shut down. Your steering and
braking effort increases in this situation.
When the engine temperature cools, you can
re-start the engine. Have your vehicle
checked as soon as possible to minimize
engine damage.
When Fail-Safe Mode Is Activated
WARNING: Fail-safe mode is for use
during emergencies only. Operate your
vehicle in fail-safe mode only as long as
necessary to bring your vehicle to rest in
a safe location and seek immediate repairs.
When in fail-safe mode, your vehicle will
have limited power, will not be able to
maintain high-speed operation, and may
completely shut down without warning,
potentially losing engine power, power
steering assist, and power brake assist,
which may increase the possibility of a
crash resulting in serious injury. WARNING: Do not remove the
coolant reservoir cap when the engine is
on or the cooling system is hot. Wait 10
minutes for the cooling system to cool
down. Cover the coolant reservoir cap with
a thick cloth to prevent the possibility of
scalding and slowly remove the cap.
Failure to follow this instruction could result
in personal injury.
Your vehicle has limited engine power when
in the fail-safe mode, drive your vehicle with
caution. Your vehicle does not maintain
high-speed operation and the engine could
operate poorly.
Remember that the engine is capable of
automatically shutting down to prevent
engine damage. In this situation:
1. Pull off the road as soon as safely possible and switch the engine off.
2. If you are a member of a roadside assistance program, we recommend that
you contact your roadside assistance
service provider.
342
2021 Nautilus (CD9) Canada/United States of America, enUSA, Edition date: 202011, First-Printing Maintenance
Page 347 of 579
3. If this is not possible, wait for a short
period of time for the engine to cool.
4. Check the coolant level. If the coolant level is at or below the minimum mark,
add prediluted coolant immediately.
5. When the engine temperature cools, you
can re-start the engine. Have your vehicle
checked as soon as possible to minimize
engine damage.
Note: Driving your vehicle without repair
increases the chance of engine damage.
Engine Coolant Temperature
Management (If Equipped) WARNING:
To reduce the risk of
crash and injury, be prepared that the
vehicle speed may reduce and the vehicle
may not be able to accelerate with full
power until the coolant temperature
reduces. If you tow a trailer with your vehicle, the
engine may temporarily reach a higher
temperature during severe operating
conditions, for example ascending a long or
steep grade in high ambient temperatures.
At this time, you may notice the coolant
temperature gauge moves toward the red
zone and a message may appear in the
information display.
You may notice a reduction in vehicle speed
caused by reduced engine power in order
to manage the engine coolant temperature.
Your vehicle may enter this mode if certain
high-temperature and high-load conditions
take place. The amount of speed reduction
depends on vehicle loading, grade and
ambient temperature. If this occurs, there is
no need to stop your vehicle. You can
continue to drive.
The air conditioning may automatically turn
on and off during severe operating
conditions to protect the engine from
overheating. When the coolant temperature
decreases to the normal operating
temperature, the air conditioning turns on. If the coolant temperature gauge moves fully
into the red zone, or if the coolant
temperature warning or service engine soon
messages appear in your information display,
do the following:
1.
Stop your vehicle as soon as it is safe to
do so. Fully apply the parking brake, shift
into park (P) or neutral (N).
2. Leave the engine running until the coolant temperature gauge needle
returns to the normal position. If the
temperature does not drop after several
minutes, follow the remaining steps.
3. Switch the engine off and wait for it to cool. Check the coolant level.
4. If the coolant level is at or below the minimum mark, add prediluted coolant
immediately.
5. If the coolant level is normal, restart the engine and continue.
343
2021 Nautilus (CD9) Canada/United States of America, enUSA, Edition date: 202011, First-Printing Maintenance
Page 366 of 579
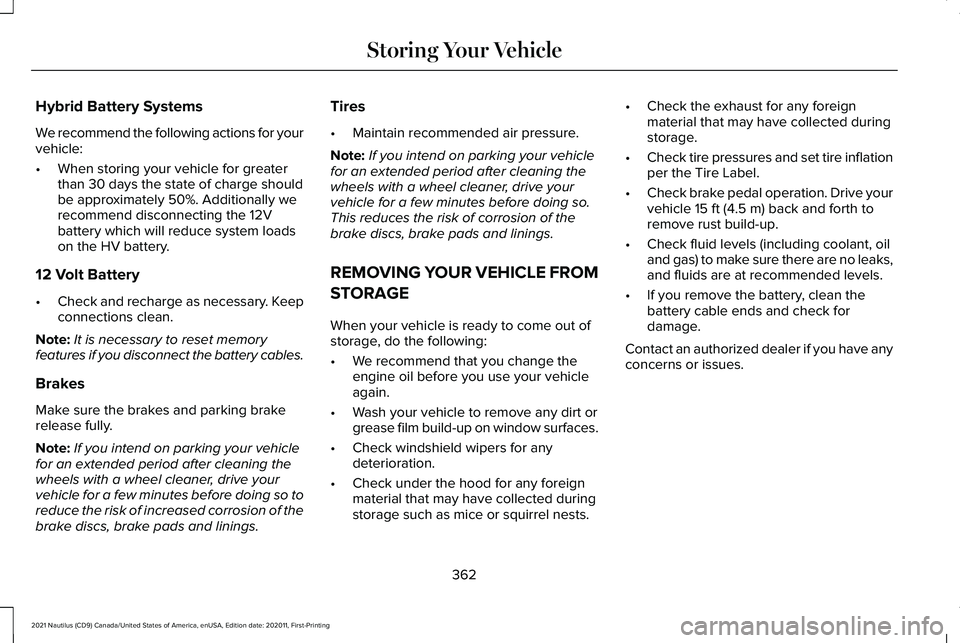
Hybrid Battery Systems
We recommend the following actions for your
vehicle:
•
When storing your vehicle for greater
than 30 days the state of charge should
be approximately 50%. Additionally we
recommend disconnecting the 12V
battery which will reduce system loads
on the HV battery.
12 Volt Battery
• Check and recharge as necessary. Keep
connections clean.
Note: It is necessary to reset memory
features if you disconnect the battery cables.
Brakes
Make sure the brakes and parking brake
release fully.
Note: If you intend on parking your vehicle
for an extended period after cleaning the
wheels with a wheel cleaner, drive your
vehicle for a few minutes before doing so to
reduce the risk of increased corrosion of the
brake discs, brake pads and linings. Tires
•
Maintain recommended air pressure.
Note: If you intend on parking your vehicle
for an extended period after cleaning the
wheels with a wheel cleaner, drive your
vehicle for a few minutes before doing so.
This reduces the risk of corrosion of the
brake discs, brake pads and linings.
REMOVING YOUR VEHICLE FROM
STORAGE
When your vehicle is ready to come out of
storage, do the following:
• We recommend that you change the
engine oil before you use your vehicle
again.
• Wash your vehicle to remove any dirt or
grease film build-up on window surfaces.
• Check windshield wipers for any
deterioration.
• Check under the hood for any foreign
material that may have collected during
storage such as mice or squirrel nests. •
Check the exhaust for any foreign
material that may have collected during
storage.
• Check tire pressures and set tire inflation
per the Tire Label.
• Check brake pedal operation. Drive your
vehicle 15 ft (4.5 m) back and forth to
remove rust build-up.
• Check fluid levels (including coolant, oil
and gas) to make sure there are no leaks,
and fluids are at recommended levels.
• If you remove the battery, clean the
battery cable ends and check for
damage.
Contact an authorized dealer if you have any
concerns or issues.
362
2021 Nautilus (CD9) Canada/United States of America, enUSA, Edition date: 202011, First-Printing Storing Your Vehicle
Page 467 of 579
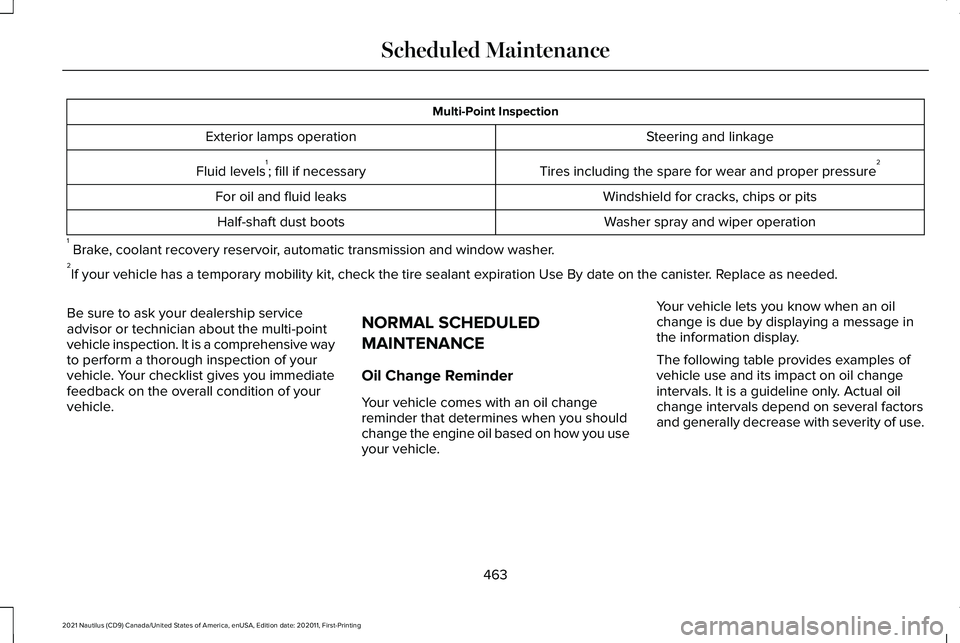
Multi-Point Inspection
Steering and linkage
Exterior lamps operation
Tires including the spare for wear and proper pressure 2
Fluid levels 1
; fill if necessary
Windshield for cracks, chips or pits
For oil and fluid leaks
Washer spray and wiper operation
Half-shaft dust boots
1 Brake, coolant recovery reservoir, automatic transmission and window washer.
2 If your vehicle has a temporary mobility kit, check the tire sealant exp\
iration Use By date on the canister. Replace as needed.
Be sure to ask your dealership service
advisor or technician about the multi-point
vehicle inspection. It is a comprehensive way
to perform a thorough inspection of your
vehicle. Your checklist gives you immediate
feedback on the overall condition of your
vehicle. NORMAL SCHEDULED
MAINTENANCE
Oil Change Reminder
Your vehicle comes with an oil change
reminder that determines when you should
change the engine oil based on how you use
your vehicle.Your vehicle lets you know when an oil
change is due by displaying a message in
the information display.
The following table provides examples of
vehicle use and its impact on oil change
intervals. It is a guideline only. Actual oil
change intervals depend on several factors
and generally decrease with severity of use.
463
2021 Nautilus (CD9) Canada/United States of America, enUSA, Edition date: 202011, First-Printing Scheduled Maintenance
Page 469 of 579
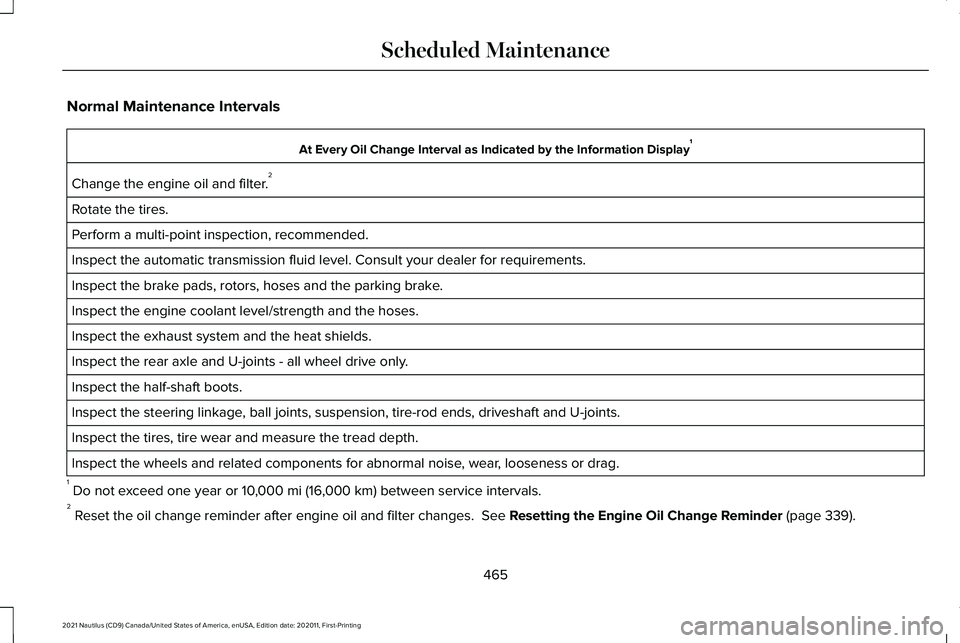
Normal Maintenance Intervals
At Every Oil Change Interval as Indicated by the Information Display
1
Change the engine oil and filter. 2
Rotate the tires.
Perform a multi-point inspection, recommended.
Inspect the automatic transmission fluid level. Consult your dealer for \
requirements.
Inspect the brake pads, rotors, hoses and the parking brake.
Inspect the engine coolant level/strength and the hoses.
Inspect the exhaust system and the heat shields.
Inspect the rear axle and U-joints - all wheel drive only.
Inspect the half-shaft boots.
Inspect the steering linkage, ball joints, suspension, tire-rod ends, driveshaft and U-joints.
Inspect the tires, tire wear and measure the tread depth.
Inspect the wheels and related components for abnormal noise, wear, looseness or drag.
1 Do not exceed one year or 10,000 mi (16,000 km) between service intervals.
2 Reset the oil change reminder after engine oil and filter changes.
See Resetting the Engine Oil Change Reminder (page 339).
465
2021 Nautilus (CD9) Canada/United States of America, enUSA, Edition date: 202011, First-Printing Scheduled Maintenance
Page 470 of 579
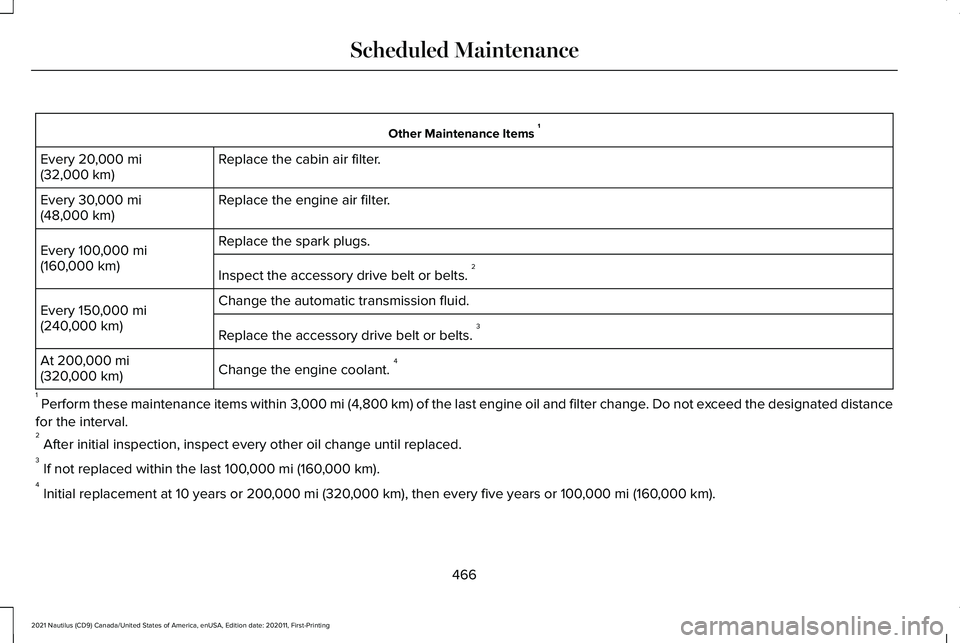
Other Maintenance Items
1
Replace the cabin air filter.
Every 20,000 mi
(32,000 km)
Replace the engine air filter.
Every
30,000 mi
(48,000 km)
Replace the spark plugs.
Every
100,000 mi
(160,000 km) Inspect the accessory drive belt or belts. 2
Change the automatic transmission fluid.
Every
150,000 mi
(240,000 km) Replace the accessory drive belt or belts. 3
Change the engine coolant. 4
At
200,000 mi
(320,000 km)
1 Perform these maintenance items within 3,000 mi (4,800 km) of the last engine oil and filter change. Do not exceed the designated distance
for the interval.
2 After initial inspection, inspect every other oil change until replaced\
.
3 If not replaced within the last
100,000 mi (160,000 km).
4 Initial replacement at 10 years or
200,000 mi (320,000 km), then every five years or 100,000 mi (160,000 km).
466
2021 Nautilus (CD9) Canada/United States of America, enUSA, Edition date: 202011, First-Printing Scheduled Maintenance
Page 561 of 579
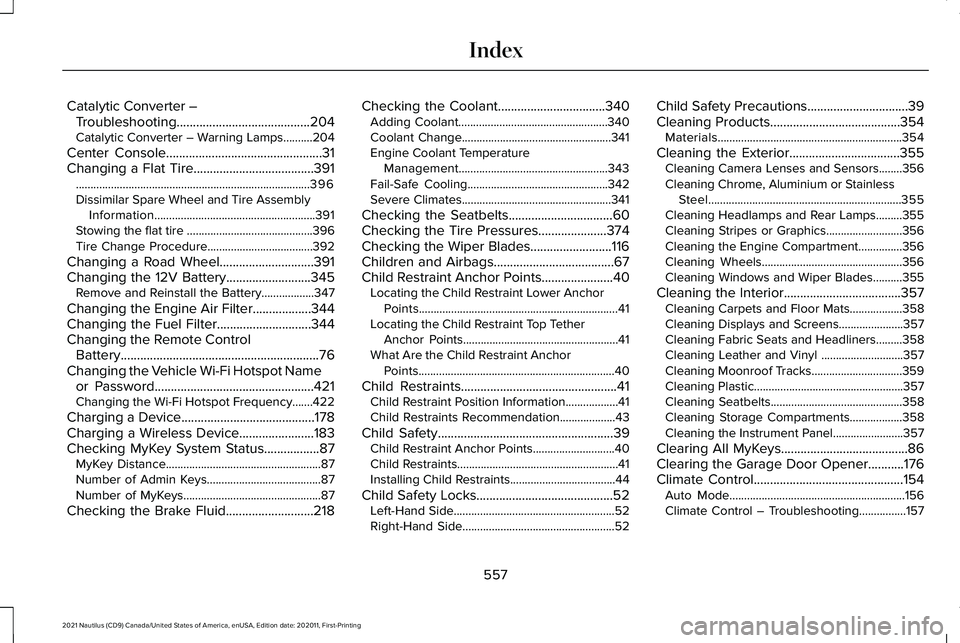
Catalytic Converter –
Troubleshooting.........................................204
Catalytic Converter – Warning Lamps..........204
Center Console................................................31
Changing a Flat Tire.....................................391 ........................................................................\
........396
Dissimilar Spare Wheel and Tire Assembly
Information.......................................................391
Stowing the flat tire ...........................................396
Tire Change Procedure....................................392
Changing a Road Wheel.............................391
Changing the 12V Battery..........................345 Remove and Reinstall the Battery..................347
Changing the Engine Air Filter..................344
Changing the Fuel Filter.............................344
Changing the Remote Control Battery.............................................................76
Changing the Vehicle Wi-Fi Hotspot Name or Password.................................................421
Changing the Wi-Fi Hotspot Frequency.......422
Charging a Device .........................................178
Charging a Wireless Device.......................183
Checking MyKey System Status.................87 MyKey Distance.....................................................87
Number of Admin Keys.......................................87
Number of MyKeys...............................................87
Checking the Brake Fluid
...........................218 Checking the Coolant.................................340
Adding Coolant...................................................340
Coolant Change...................................................341
Engine Coolant Temperature
Management...................................................343
Fail-Safe Cooling................................................342
Severe Climates...................................................341
Checking the Seatbelts................................60
Checking the Tire Pressures.....................374
Checking the Wiper Blades.........................116
Children and Airbags.....................................67
Child Restraint Anchor Points
......................40
Locating the Child Restraint Lower Anchor
Points....................................................................41
Locating the Child Restraint Top Tether Anchor Points.....................................................41
What Are the Child Restraint Anchor Points...................................................................40
Child Restraints
................................................41
Child Restraint Position Information..................41
Child Restraints Recommendation...................43
Child Safety
......................................................39
Child Restraint Anchor Points............................40
Child Restraints.......................................................41
Installing Child Restraints....................................44
Child Safety Locks..........................................52 Left-Hand Side.......................................................52
Right-Hand Side....................................................52 Child Safety Precautions
...............................39
Cleaning Products........................................354
Materials...............................................................354
Cleaning the Exterior
..................................355
Cleaning Camera Lenses and Sensors........356
Cleaning Chrome, Aluminium or Stainless
Steel..................................................................355
Cleaning Headlamps and Rear Lamps.........355
Cleaning Stripes or Graphics..........................356
Cleaning the Engine Compartment...............356
Cleaning Wheels................................................356
Cleaning Windows and Wiper Blades
..........355
Cleaning the Interior....................................357 Cleaning Carpets and Floor Mats..................358
Cleaning Displays and Screens......................357
Cleaning Fabric Seats and Headliners.........358
Cleaning Leather and Vinyl ............................357
Cleaning Moonroof Tracks...............................359
Cleaning Plastic...................................................357
Cleaning Seatbelts.............................................358
Cleaning Storage Compartments..................358
Cleaning the Instrument Panel........................357
Clearing All MyKeys.......................................86
Clearing the Garage Door Opener...........176
Climate Control..............................................154 Auto Mode............................................................156
Climate Control – Troubleshooting................157
557
2021 Nautilus (CD9) Canada/United States of America, enUSA, Edition date: 202011, First-Printing Index
Page 567 of 579
How Do the Knee Airbags Work.................64
How Do the Side Airbags Work..................63
I
Identifying Fuse Types
.................................331
Identifying the Audio Unit..........................429
Identifying the Climate Control Unit.........154
Inflating the Tires
..........................................374
Information and Entertainment Display Limitations....................................................431
Speed-restricted Features................................431
Information and Entertainment Display Overview.......................................................431
Information and Entertainment Display Precautions..................................................431
Information On Demand Screen..............433
Information on the Tire Sidewall..............364 Information on P Type Tires............................364
Inspecting the Tire for Damage................375 Safety Practices..................................................375
Inspecting the Tire for Wear......................375
Inspecting the Wheel Valve Stems..........376
Installing and Removing the Luggage Compartment Cargo Net.........................295
Installing and Removing the Luggage Compartment Cover
.................................295
Installing the Luggage Cover..........................296 Removing the Luggage Cover........................296
Installing Child Restraints..............................44 Combining the Seatbelt and Lower Anchors
for Attaching Child Restraints........................
47
Installing a Child Restraint in a Center Seat......................................................................47
Using Lower Anchors and Tethers for Children..............................................................46
Using Seatbelts.....................................................44
Using Tether Straps..............................................48
Instrument Cluster Display..........................143 Personalized Settings.........................................148
Trip Computer......................................................145
Instrument Cluster Display Main Menu..............................................................144
Instrument Cluster Indicators
......................141
Adaptive Cruise Control.....................................141
Adaptive Steering.................................................141
Airbag......................................................................141
Auto Hold...............................................................141
Automatic High Beam.........................................141
Auto Start-Stop......................................................141
Blind Spot Information System.........................141
Cruise Control.......................................................141
Front Fog Lamp....................................................142
Headlamp High Beam........................................142
Hill Start Assist.....................................................142
Parking Lamps......................................................142 Stability and Traction Control...........................
142
Turn Signal............................................................142
Instrument Cluster
.........................................137
Fuel Gauge............................................................138
Instrument Cluster Overview......................137
Instrument Cluster Warning Lamps
..........139
Anti-Lock Brake System....................................139
Battery....................................................................139
Brake System.......................................................140
Door Ajar...............................................................140
Electric Parking Brake........................................140
Engine Coolant Temperature...........................140
Fasten Seatbelt....................................................140
Hood Ajar..............................................................140
Liftgate Ajar...........................................................140
Low Beam Warning.............................................140
Low Fuel Level.....................................................140
Low Tire Pressure...............................................140
Low Washer Fluid Level.....................................140
Malfunction Indicator Lamp...............................141
Oil Pressure...........................................................141
Powertrain Fault....................................................141
Instrument Panel
.............................................29
Interior Air Quality.........................................158
Interior Bulbs.................................................353
Interior Bulb Specification Chart....................353
563
2021 Nautilus (CD9) Canada/United States of America, enUSA, Edition date: 202011, First-Printing Index