warning light LINCOLN NAUTILUS 2021 User Guide
[x] Cancel search | Manufacturer: LINCOLN, Model Year: 2021, Model line: NAUTILUS, Model: LINCOLN NAUTILUS 2021Pages: 579, PDF Size: 6.9 MB
Page 127 of 579
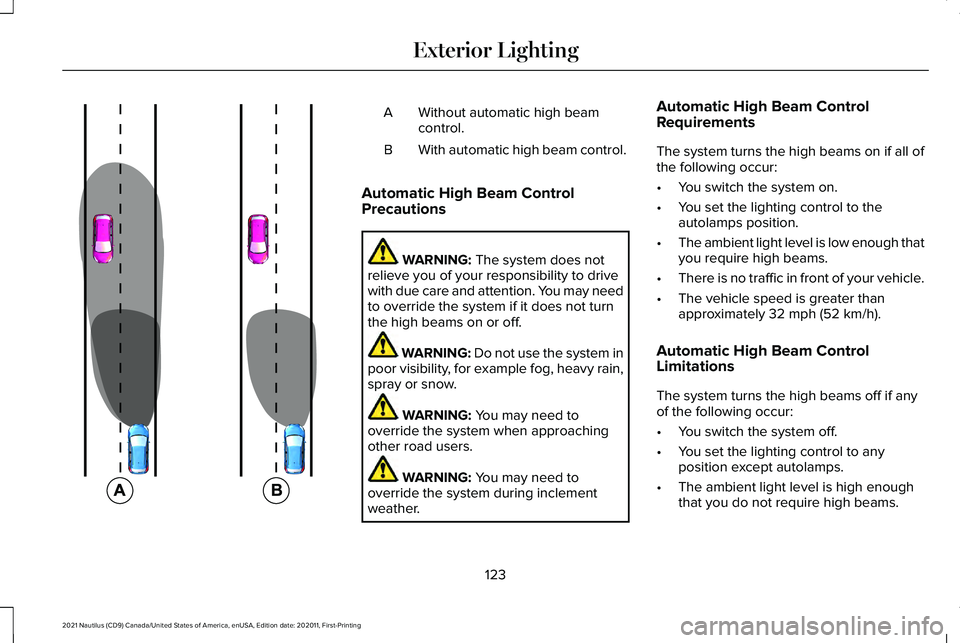
Without automatic high beam
control.
A
With automatic high beam control.
B
Automatic High Beam Control
Precautions WARNING: The system does not
relieve you of your responsibility to drive
with due care and attention. You may need
to override the system if it does not turn
the high beams on or off. WARNING:
Do not use the system in
poor visibility, for example fog, heavy rain,
spray or snow. WARNING:
You may need to
override the system when approaching
other road users. WARNING:
You may need to
override the system during inclement
weather. Automatic High Beam Control
Requirements
The system turns the high beams on if all of
the following occur:
•
You switch the system on.
• You set the lighting control to the
autolamps position.
• The ambient light level is low enough that
you require high beams.
• There is no traffic in front of your vehicle.
• The vehicle speed is greater than
approximately
32 mph (52 km/h).
Automatic High Beam Control
Limitations
The system turns the high beams off if any
of the following occur:
• You switch the system off.
• You set the lighting control to any
position except autolamps.
• The ambient light level is high enough
that you do not require high beams.
123
2021 Nautilus (CD9) Canada/United States of America, enUSA, Edition date: 202011, First-Printing Exterior Lighting E327596
Page 133 of 579
OPENING AND CLOSING THE
WINDOWS
WARNING: Do not leave children
unattended in your vehicle and do not let
them play with the power windows. Failure
to follow this instruction could result in
personal injury. WARNING:
When closing the power
windows, verify they are free of obstruction
and make sure that children and pets are
not in the proximity of the window
openings. Press the window control switch
to open the window. Lift the
window control switch to close the
window.
Note: The power windows operate with the
ignition on, and for several minutes after you
switch the ignition off or until you open a
front door. To reduce wind noise or pulsing noise when
one window is open, slightly open the
opposite window.
One-Touch Open
(If Equipped)
Fully press the window control switch and
release it. Press again or lift it to stop the
window.
One-Touch Close
(If Equipped)
Fully lift the window control switch and
release it. Press again or lift it to stop the
window.
Resetting One-Touch Close
Carry out all steps within 30 seconds of
starting the sequence.
1. Close the window.
2. Press and hold the window control switch
until the window is fully open. Keep the
window control switch pressed for a few
seconds. 3. Lift and hold the window control switch
until the window is fully closed. Keep the
window control switch held for a few
seconds.
4. Press and hold the window control switch
until the window is fully open. Keep the
window control switch pressed for a few
seconds.
5. Lift and hold the window control switch until the window is fully closed. Keep the
window control switch held for a few
seconds.
Note: Repeat the procedure if the window
does not close when you use one-touch.
Accessory Delay
The window switches remain operational for
several minutes when you switch the ignition
off or until you open either front door.
129
2021 Nautilus (CD9) Canada/United States of America, enUSA, Edition date: 202011, First-Printing Windows
Page 136 of 579
INTERIOR MIRROR PRECAUTIONS
WARNING: Do not adjust the mirrors
when your vehicle is moving. This could
result in the loss of control of your vehicle,
serious personal injury or death.
Note: Do not clean the mirror housing or
glass with harsh abrasives, fuel or other
petroleum-based cleaning products.
AUTO-DIMMING INTERIOR MIRROR
What Is the Auto-Dimming Interior
Mirror
The mirror dims to reduce the effect of bright
light from behind. It returns to normal when
the bright light from behind is no longer
present or if you shift into reverse (R). Auto-Dimming Interior Mirror
Limitations
Do not block the sensors on the front and
back of the mirror.
Note:
A rear center passenger or raised rear
center head restraint could prevent light from
reaching the sensor.
132
2021 Nautilus (CD9) Canada/United States of America, enUSA, Edition date: 202011, First-Printing Interior Mirror
Page 137 of 579
ADJUSTING THE EXTERIOR
MIRRORS
WARNING: Do not adjust the mirrors
when your vehicle is moving. This could
result in the loss of control of your vehicle,
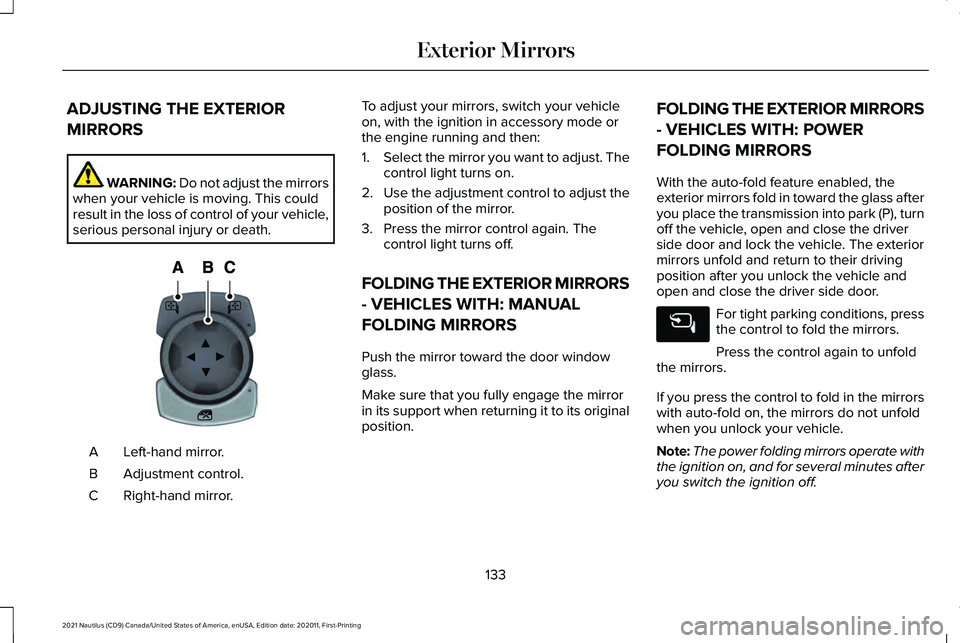
serious personal injury or death. Left-hand mirror.
A
Adjustment control.
B
Right-hand mirror.
C To adjust your mirrors, switch your vehicle
on, with the ignition in accessory mode or
the engine running and then:
1.
Select the mirror you want to adjust. The
control light turns on.
2. Use the adjustment control to adjust the
position of the mirror.
3. Press the mirror control again. The control light turns off.
FOLDING THE EXTERIOR MIRRORS
- VEHICLES WITH: MANUAL
FOLDING MIRRORS
Push the mirror toward the door window
glass.
Make sure that you fully engage the mirror
in its support when returning it to its original
position. FOLDING THE EXTERIOR MIRRORS
- VEHICLES WITH: POWER
FOLDING MIRRORS
With the auto-fold feature enabled, the
exterior mirrors fold in toward the glass after
you place the transmission into park (P), turn
off the vehicle, open and close the driver
side door and lock the vehicle. The exterior
mirrors unfold and return to their driving
position after you unlock the vehicle and
open and close the driver side door.
For tight parking conditions, press
the control to fold the mirrors.
Press the control again to unfold
the mirrors.
If you press the control to fold in the mirrors
with auto-fold on, the mirrors do not unfold
when you unlock your vehicle.
Note: The power folding mirrors operate with
the ignition on, and for several minutes after
you switch the ignition off.
133
2021 Nautilus (CD9) Canada/United States of America, enUSA, Edition date: 202011, First-Printing Exterior MirrorsE144073
Page 145 of 579
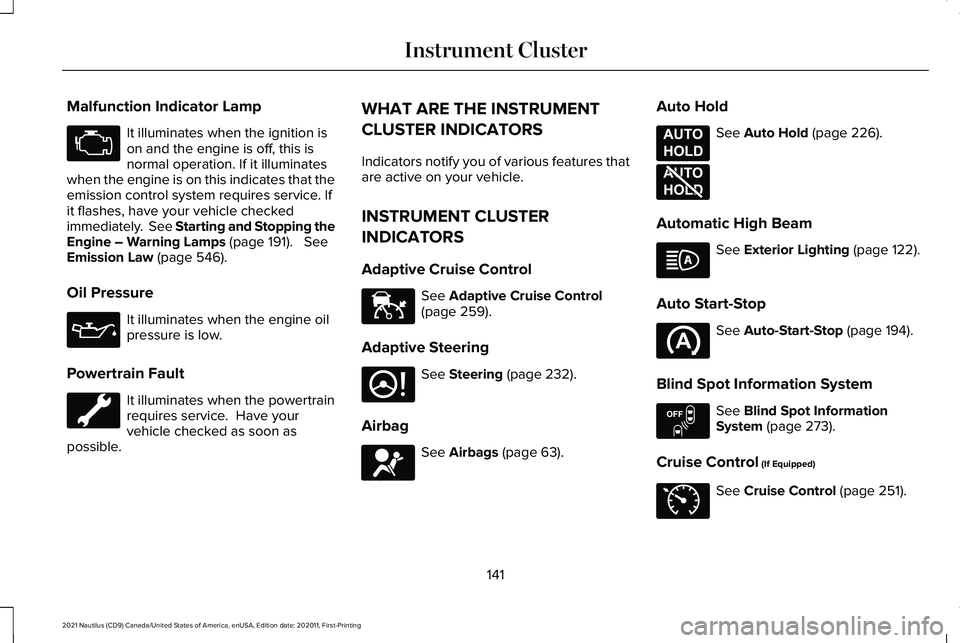
Malfunction Indicator Lamp
It illuminates when the ignition is
on and the engine is off, this is
normal operation. If it illuminates
when the engine is on this indicates that the
emission control system requires service. If
it flashes, have your vehicle checked
immediately. See Starting and Stopping the
Engine – Warning Lamps (page 191). See
Emission Law (page 546).
Oil Pressure It illuminates when the engine oil
pressure is low.
Powertrain Fault It illuminates when the powertrain
requires service. Have your
vehicle checked as soon as
possible. WHAT ARE THE INSTRUMENT
CLUSTER INDICATORS
Indicators notify you of various features that
are active on your vehicle.
INSTRUMENT CLUSTER
INDICATORS
Adaptive Cruise Control
See
Adaptive Cruise Control
(page 259).
Adaptive Steering See
Steering (page 232).
Airbag See
Airbags (page 63).Auto Hold See
Auto Hold (page 226).
Automatic High Beam See
Exterior Lighting (page 122).
Auto Start-Stop See
Auto-Start-Stop (page 194).
Blind Spot Information System See
Blind Spot Information
System (page 273).
Cruise Control
(If Equipped) See
Cruise Control (page 251).
141
2021 Nautilus (CD9) Canada/United States of America, enUSA, Edition date: 202011, First-Printing Instrument Cluster E144524 E223375 E67017 E197933 E197934 E151262 E71340
Page 147 of 579
USING THE INSTRUMENT
CLUSTER DISPLAY CONTROLS
WARNING: Driving while distracted
can result in loss of vehicle control, crash
and injury. We strongly recommend that
you use extreme caution when using any
device that may take your focus off the
road. Your primary responsibility is the safe
operation of your vehicle. We recommend
against the use of any hand-held device
while driving and encourage the use of
voice-operated systems when possible.
Make sure you are aware of all applicable
local laws that may affect the use of
electronic devices while driving.
Note: Some options may appear slightly
different or not at all if the items are optional.
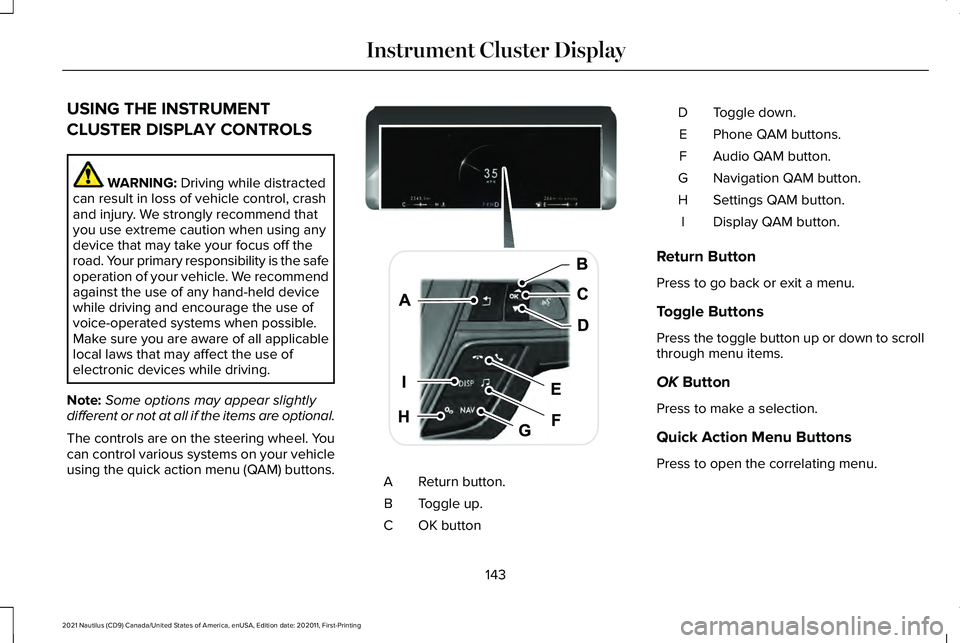
The controls are on the steering wheel. You
can control various systems on your vehicle
using the quick action menu (QAM) buttons. Return button.
A
Toggle up.
B
OK button
C Toggle down.
D
Phone QAM buttons.
E
Audio QAM button.
F
Navigation QAM button.
G
Settings QAM button.
H
Display QAM button.
I
Return Button
Press to go back or exit a menu.
Toggle Buttons
Press the toggle button up or down to scroll
through menu items.
OK
Button
Press to make a selection.
Quick Action Menu Buttons
Press to open the correlating menu.
143
2021 Nautilus (CD9) Canada/United States of America, enUSA, Edition date: 202011, First-Printing Instrument Cluster DisplayE247519
Page 163 of 579
FRONT SEAT PRECAUTIONS
WARNING: Sitting improperly, out of
position or with the seatback reclined too
far can take weight off the seat cushion
and affect the decision of the passenger
sensing system, resulting in serious injury
or death in the event of a crash. Always sit
upright against your seat back, with your
feet on the floor. WARNING: Do not recline the seat
backrest too far as this can cause the
occupant to slide under the seatbelt,
resulting in personal injury in the event of
a crash. WARNING:
Do not place objects
higher than the top of the seat backrest.
Failure to follow this instruction could result
in personal injury or death in the event of
a sudden stop or crash. WARNING:
Do not adjust the driver
seat or seat backrest when your vehicle is
moving. This may result in sudden seat
movement, causing the loss of control of
your vehicle.
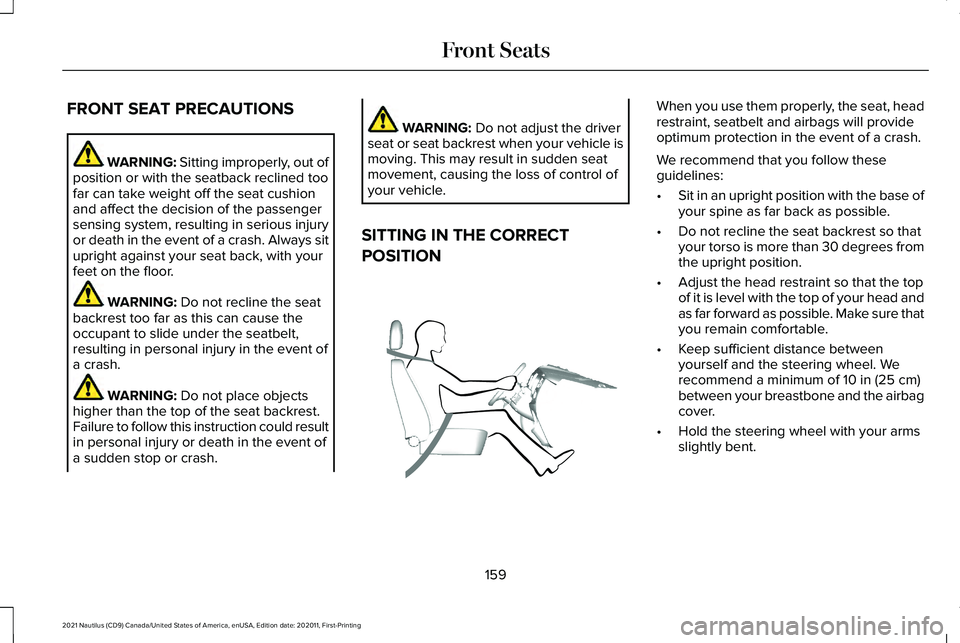
SITTING IN THE CORRECT
POSITION When you use them properly, the seat, head
restraint, seatbelt and airbags will provide
optimum protection in the event of a crash.
We recommend that you follow these
guidelines:
•
Sit in an upright position with the base of
your spine as far back as possible.
• Do not recline the seat backrest so that
your torso is more than 30 degrees from
the upright position.
• Adjust the head restraint so that the top
of it is level with the top of your head and
as far forward as possible. Make sure that
you remain comfortable.
• Keep sufficient distance between
yourself and the steering wheel. We
recommend a minimum of
10 in (25 cm)
between your breastbone and the airbag
cover.
• Hold the steering wheel with your arms
slightly bent.
159
2021 Nautilus (CD9) Canada/United States of America, enUSA, Edition date: 202011, First-Printing Front SeatsE68595
Page 164 of 579
•
Bend your legs slightly so that you can
press the pedals fully.
• Position the shoulder strap of the seatbelt
over the center of your shoulder and
position the lap strap tightly across your
hips.
Make sure that your driving position is
comfortable and that you can maintain full
control of your vehicle.
POWER SEATS
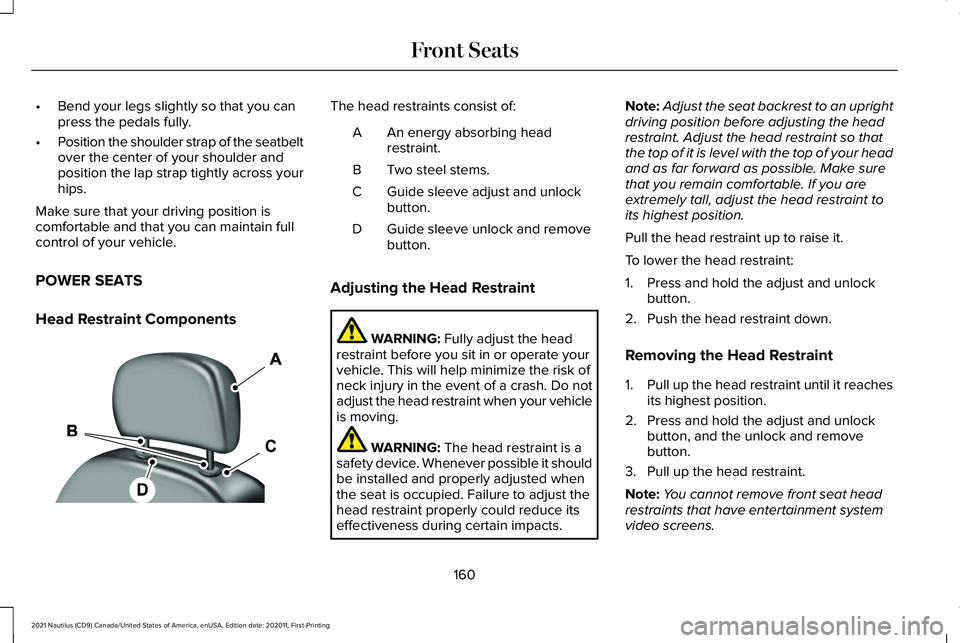
Head Restraint Components The head restraints consist of:
An energy absorbing head
restraint.
A
Two steel stems.
B
Guide sleeve adjust and unlock
button.
C
Guide sleeve unlock and remove
button.
D
Adjusting the Head Restraint WARNING: Fully adjust the head
restraint before you sit in or operate your
vehicle. This will help minimize the risk of
neck injury in the event of a crash. Do not
adjust the head restraint when your vehicle
is moving. WARNING:
The head restraint is a
safety device. Whenever possible it should
be installed and properly adjusted when
the seat is occupied. Failure to adjust the
head restraint properly could reduce its
effectiveness during certain impacts. Note:
Adjust the seat backrest to an upright
driving position before adjusting the head
restraint. Adjust the head restraint so that
the top of it is level with the top of your head
and as far forward as possible. Make sure
that you remain comfortable. If you are
extremely tall, adjust the head restraint to
its highest position.
Pull the head restraint up to raise it.
To lower the head restraint:
1. Press and hold the adjust and unlock button.
2. Push the head restraint down.
Removing the Head Restraint
1. Pull up the head restraint until it reaches
its highest position.
2. Press and hold the adjust and unlock button, and the unlock and remove
button.
3. Pull up the head restraint.
Note: You cannot remove front seat head
restraints that have entertainment system
video screens.
160
2021 Nautilus (CD9) Canada/United States of America, enUSA, Edition date: 202011, First-Printing Front SeatsE138642
Page 168 of 579
WARNING: Do not place anything on
the seat that blocks the heat, for example
a seat cover or a cushion. This could cause
the seat to overheat. Failure to follow this
instruction could result in personal injury.
Do not:
• Place heavy objects on the seat.
• Operate the heated seat if water or any
other liquid spills on the seat. Allow the
seat to dry.
Switching the Heated Seats On and Off
The vehicle must be running to use this
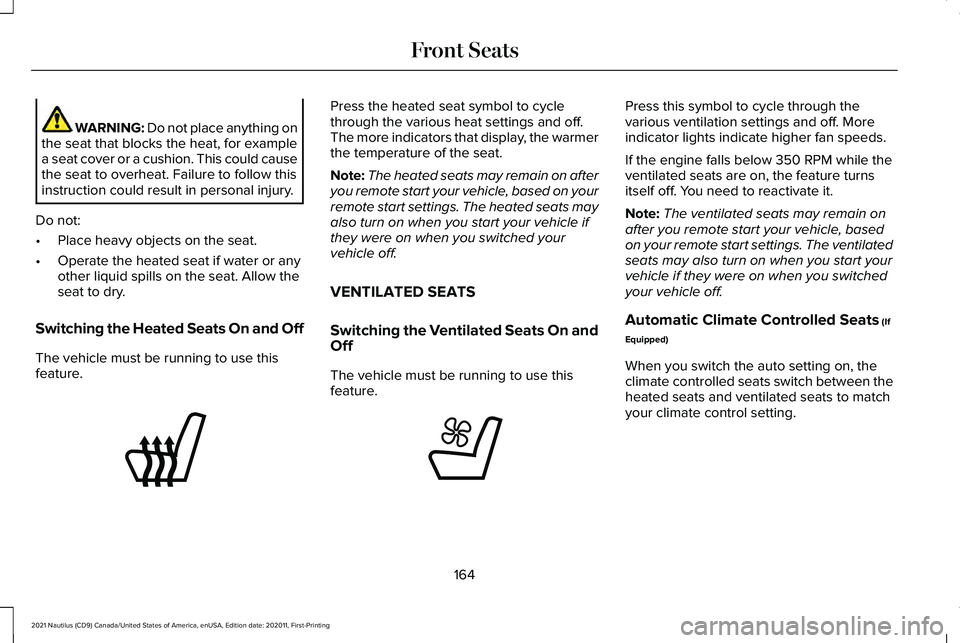
feature. Press the heated seat symbol to cycle
through the various heat settings and off.
The more indicators that display, the warmer
the temperature of the seat.
Note:
The heated seats may remain on after
you remote start your vehicle, based on your
remote start settings. The heated seats may
also turn on when you start your vehicle if
they were on when you switched your
vehicle off.
VENTILATED SEATS
Switching the Ventilated Seats On and
Off
The vehicle must be running to use this
feature. Press this symbol to cycle through the
various ventilation settings and off. More
indicator lights indicate higher fan speeds.
If the engine falls below 350 RPM while the
ventilated seats are on, the feature turns
itself off. You need to reactivate it.
Note:
The ventilated seats may remain on
after you remote start your vehicle, based
on your remote start settings. The ventilated
seats may also turn on when you start your
vehicle if they were on when you switched
your vehicle off.
Automatic Climate Controlled Seats
(If
Equipped)
When you switch the auto setting on, the
climate controlled seats switch between the
heated seats and ventilated seats to match
your climate control setting.
164
2021 Nautilus (CD9) Canada/United States of America, enUSA, Edition date: 202011, First-Printing Front SeatsE146322 E224689
Page 177 of 579
WHAT IS THE GARAGE DOOR
OPENER
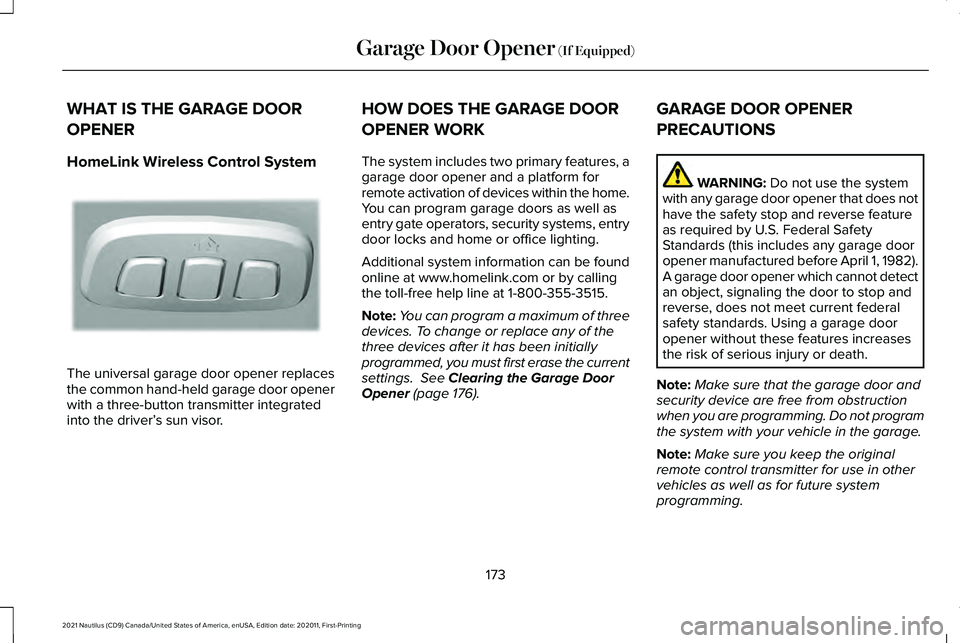
HomeLink Wireless Control System
The universal garage door opener replaces
the common hand-held garage door opener
with a three-button transmitter integrated
into the driver’
s sun visor. HOW DOES THE GARAGE DOOR
OPENER WORK
The system includes two primary features, a
garage door opener and a platform for
remote activation of devices within the home.
You can program garage doors as well as
entry gate operators, security systems, entry
door locks and home or office lighting.
Additional system information can be found
online at www.homelink.com or by calling
the toll-free help line at 1-800-355-3515.
Note:
You can program a maximum of three
devices. To change or replace any of the
three devices after it has been initially
programmed, you must first erase the current
settings. See Clearing the Garage Door
Opener (page 176). GARAGE DOOR OPENER
PRECAUTIONS WARNING:
Do not use the system
with any garage door opener that does not
have the safety stop and reverse feature
as required by U.S. Federal Safety
Standards (this includes any garage door
opener manufactured before April 1, 1982).
A garage door opener which cannot detect
an object, signaling the door to stop and
reverse, does not meet current federal
safety standards. Using a garage door
opener without these features increases
the risk of serious injury or death.
Note: Make sure that the garage door and
security device are free from obstruction
when you are programming. Do not program
the system with your vehicle in the garage.
Note: Make sure you keep the original
remote control transmitter for use in other
vehicles as well as for future system
programming.
173
2021 Nautilus (CD9) Canada/United States of America, enUSA, Edition date: 202011, First-Printing Garage Door Opener
(If Equipped)E188211