warning light LINCOLN NAUTILUS 2021 Service Manual
[x] Cancel search | Manufacturer: LINCOLN, Model Year: 2021, Model line: NAUTILUS, Model: LINCOLN NAUTILUS 2021Pages: 579, PDF Size: 6.9 MB
Page 361 of 579
WAXING
Wax the high-gloss painted surface of your
prewashed vehicle once or twice a year.
We recommend that you only use an
approved quality wax that does not contain
abrasives. For additional information and
assistance, we recommend that you contact
an authorized dealer.
When washing and waxing, park your vehicle
in a shaded area out of direct sunlight.
Note:
Avoid waxing unpainted or low-gloss
black colored parts, they discolor over time.
CLEANING THE INTERIOR
Cleaning the Instrument Panel WARNING: Do not use chemical
solvents or strong detergents when
cleaning the steering wheel or instrument
panel to avoid contamination of the airbag
system. We recommend that you only clean the
instrument panel and cluster lens with a
damp soft cloth. Dry the area with a clean,
soft cloth.
For additional information and assistance,
we recommend that you contact an
authorized dealer.
Note:
Avoid cleaners or polishes that
increase the gloss of the upper portion of
the instrument panel. The dull finish in this
area helps protect you from undesirable
windshield reflection.
Cleaning Plastic
We recommend that you only use a mild
soap and water solution on a soft cloth. Dry
the area with a clean, soft cloth.
Cleaning Displays and Screens
We recommend that you only use a
microfiber cloth in a circular motion to clean
off the fingerprint or dust. If dirt or fingerprints are still on the screen,
apply a small amount of alcohol to the cloth
and try to clean it again.
Note:
Do not pour or spray alcohol onto the
touchscreen.
Note: Do not use detergent or any type of
solvent to clean the touchscreen.
Cleaning Leather and Vinyl
We recommend that you only clean the
leather and vinyl surfaces in the following
way:
1. Remove dust and loose dirt with a vacuum cleaner.
2. Wipe the surface with a soft, damp cloth
and a mild soap and water solution. Dry
the area with a clean, soft cloth.
3. Make sure the leather is dry, then apply a small amount of conditioner to a clean,
dry cloth.
357
2021 Nautilus (CD9) Canada/United States of America, enUSA, Edition date: 202011, First-Printing Vehicle Care
Page 367 of 579
LOCATING THE TIRE LABEL
You will find a Tire Label containing tire
inflation pressure by tire size and other
important information located on the
B-Pillar or the edge of the driver's door.
See Locating the Safety Compliance
Certification Labels (page 290).
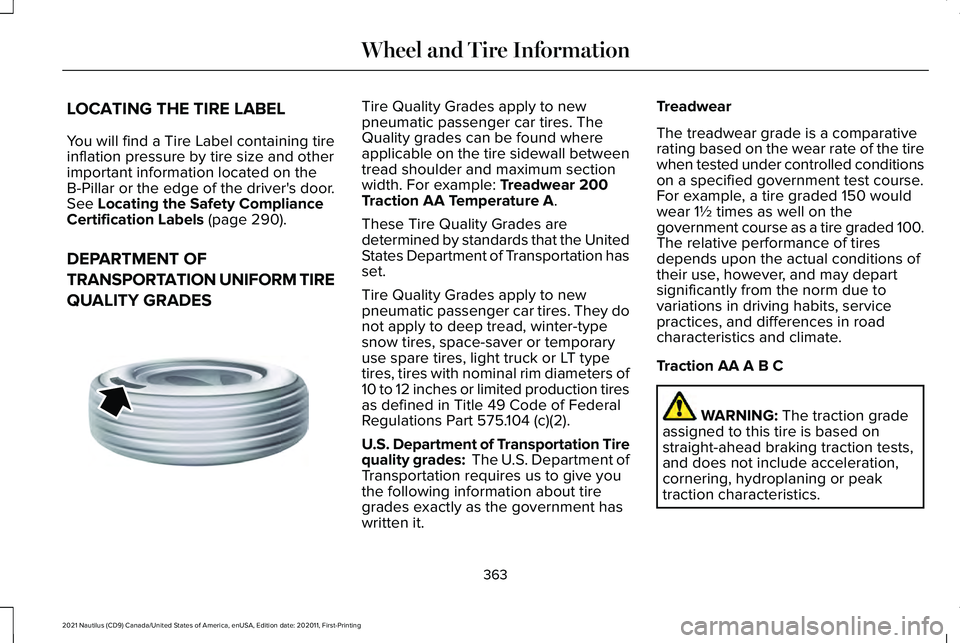
DEPARTMENT OF
TRANSPORTATION UNIFORM TIRE
QUALITY GRADES Tire Quality Grades apply to new
pneumatic passenger car tires. The
Quality grades can be found where
applicable on the tire sidewall between
tread shoulder and maximum section
width. For example:
Treadwear 200
Traction AA Temperature A.
These Tire Quality Grades are
determined by standards that the United
States Department of Transportation has
set.
Tire Quality Grades apply to new
pneumatic passenger car tires. They do
not apply to deep tread, winter-type
snow tires, space-saver or temporary
use spare tires, light truck or LT type
tires, tires with nominal rim diameters of
10 to 12 inches or limited production tires
as defined in Title 49 Code of Federal
Regulations Part 575.104 (c)(2).
U.S. Department of Transportation Tire
quality grades: The U.S. Department of
Transportation requires us to give you
the following information about tire
grades exactly as the government has
written it. Treadwear
The treadwear grade is a comparative
rating based on the wear rate of the tire
when tested under controlled conditions
on a specified government test course.
For example, a tire graded 150 would
wear 1½ times as well on the
government course as a tire graded 100.
The relative performance of tires
depends upon the actual conditions of
their use, however, and may depart
significantly from the norm due to
variations in driving habits, service
practices, and differences in road
characteristics and climate.
Traction AA A B C
WARNING:
The traction grade
assigned to this tire is based on
straight-ahead braking traction tests,
and does not include acceleration,
cornering, hydroplaning or peak
traction characteristics.
363
2021 Nautilus (CD9) Canada/United States of America, enUSA, Edition date: 202011, First-Printing Wheel and Tire InformationE142542
Page 371 of 579
*Traction: The traction grades, from
highest to lowest are AA, A, B, and C.
The grades represent the tire's ability to
stop on wet pavement as measured
under controlled conditions on specified
government test surfaces of asphalt and
concrete. A tire marked C may have
poor traction performance.
*
Temperature: The temperature grades
are A (the highest), B and C,
representing the tire's resistance to the
generation of heat and its ability to
dissipate heat when tested under
controlled conditions on a specified
indoor laboratory test wheel.
M.
Maximum Inflation Pressure:
Indicates the tire manufacturers'
maximum permissible pressure or the
pressure at which the maximum load
can be carried by the tire. This pressure
is normally higher than the vehicle
manufacturer's recommended cold
inflation pressure which can be found
on the Safety Compliance Certification
Label (affixed to either the door hinge
pillar, door-latch post, or the door edge
that meets the door-latch post, next to the driver's seating position), or Tire
Label which is located on the B-Pillar or
the edge of the driver’
s door. The cold
inflation pressure should never be set
lower than the recommended pressure
on the vehicle label.
The tire suppliers may have additional
markings, notes or warnings such as
standard load or radial tubeless.
Additional Information Contained on
the Tire Sidewall for LT Type Tires
Note: Tire Quality Grades do not apply
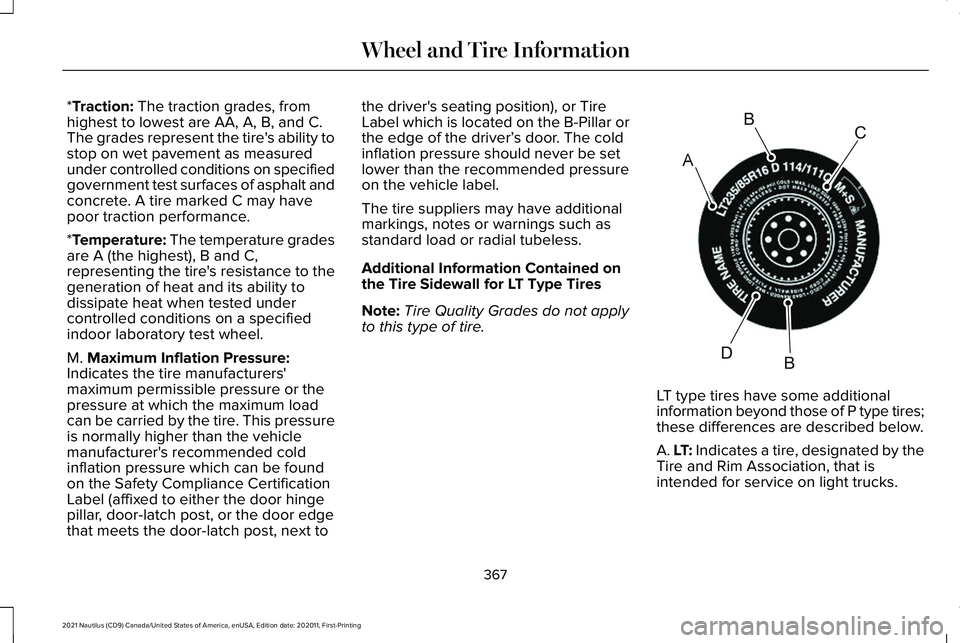
to this type of tire. LT type tires have some additional
information beyond those of P type tires;
these differences are described below.
A. LT: Indicates a tire, designated by the
Tire and Rim Association, that is
intended for service on light trucks.
367
2021 Nautilus (CD9) Canada/United States of America, enUSA, Edition date: 202011, First-Printing Wheel and Tire InformationA
BC
BDE142544
Page 384 of 579
•
In the first stage, the tire will be reinflated
with a sealing compound and air. After
the tire has been inflated, you will need
to drive the vehicle a short distance
approximately 4 mi (6 km) to distribute
the sealant in the tire.
• In the second stage, you will need to
check the tire pressure and adjust, if
necessary, to the vehicle's specified tire
inflation pressure.
First Stage: Reinflating the Tire with
sealing compound and air WARNING: Do not stand directly over
the kit while inflating the tire. If you notice
any unusual bulges or deformations in the
tire's sidewall during inflation, stop and call
roadside assistance. WARNING:
If the tire does not inflate
to the recommended tire pressure within
15 minutes, stop and call roadside
assistance.
Park the vehicle in a safe, level and secure
area, away from moving traffic. Turn the hazard lights on. Apply the parking
brake and power off the vehicle. Inspect the
flat tire for visible damage.
If a puncture is located in the tire sidewall,
stop and call roadside assistance.
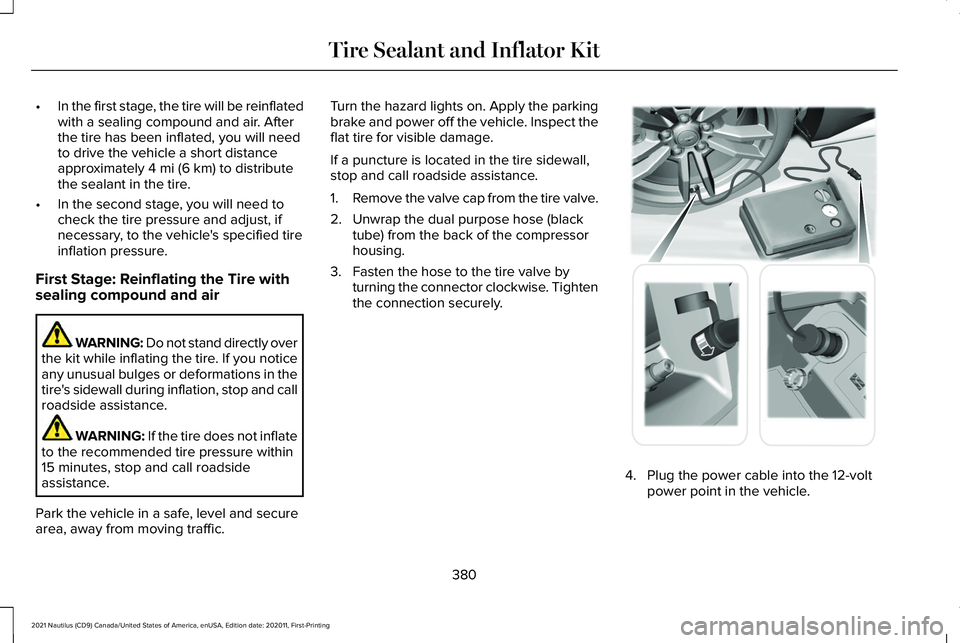
1.
Remove the valve cap from the tire valve.
2. Unwrap the dual purpose hose (black tube) from the back of the compressor
housing.
3. Fasten the hose to the tire valve by turning the connector clockwise. Tighten
the connection securely. 4. Plug the power cable into the 12-volt
power point in the vehicle.
380
2021 Nautilus (CD9) Canada/United States of America, enUSA, Edition date: 202011, First-Printing Tire Sealant and Inflator Kit E175979
Page 392 of 579
You should always have your tires
serviced by an authorized dealer.
Check the tire pressure periodically (at
least monthly) using an accurate tire
gauge. See When Inflating Your Tires
in this chapter.
When Inflating Your Tires
When putting air into your tires (such as
at a gas station or in your garage), the
tire pressure monitoring system may not
respond immediately to the air added
to your tires. It may take up to two minutes of driving
over
20 mph (32 km/h) for the light to
turn off after you have filled your tires to
the recommended inflation pressure.
When Your Temporary Spare Tire is
Installed
When one of your road tires needs to
be replaced with the temporary spare,
the system will continue to identify an
issue to remind you that the damaged
road wheel and tire assembly needs to
be repaired and put back on your
vehicle. To restore the full function of the tire
pressure monitoring system, have the
damaged road wheel and tire assembly
repaired and remounted on your vehicle.
TIRE PRESSURE MONITORING
SYSTEM – TROUBLESHOOTING
Tire Pressure Monitoring System –
Warning Lamps The low tire pressure warning lamp
has combined functions, as it
warns you when your tires need
air, and when the system is no longer
capable of functioning as intended.
388
2021 Nautilus (CD9) Canada/United States of America, enUSA, Edition date: 202011, First-Printing Tire Pressure Monitoring System
Page 393 of 579
Action Required
Possible Cause
Warning Lamp
After inflating your tires to the manufacturer’s recommended
pressure as shown on the Tire Label, on the edge of driver door
or the B-Pillar, drive your vehicle for at least two minutes over
20 mph (32 km/h) before the light turns off.
One or more tires are significantly under
inflated
Solid warning lamp
Repair the damaged road wheel and tire and refit it to your vehicle
to restore operation of the system.
Temporary spare wheel in use
Solid warning lamp or flashing
warning lamp
If the tires are inflated to the recommended tire pressures and
the temporary spare wheel is not in use, the system detected a
fault that requires service. Have your vehicle checked as soon
as possible.
Tire pressure monitoring system
malfunction
389
2021 Nautilus (CD9) Canada/United States of America, enUSA, Edition date: 202011, First-Printing Tire Pressure Monitoring System
Page 395 of 579
CHANGING A FLAT TIRE
WARNING: If the tire pressure
monitor sensor becomes damaged it may
not function.
Note: The use of tire sealant may damage
your tire pressure monitoring system and
should only be used in roadside
emergencies. If you must use a sealant, use
the Tire Mobility Kit sealant. Replace the tire
pressure monitoring system sensor and
valve stem on the wheel by an authorized
dealer after use of the sealant.
Note: The tire pressure monitoring system
indicator light will illuminate when the spare
tire is in use. To restore the full function of
the monitoring system, all road wheels
equipped with tire pressure monitoring
sensors must be mounted on the vehicle.
If you get a flat tire while driving, do not apply
the brake heavily. Instead, gradually
decrease your speed. Hold the steering
wheel firmly and slowly move to a safe place
on the side of the road. Have a flat serviced by an authorized dealer
in order to prevent damage to the tire
pressure monitoring system sensors.
See
Tire Pressure Monitoring System Overview
(page 385). Replace the spare tire with a road
tire as soon as possible. During repairing or
replacing of the flat tire, have an authorized
dealer inspect the tire pressure monitoring
system sensor for damage.
Dissimilar Spare Wheel and Tire
Assembly Information WARNING:
Failure to follow these
guidelines could result in an increased risk
of loss of vehicle control, injury or death.
If you have a dissimilar spare wheel and tire,
then it is intended for temporary use only.
This means that if you need to use it, you
should replace it as soon as possible with a
road wheel and tire assembly that is the
same size and type as the road tires and
wheels that were originally provided on your
vehicle. If the dissimilar spare tire or wheel
is damaged, replace it instead of repairing
it. A dissimilar spare wheel and tire assembly
is defined as a spare wheel and tire assembly
that is different in brand, size or appearance
from the road tires and wheels and can be
one of three types:
1.
T-type mini-spare: This spare tire begins
with the letter T for tire size and may have
Temporary Use Only molded in the sidewall.
2.
Full-size dissimilar spare with label on
wheel: This spare tire has a label on the
wheel that states: THIS WHEEL AND TIRE
ASSEMBLY FOR TEMPORARY USE ONLY.
When driving with one of the dissimilar spare
tires listed above, do not:
• Exceed
50 mph (80 km/h).
• Load the vehicle beyond maximum
vehicle load rating listed on the Safety
Compliance Label.
• Tow a trailer.
• Use snow chains on the end of the
vehicle with the dissimilar spare tire.
• Use more than one dissimilar spare tire
at a time.
391
2021 Nautilus (CD9) Canada/United States of America, enUSA, Edition date: 202011, First-Printing Changing a Road Wheel
Page 550 of 579
We will use reasonable endeavours to
provide the SUNA Traffic Channel 24 hours
a day, 365 days a year. The SUNA Traffic
Channel may occasionally be unavailable for
technical reasons or for planned
maintenance. We will try to perform
maintenance at times when congestion is
light. We reserve the right to withdraw SUNA
Products and/or Services at any time.
Also, we cannot assure the uninterrupted
reception of the SUNA Traffic Channel
RDS-TMC signal at any particular location.
6. Limitation of Liability
Neither Intelematics (nor its suppliers or the
manufacturer of your device (the
“Suppliers”)) shall be liable to you or to any
third party for any damages either direct,
indirect, incidental, consequential or
otherwise arising out of the use of or inability
to use SUNA Products and/or Services even
if Intelematics or a Supplier has been advised
of the possibility of such damages. You also
acknowledge that the neither Intelematics
nor any Supplier guarantees nor make any
warranties that relate to the availability,
accuracy or completeness of SUNA Products and/or Services, and to the extent which it
is lawful to do so, both Intelematics and each
Supplier excludes any warranties which
might otherwise be implied by any State or
Federal legislation in relation to SUNA
Products and/or Services.
7. Please Note
Great care has been taken in preparing this
manual. Constant product development may
mean that some information is not entirely
up-to-date. The information in this document
is subject to change without notice.
EMISSION LAW
WARNING:
Do not remove or alter
the original equipment floor covering or
insulation between it and the metal floor
of the vehicle. The floor covering and
insulation protect occupants of the vehicle
from the engine and exhaust system heat and noise. On vehicles with no original
equipment floor covering insulation, do not
carry passengers in a manner that permits
prolonged skin contact with the metal floor.
Failure to follow these instructions may
result in fire or personal injury.
U.S. federal laws and certain state laws
prohibit removing or rendering inoperative
emission control system components. Similar
federal or provincial laws may apply in
Canada. We do not approve of any vehicle
modification without first determining
applicable laws. Tampering with emissions control
systems including related sensors
or the Diesel Exhaust Fluid system
can result in reduced engine power and the
illumination of the service engine soon light.
546
2021 Nautilus (CD9) Canada/United States of America, enUSA, Edition date: 202011, First-Printing Customer Information
Page 564 of 579
Electric Parking Brake..................................221
Electric Parking Brake –
Troubleshooting.............................................222
Electric Parking Brake – Troubleshooting.........................................222
Electric Parking Brake – Information
Messages.........................................................223
Electric Parking Brake – Warning Lamps...............................................................222
Electric Power Steering..............................232 Electric Power Steering Precautions.............232
Electromagnetic Compatibility..................548
Emergency Call Limitations..........................74
Emergency Call Requirements
....................73
Emergency Call System Data......................26
Emergency Towing
.......................................315
Emission Law.................................................546 Noise Emissions Warranty, Prohibited
Tampering Acts and Maintenance.............547
Tampering With a Noise Control System..............................................................547
Enabling Apps on an Android Device...........................................................444
Enabling Apps on an iOS Device.............444
Enabling or Disabling Personal Profiles..........................................................447
Enabling Remote Start..................................151 End User License Agreement
....................516
VEHICLE SOFTWARE END USER LICENSE
AGREEMENT (EULA) .....................................
516
Engine Block Heater....................................188 Engine Block Heater Precautions...................188
How Does the Engine Block Heater
Work...................................................................188
Using the Engine Block Heater.......................189
Engine Oil Capacity and Specification - 2.0L...............................................................402
Alternative Engine Oil for Extremely Cold Climates............................................................403
Engine Oil Capacity and Specification - 2.7L................................................................404
Alternative Engine Oil for Extremely Cold Climates...........................................................406
Engine Oil
.......................................................338
Adding Engine Oil..............................................338
Checking the Engine Oil Level.......................338
Engine Oil Capacity and Specification..........339
Engine Oil Dipstick Overview..........................338
Resetting the Engine Oil Change
Reminder..........................................................339
Engine Specifications - 2.0L......................398
Engine Specifications - 2.7L......................399
Entering a Parallel Parking Space............247
Entering a Perpendicular Parking Space............................................................247 Evasive Steering Assist...............................284
Evasive Steering Assist Limitations...............284
Switching Evasive Steering Assist On and
Off......................................................................284
What Is Evasive Steering Assist......................284
Event Data
........................................................24
Exiting a Parking Space..............................248
Extending the Remote Start Duration........................................................152
Exterior Bulbs
................................................350
Changing a Front Turn Signal Lamp
Bulb...................................................................352
Changing a License Plate Lamp Bulb...........353
Exterior Bulb Specification Chart...................350
Removing a Headlamp Assembly..................352
Exterior Lamps................................................121 Exterior Lamp Audible Warning.......................122
Exterior Lamp Indicators....................................122
Switching the Daytime Running Lamps On
and Off................................................................121
Switching the Front Fog Lamps On and Off.......................................................................122
Switching the Turn Signal Lamps On and Off........................................................................\
121
Switching Welcome Lighting On and Off.......................................................................122
Exterior Lighting Control
..............................119
560
2021 Nautilus (CD9) Canada/United States of America, enUSA, Edition date: 202011, First-Printing Index
Page 565 of 579
Exterior Lighting.............................................119
Adaptive Front Lighting.....................................125
Autolamps.............................................................120
Automatic High Beam Control.........................122
Automatic High Beam Control –
Troubleshooting..............................................125
Exterior Lamps......................................................121
Headlamps.............................................................119
Headlamps – Troubleshooting........................120
Exterior Mirrors
...............................................133
Auto-Dimming Exterior Mirror..........................134
F
Fastening and Unfastening the Seatbelts........................................................54
Unfastening the Seatbelts..................................55
Using a Sliding Clip..............................................55
Feature Bar
....................................................433
Flat Tire See: Changing a Flat Tire..................................391
Floor Mats
......................................................306
Folding the Exterior Mirrors - Vehicles With: Manual Folding Mirrors
.............................133
Folding the Exterior Mirrors - Vehicles With: Power Folding Mirrors...............................133
Switching Auto-fold On and Off.......................134
Front Exterior...................................................35 Front Parking Aid..........................................236
Front Parking Aid Audible Warnings.............236
Front Parking Aid Limitations..........................
236
Locating the Front Parking Aid Sensors.......236
What is the Front Parking Aid.........................236
Front Passenger Sensing System...............67 Front Passenger Sensing System
Indicators............................................................70
Front Passenger Sensing System Precautions........................................................70
How Does the Front Passenger Sensing System Work......................................................67
What Is the Front Passenger Sensing System.................................................................67
Front Seat Precautions
................................159
Front Seats......................................................159
Heated Seats........................................................163
Massage Seats.....................................................163
Power Seats..........................................................160
Ventilated Seats...................................................164
Fuel and Refueling
........................................197
Fuel and Refueling – Troubleshooting.........203
Fuel Quality...........................................................198
Refueling..............................................................200
Running Out of Fuel...........................................199
Fuel and Refueling Precautions.................197 Fuel and Refueling –
Troubleshooting.........................................
203
Fuel and Refueling – Information
Messages .........................................................203
Fuel and Refueling – Warning Lamps...........203
Fuel Gauge
.....................................................138
Fuel Gauge Limitations......................................138
Locating the Fuel Filler Door............................138
What Is Distance to Empty................................139
What Is the Fuel Gauge.....................................138
What Is the Low Fuel Reminder.......................138
Fuel Quality.....................................................198 Selecting the Correct Fuel................................198
Fuel Tank Capacity......................................202 Advertised Capacity..........................................202
Fuse Precautions
...........................................316
Fuses................................................................316 Body Control Module Fuse Box.....................326
Fuses – Troubleshooting...................................331
Under Hood Fuse Box.......................................316
Fuses – Troubleshooting.............................331 Fuses – Frequently Asked Questions............331
G
Garage Door Opener...................................173
Garage Door Opener Limitations
..............174
Garage Door Opener Precautions............173
561
2021 Nautilus (CD9) Canada/United States of America, enUSA, Edition date: 202011, First-Printing Index