tow LINCOLN NAUTILUS 2021 Owner's Manual
[x] Cancel search | Manufacturer: LINCOLN, Model Year: 2021, Model line: NAUTILUS, Model: LINCOLN NAUTILUS 2021Pages: 579, PDF Size: 6.9 MB
Page 212 of 579
Manually Shifting in Drive (D)
Use this feature when you need immediate
shift response, for example overtaking
another vehicle.
•
Pull the (+) paddle to switch the feature
on.
• Hold the plus paddle to switch the
feature off.
Note: This feature will turn off if paddles are
not used continuously while driving.
Manually Shifting in Sport (S) (If Equipped)
• Pull the (+) paddle to switch the feature
on.
• Hold the (+) paddle to switch the feature
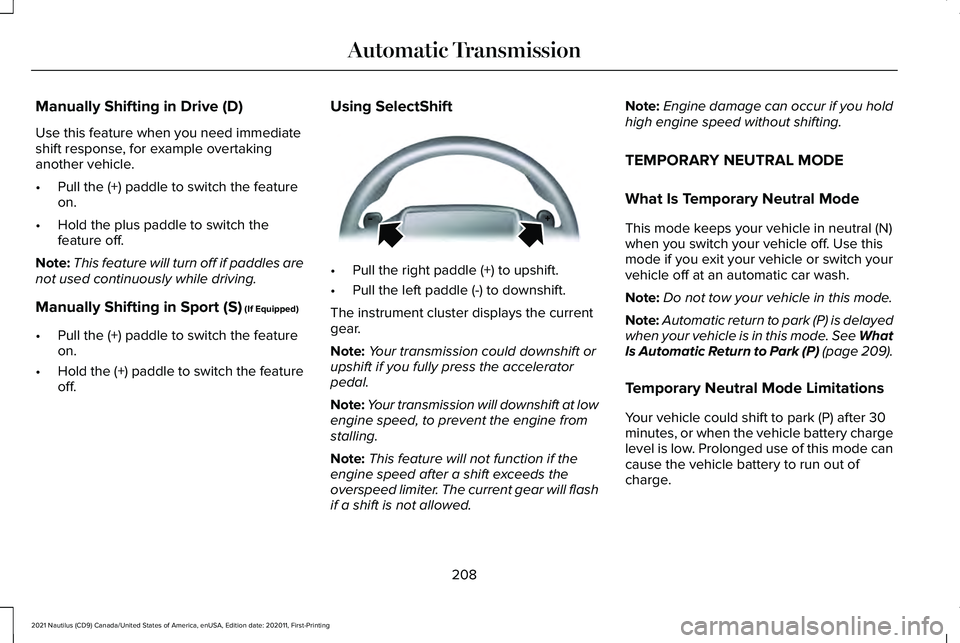
off. Using SelectShift •
Pull the right paddle (+) to upshift.
• Pull the left paddle (-) to downshift.
The instrument cluster displays the current
gear.
Note: Your transmission could downshift or
upshift if you fully press the accelerator
pedal.
Note: Your transmission will downshift at low
engine speed, to prevent the engine from
stalling.
Note: This feature will not function if the
engine speed after a shift exceeds the
overspeed limiter. The current gear will flash
if a shift is not allowed. Note:
Engine damage can occur if you hold
high engine speed without shifting.
TEMPORARY NEUTRAL MODE
What Is Temporary Neutral Mode
This mode keeps your vehicle in neutral (N)
when you switch your vehicle off. Use this
mode if you exit your vehicle or switch your
vehicle off at an automatic car wash.
Note: Do not tow your vehicle in this mode.
Note: Automatic return to park (P) is delayed
when your vehicle is in this mode. See What
Is Automatic Return to Park (P)
(page 209).
Temporary Neutral Mode Limitations
Your vehicle could shift to park (P) after 30
minutes, or when the vehicle battery charge
level is low. Prolonged use of this mode can
cause the vehicle battery to run out of
charge.
208
2021 Nautilus (CD9) Canada/United States of America, enUSA, Edition date: 202011, First-Printing Automatic TransmissionE144821
Page 213 of 579

Do not tow your vehicle in this mode. Failure
to follow these instructions could result in
vehicle damage not covered by the vehicle
warranty.
Entering Temporary Neutral Mode
1. Power your vehicle on.
2. Bring your vehicle to a complete stop.
3. Press and hold the brake pedal.
4. Shift into neutral (N).
Note:
An instructional message appears.
5. Press the neutral (N) button.
Note: A confirmation message appears
when your vehicle enters the mode.
6. Release the brake pedal.
Note: Your vehicle is free to roll.
7. Switch your vehicle off.
Note: Do not tow your vehicle in this mode.
Note: The neutral (N) indicator on the
transmission selector may flash in this mode. Exiting Temporary Neutral Mode
1. Press the brake pedal.
2. Shift into park (P), or power your vehicle
on and shift into drive (D) or reverse (R).
AUTOMATIC RETURN TO PARK (P)
What Is Automatic Return to Park (P)
Your vehicle shifts into park (P) if you attempt
to exit your vehicle without the transmission
in park (P).
How Does Automatic Return to Park
(P) Work
Your vehicle shifts into park (P) when your
vehicle is stationary and any of the following
occur:
• You switch the vehicle off.
• You open the driver door with your
seatbelt unlatched.
• You unlatch the driver seatbelt when the
driver door is open. Note:
Do not use automatic return to park
(P) when your vehicle is moving, except in
an emergency. See Stopping the Engine
When Your Vehicle is Moving (page 189).
Automatic Return to Park (P)
Limitations
Automatic return to park may not work if the
door ajar switch is malfunctioning.
See an authorized dealer if any of the
following occur:
• Door ajar indicator does not illuminate
with the driver door open.
• Door ajar indicator illuminates with the
driver door closed.
• Transmission not in park message
appears with the driver door closed, after
you shift out of park (P).
209
2021 Nautilus (CD9) Canada/United States of America, enUSA, Edition date: 202011, First-Printing Automatic Transmission
Page 214 of 579
MANUAL PARK RELEASE
What Is Manual Park Release
Manual park release allows you to move your
transmission out of the park (P) position in
the event of an electrical malfunction or
emergency.
Manual Park Release Precautions
WARNING: When doing this
procedure, you need to take the
transmission out of park (P) which means
your vehicle can roll freely. To avoid
unwanted vehicle movement, always fully
apply the parking brake prior to doing this
procedure. Use wheels chocks if
appropriate. WARNING:
If the parking brake is
fully released, but the brake warning lamp
remains illuminated, the brakes may not
be working properly. Have your vehicle
checked as soon as possible. WARNING: Do not drive your vehicle
until you verify that the stoplamps are
working.
Using Manual Park Release
Activating Manual Park Release Cable
Use this procedure to move your
transmission out of park (P) for towing.
1. Apply the parking brake.
See Electric
Parking Brake (page 221).
Note: If the vehicle battery has no charge,
use an external power source to apply the
parking brake.
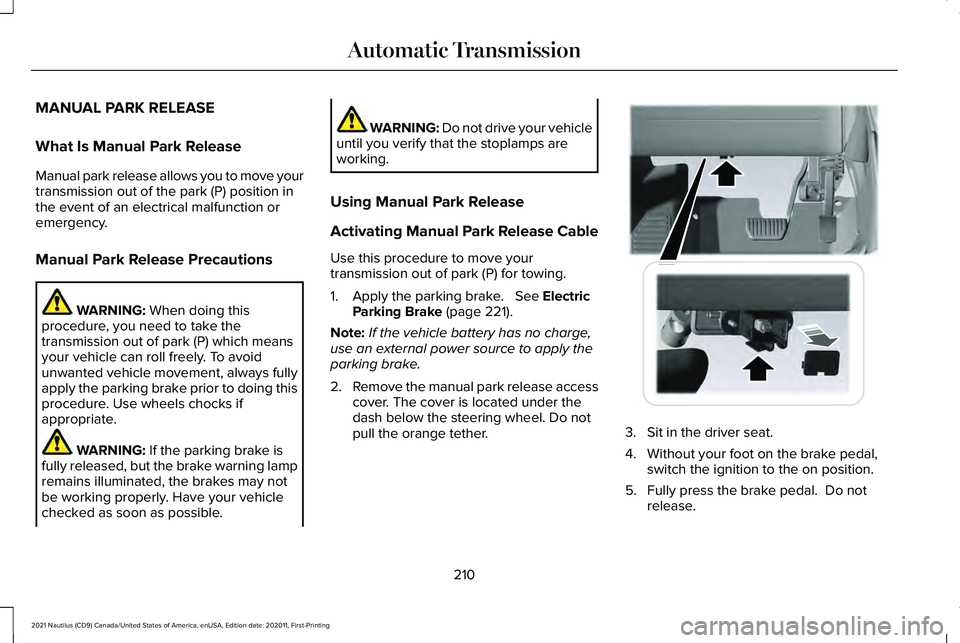
2. Remove the manual park release access
cover. The cover is located under the
dash below the steering wheel. Do not
pull the orange tether. 3. Sit in the driver seat.
4. Without your foot on the brake pedal,
switch the ignition to the on position.
5. Fully press the brake pedal. Do not release.
210
2021 Nautilus (CD9) Canada/United States of America, enUSA, Edition date: 202011, First-Printing Automatic TransmissionE272552
Page 215 of 579
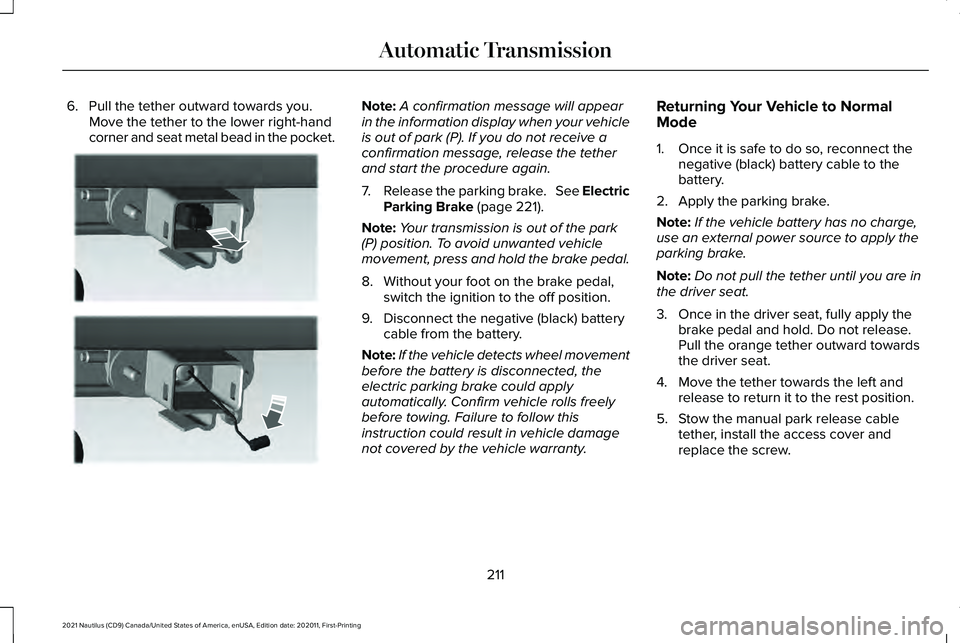
6. Pull the tether outward towards you.
Move the tether to the lower right-hand
corner and seat metal bead in the pocket. Note:
A confirmation message will appear
in the information display when your vehicle
is out of park (P). If you do not receive a
confirmation message, release the tether
and start the procedure again.
7. Release the parking brake. See Electric
Parking Brake (page 221).
Note: Your transmission is out of the park
(P) position. To avoid unwanted vehicle
movement, press and hold the brake pedal.
8. Without your foot on the brake pedal, switch the ignition to the off position.
9. Disconnect the negative (black) battery cable from the battery.
Note: If the vehicle detects wheel movement
before the battery is disconnected, the
electric parking brake could apply
automatically. Confirm vehicle rolls freely
before towing. Failure to follow this
instruction could result in vehicle damage
not covered by the vehicle warranty. Returning Your Vehicle to Normal
Mode
1. Once it is safe to do so, reconnect the
negative (black) battery cable to the
battery.
2. Apply the parking brake.
Note: If the vehicle battery has no charge,
use an external power source to apply the
parking brake.
Note: Do not pull the tether until you are in
the driver seat.
3. Once in the driver seat, fully apply the brake pedal and hold. Do not release.
Pull the orange tether outward towards
the driver seat.
4. Move the tether towards the left and release to return it to the rest position.
5. Stow the manual park release cable tether, install the access cover and
replace the screw.
211
2021 Nautilus (CD9) Canada/United States of America, enUSA, Edition date: 202011, First-Printing Automatic TransmissionE272553
Page 222 of 579

BRAKE PRECAUTIONS
WARNING: Driving your vehicle with
the warning lamp on is dangerous. A
significant decrease in braking
performance may occur. It may take you
longer to stop your vehicle. Have your
vehicle checked as soon as possible.
Driving extended distances with the
parking brake engaged can cause brake
failure and the risk of personal injury.
Wet brakes result in reduced braking
efficiency. Gently press the brake pedal a
few times when driving from a car wash or
standing water to dry the brakes. ANTI-LOCK BRAKING SYSTEM
Anti-Lock Braking System Limitations
The anti-lock braking system does not
eliminate the risk of crash when:
•
You drive too closely to the vehicle in
front of you.
• Your vehicle is hydroplaning.
• You take corners too fast.
• The road surface is poor.
Note: If the system activates, the brake
pedal could pulse and could travel further.
Maintain pressure on the brake pedal.
BRAKE OVER ACCELERATOR
In the event the accelerator pedal becomes
stuck or entrapped, apply steady and firm
pressure to the brake pedal to slow the
vehicle and reduce engine power. If you
experience this condition, apply the brakes
and bring your vehicle to a safe stop. Move the transmission to park (P), switch the
engine off and apply the parking brake.
Inspect the accelerator pedal for any
interference. If none are found and the
condition persists, have your vehicle towed
to the nearest authorized dealer.
LOCATING THE BRAKE FLUID
RESERVOIR
See
Under Hood Overview (page 334).
CHECKING THE BRAKE FLUID WARNING: Do not use any fluid other
than the recommended brake fluid as this
will reduce brake efficiency. Use of
incorrect fluid could result in the loss of
vehicle control, serious personal injury or
death.
218
2021 Nautilus (CD9) Canada/United States of America, enUSA, Edition date: 202011, First-Printing Brakes
Page 225 of 579
WHAT IS THE ELECTRIC PARKING
BRAKE
The electric parking brake is used to hold
your vehicle on slopes and flat roads.
APPLYING THE ELECTRIC
PARKING BRAKE
WARNING: Always fully apply the
parking brake and make sure you shift into
park (P). Failure to follow this instruction
could result in personal injury or death. WARNING:
If you drive extended
distances with the parking brake applied,
you could cause damage to the brake
system. WARNING:
The electric parking
brake does not operate if the vehicle
battery has run out of charge. The electronic parking brake
switch is on the center console. 1. Pull the switch up.
The red warning lamp flashes during
operation and illuminates when the parking
brake is applied.
Note:
You can apply the electric parking
brake when the power is off.
Note: The electric parking brake could apply
when you shift into park (P).
See Park (P)
(page 206).
APPLYING THE ELECTRIC
PARKING BRAKE IN AN
EMERGENCY
You can use the electric parking brake to
slow or stop your vehicle in an emergency.
1. Pull the switch up and hold it.
The electric parking brake continues to slow
your vehicle down unless you release the
switch.
The red warning lamp illuminates, a tone
sounds and the stoplamps turn on when you
use the electric parking brake in an
emergency. Note:
Do not apply the electric parking brake
when your vehicle is moving, except in an
emergency.
MANUALLY RELEASING THE
ELECTRIC PARKING BRAKE
1. Switch the ignition on.
2. Press and hold the brake pedal.
3. Push the switch down.
The red warning lamp turns off.
Pulling Away on a Hill When Towing a
Trailer
1. Press and hold the brake pedal.
2. Pull the switch upward and hold it.
3. Shift into gear.
4. Press the accelerator pedal until engine has developed sufficient torque to
prevent your vehicle from rolling down
the hill.
5. Release the switch and pull away in a normal manner.
221
2021 Nautilus (CD9) Canada/United States of America, enUSA, Edition date: 202011, First-Printing Electric Parking BrakeE267156
Page 230 of 579
HOW DOES AUTO HOLD WORK
Auto Hold applies the brakes to hold your
vehicle after you stop it and release the
brake pedal. This can help when waiting on
a hill or in traffic.
SWITCHING AUTO HOLD ON AND
OFF
WARNING: The system does not
replace the parking brake. When you leave
your vehicle, always apply the parking
brake. WARNING: You must remain in your
vehicle when the system turns on. At all
times, you are responsible for controlling
your vehicle, supervising the system and
intervening, if required. Failure to take care
may result in the loss of control of your
vehicle, serious personal injury or death. WARNING:
The system turns off if
there is a malfunction or if you excessively
rev the engine.
Select the drive assist menu in the center
display screen to switch auto hold on and
off.
Note: You can only switch the system on
after you close the driver door, fasten your
seatbelt and start the engine.
Note: The system remembers the last setting
when you start your vehicle.
Make sure you switch the system off before
towing with your vehicle or before using an
automatic car wash.
USING AUTO HOLD
1. Bring your vehicle to a complete stop. The auto hold active indicator illuminates
in the information display. 2. Release the brake pedal. The system
holds your vehicle at a standstill. The
auto hold active indicator remains
illuminated in the information display.
3. Pull away in the normal manner. The system releases the brakes and the auto
hold active indicator switches off.
Note: The system only activates if you apply
enough brake pressure on the brake pedal.
Note: Under certain conditions, the system
could apply the electric parking brake. The
brake system warning lamp illuminates. The
electric parking brake releases when you
press the accelerator pedal.
See
Automatically Releasing the Electric
Parking Brake
(page 222).
Note: The system switches off if you shift
into reverse (R) and press the brake pedal.
There could be actions that can cause the
auto hold system not to work when the
following occur:
• When you use active park assist.
• Your vehicle is in stay in neutral mode.
• The driver door is open.
226
2021 Nautilus (CD9) Canada/United States of America, enUSA, Edition date: 202011, First-Printing Auto Hold
Page 239 of 579
SWITCHING PARKING AID ON AND
OFF
Press the parking aid button and
use the menu to turn the system
on and off.
The system can also be turned off using the
pop-up message that appears when you are
in reverse (R).
REAR PARKING AID
What is the Rear Parking Aid
Rear parking sensors detect objects behind
your vehicle when in reverse (R).
Rear Parking Aid Limitations
There is a decreased coverage area at the
outer corners.
When using a programmed MyKey, you
cannot switch the rear parking aid off. The rear parking aid sensors are active when
your vehicle is in reverse (R) and the vehicle
speed is less than 3 mph (5 km/h).
The sensor coverage area is up to
71 in
(180 cm) from the rear bumper.
The rear parking aid detects large objects
when you shift into reverse (R) and any of
the following occur:
• Your vehicle is moving backward at a low
speed.
• Your vehicle is stationary but an object
is approaching the rear of your vehicle
at a low speed.
• Your vehicle is moving backward at a low
speed and an object is moving towards
your vehicle, for example another vehicle
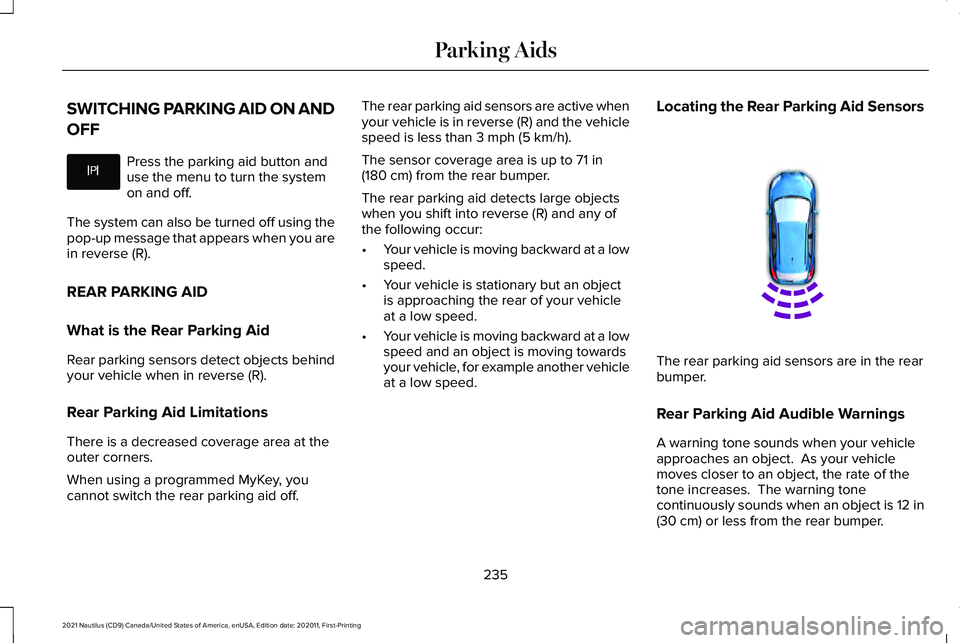
at a low speed. Locating the Rear Parking Aid Sensors
The rear parking aid sensors are in the rear
bumper.
Rear Parking Aid Audible Warnings
A warning tone sounds when your vehicle
approaches an object. As your vehicle
moves closer to an object, the rate of the
tone increases. The warning tone
continuously sounds when an object is 12 in
(30 cm)
or less from the rear bumper.
235
2021 Nautilus (CD9) Canada/United States of America, enUSA, Edition date: 202011, First-Printing Parking AidsE326188P E130178
Page 240 of 579
If your vehicle remains stationary for a few
seconds, the audible warning turns off. If your
vehicle moves backward the tone sounds
again.
Note:
When the parking aid system sounds
a tone, the audio system could reduce the
set volume.
FRONT PARKING AID (If Equipped)
What is the Front Parking Aid
Front parking sensors detect objects in front
of your vehicle.
Front Parking Aid Limitations
The front parking aid sensors are active
when your vehicle is in any position other
than park (P) and the vehicle speed is less
than 5 mph (8 km/h).
The sensor coverage area is up to
28 in
(70 cm) from the bumper. If your vehicle is in reverse (R), the front
parking aid detects objects when your
vehicle is moving at a low speed or an object
is moving toward your vehicle and provides
an audio warning, for example another
vehicle at a low speed. Once your vehicle
reaches a stop, the audio warning stops after
a few seconds. Visual indication is always
active in reverse (R).
If your vehicle is in any forward gear, the
front parking aid provides audible warnings
and visual indication when your vehicle is
moving at a speed of
5 mph (8 km/h) or
below and the system detects an object
within the detection zone. Once your vehicle
reaches a stop, the visual indication and
audio warning stops after a few seconds.
If your vehicle is in neutral (N), the front and
rear sensors provide visual indication only
when your vehicle is moving below a speed
of 5 mph (8 km/h) and obstacles are detected
inside the detection areas. Once your vehicle
stops, the visual indication and audio warning
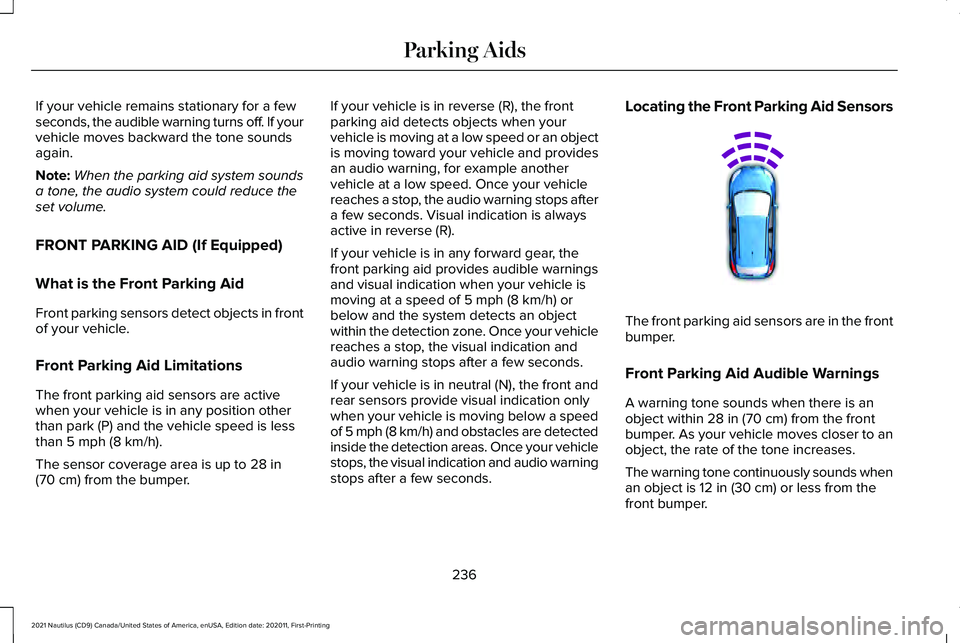
stops after a few seconds. Locating the Front Parking Aid Sensors
The front parking aid sensors are in the front
bumper.
Front Parking Aid Audible Warnings
A warning tone sounds when there is an
object within
28 in (70 cm) from the front
bumper. As your vehicle moves closer to an
object, the rate of the tone increases.
The warning tone continuously sounds when
an object is
12 in (30 cm) or less from the
front bumper.
236
2021 Nautilus (CD9) Canada/United States of America, enUSA, Edition date: 202011, First-Printing Parking AidsE187330
Page 241 of 579
Note:
If the detected object is 12 in (30 cm)
or less from your vehicle, visual indication
remains on.
SIDE PARKING AID
What is the Side Parking Aid
The front and rear outermost parking aid
sensors map objects that are near to the
sides of your vehicle.
Side Parking Aid Limitations
The sensor coverage is up to
24 in (60 cm)
from the sides of your vehicle.
The side parking aid may not function if:
• You switch your vehicle on, off and back
on within a few seconds.
• Your vehicle remains stationary for over
two minutes.
• The anti-lock brake system activates.
• The traction control system activates. •
Your vehicle is in park (P).
• The steering wheel angle information is
not available. You must drive at least
492 ft (150 m) above 19 mph (30 km/h) to
reset the steering wheel angle
information.
Note: If you switch traction control off, the
side sensing system also turns off.
To reinitialize the system, drive the length of
your vehicle.
The side parking aid does not detect an
object that is moving toward the side of your
vehicle, for example another vehicle moving
at a low speed, if it does not pass a front or
rear parking aid sensor.
If the transmission is in reverse (R), the side
sensing system provides audible warnings.
When your vehicle is moving slowly,
obstacles are detected within
24 in (60 cm)
and are inside the driving path of your
vehicle. Once your vehicle reaches a
standstill condition, the audible warning
stops after a few seconds. Visual indication
is always present in reverse (R). If your vehicle is in neutral (N), the side
sensing system provides visual indication
only when your vehicle is moving slowly and
there is a front or rear park aid obstacle
detected, and the side obstacle is within
24 in (60 cm)
from the side of your vehicle.
Once your vehicle reaches a stop, the visual
indication stops after a few seconds.
If the transmission is in drive (D) or any other
forward gear, the side sensing system
provides audible and visual warnings. When
your vehicle is moving slowly, obstacles are
detected within
24 in (60 cm) and are inside
the driving path of your vehicle. Once your
vehicle reaches a standstill condition, the
audible warning and visual indication stops
after a few seconds.
237
2021 Nautilus (CD9) Canada/United States of America, enUSA, Edition date: 202011, First-Printing Parking Aids