engine LINCOLN NAUTILUS 2021 Repair Manual
[x] Cancel search | Manufacturer: LINCOLN, Model Year: 2021, Model line: NAUTILUS, Model: LINCOLN NAUTILUS 2021Pages: 579, PDF Size: 6.9 MB
Page 314 of 579
WARNING: Keep batteries out of
reach of children. Batteries contain sulfuric
acid. Avoid contact with skin, eyes or
clothing. Shield your eyes when working
near the battery to protect against possible
splashing of acid solution. In case of acid
contact with skin or eyes, flush immediately
with water for a minimum of 15 minutes and
get prompt medical attention. If acid is
swallowed, call a physician immediately. WARNING:
Use only adequately
sized cables with insulated clamps. WARNING: Make sure that the cables
are clear of any moving parts and fuel
delivery system parts. WARNING:
Connect batteries with
only the same nominal voltage. WARNING:
If the engine is running
while the hood is open, stay clear of
moving engine components. Failure to
follow this warning could result in serious
personal injury or death. Do not attempt to push-start an automatic
transmission vehicle. This could cause
transmission damage.
Do not disconnect the battery of the disabled
vehicle. This could damage your vehicle's
electrical system.
Preparing the Vehicle
Use only a 12 volt supply to start your vehicle.
Park the booster vehicle close to the hood
of the disabled vehicle, making sure the two
vehicles do not touch.
Jump Starting the Vehicle
Connecting the Jumper Cables
WARNING:
Do not connect the
negative jumper cable to any other part of
your vehicle. Use the ground point.
Note: If you are using a jump pack or booster
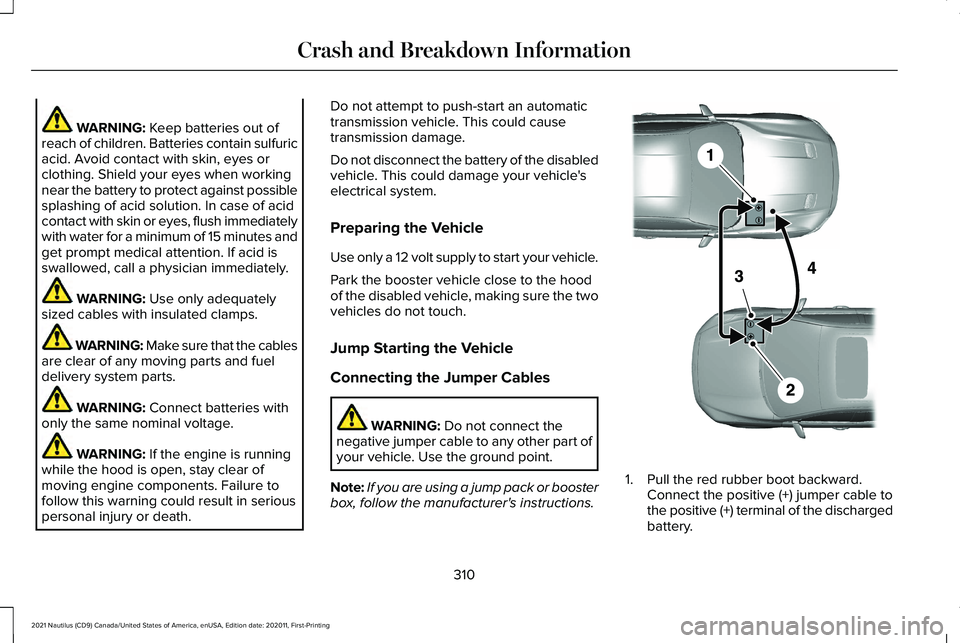
box, follow the manufacturer's instructions. 1. Pull the red rubber boot backward.
Connect the positive (+) jumper cable to
the positive (+) terminal of the discharged
battery.
310
2021 Nautilus (CD9) Canada/United States of America, enUSA, Edition date: 202011, First-Printing Crash and Breakdown InformationE281345
Page 315 of 579
2.
Connect the other end of the positive (+)
jumper cable to the positive (+) terminal
of the booster vehicle battery.
3. Connect the negative (-) jumper cable to
the negative (-) terminal of the booster
vehicle battery.
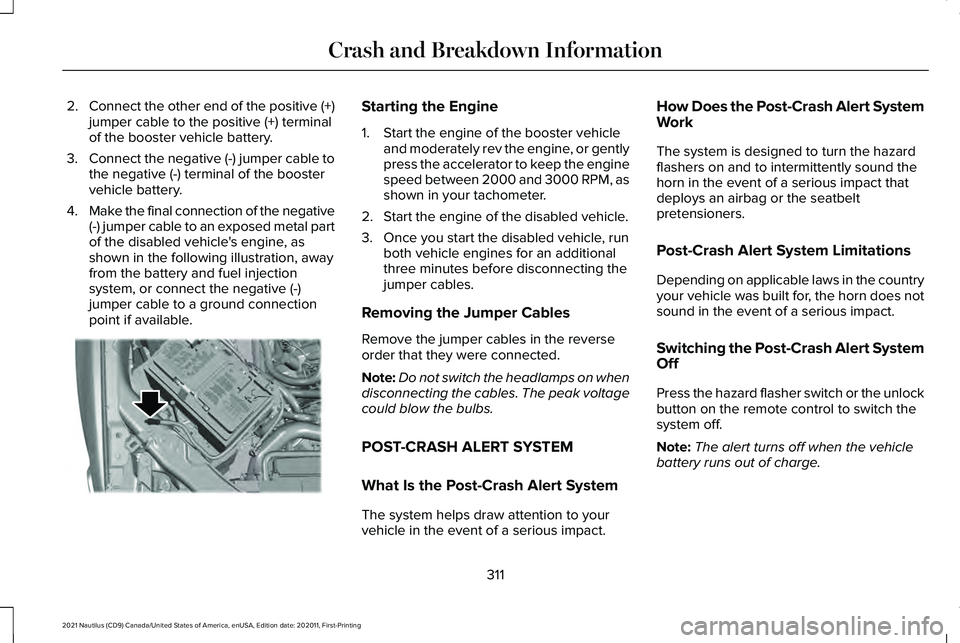
4. Make the final connection of the negative
(-) jumper cable to an exposed metal part
of the disabled vehicle's engine, as
shown in the following illustration, away
from the battery and fuel injection
system, or connect the negative (-)
jumper cable to a ground connection
point if available. Starting the Engine
1. Start the engine of the booster vehicle
and moderately rev the engine, or gently
press the accelerator to keep the engine
speed between 2000 and 3000 RPM, as
shown in your tachometer.
2. Start the engine of the disabled vehicle.
3. Once you start the disabled vehicle, run both vehicle engines for an additional
three minutes before disconnecting the
jumper cables.
Removing the Jumper Cables
Remove the jumper cables in the reverse
order that they were connected.
Note: Do not switch the headlamps on when
disconnecting the cables. The peak voltage
could blow the bulbs.
POST-CRASH ALERT SYSTEM
What Is the Post-Crash Alert System
The system helps draw attention to your
vehicle in the event of a serious impact. How Does the Post-Crash Alert System
Work
The system is designed to turn the hazard
flashers on and to intermittently sound the
horn in the event of a serious impact that
deploys an airbag or the seatbelt
pretensioners.
Post-Crash Alert System Limitations
Depending on applicable laws in the country
your vehicle was built for, the horn does not
sound in the event of a serious impact.
Switching the Post-Crash Alert System
Off
Press the hazard flasher switch or the unlock
button on the remote control to switch the
system off.
Note:
The alert turns off when the vehicle
battery runs out of charge.
311
2021 Nautilus (CD9) Canada/United States of America, enUSA, Edition date: 202011, First-Printing Crash and Breakdown InformationE309115
Page 316 of 579
AUTOMATIC CRASH SHUTOFF
What Is Automatic Crash Shutoff
The automatic crash shutoff is designed to
stop the fuel going to the engine in the event
of a moderate or severe crash.
Note:
Not every impact causes a shutoff.
Automatic Crash Shutoff Precautions WARNING: If your vehicle has been
involved in a crash, have the fuel system
checked. Failure to follow this instruction
could result in fire, personal injury or death.
Re-Enabling Your Vehicle
1. Switch the ignition off.
2. Attempt to start your vehicle.
3. Switch the ignition off.
4. Attempt to start your vehicle. Note:
If your vehicle does not start after the
third attempt, have your vehicle checked as
soon as possible. TRANSPORTING THE VEHICLE 312
2021 Nautilus (CD9) Canada/United States of America, enUSA, Edition date: 202011, First-Printing Crash and Breakdown InformationE143886
Page 321 of 579
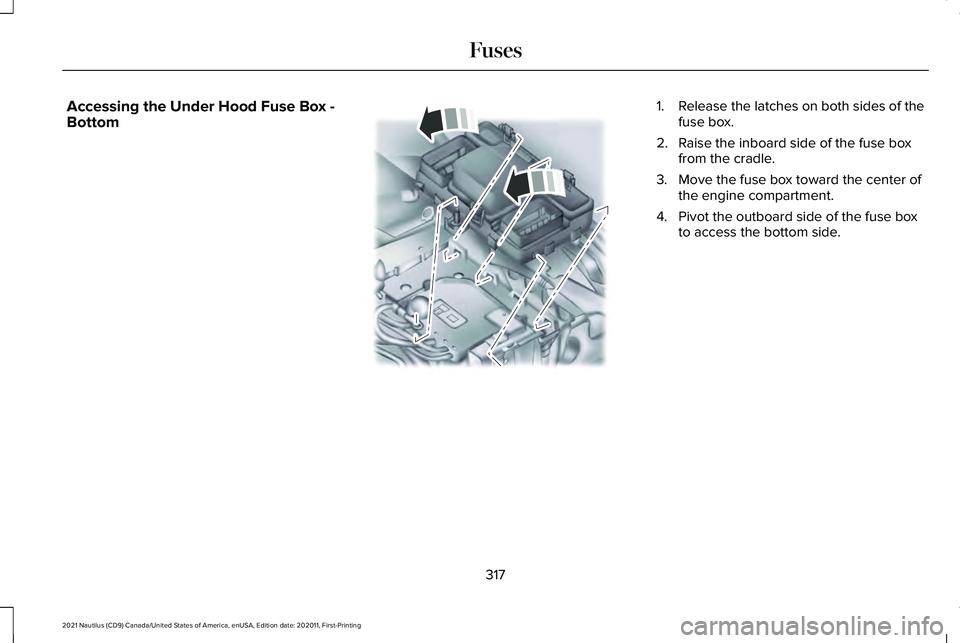
Accessing the Under Hood Fuse Box -
Bottom 1.
Release the latches on both sides of the
fuse box.
2. Raise the inboard side of the fuse box from the cradle.
3. Move the fuse box toward the center of the engine compartment.
4. Pivot the outboard side of the fuse box to access the bottom side.
317
2021 Nautilus (CD9) Canada/United States of America, enUSA, Edition date: 202011, First-Printing FusesE145983
Page 336 of 579
MAINTENANCE PRECAUTIONS
Service your vehicle regularly to help
maintain its roadworthiness and resale value.
There is a large network of authorized
dealers that are there to help you with their
professional servicing expertise. We believe
that their specially trained technicians are
best qualified to service your vehicle properly
and expertly. They are supported by a wide
range of highly specialized tools developed
specifically for servicing your vehicle.
If your vehicle requires professional service,
an authorized dealer can provide the
necessary parts and service. Check your
warranty information to find out which parts
and services are covered.
Use only recommended fuels, lubricants,
fluids and service parts conforming to
specifications. See Capacities and
Specifications (page 398).
• Do not work on a hot engine.
• Make sure that nothing gets caught in
moving parts. •
Do not work on a vehicle with the engine
running in an enclosed space, unless you
are sure you have enough ventilation.
• Keep all open flames and other burning
material, such as cigarettes, away from
the battery and all fuel related parts.
• Set the parking brake, shift the
transmission to park (P) and block the
wheels.
OPENING AND CLOSING THE
HOOD
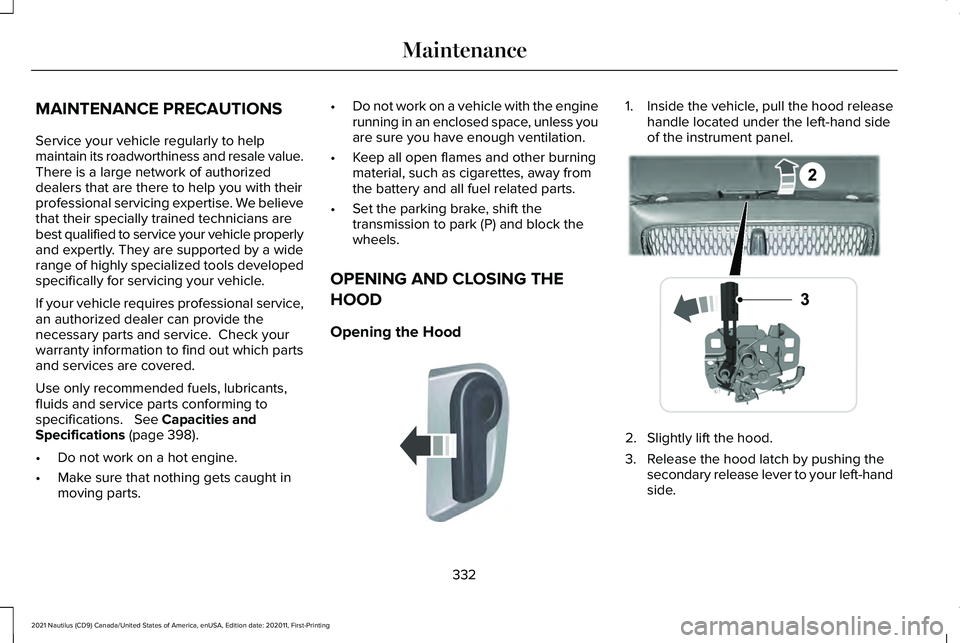
Opening the Hood 1. Inside the vehicle, pull the hood release
handle located under the left-hand side
of the instrument panel. 2. Slightly lift the hood.
3. Release the hood latch by pushing the
secondary release lever to your left-hand
side.
332
2021 Nautilus (CD9) Canada/United States of America, enUSA, Edition date: 202011, First-Printing MaintenanceE142457 E267365
Page 339 of 579
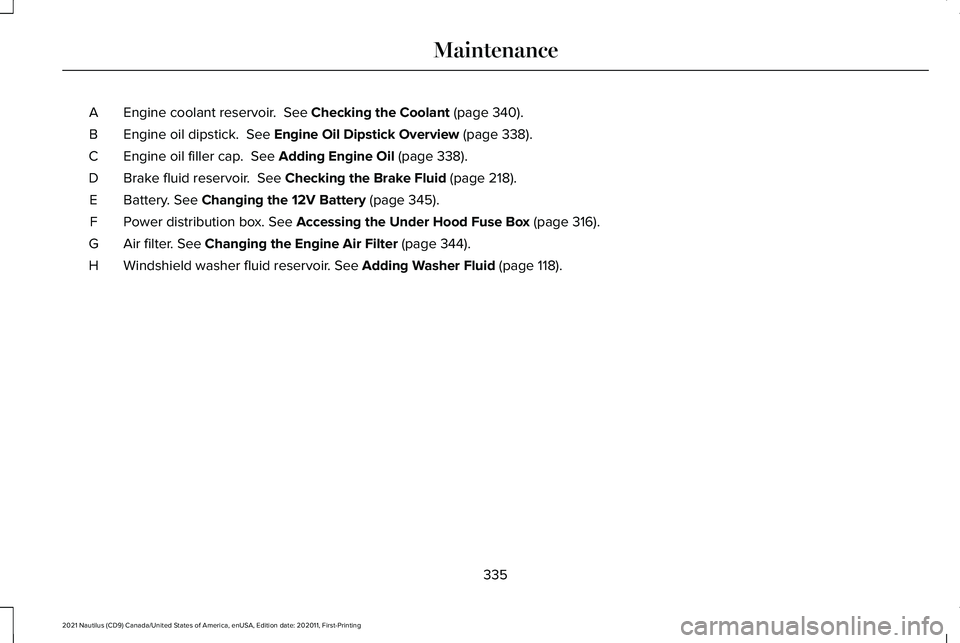
Engine coolant reservoir. See Checking the Coolant (page 340).
A
Engine oil dipstick.
See Engine Oil Dipstick Overview (page 338).
B
Engine oil filler cap.
See Adding Engine Oil (page 338).
C
Brake fluid reservoir.
See Checking the Brake Fluid (page 218).
D
Battery.
See Changing the 12V Battery (page 345).
E
Power distribution box.
See Accessing the Under Hood Fuse Box (page 316).
F
Air filter.
See Changing the Engine Air Filter (page 344).
G
Windshield washer fluid reservoir.
See Adding Washer Fluid (page 118).
H
335
2021 Nautilus (CD9) Canada/United States of America, enUSA, Edition date: 202011, First-Printing Maintenance
Page 341 of 579

Engine coolant reservoir. See Checking the Coolant (page 340).
A
Brake fluid reservoir.
See Checking the Brake Fluid (page 218).
B
Battery.
See Changing the 12V Battery (page 345).
C
Power distribution box.
See Accessing the Under Hood Fuse Box (page 316).
D
Air filter assembly.
See Changing the Engine Air Filter (page 344).
E
Engine oil dipstick.
See Engine Oil Dipstick Overview (page 338).
F
Engine oil filler cap.
See Adding Engine Oil (page 338).
G
Windshield washer fluid reservoir.
See Adding Washer Fluid (page 118).
H
337
2021 Nautilus (CD9) Canada/United States of America, enUSA, Edition date: 202011, First-Printing Maintenance
Page 342 of 579
ENGINE OIL
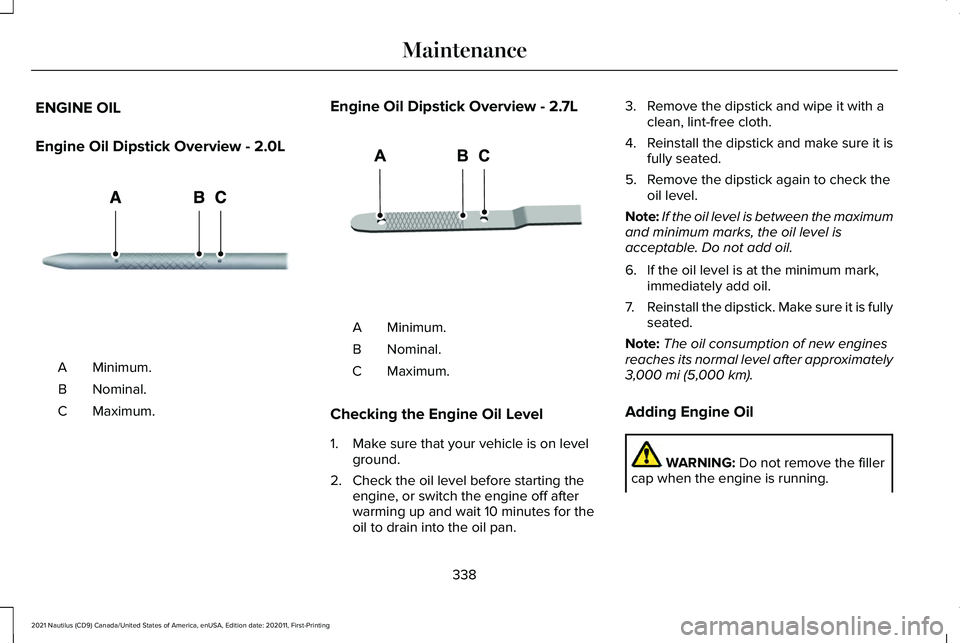
Engine Oil Dipstick Overview - 2.0L
Minimum.
A
Nominal.
B
Maximum.
C Engine Oil Dipstick Overview - 2.7L
Minimum.
A
Nominal.
B
Maximum.
C
Checking the Engine Oil Level
1. Make sure that your vehicle is on level ground.
2. Check the oil level before starting the engine, or switch the engine off after
warming up and wait 10 minutes for the
oil to drain into the oil pan. 3. Remove the dipstick and wipe it with a
clean, lint-free cloth.
4. Reinstall the dipstick and make sure it is
fully seated.
5. Remove the dipstick again to check the oil level.
Note: If the oil level is between the maximum
and minimum marks, the oil level is
acceptable. Do not add oil.
6. If the oil level is at the minimum mark, immediately add oil.
7. Reinstall the dipstick. Make sure it is fully
seated.
Note: The oil consumption of new engines
reaches its normal level after approximately
3,000 mi (5,000 km).
Adding Engine Oil WARNING:
Do not remove the filler
cap when the engine is running.
338
2021 Nautilus (CD9) Canada/United States of America, enUSA, Edition date: 202011, First-Printing MaintenanceE270482 E250320
Page 343 of 579
WARNING: Do not add engine oil
when the engine is hot. Failure to follow
this instruction could result in personal
injury.
Do not use supplemental engine oil additives
because they are unnecessary and could
lead to engine damage that the vehicle
warranty may not cover.
1. Clean the area surrounding the engine oil filler cap before you remove it.
2. Remove the engine oil filler cap.
3. Add engine oil that meets our specifications.
See Capacities and
Specifications (page 402).
4. Reinstall the engine oil filler cap. Turn it clockwise until you feel a strong
resistance.
Note: Do not add oil further than the
maximum mark. Oil levels above the
maximum mark may cause engine damage.
Note: Immediately soak up any oil spillage
with an absorbent cloth. Resetting the Engine Oil Change
Reminder
Use the information display controls on the
steering wheel to reset the oil change
indicator.
From the main menu scroll to:
Action and description
Message
Press the right arrow button,
then from this menu scroll to
the following message.
Settings
Press the right arrow button,
then from this menu scroll to
the following message.
Vehicle
Press the right arrow button,
then from this menu scroll to
the following message.
Oil Life
Press and hold the OK button
until the instrument cluster
displays the following
message.
Hold OK to
Reset
Reset Successful Action and description
Message
When the oil change indicator
resets the instrument cluster
displays 100%.
Remaining Life
{00}%
If the instrument cluster
displays one of the following
messages, repeat the
process.
Not Reset
Reset Cancelled
Engine Oil Capacity and Specification
For filling information, please refer to the
Capacities and Specifications section of your
owner's manual.
See Engine Oil Capacity
and Specification (page 404).
339
2021 Nautilus (CD9) Canada/United States of America, enUSA, Edition date: 202011, First-Printing Maintenance
Page 344 of 579
CHECKING THE COOLANT
When the engine is cold, check the
concentration and level of the coolant at the
intervals listed in the scheduled maintenance
information. See Scheduled Maintenance
(page 459).
Note: Make sure that the coolant level is
between the minimum and maximum marks
on the coolant reservoir.
Note: Coolant expands when it is hot. The
level may extend beyond the
MAX mark.
If the coolant level is at or below the
minimum mark, add prediluted coolant
immediately.
Maintain coolant concentration within 48%
to 50%, which equates to a freeze point
between
-29°F (-34°C) and -35°F (-37°C).
Coolant concentration should be checked
using a refractometer. We do not recommend
the use of hydrometers or coolant test strips
for measuring coolant concentration. Adding Coolant WARNING:
Do not remove the
coolant reservoir cap when the engine is
on or the cooling system is hot. Wait 10
minutes for the cooling system to cool
down. Cover the coolant reservoir cap with
a thick cloth to prevent the possibility of
scalding and slowly remove the cap.
Failure to follow this instruction could result
in personal injury. WARNING:
Do not add engine
coolant when the engine is on or the
cooling system is hot. Failure to follow this
instruction could result in personal injury. WARNING:
Do not add coolant
further than the MAX mark. WARNING: Do not put coolant in the
windshield washer reservoir. If sprayed on
the windshield, coolant could make it
difficult to see through the windshield. Note:
Do not use stop leak pellets, cooling
system sealants, or non-specified additives
as they can cause damage to the engine
cooling or heating systems. Resulting
component damage may not be covered by
the vehicle Warranty.
Note: Automotive fluids are not
interchangeable.
It is very important to use prediluted coolant
approved to the correct specification in order
to avoid plugging the small passageways in
the engine cooling system.
See Capacities
and Specifications (page 407). Do not mix
different colors or types of coolant in your
vehicle. Mixing of engine coolants or using
an incorrect coolant may harm the engine or
cooling system components and could void
the vehicle Warranty.
Note: If prediluted coolant is not available,
use the approved concentrated coolant
diluting it to 50/50 with distilled water.
See
Capacities and Specifications (page 407).
Using water that has not been deionized
may contribute to deposit formation,
corrosion and plugging of the small cooling
system passageways.
340
2021 Nautilus (CD9) Canada/United States of America, enUSA, Edition date: 202011, First-Printing Maintenance