lock LINCOLN NAUTILUS 2023 Owners Manual
[x] Cancel search | Manufacturer: LINCOLN, Model Year: 2023, Model line: NAUTILUS, Model: LINCOLN NAUTILUS 2023Pages: 606, PDF Size: 13.57 MB
Page 396 of 606
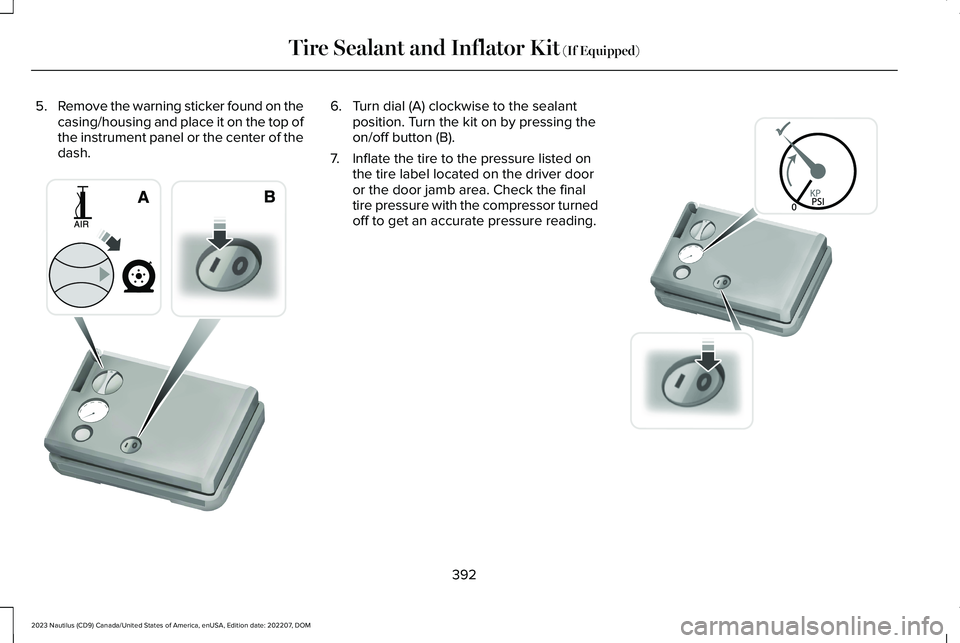
5.Remove the warning sticker found on thecasing/housing and place it on the top ofthe instrument panel or the center of thedash.
6.Turn dial (A) clockwise to the sealantposition. Turn the kit on by pressing theon/off button (B).
7.Inflate the tire to the pressure listed onthe tire label located on the driver dooror the door jamb area. Check the finaltire pressure with the compressor turnedoff to get an accurate pressure reading.
392
2023 Nautilus (CD9) Canada/United States of America, enUSA, Edition date: 202207, DOMTire Sealant and Inflator Kit (If Equipped)E175981 E175982
Page 397 of 606
8.When the recommended tire pressure isreached, turn off the kit, unplug thepower cable, and disconnect the hosefrom the tire valve. Re-install the valvecap on the tire valve and return the kit tothe rear of the vehicle.
9.Drive the vehicle 4 mi (6 km) to distributethe sealant evenly inside the tire.
Note:If you experience any unusualvibration, ride disturbance or noise whiledriving, reduce your speed until you cansafely pull off to the side of the road to callfor roadside assistance. Do not proceed tothe second stage of this operation.
Second Stage: Checking the tirepressure with the inflator kit
WARNING: If the tire does not inflateto the recommended tire pressure within15 minutes, stop and call roadsideassistance.
WARNING: The power plug may gethot after use and should be handledcarefully when unplugging.
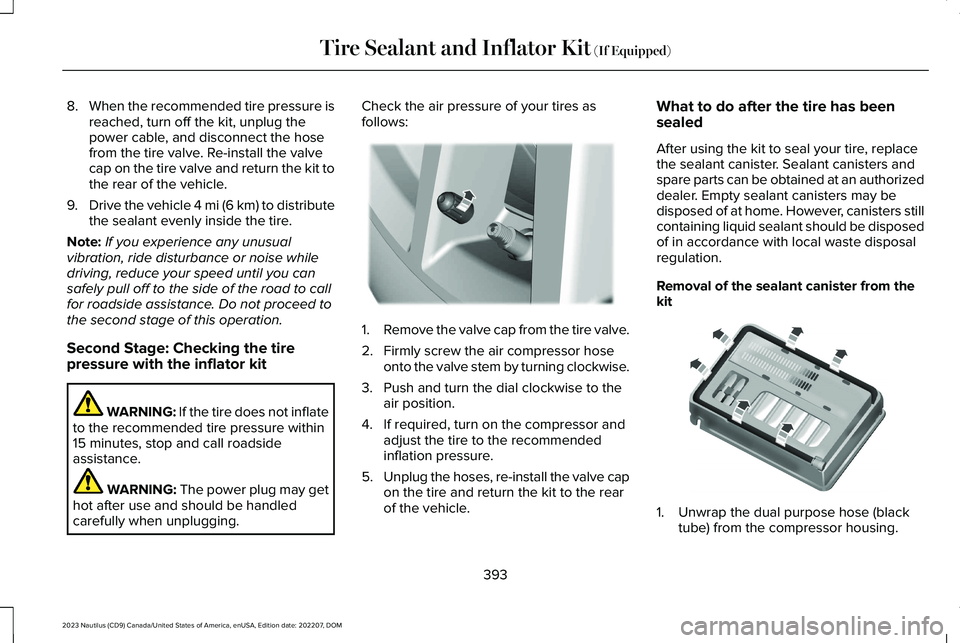
Check the air pressure of your tires asfollows:
1.Remove the valve cap from the tire valve.
2.Firmly screw the air compressor hoseonto the valve stem by turning clockwise.
3.Push and turn the dial clockwise to theair position.
4.If required, turn on the compressor andadjust the tire to the recommendedinflation pressure.
5.Unplug the hoses, re-install the valve capon the tire and return the kit to the rearof the vehicle.
What to do after the tire has beensealed
After using the kit to seal your tire, replacethe sealant canister. Sealant canisters andspare parts can be obtained at an authorizeddealer. Empty sealant canisters may bedisposed of at home. However, canisters stillcontaining liquid sealant should be disposedof in accordance with local waste disposalregulation.
Removal of the sealant canister from thekit
1.Unwrap the dual purpose hose (blacktube) from the compressor housing.
393
2023 Nautilus (CD9) Canada/United States of America, enUSA, Edition date: 202207, DOMTire Sealant and Inflator Kit (If Equipped)E175983 E175984
Page 407 of 606
WARNING: To help prevent yourvehicle from moving when changing awheel, shift the transmission into park (P),set the parking brake and use anappropriate block or wheel chock tosecure the wheel diagonally opposite tothe wheel being changed. For example,when changing the front left wheel, placean appropriate block or wheel chock onthe right rear wheel.
WARNING: Never place anythingbetween the vehicle jack and your vehicle.
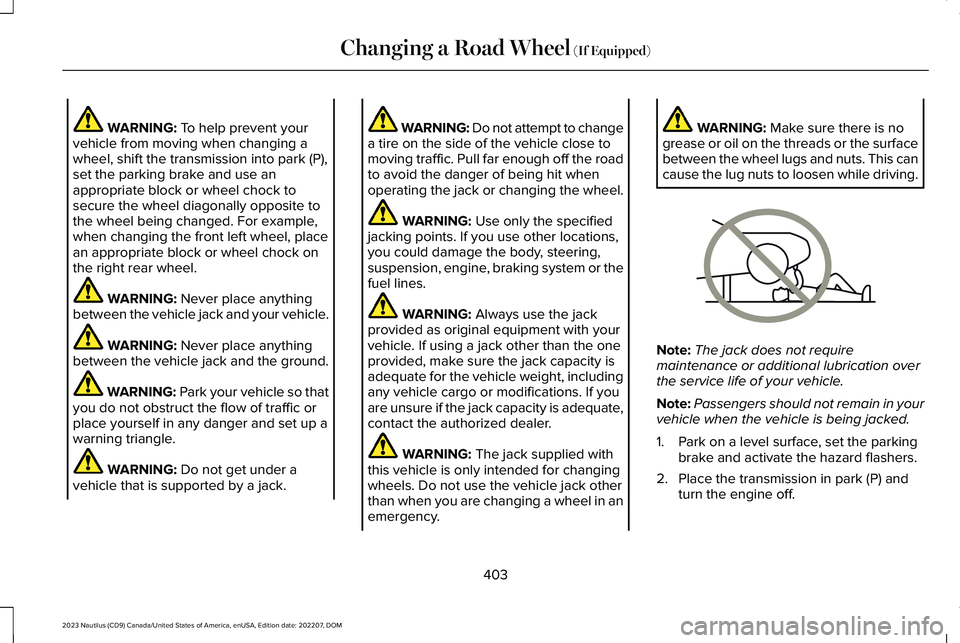
WARNING: Never place anythingbetween the vehicle jack and the ground.
WARNING: Park your vehicle so thatyou do not obstruct the flow of traffic orplace yourself in any danger and set up awarning triangle.
WARNING: Do not get under avehicle that is supported by a jack.
WARNING: Do not attempt to changea tire on the side of the vehicle close tomoving traffic. Pull far enough off the roadto avoid the danger of being hit whenoperating the jack or changing the wheel.
WARNING: Use only the specifiedjacking points. If you use other locations,you could damage the body, steering,suspension, engine, braking system or thefuel lines.
WARNING: Always use the jackprovided as original equipment with yourvehicle. If using a jack other than the oneprovided, make sure the jack capacity isadequate for the vehicle weight, includingany vehicle cargo or modifications. If youare unsure if the jack capacity is adequate,contact the authorized dealer.
WARNING: The jack supplied withthis vehicle is only intended for changingwheels. Do not use the vehicle jack otherthan when you are changing a wheel in anemergency.
WARNING: Make sure there is nogrease or oil on the threads or the surfacebetween the wheel lugs and nuts. This cancause the lug nuts to loosen while driving.
Note:The jack does not requiremaintenance or additional lubrication overthe service life of your vehicle.
Note:Passengers should not remain in yourvehicle when the vehicle is being jacked.
1.Park on a level surface, set the parkingbrake and activate the hazard flashers.
2.Place the transmission in park (P) andturn the engine off.
403
2023 Nautilus (CD9) Canada/United States of America, enUSA, Edition date: 202207, DOMChanging a Road Wheel (If Equipped)E166722
Page 408 of 606
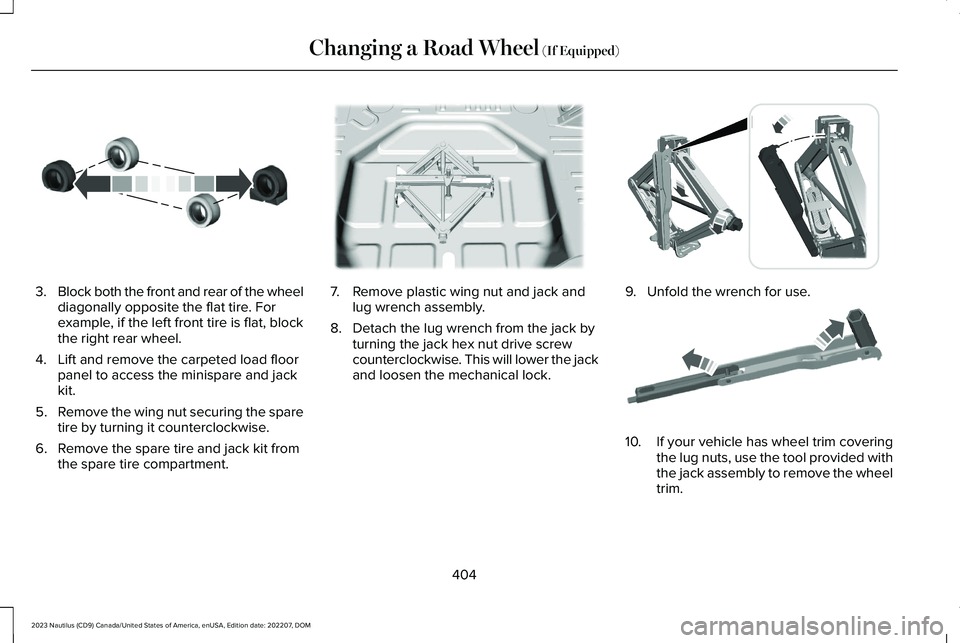
3.Block both the front and rear of the wheeldiagonally opposite the flat tire. Forexample, if the left front tire is flat, blockthe right rear wheel.
4.Lift and remove the carpeted load floorpanel to access the minispare and jackkit.
5.Remove the wing nut securing the sparetire by turning it counterclockwise.
6.Remove the spare tire and jack kit fromthe spare tire compartment.
7.Remove plastic wing nut and jack andlug wrench assembly.
8.Detach the lug wrench from the jack byturning the jack hex nut drive screwcounterclockwise. This will lower the jackand loosen the mechanical lock.
9.Unfold the wrench for use.
10.If your vehicle has wheel trim coveringthe lug nuts, use the tool provided withthe jack assembly to remove the wheeltrim.
404
2023 Nautilus (CD9) Canada/United States of America, enUSA, Edition date: 202207, DOMChanging a Road Wheel (If Equipped)E175447 E178186 E294117 E181744
Page 409 of 606
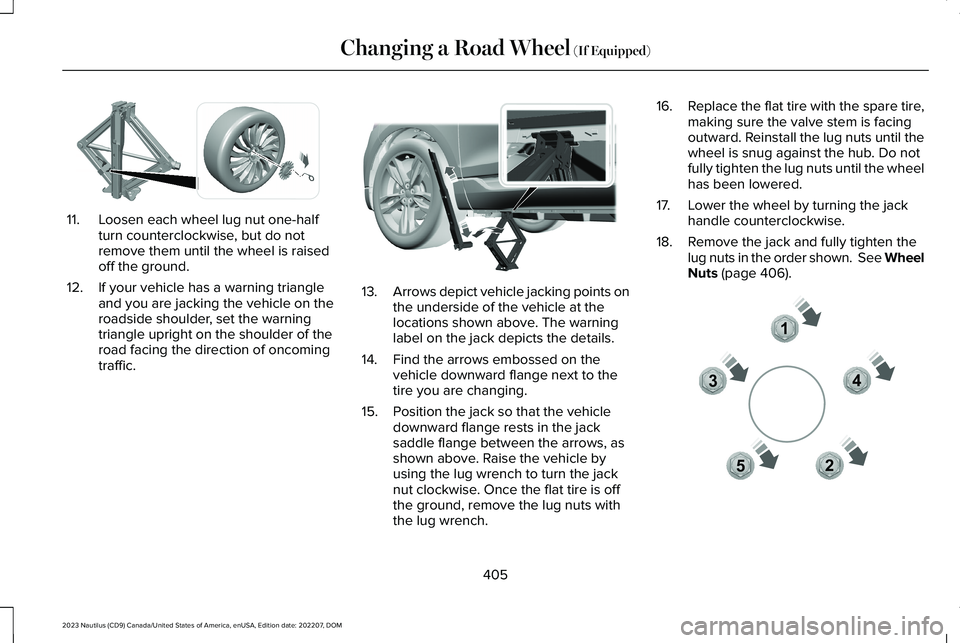
11.Loosen each wheel lug nut one-halfturn counterclockwise, but do notremove them until the wheel is raisedoff the ground.
12.If your vehicle has a warning triangleand you are jacking the vehicle on theroadside shoulder, set the warningtriangle upright on the shoulder of theroad facing the direction of oncomingtraffic.
13.Arrows depict vehicle jacking points onthe underside of the vehicle at thelocations shown above. The warninglabel on the jack depicts the details.
14.Find the arrows embossed on thevehicle downward flange next to thetire you are changing.
15.Position the jack so that the vehicledownward flange rests in the jacksaddle flange between the arrows, asshown above. Raise the vehicle byusing the lug wrench to turn the jacknut clockwise. Once the flat tire is offthe ground, remove the lug nuts withthe lug wrench.
16.Replace the flat tire with the spare tire,making sure the valve stem is facingoutward. Reinstall the lug nuts until thewheel is snug against the hub. Do notfully tighten the lug nuts until the wheelhas been lowered.
17.Lower the wheel by turning the jackhandle counterclockwise.
18.Remove the jack and fully tighten thelug nuts in the order shown. See WheelNuts (page 406).
405
2023 Nautilus (CD9) Canada/United States of America, enUSA, Edition date: 202207, DOMChanging a Road Wheel (If Equipped)E294584 E336095 12345E306781
Page 410 of 606
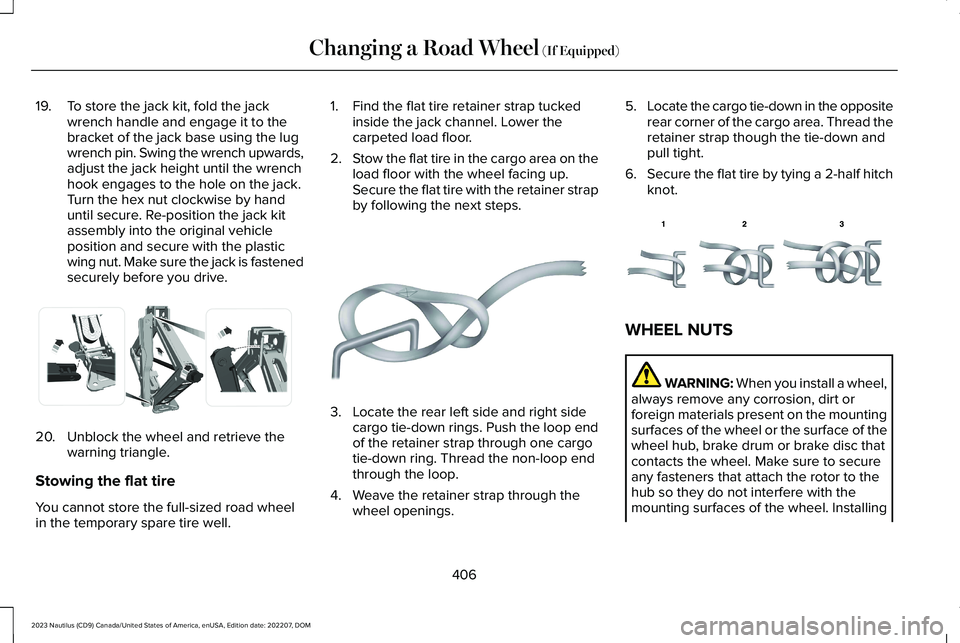
19.To store the jack kit, fold the jackwrench handle and engage it to thebracket of the jack base using the lugwrench pin. Swing the wrench upwards,adjust the jack height until the wrenchhook engages to the hole on the jack.Turn the hex nut clockwise by handuntil secure. Re-position the jack kitassembly into the original vehicleposition and secure with the plasticwing nut. Make sure the jack is fastenedsecurely before you drive.
20.Unblock the wheel and retrieve thewarning triangle.
Stowing the flat tire
You cannot store the full-sized road wheelin the temporary spare tire well.
1.Find the flat tire retainer strap tuckedinside the jack channel. Lower thecarpeted load floor.
2.Stow the flat tire in the cargo area on theload floor with the wheel facing up.Secure the flat tire with the retainer strapby following the next steps.
3.Locate the rear left side and right sidecargo tie-down rings. Push the loop endof the retainer strap through one cargotie-down ring. Thread the non-loop endthrough the loop.
4.Weave the retainer strap through thewheel openings.
5.Locate the cargo tie-down in the oppositerear corner of the cargo area. Thread theretainer strap though the tie-down andpull tight.
6.Secure the flat tire by tying a 2-half hitchknot.
WHEEL NUTS
WARNING: When you install a wheel,always remove any corrosion, dirt orforeign materials present on the mountingsurfaces of the wheel or the surface of thewheel hub, brake drum or brake disc thatcontacts the wheel. Make sure to secureany fasteners that attach the rotor to thehub so they do not interfere with themounting surfaces of the wheel. Installing
406
2023 Nautilus (CD9) Canada/United States of America, enUSA, Edition date: 202207, DOMChanging a Road Wheel (If Equipped)E294121 E142906 E143746
Page 439 of 606
3.Press Tone Settings.
4.Press the arrows or slider bar to adjustthe settings.
Speed Compensated Volume
1.Press Settings on the touchscreen.
2.Press Sound Settings.
3.Press Speed Compensated Volume.
4.Press a setting.
Occupancy Mode (If Equipped)
1.Press Settings on the touchscreen.
2.Press Sound Settings.
3.Press Occupancy Mode.
4.Press a setting.
Sound Mode (If Equipped)
1.Press Settings on the touchscreen.
2.Press Sound Settings.
3.Press Sound Mode.
4.Press a setting.
SETTING THE CLOCK AND DATE
1.Press Settings on the touchscreen.
2.Press Clock Settings.
3.Set the time.
Note:The AM and PM options are notavailable if 24-hour mode is on.
Switching Automatic Time Updates Onand Off
1.Press Settings on the touchscreen.
2.Press Clock Settings.
3.Switch Auto Time Update on or off.
AM/FM RADIO
AM/FM RADIO LIMITATIONS
The further you travel from an AM or FMstation, the weaker the signal and the weakerthe reception.
Hills, mountains, tall buildings, bridges,tunnels, freeway overpasses, parkinggarages, dense tree foliage andthunderstorms can interfere with thereception.
When you pass a ground-based broadcastrepeating tower, a stronger signal mayovertake a weaker one and result in theaudio system muting.
435
2023 Nautilus (CD9) Canada/United States of America, enUSA, Edition date: 202207, DOMAudio System
Page 460 of 606
HOW DO PERSONAL PROFILES
WORK
This feature allows you to create multiplepersonal profiles enabling users topersonalize vehicle’s settings such as seatsand mirrors, as well as non-positional settingslike radio, navigation, driver assist systemsettings. Positional settings are saved byholding a memory seat button.Non-positional settings are saved youchange a setting while a profile is active. Youcan create one profile for each presetmemory seat button along with a guestprofile.
Recalling and Changing a Profile
You can recall a profile using thetouchscreen or the preset button youselected when you created your profile. Youcan also link a remote control and a mobiledevice to your profile, which are used torecall it.
ENABLING OR DISABLING
PERSONAL PROFILES
When you switch on the Personal Profilesfeature:
•Unlocking a door with a remote controlor mobile device that is not linked to adriver profile does not change the activeprofile, but remains in the last knownprofile. It does not change the positionalsettings.
•Pressing a memory seat button that isnot linked to a driver profile or saved toa preset setting does not change theactive profile, but remains in the lastknown profile. It does not change thepositional settings.
•Pressing a memory seat button that isnot linked to a driver profile but is savedto a preset setting does not change theactive profile, but remains in the lastknown profile. It recalls the positionalsettings that you saved to that memoryseat button.
When you switch off a Personal Profilesfeature:
•Unlocking a door with a remote controlor mobile device does not recall anynon-positional settings but still recallspositional settings from the driver profilewhich the remote control or mobiledevice is linked to.
•Pressing a memory seat button that isnot linked to a driver profile or saved toa preset setting does not change thepositional or non-positional settings.
•Pressing a memory seat button that islinked to a driver profile or has saved toa preset setting recalls the positionalsettings that you saved to that memoryseat button.
CREATING A PERSONAL PROFILE
Use the touchscreen to create a personalprofile.
1.Switch the vehicle on and leave thevehicle in park (P).
2.Select the Personal Profiles button underSettings.
456
2023 Nautilus (CD9) Canada/United States of America, enUSA, Edition date: 202207, DOMPersonal Profiles
Page 465 of 606
Lincoln Enhance Software Updates VideoLink
This introduces new features and providesupdates to the vehicle's software systems.Make sure to switch Automatic Updates on,set a recurring update schedule and connectyour vehicle to Wi-Fi. Updates could takelonger when not connected to Wi-Fi or couldnot download at all. See Connecting theVehicle to a Wi-Fi Network (page 427).
Your vehicle may be able to receive drivablesoftware updates, non-drivable softwareupdates or both. Drivable software updateshappen during normal vehicle usage andrequire limited input from you. You arenotified on your touchscreen and connecteddevice prior to a non-drivable update.
Most updates complete in less than 30minutes, although some updates could takeup to a few hours. Check your touchscreenor connected device for the most accurateestimated update time.
You are notified of the status of the vehiclesoftware update in the touchscreen and onyour connected device. See SoftwareUpdate Indicators (page 462).
Vehicle Software Update Requirements
Non-drivable software updates do not installif any of the following occur:
•Your vehicle is running.
•Your vehicle is switched on.
•Your vehicle is not parked.
•The 12 V battery charge is too low.
•The hazard indicators are switched on.
•The alarm is sounding.
•The doors are open.
•The parking lamps are switched on.
•You are pressing the brake pedal.
•An emergency call is in process.
•Your vehicle is in limp home mode.
Vehicle Software Update Limitations
Once you begin a non-drivable softwareupdate, you cannot:
•Cancel the update.
•Lock, unlock or enter your vehicle unlessyou have a key blade.
•You can open the doors using themechanical latch if child locks are noton.
•Drive your vehicle.
•Start your vehicle.
•Use the remote control to lock, unlock orstart your vehicle.
•Use the alarm, central locks or doortones.
•Use the electronic door locks.
•Charge your vehicle.
•Charging resumes once the updatecompletes.
SOFTWARE UPDATE SETTINGS
To access the Software Updates menu:
461
2023 Nautilus (CD9) Canada/United States of America, enUSA, Edition date: 202207, DOMVehicle Software Updates
Page 471 of 606
WHAT IS LINCOLN PROTECT
Protect yourself from the rising cost ofvehicle repairs with the Lincoln Protectextended service plan.
Lincoln Protect Extended Service Plans(United States Only)
Lincoln Protect means peace of mind. It isthe extended service plan backed by Lincoln,and provides more protection beyond theNew Vehicle Limited Warranty coverage.When you visit your Lincoln Dealer, insist ongenuine Lincoln Protect extended serviceplans.
Lincoln Protect Extended Service Plan CanQuickly Pay for Itself
One trip to the Service Center could easilyexceed the price of your Lincoln Protectextended service plan. With Lincoln Protect,you minimize your risk for unexpected repairbills and rising repair costs.
Up to 1000+ Covered Vehicle Components
There are four mechanical Lincoln Protectextended service plans with different levelsof coverage. Ask your authorized dealer fordetails.
1.PremiumCARE - Our most comprehensivecoverage. With over 1,000 coveredcomponents, this plan is so complete itis probably easier to list what is notcovered.
2.ExtraCARE - Covers 113 components, andincludes many high-tech items.
3.BaseCARE - Covers 84 components.
4.PowertrainCARE - Covers 29 criticalcomponents.
Lincoln Protect extended service plans arehonored by all authorized Lincoln dealers inthe United States, Canada and Mexico.
That means you get:
•Reliable, quality service at any Lincoln orFord dealership.
•Repairs performed by factory trainedtechnicians, using genuine parts.
Rental Car Reimbursement
First Day Rental Benefit
If you bring your car into your dealer forservice, we will give you a rental vehicle touse for the day.
Extended Rental Benefits
If your vehicle is kept overnight for coveredrepairs, you are eligible for rental carcoverage, including bumper to bumperwarranty repairs, and field service actions.
Roadside Assistance
Exclusive 24/7 roadside assistance, including:
•Towing, flat-tire change and battery jumpstarts.
•Out of fuel and lock-out assistance.
•Travel expense reimbursement forlodging, meals and rental car.
•Assistance for taxi, shuttle, rental carcoverage and other transportation.
467
2023 Nautilus (CD9) Canada/United States of America, enUSA, Edition date: 202207, DOMLincoln Protect