lock LINCOLN NAUTILUS 2023 Owners Manual
[x] Cancel search | Manufacturer: LINCOLN, Model Year: 2023, Model line: NAUTILUS, Model: LINCOLN NAUTILUS 2023Pages: 606, PDF Size: 13.57 MB
Page 345 of 606
MAINTENANCE PRECAUTIONS
Service your vehicle regularly to helpmaintain its roadworthiness and resale value.There is a large network of authorizeddealers that are there to help you with theirprofessional servicing expertise. We believethat their specially trained technicians arebest qualified to service your vehicle properlyand expertly. They are supported by a widerange of highly specialized tools developedspecifically for servicing your vehicle.
If your vehicle requires professional service,an authorized dealer can provide thenecessary parts and service. Check yourwarranty information to find out which partsand services are covered.
Use only recommended fuels, lubricants,fluids and service parts conforming tospecifications. See Capacities andSpecifications (page 408).
•Do not work on a hot engine.
•Make sure that nothing gets caught inmoving parts.
•Do not work on a vehicle with the enginerunning in an enclosed space, unless youare sure you have enough ventilation.
•Keep all open flames and other burningmaterial, such as cigarettes, away fromthe battery and all fuel related parts.
•Set the parking brake, shift thetransmission to park (P) and block thewheels.
OPENING AND CLOSING THE
HOOD
Opening the Hood
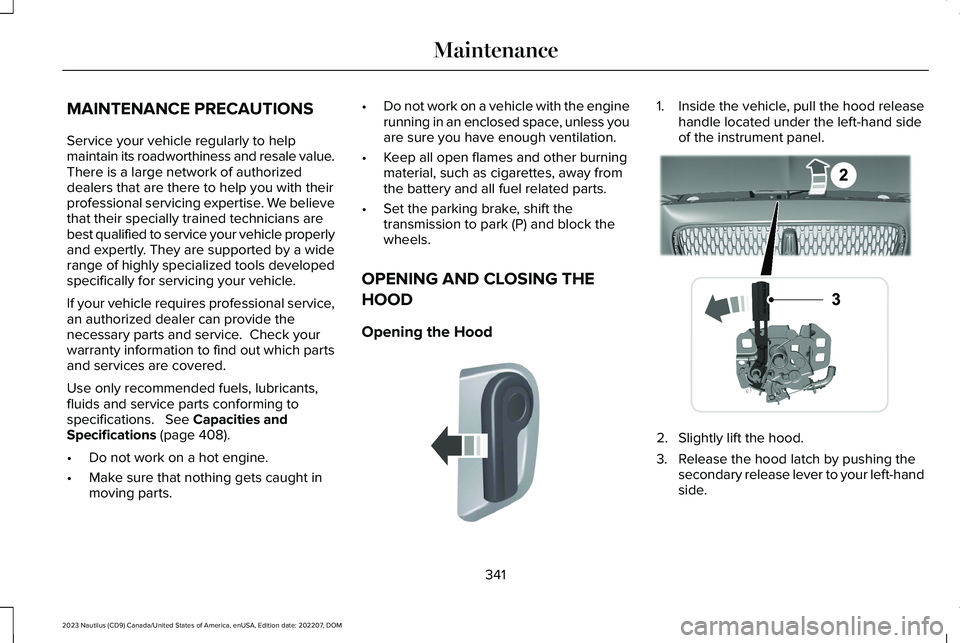
1.Inside the vehicle, pull the hood releasehandle located under the left-hand sideof the instrument panel.
2.Slightly lift the hood.
3.Release the hood latch by pushing thesecondary release lever to your left-handside.
341
2023 Nautilus (CD9) Canada/United States of America, enUSA, Edition date: 202207, DOMMaintenanceE142457 E267365
Page 352 of 606
Note:Increases in oil level can occur fromfrequent short trips that do not allow theengine to get to operating temperature, aswell as frequent idling or low speed drivingfor long periods of time.
Note:If oil levels are continuously notedabove the maximum mark, schedule a visitto your authorized dealer.
ADDING ENGINE OIL
WARNING: Do not remove the fillercap when the engine is running.
WARNING: Do not add engine oilwhen the engine is hot. Failure to followthis instruction could result in personalinjury.
Do not use supplemental engine oil additivesbecause they are unnecessary and couldlead to engine damage that the vehiclewarranty may not cover.
1.Clean the area surrounding the engineoil filler cap before you remove it.
2.Remove the engine oil filler cap.
3.Add engine oil that meets ourspecifications. See Capacities andSpecifications (page 408).
4.Reinstall the engine oil filler cap. Turn itclockwise until you feel a strongresistance.
Note: Do not add oil further than themaximum mark. Oil levels above themaximum mark may cause engine damage.
Note:Immediately soak up any oil spillagewith an absorbent cloth.
RESETTING THE INTELLIGENT OIL LIFEMONITOR
Use the information display controls on thesteering wheel to reset the oil changeindicator.
From the main menu scroll to:
Action and descriptionMessage
Press the right arrow button,then from this menu scroll tothe following message.
Settings
Press the right arrow button,then from this menu scroll tothe following message.
Vehicle
Press the right arrow button,then from this menu scroll tothe following message.
Oil Life
Press and hold the OK buttonuntil the instrument clusterdisplays the followingmessage.
Hold OK toReset
Reset Successful
When the oil change indicatorresets the instrument clusterdisplays 100%.
Remaining Life
{00}%
348
2023 Nautilus (CD9) Canada/United States of America, enUSA, Edition date: 202207, DOMMaintenance
Page 354 of 606
WARNING: Do not allow the fluid totouch your skin or eyes. If this happens,rinse the affected areas immediately withplenty of water and contact your physician.
Note: Do not use stop leak pellets, coolingsystem sealants, or non-specified additivesas they can cause damage to the enginecooling or heating systems. Resultingcomponent damage may not be covered bythe vehicle Warranty.
Note:Automotive fluids are notinterchangeable.
It is very important to use prediluted coolantapproved to the correct specification in orderto avoid plugging the small passageways inthe engine cooling system. See Capacitiesand Specifications (page 408). Do not mixdifferent colors or types of coolant in yourvehicle. Mixing of engine coolants or usingan incorrect coolant may harm the engine orcooling system components and could voidthe vehicle Warranty.
Note:If prediluted coolant is not available,use the approved concentrated coolantdiluting it to 50/50 with deionized or distilledwater. See Capacities and Specifications(page 408). Using water that has not beendeionized may contribute to depositformation, corrosion and plugging of thesmall cooling system passageways.
To top up the coolant level do the following:
1.Unscrew the cap slowly. Any pressureescapes as you unscrew the cap.
2.Add enough prediluted coolant to reachthe correct level.
Note:We do not recommend the use ofrecycled coolant.
3.Replace the coolant reservoir cap. Turnthe cap clockwise until it contacts thehard stop.
4.Check the coolant level in the coolantreservoir the next few times you driveyour vehicle. If necessary, repeat step 2.
If you have to add more than 1.1 qt (1 L) ofengine coolant per month, have your vehiclechecked as soon as possible. Operating anengine with a low level of coolant can resultin engine overheating and possible enginedamage.
In case of emergency, you can add a largeamount of water without engine coolant inorder to reach a vehicle service location.Service your vehicle as soon as possible.
Water alone, without engine coolant, cancause engine damage from corrosion,overheating or freezing.
Do not use the following as a coolantsubstitute, as they can cause engine damagefrom overheating or freezing:
•Alcohol.
•Methanol.
•Brine.
•Any coolant mixed with alcohol ormethanol antifreeze.
Do not add extra inhibitors or additives tothe coolant. These can be harmful andcompromise the corrosion protection of thecoolant.
350
2023 Nautilus (CD9) Canada/United States of America, enUSA, Edition date: 202207, DOMMaintenance
Page 361 of 606
If you disconnect or replace the battery andyour vehicle has an automatic transmission,it must relearn its adaptive strategy. Becauseof this, the transmission may shift firmly whenfirst driven. This is normal operation whilethe transmission fully updates its operationto optimum shift feel.
Remove and Reinstall the Battery
To disconnect or remove the battery, do thefollowing:
1.Apply the parking brake and switch theignition off.
2.Switch all electrical equipment off, forexample lights and radio.
3.Wait a minimum of two minutes beforedisconnecting the battery.
Note:The engine management system hasa power hold function and remains poweredfor a period of time after you switch theignition off. This is to allow diagnostic andadaptive tables to be stored. Disconnectingthe battery without waiting can causedamage not covered by the vehicleWarranty.
4.Disconnect the negative battery cableterminal.
5.Disconnect the positive battery cableterminal.
6.Remove the battery securing clamp.
7.Remove the battery.
8.To install, reverse the removal procedure.
Note:Before reconnecting the battery, makesure the ignition remains switched off.
Note:Make sure the battery cable terminalsare fully tightened.
Note:After cleaning or replacing the battery,make sure you reinstall the battery cover orshield.
If you disconnect or replace the vehiclebattery, you must reset the followingfeatures:
•Window bounce-back. See Windows(page 131).
•Clock Settings.
•Pre-set radio stations.
•Steering Angle Sensor.
Note:To calibrate the steering angle sensor,drive the vehicle above 30 mph (50 km/h)for a minimum of 1.2 mi (2 km). Make sure todrive straight ahead for a minimum of 30seconds. Several vehicle functions aredisabled and a warning light could appearuntil the sensor is calibrated.
Note:The battery sensor must be reset whena new battery is installed. Install only abattery approved by Ford for use in thevehicle. Use the following procedure toperform the battery sensor reset:
1.1. Turn ignition to on and leave engineoff. Steps 2 and 3 must be completedwithin 10 seconds.
2.2. Flash the high beams 5 times, endingwith the high beams off.
3.3. Press and release the brake pedal 3times.
The battery warning light on the cluster willflash 3 times to confirm that the reset wassuccessful.
357
2023 Nautilus (CD9) Canada/United States of America, enUSA, Edition date: 202207, DOMMaintenance
Page 362 of 606
Battery Management System
The battery management system monitorsbattery conditions and takes actions toextend battery life. If excessive battery drainis detected, the system temporarily disablessome of the following features:
•Heated rear window.
•Heated seats.
•Climate control.
•Heated steering wheel.
•Audio unit.
•Navigation system.
A message may appear in the informationdisplay to alert you that battery protectionactions are active.
After battery replacement, or in some casesafter charging the battery with an externalcharger, the battery management systemrequires eight hours of vehicle sleep time torelearn the battery state of charge. Duringthis time your vehicle must remain fullylocked with the ignition off.
Note:If you add electrical accessories orcomponents to the vehicle, it may adverselyaffect battery performance and durability.This may also affect the performance ofother electrical systems in the vehicle.
Battery Disposal
Make sure that you dispose of oldbatteries in an environmentallyfriendly way. Seek advice fromyour local authority about recycling oldbatteries.
ADJUSTING THE HEADLAMPS
Vertical Aim Adjustment
The headlamps on your vehicle are properlyaimed at the assembly plant. If your vehiclehas been involved in a crash, have the aimof the headlamp beam checked by anauthorized dealer.
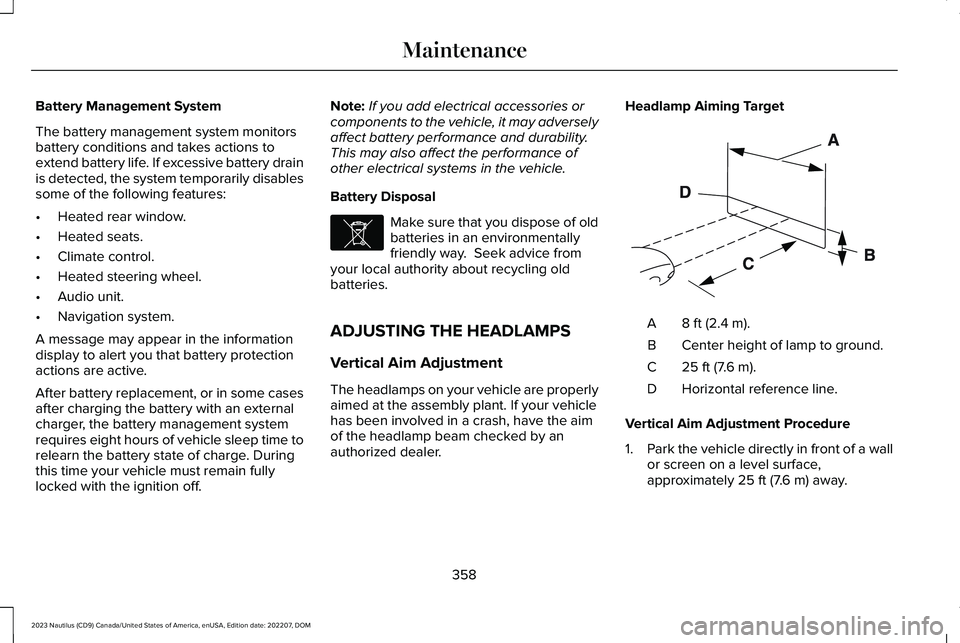
Headlamp Aiming Target
8 ft (2.4 m).A
Center height of lamp to ground.B
25 ft (7.6 m).C
Horizontal reference line.D
Vertical Aim Adjustment Procedure
1.Park the vehicle directly in front of a wallor screen on a level surface,approximately 25 ft (7.6 m) away.
358
2023 Nautilus (CD9) Canada/United States of America, enUSA, Edition date: 202207, DOMMaintenanceE107998 E142592
Page 363 of 606
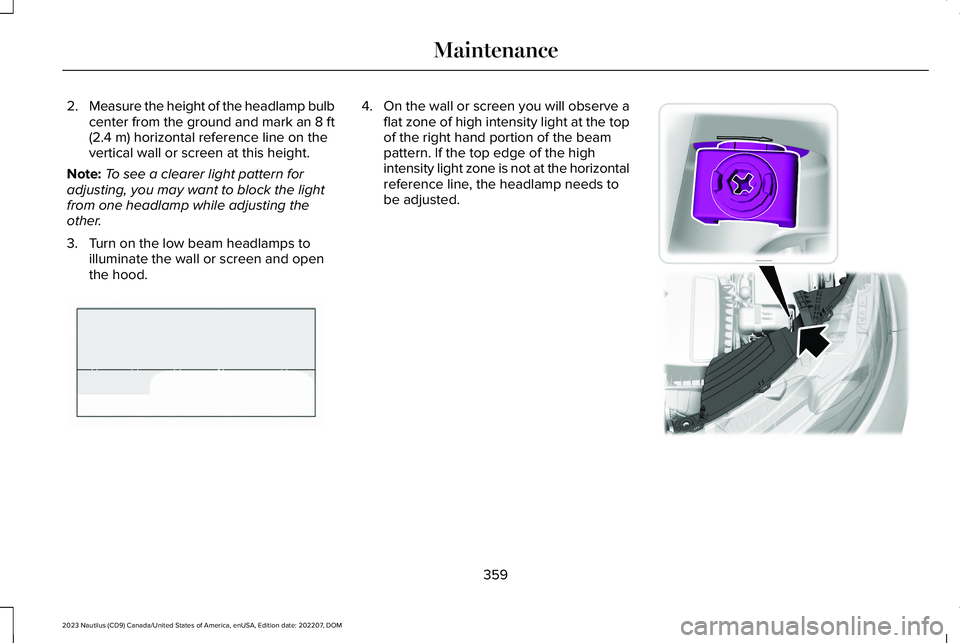
2.Measure the height of the headlamp bulbcenter from the ground and mark an 8 ft(2.4 m) horizontal reference line on thevertical wall or screen at this height.
Note:To see a clearer light pattern foradjusting, you may want to block the lightfrom one headlamp while adjusting theother.
3.Turn on the low beam headlamps toilluminate the wall or screen and openthe hood.
4.On the wall or screen you will observe aflat zone of high intensity light at the topof the right hand portion of the beampattern. If the top edge of the highintensity light zone is not at the horizontalreference line, the headlamp needs tobe adjusted.
359
2023 Nautilus (CD9) Canada/United States of America, enUSA, Edition date: 202207, DOMMaintenanceE142465 E194757
Page 364 of 606
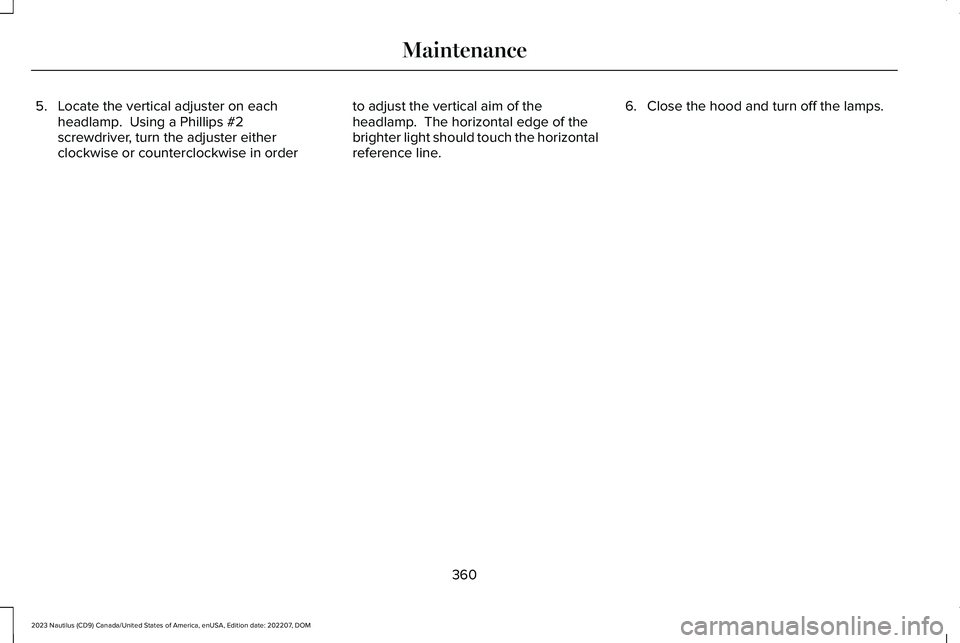
5.Locate the vertical adjuster on eachheadlamp. Using a Phillips #2screwdriver, turn the adjuster eitherclockwise or counterclockwise in order
to adjust the vertical aim of theheadlamp. The horizontal edge of thebrighter light should touch the horizontalreference line.
6.Close the hood and turn off the lamps.
360
2023 Nautilus (CD9) Canada/United States of America, enUSA, Edition date: 202207, DOMMaintenance
Page 367 of 606
REMOVING A HEADLAMP ASSEMBLY
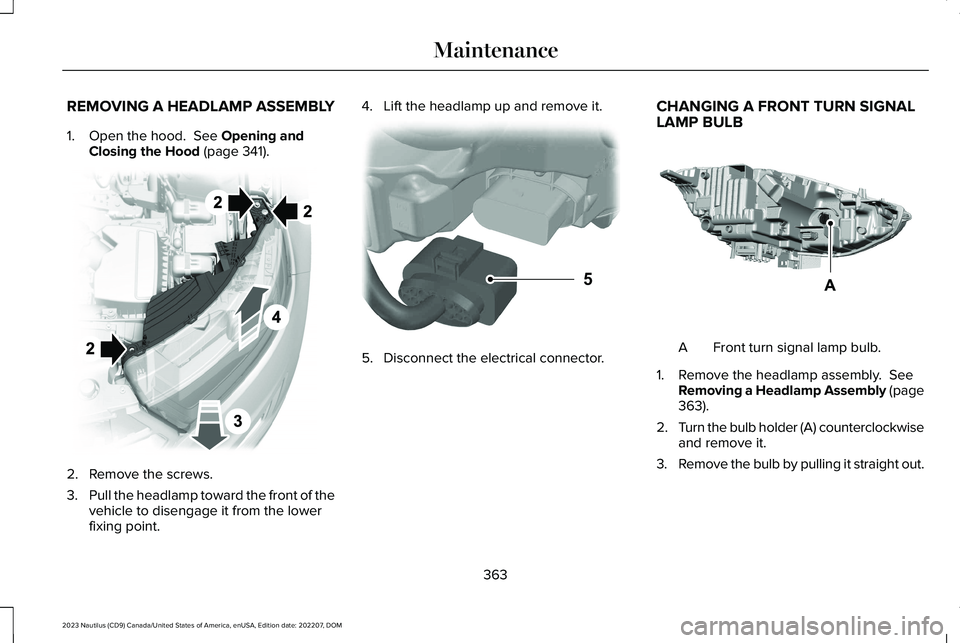
1.Open the hood. See Opening andClosing the Hood (page 341).
2.Remove the screws.
3.Pull the headlamp toward the front of thevehicle to disengage it from the lowerfixing point.
4.Lift the headlamp up and remove it.
5.Disconnect the electrical connector.
CHANGING A FRONT TURN SIGNALLAMP BULB
Front turn signal lamp bulb.A
1.Remove the headlamp assembly. SeeRemoving a Headlamp Assembly (page363).
2.Turn the bulb holder (A) counterclockwiseand remove it.
3.Remove the bulb by pulling it straight out.
363
2023 Nautilus (CD9) Canada/United States of America, enUSA, Edition date: 202207, DOMMaintenance E194758 5E133750 E387424
Page 368 of 606
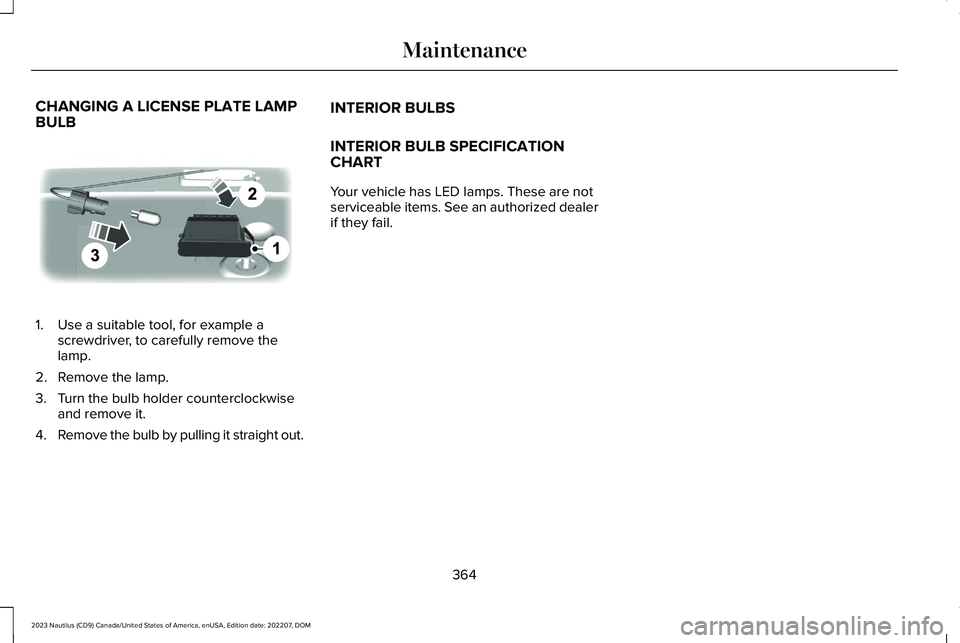
CHANGING A LICENSE PLATE LAMPBULB
1.Use a suitable tool, for example ascrewdriver, to carefully remove thelamp.
2.Remove the lamp.
3.Turn the bulb holder counterclockwiseand remove it.
4.Remove the bulb by pulling it straight out.
INTERIOR BULBS
INTERIOR BULB SPECIFICATIONCHART
Your vehicle has LED lamps. These are notserviceable items. See an authorized dealerif they fail.
364
2023 Nautilus (CD9) Canada/United States of America, enUSA, Edition date: 202207, DOMMaintenance E72789
Page 395 of 606
What to do when a tire is punctured
A tire puncture within the tire's tread areacan be repaired in two stages with the kit.
•In the first stage, the tire is reinflated witha sealing compound and air. After the tirehas been inflated, drive the vehicle ashort distance approximately 4 mi (6 km)to distribute the sealant in the tire.
•In the second stage, check the tirepressure and adjust, if necessary, to thevehicle's specified tire inflation pressure.
First Stage: Reinflating the Tire withsealing compound and air
WARNING: Do not stand directly overthe kit while inflating the tire. If you noticeany unusual bulges or deformations in thetire's sidewall during inflation, stop and callroadside assistance.
WARNING: If the tire does not inflateto the recommended tire pressure within15 minutes, stop and call roadsideassistance.
Park the vehicle in a safe, level and securearea, away from moving traffic.
Turn the hazard lights on. Apply the parkingbrake and power off the vehicle. Inspect theflat tire for visible damage.
If a puncture is located in the tire sidewall,stop and call roadside assistance.
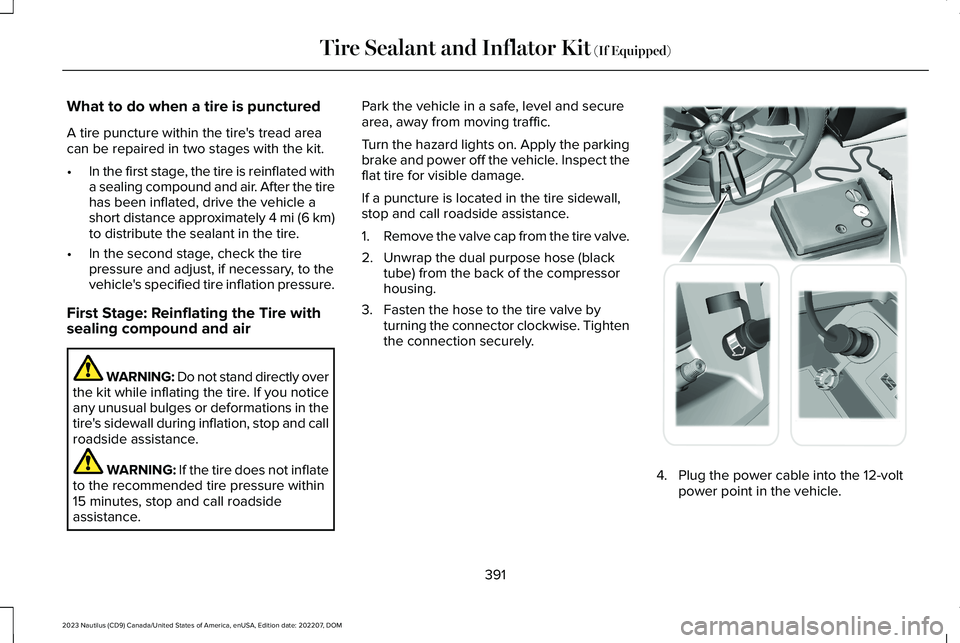
1.Remove the valve cap from the tire valve.
2.Unwrap the dual purpose hose (blacktube) from the back of the compressorhousing.
3.Fasten the hose to the tire valve byturning the connector clockwise. Tightenthe connection securely.
4.Plug the power cable into the 12-voltpower point in the vehicle.
391
2023 Nautilus (CD9) Canada/United States of America, enUSA, Edition date: 202207, DOMTire Sealant and Inflator Kit (If Equipped) E175979