ignition LINCOLN NAUTILUS 2023 Workshop Manual
[x] Cancel search | Manufacturer: LINCOLN, Model Year: 2023, Model line: NAUTILUS, Model: LINCOLN NAUTILUS 2023Pages: 606, PDF Size: 13.57 MB
Page 326 of 606
If you need to tow your vehicle, contact aprofessional towing service or your roadsideassistance service provider.
Your manufacturer produces a towingmanual for all authorized tow truck operators.Have your tow truck operator refer to thismanual for proper hook-up and towingprocedures.
We recommend the use of a wheel lift anddollies or flatbed equipment to tow yourvehicle. Vehicle damage could occur if towedincorrectly, or by any other means.
Front-wheel and rear-wheel drive vehiclesmust have their designated drive wheels offthe ground regardless of towing direction.Use tow dollies to prevent damage to thetransmission.
All-wheel or four-wheel drive vehicles requirethat all wheels be off the ground using awheel lift and dollies or flatbed equipment.This prevents damage to the transmissionand drive system.
Note:You need to switch on the ignition tounlock the steering.
Note:Make sure you check the steeringcolumn before towing. It could lock if thebattery is dead.
322
2023 Nautilus (CD9) Canada/United States of America, enUSA, Edition date: 202207, DOMCrash and Breakdown Information
Page 342 of 606
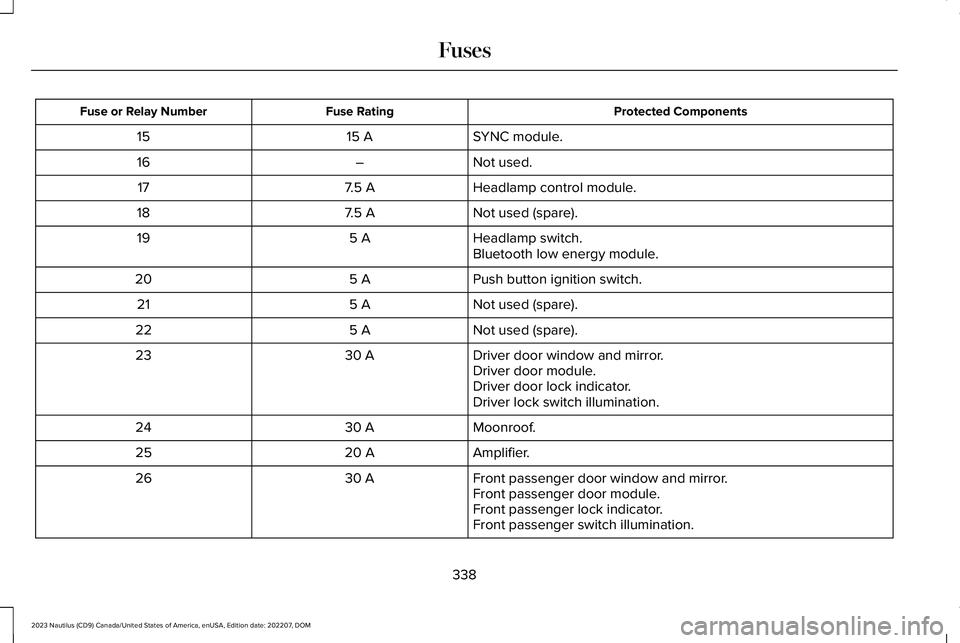
Protected ComponentsFuse RatingFuse or Relay Number
SYNC module.15 A15
Not used.–16
Headlamp control module.7.5 A17
Not used (spare).7.5 A18
Headlamp switch.5 A19Bluetooth low energy module.
Push button ignition switch.5 A20
Not used (spare).5 A21
Not used (spare).5 A22
Driver door window and mirror.30 A23Driver door module.Driver door lock indicator.Driver lock switch illumination.
Moonroof.30 A24
Amplifier.20 A25
Front passenger door window and mirror.30 A26Front passenger door module.Front passenger lock indicator.Front passenger switch illumination.
338
2023 Nautilus (CD9) Canada/United States of America, enUSA, Edition date: 202207, DOMFuses
Page 361 of 606
If you disconnect or replace the battery andyour vehicle has an automatic transmission,it must relearn its adaptive strategy. Becauseof this, the transmission may shift firmly whenfirst driven. This is normal operation whilethe transmission fully updates its operationto optimum shift feel.
Remove and Reinstall the Battery
To disconnect or remove the battery, do thefollowing:
1.Apply the parking brake and switch theignition off.
2.Switch all electrical equipment off, forexample lights and radio.
3.Wait a minimum of two minutes beforedisconnecting the battery.
Note:The engine management system hasa power hold function and remains poweredfor a period of time after you switch theignition off. This is to allow diagnostic andadaptive tables to be stored. Disconnectingthe battery without waiting can causedamage not covered by the vehicleWarranty.
4.Disconnect the negative battery cableterminal.
5.Disconnect the positive battery cableterminal.
6.Remove the battery securing clamp.
7.Remove the battery.
8.To install, reverse the removal procedure.
Note:Before reconnecting the battery, makesure the ignition remains switched off.
Note:Make sure the battery cable terminalsare fully tightened.
Note:After cleaning or replacing the battery,make sure you reinstall the battery cover orshield.
If you disconnect or replace the vehiclebattery, you must reset the followingfeatures:
•Window bounce-back. See Windows(page 131).
•Clock Settings.
•Pre-set radio stations.
•Steering Angle Sensor.
Note:To calibrate the steering angle sensor,drive the vehicle above 30 mph (50 km/h)for a minimum of 1.2 mi (2 km). Make sure todrive straight ahead for a minimum of 30seconds. Several vehicle functions aredisabled and a warning light could appearuntil the sensor is calibrated.
Note:The battery sensor must be reset whena new battery is installed. Install only abattery approved by Ford for use in thevehicle. Use the following procedure toperform the battery sensor reset:
1.1. Turn ignition to on and leave engineoff. Steps 2 and 3 must be completedwithin 10 seconds.
2.2. Flash the high beams 5 times, endingwith the high beams off.
3.3. Press and release the brake pedal 3times.
The battery warning light on the cluster willflash 3 times to confirm that the reset wassuccessful.
357
2023 Nautilus (CD9) Canada/United States of America, enUSA, Edition date: 202207, DOMMaintenance
Page 362 of 606
Battery Management System
The battery management system monitorsbattery conditions and takes actions toextend battery life. If excessive battery drainis detected, the system temporarily disablessome of the following features:
•Heated rear window.
•Heated seats.
•Climate control.
•Heated steering wheel.
•Audio unit.
•Navigation system.
A message may appear in the informationdisplay to alert you that battery protectionactions are active.
After battery replacement, or in some casesafter charging the battery with an externalcharger, the battery management systemrequires eight hours of vehicle sleep time torelearn the battery state of charge. Duringthis time your vehicle must remain fullylocked with the ignition off.
Note:If you add electrical accessories orcomponents to the vehicle, it may adverselyaffect battery performance and durability.This may also affect the performance ofother electrical systems in the vehicle.
Battery Disposal
Make sure that you dispose of oldbatteries in an environmentallyfriendly way. Seek advice fromyour local authority about recycling oldbatteries.
ADJUSTING THE HEADLAMPS
Vertical Aim Adjustment
The headlamps on your vehicle are properlyaimed at the assembly plant. If your vehiclehas been involved in a crash, have the aimof the headlamp beam checked by anauthorized dealer.
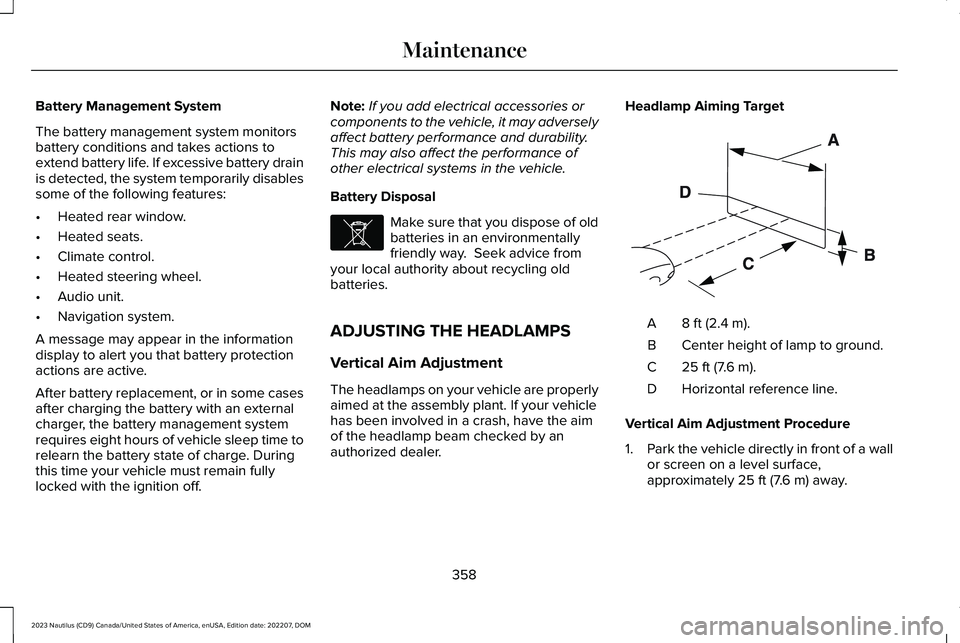
Headlamp Aiming Target
8 ft (2.4 m).A
Center height of lamp to ground.B
25 ft (7.6 m).C
Horizontal reference line.D
Vertical Aim Adjustment Procedure
1.Park the vehicle directly in front of a wallor screen on a level surface,approximately 25 ft (7.6 m) away.
358
2023 Nautilus (CD9) Canada/United States of America, enUSA, Edition date: 202207, DOMMaintenanceE107998 E142592
Page 371 of 606
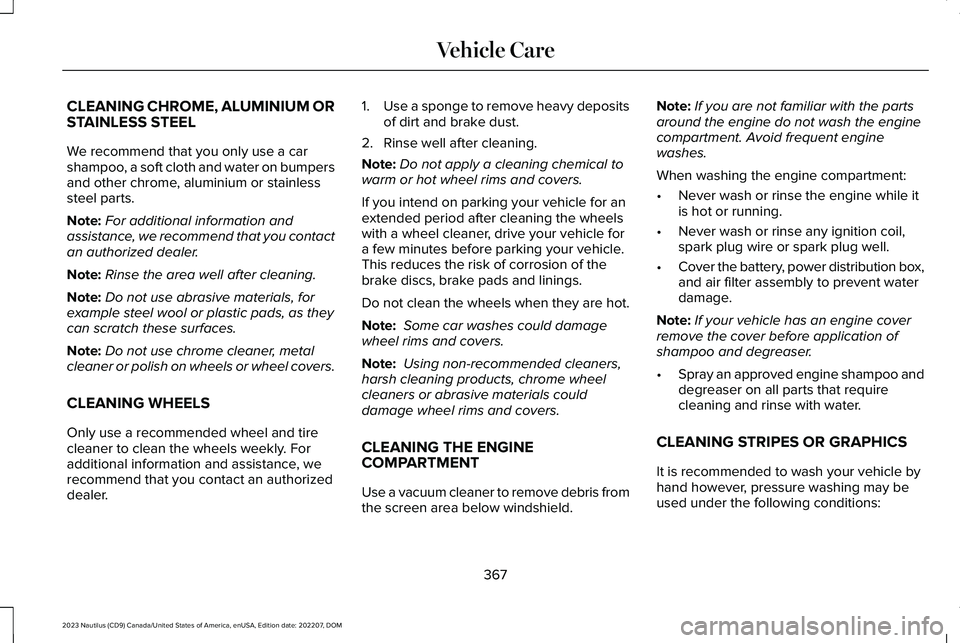
CLEANING CHROME, ALUMINIUM ORSTAINLESS STEEL
We recommend that you only use a carshampoo, a soft cloth and water on bumpersand other chrome, aluminium or stainlesssteel parts.
Note:For additional information andassistance, we recommend that you contactan authorized dealer.
Note:Rinse the area well after cleaning.
Note:Do not use abrasive materials, forexample steel wool or plastic pads, as theycan scratch these surfaces.
Note:Do not use chrome cleaner, metalcleaner or polish on wheels or wheel covers.
CLEANING WHEELS
Only use a recommended wheel and tirecleaner to clean the wheels weekly. Foradditional information and assistance, werecommend that you contact an authorizeddealer.
1.Use a sponge to remove heavy depositsof dirt and brake dust.
2.Rinse well after cleaning.
Note:Do not apply a cleaning chemical towarm or hot wheel rims and covers.
If you intend on parking your vehicle for anextended period after cleaning the wheelswith a wheel cleaner, drive your vehicle fora few minutes before parking your vehicle.This reduces the risk of corrosion of thebrake discs, brake pads and linings.
Do not clean the wheels when they are hot.
Note: Some car washes could damagewheel rims and covers.
Note: Using non-recommended cleaners,harsh cleaning products, chrome wheelcleaners or abrasive materials coulddamage wheel rims and covers.
CLEANING THE ENGINECOMPARTMENT
Use a vacuum cleaner to remove debris fromthe screen area below windshield.
Note:If you are not familiar with the partsaround the engine do not wash the enginecompartment. Avoid frequent enginewashes.
When washing the engine compartment:
•Never wash or rinse the engine while itis hot or running.
•Never wash or rinse any ignition coil,spark plug wire or spark plug well.
•Cover the battery, power distribution box,and air filter assembly to prevent waterdamage.
Note:If your vehicle has an engine coverremove the cover before application ofshampoo and degreaser.
•Spray an approved engine shampoo anddegreaser on all parts that requirecleaning and rinse with water.
CLEANING STRIPES OR GRAPHICS
It is recommended to wash your vehicle byhand however, pressure washing may beused under the following conditions:
367
2023 Nautilus (CD9) Canada/United States of America, enUSA, Edition date: 202207, DOMVehicle Care
Page 412 of 606
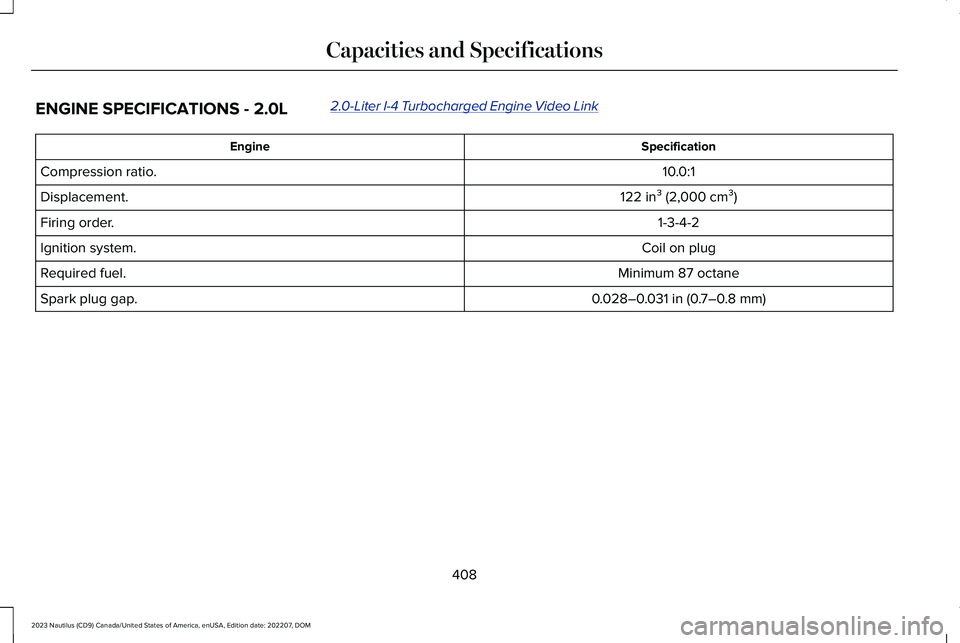
ENGINE SPECIFICATIONS - 2.0L2.0-Liter I-4 Turbocharged Engine Video Link
SpecificationEngine
10.0:1Compression ratio.
122 in³ (2,000 cm³)Displacement.
1-3-4-2Firing order.
Coil on plugIgnition system.
Minimum 87 octaneRequired fuel.
0.028–0.031 in (0.7–0.8 mm)Spark plug gap.
408
2023 Nautilus (CD9) Canada/United States of America, enUSA, Edition date: 202207, DOMCapacities and Specifications
Page 413 of 606
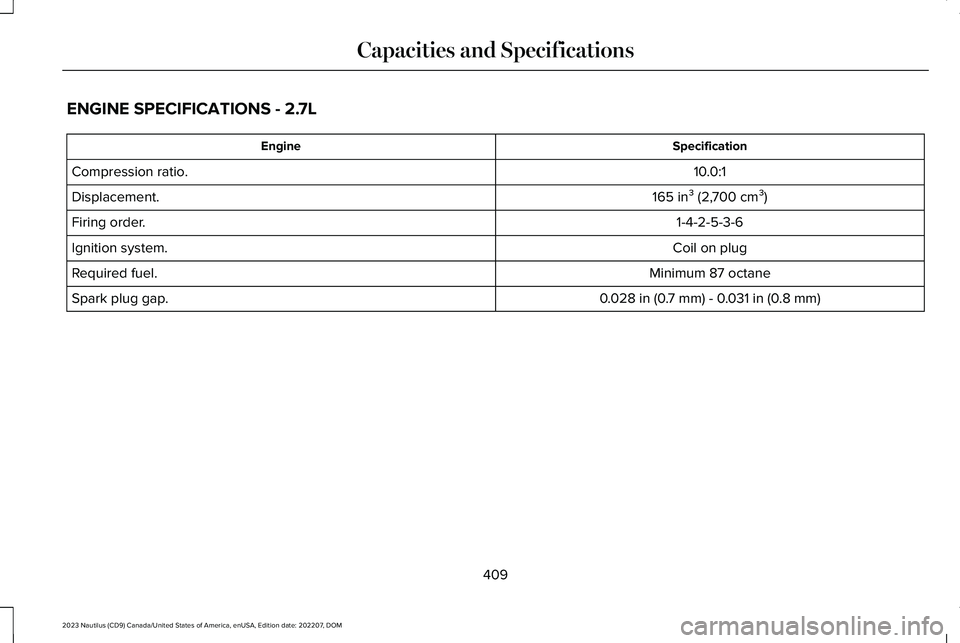
ENGINE SPECIFICATIONS - 2.7L
SpecificationEngine
10.0:1Compression ratio.
165 in³ (2,700 cm³)Displacement.
1-4-2-5-3-6Firing order.
Coil on plugIgnition system.
Minimum 87 octaneRequired fuel.
0.028 in (0.7 mm) - 0.031 in (0.8 mm)Spark plug gap.
409
2023 Nautilus (CD9) Canada/United States of America, enUSA, Edition date: 202207, DOMCapacities and Specifications
Page 578 of 606
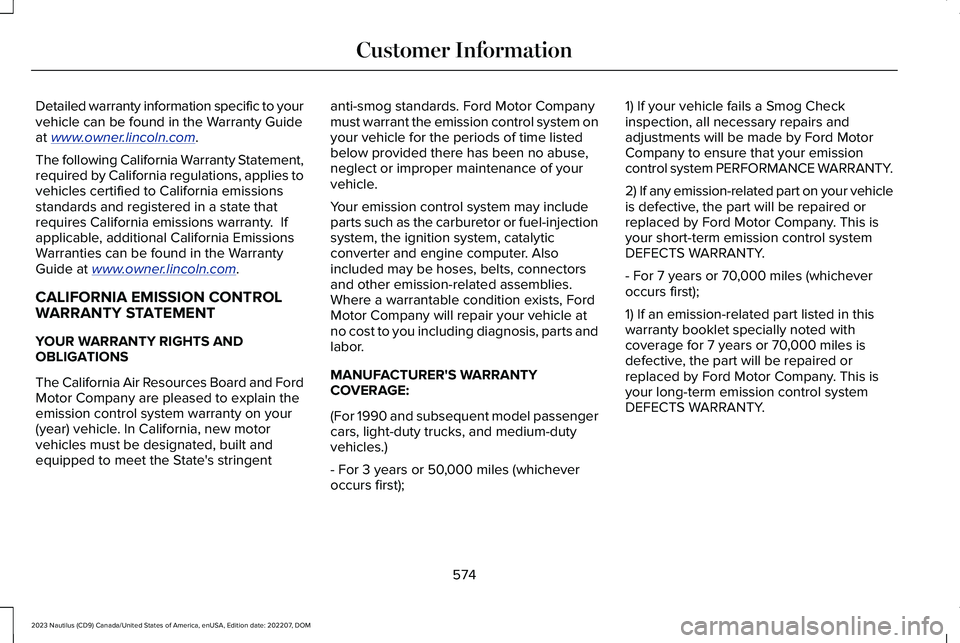
Detailed warranty information specific to yourvehicle can be found in the Warranty Guideat www.owner.lincoln.com.
The following California Warranty Statement,required by California regulations, applies tovehicles certified to California emissionsstandards and registered in a state thatrequires California emissions warranty. Ifapplicable, additional California EmissionsWarranties can be found in the WarrantyGuide at www.owner.lincoln.com.
CALIFORNIA EMISSION CONTROLWARRANTY STATEMENT
YOUR WARRANTY RIGHTS ANDOBLIGATIONS
The California Air Resources Board and FordMotor Company are pleased to explain theemission control system warranty on your(year) vehicle. In California, new motorvehicles must be designated, built andequipped to meet the State's stringent
anti-smog standards. Ford Motor Companymust warrant the emission control system onyour vehicle for the periods of time listedbelow provided there has been no abuse,neglect or improper maintenance of yourvehicle.
Your emission control system may includeparts such as the carburetor or fuel-injectionsystem, the ignition system, catalyticconverter and engine computer. Alsoincluded may be hoses, belts, connectorsand other emission-related assemblies.Where a warrantable condition exists, FordMotor Company will repair your vehicle atno cost to you including diagnosis, parts andlabor.
MANUFACTURER'S WARRANTYCOVERAGE:
(For 1990 and subsequent model passengercars, light-duty trucks, and medium-dutyvehicles.)
- For 3 years or 50,000 miles (whicheveroccurs first);
1) If your vehicle fails a Smog Checkinspection, all necessary repairs andadjustments will be made by Ford MotorCompany to ensure that your emissioncontrol system PERFORMANCE WARRANTY.
2) If any emission-related part on your vehicleis defective, the part will be repaired orreplaced by Ford Motor Company. This isyour short-term emission control systemDEFECTS WARRANTY.
- For 7 years or 70,000 miles (whicheveroccurs first);
1) If an emission-related part listed in thiswarranty booklet specially noted withcoverage for 7 years or 70,000 miles isdefective, the part will be repaired orreplaced by Ford Motor Company. This isyour long-term emission control systemDEFECTS WARRANTY.
574
2023 Nautilus (CD9) Canada/United States of America, enUSA, Edition date: 202207, DOMCustomer Information
Page 584 of 606
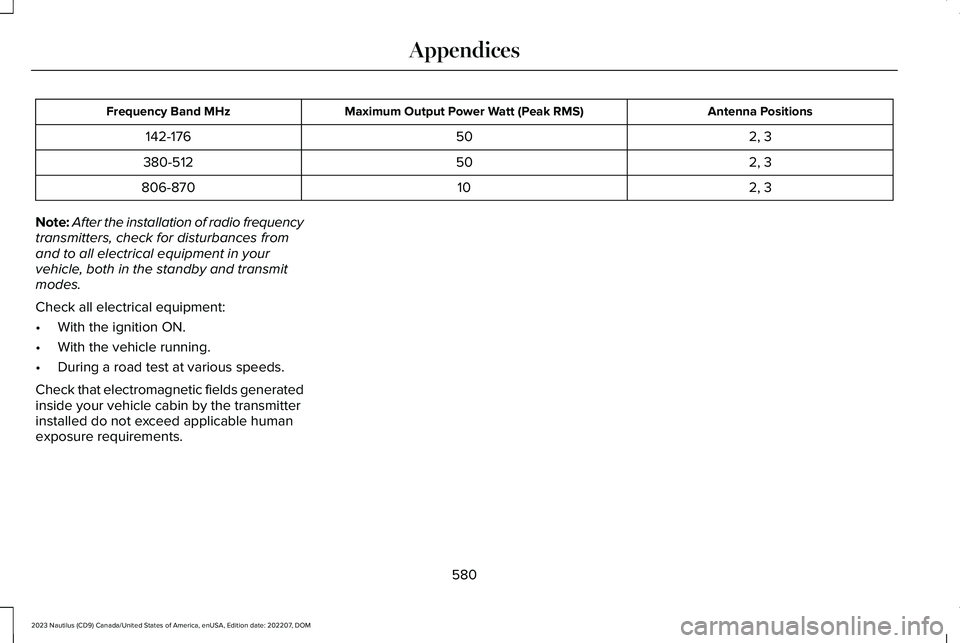
Antenna PositionsMaximum Output Power Watt (Peak RMS)Frequency Band MHz
2, 350142-176
2, 350380-512
2, 310806-870
Note:After the installation of radio frequencytransmitters, check for disturbances fromand to all electrical equipment in yourvehicle, both in the standby and transmitmodes.
Check all electrical equipment:
•With the ignition ON.
•With the vehicle running.
•During a road test at various speeds.
Check that electromagnetic fields generatedinside your vehicle cabin by the transmitterinstalled do not exceed applicable humanexposure requirements.
580
2023 Nautilus (CD9) Canada/United States of America, enUSA, Edition date: 202207, DOMAppendices
Page 598 of 606
Programming the Remote Control.............78Programming Your Phone.............................81Properly Adjusting the Driver and FrontPassenger Seats..........................................68PunctureSee: Changing a Flat Tire..................................401
Push Button Ignition Switch.......................192
R
Radio Frequency CertificationLabels............................................................487Blind Spot Information System Sensors.......487Body Control Module........................................495Cruise Control Module......................................498Garage Door Opener........................................502Keys and Remote Controls..............................503Radio Transceiver Module...............................508Remote Function Actuator...............................495SYNC.......................................................................511Telematics Control Unit......................................517Tire Pressure Monitoring SystemSensors.............................................................519Wireless Accessory Charging Module..........534
Rear Exterior.....................................................37Rear Occupant Alert System AudibleWarnings.......................................................175
Rear Occupant Alert SystemIndicators......................................................175Rear Occupant Alert SystemLimitations.....................................................174Rear Occupant Alert SystemPrecautions...................................................174Rear Occupant Alert System......................174Rear Parking Aid...........................................239Locating the Rear Parking Aid Sensors........239Rear Parking Aid Audible Warnings..............240Rear Parking Aid Limitations...........................239What is the Rear Parking Aid...........................239
Rear Seats.......................................................170Heated Seats........................................................172Manual Seats........................................................170Power Seats...........................................................171
Rear View Camera Guide Lines...............244Rear View Camera Object DistanceIndicators.....................................................245Rear View Camera Precautions................244Rear View Camera.......................................244Rear View Camera Settings.............................245
Rear View Camera Settings......................245Switching Rear View Camera Delay On andOff......................................................................246Zooming the Rear View Camera In andOut.....................................................................245
Rebooting the Center Display....................441
Recalling a Preset Position.........................176Recreationally Towing Your Vehicle - 2.0L,AWD..............................................................323Recreationally Towing Your Vehicle - 2.0L,FWD...............................................................323Recreationally Towing Your Vehicle -2.7L................................................................323Refueling........................................................206Manually Opening the Fuel Filler Door........208Refueling System Overview............................206Refueling Your Vehicle......................................206
Releasing the Electric Parking Brake if theVehicle Battery Has Run Out ofCharge.........................................................226Remote Control Limitations..........................76Remotely Starting and Stopping theVehicle...........................................................154Remote Start Limitations.............................154Remote Start Precautions...........................154Remote Start Remote ControlIndicators......................................................155Remote Start...................................................154Remote Start Settings..................................155Removing Your Vehicle FromStorage.........................................................374Repairing Minor Paint Damage..................371Replacement PartsRecommendation.......................................541
594
2023 Nautilus (CD9) Canada/United States of America, enUSA, Edition date: 202207, DOMIndex