clock LINCOLN NAVIGATOR 2014 User Guide
[x] Cancel search | Manufacturer: LINCOLN, Model Year: 2014, Model line: NAVIGATOR, Model: LINCOLN NAVIGATOR 2014Pages: 506, PDF Size: 5.72 MB
Page 273 of 506
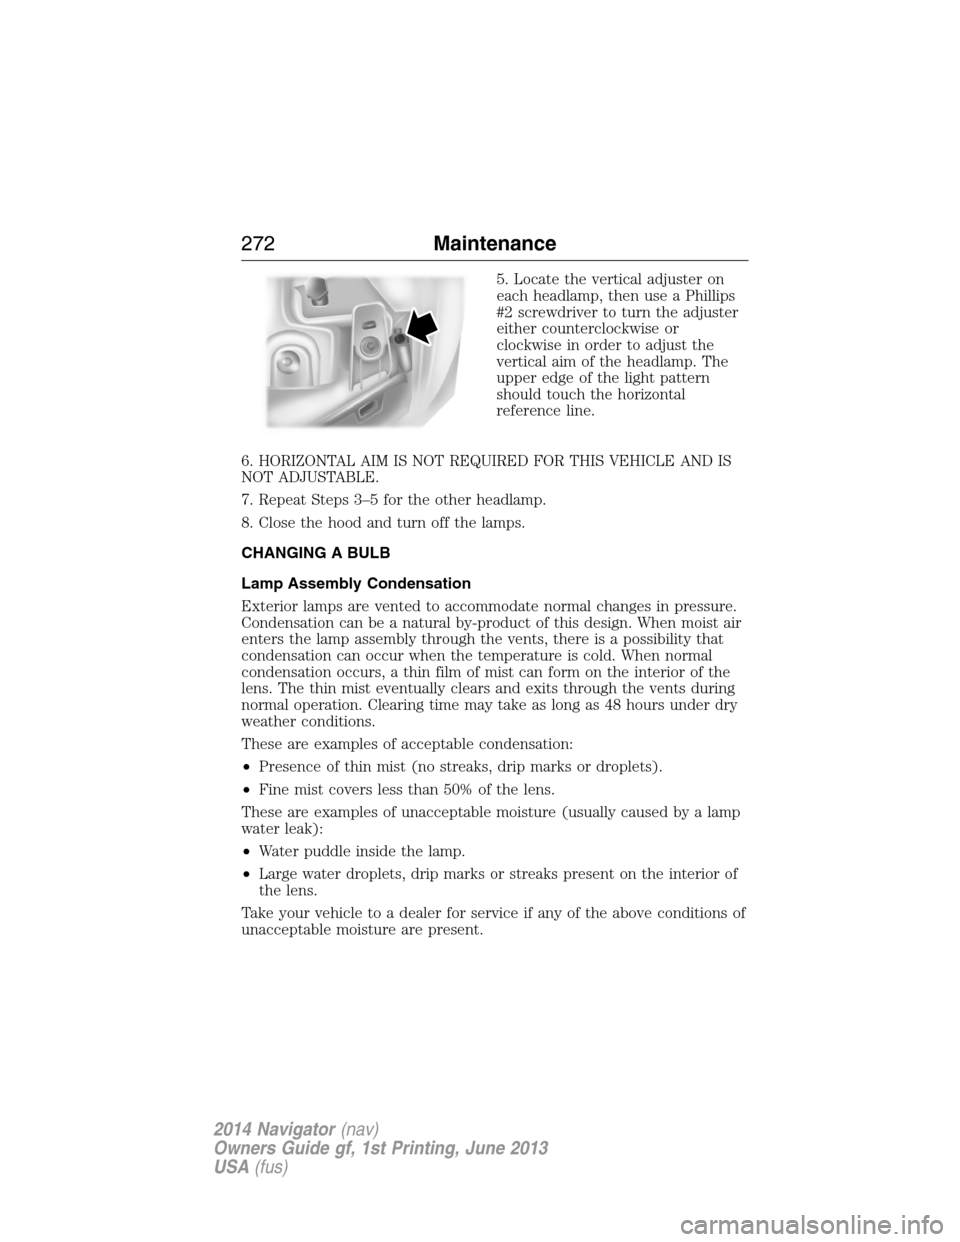
5. Locate the vertical adjuster on
each headlamp, then use a Phillips
#2 screwdriver to turn the adjuster
either counterclockwise or
clockwise in order to adjust the
vertical aim of the headlamp. The
upper edge of the light pattern
should touch the horizontal
reference line.
6. HORIZONTAL AIM IS NOT REQUIRED FOR THIS VEHICLE AND IS
NOT ADJUSTABLE.
7. Repeat Steps 3–5 for the other headlamp.
8. Close the hood and turn off the lamps.
CHANGING A BULB
Lamp Assembly Condensation
Exterior lamps are vented to accommodate normal changes in pressure.
Condensation can be a natural by-product of this design. When moist air
enters the lamp assembly through the vents, there is a possibility that
condensation can occur when the temperature is cold. When normal
condensation occurs, a thin film of mist can form on the interior of the
lens. The thin mist eventually clears and exits through the vents during
normal operation. Clearing time may take as long as 48 hours under dry
weather conditions.
These are examples of acceptable condensation:
•Presence of thin mist (no streaks, drip marks or droplets).
•Fine mist covers less than 50% of the lens.
These are examples of unacceptable moisture (usually caused by a lamp
water leak):
•Water puddle inside the lamp.
•Large water droplets, drip marks or streaks present on the interior of
the lens.
Take your vehicle to a dealer for service if any of the above conditions of
unacceptable moisture are present.
272Maintenance
2014 Navigator(nav)
Owners Guide gf, 1st Printing, June 2013
USA(fus)
Page 274 of 506
Replacing HID Headlamp Bulbs
The low/high beam headlamps on your vehicle use a “high intensity
discharge” source. These lamps operate at a high voltage. For bulb
replacement, see your authorized dealer.
Replacing Front Parking Lamp, Turn Signal, and Side Marker Bulbs
The front parking lamp, turn signal, and side marker bulbs are located in
the headlamp assembly. Follow the same steps to replace any of these
bulbs.
1. Make sure the headlamp control is in the off position.
2. Open the hood.
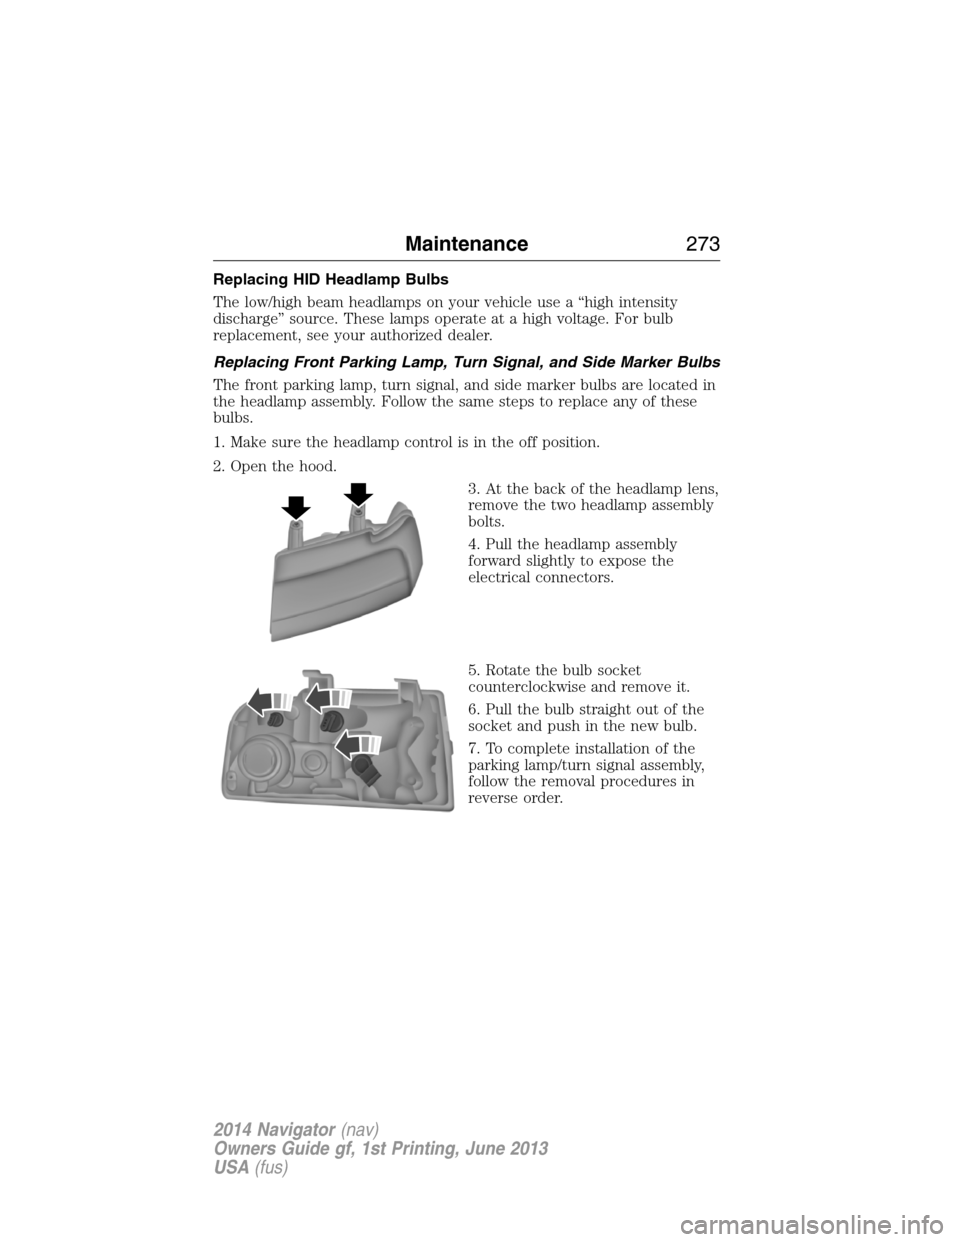
3. At the back of the headlamp lens,
remove the two headlamp assembly
bolts.
4. Pull the headlamp assembly
forward slightly to expose the
electrical connectors.
5. Rotate the bulb socket
counterclockwise and remove it.
6. Pull the bulb straight out of the
socket and push in the new bulb.
7. To complete installation of the
parking lamp/turn signal assembly,
follow the removal procedures in
reverse order.
Maintenance273
2014 Navigator(nav)
Owners Guide gf, 1st Printing, June 2013
USA(fus)
Page 275 of 506
Replacing Fog Lamp Bulbs
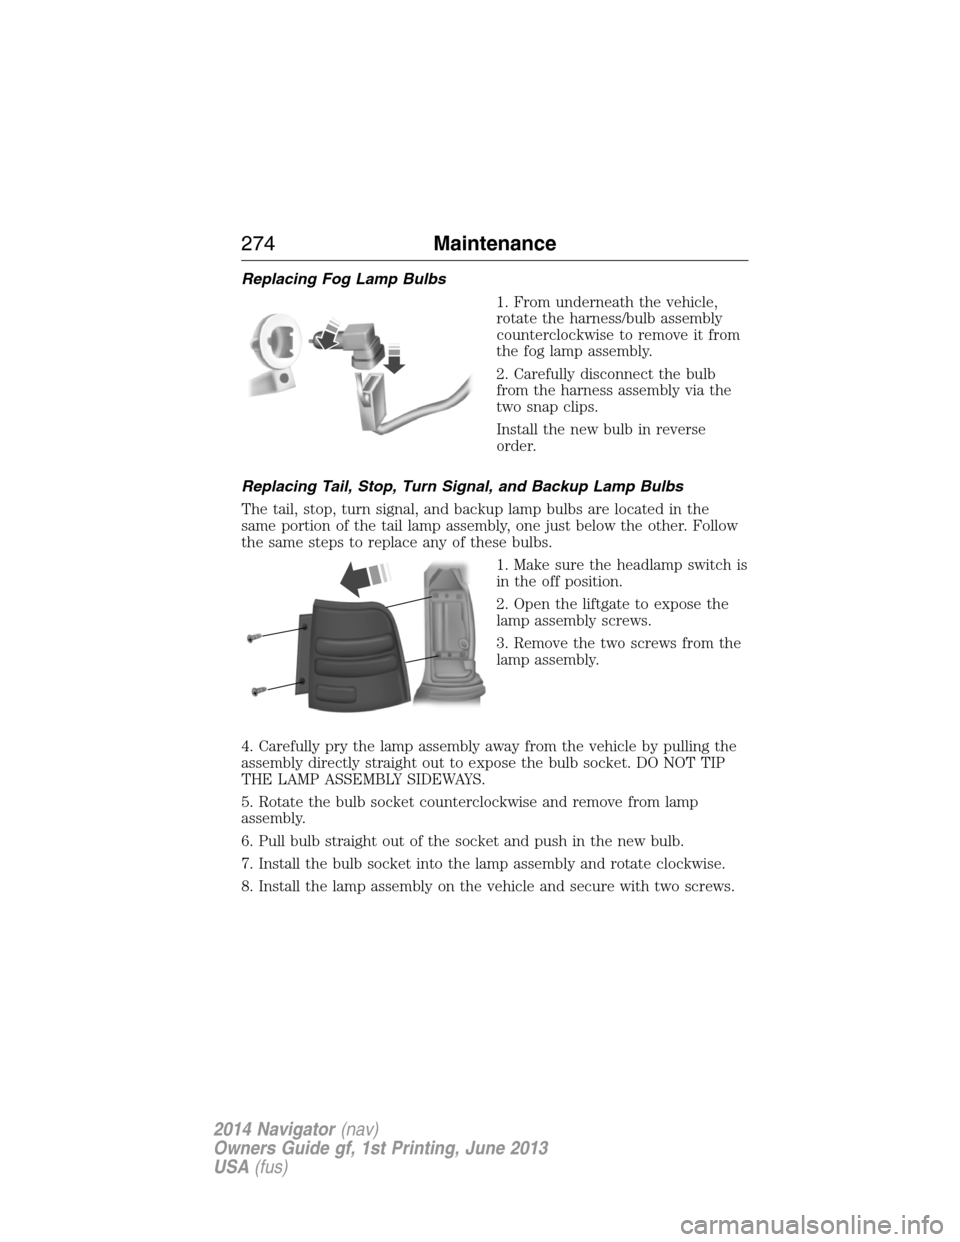
1. From underneath the vehicle,
rotate the harness/bulb assembly
counterclockwise to remove it from
the fog lamp assembly.
2. Carefully disconnect the bulb
from the harness assembly via the
two snap clips.
Install the new bulb in reverse
order.
Replacing Tail, Stop, Turn Signal, and Backup Lamp Bulbs
The tail, stop, turn signal, and backup lamp bulbs are located in the
same portion of the tail lamp assembly, one just below the other. Follow
the same steps to replace any of these bulbs.
1. Make sure the headlamp switch is
in the off position.
2. Open the liftgate to expose the
lamp assembly screws.
3. Remove the two screws from the
lamp assembly.
4. Carefully pry the lamp assembly away from the vehicle by pulling the
assembly directly straight out to expose the bulb socket. DO NOT TIP
THE LAMP ASSEMBLY SIDEWAYS.
5. Rotate the bulb socket counterclockwise and remove from lamp
assembly.
6. Pull bulb straight out of the socket and push in the new bulb.
7. Install the bulb socket into the lamp assembly and rotate clockwise.
8. Install the lamp assembly on the vehicle and secure with two screws.
274Maintenance
2014 Navigator(nav)
Owners Guide gf, 1st Printing, June 2013
USA(fus)
Page 276 of 506
Replacing Supplemental Tail Lamp Bulbs
1. Make sure the headlamp switch is in the off position.
2. Open the liftgate and remove interior trim panel.
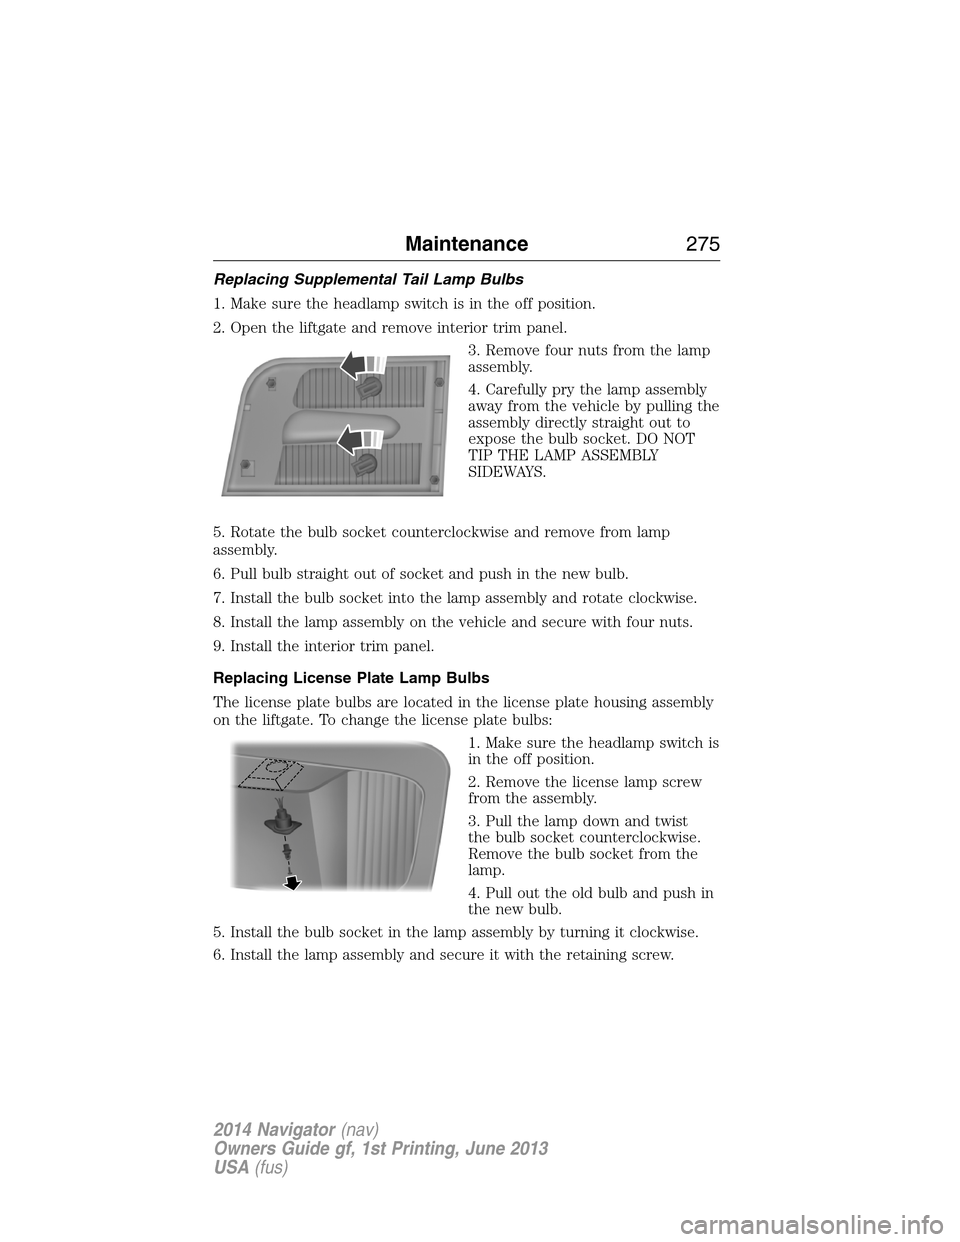
3. Remove four nuts from the lamp
assembly.
4. Carefully pry the lamp assembly
away from the vehicle by pulling the
assembly directly straight out to
expose the bulb socket. DO NOT
TIP THE LAMP ASSEMBLY
SIDEWAYS.
5. Rotate the bulb socket counterclockwise and remove from lamp
assembly.
6. Pull bulb straight out of socket and push in the new bulb.
7. Install the bulb socket into the lamp assembly and rotate clockwise.
8. Install the lamp assembly on the vehicle and secure with four nuts.
9. Install the interior trim panel.
Replacing License Plate Lamp Bulbs
The license plate bulbs are located in the license plate housing assembly
on the liftgate. To change the license plate bulbs:
1. Make sure the headlamp switch is
in the off position.
2. Remove the license lamp screw
from the assembly.
3. Pull the lamp down and twist
the bulb socket counterclockwise.
Remove the bulb socket from the
lamp.
4. Pull out the old bulb and push in
the new bulb.
5. Install the bulb socket in the lamp assembly by turning it clockwise.
6. Install the lamp assembly and secure it with the retaining screw.
Maintenance275
2014 Navigator(nav)
Owners Guide gf, 1st Printing, June 2013
USA(fus)
Page 315 of 506
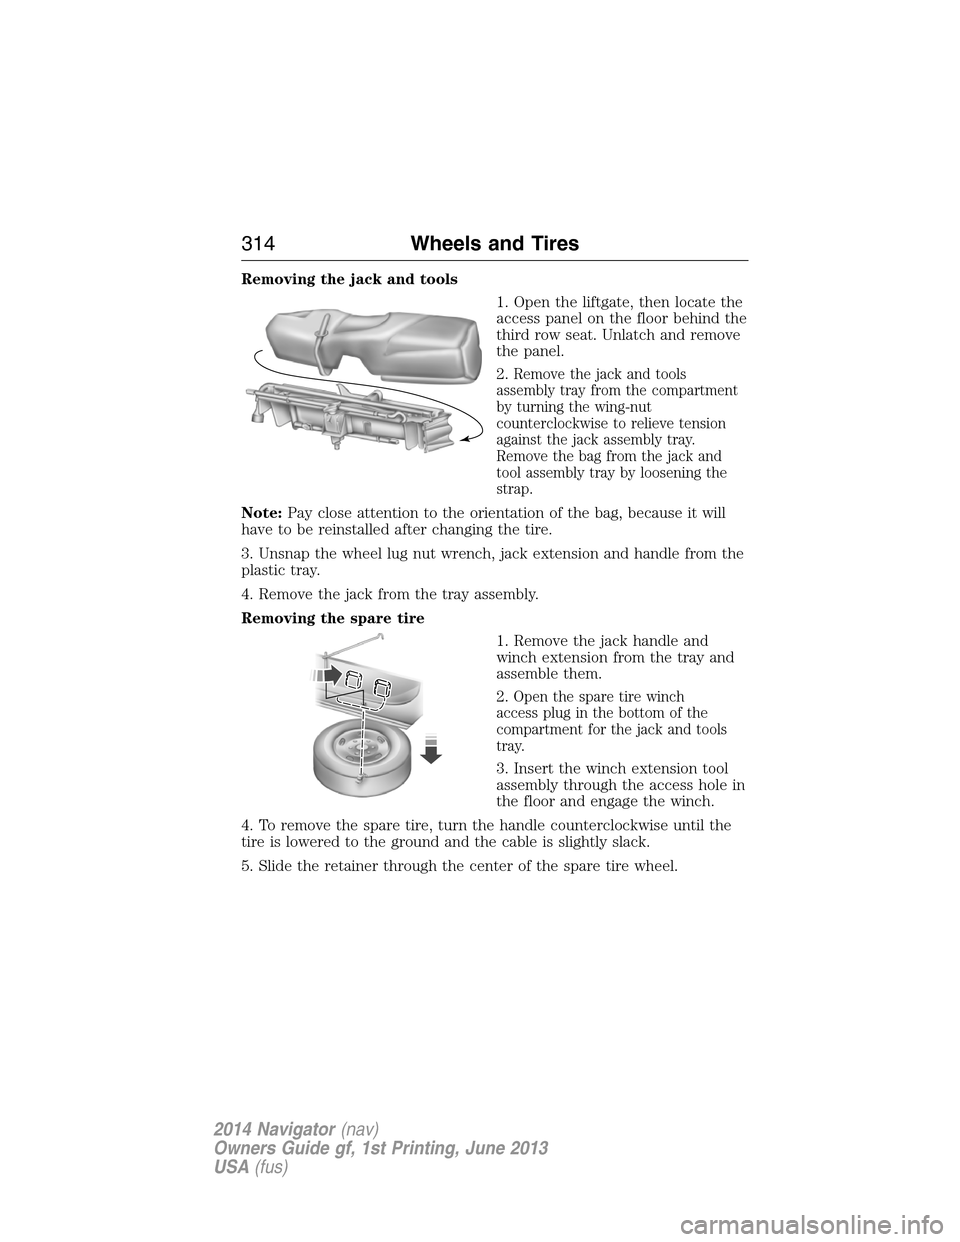
Removing the jack and tools
1. Open the liftgate, then locate the
access panel on the floor behind the
third row seat. Unlatch and remove
the panel.
2.
Remove the jack and tools
assembly tray from the compartment
by turning the wing-nut
counterclockwise to relieve tension
against the jack assembly tray.
Remove the bag from the jack and
tool assembly tray by loosening the
strap.
Note:Pay close attention to the orientation of the bag, because it will
have to be reinstalled after changing the tire.
3. Unsnap the wheel lug nut wrench, jack extension and handle from the
plastic tray.
4. Remove the jack from the tray assembly.
Removing the spare tire
1. Remove the jack handle and
winch extension from the tray and
assemble them.
2.
Open the spare tire winch
access plug in the bottom of the
compartment for the jack and tools
tray.
3. Insert the winch extension tool
assembly through the access hole in
the floor and engage the winch.
4. To remove the spare tire, turn the handle counterclockwise until the
tire is lowered to the ground and the cable is slightly slack.
5. Slide the retainer through the center of the spare tire wheel.
314Wheels and Tires
2014 Navigator(nav)
Owners Guide gf, 1st Printing, June 2013
USA(fus)
Page 316 of 506
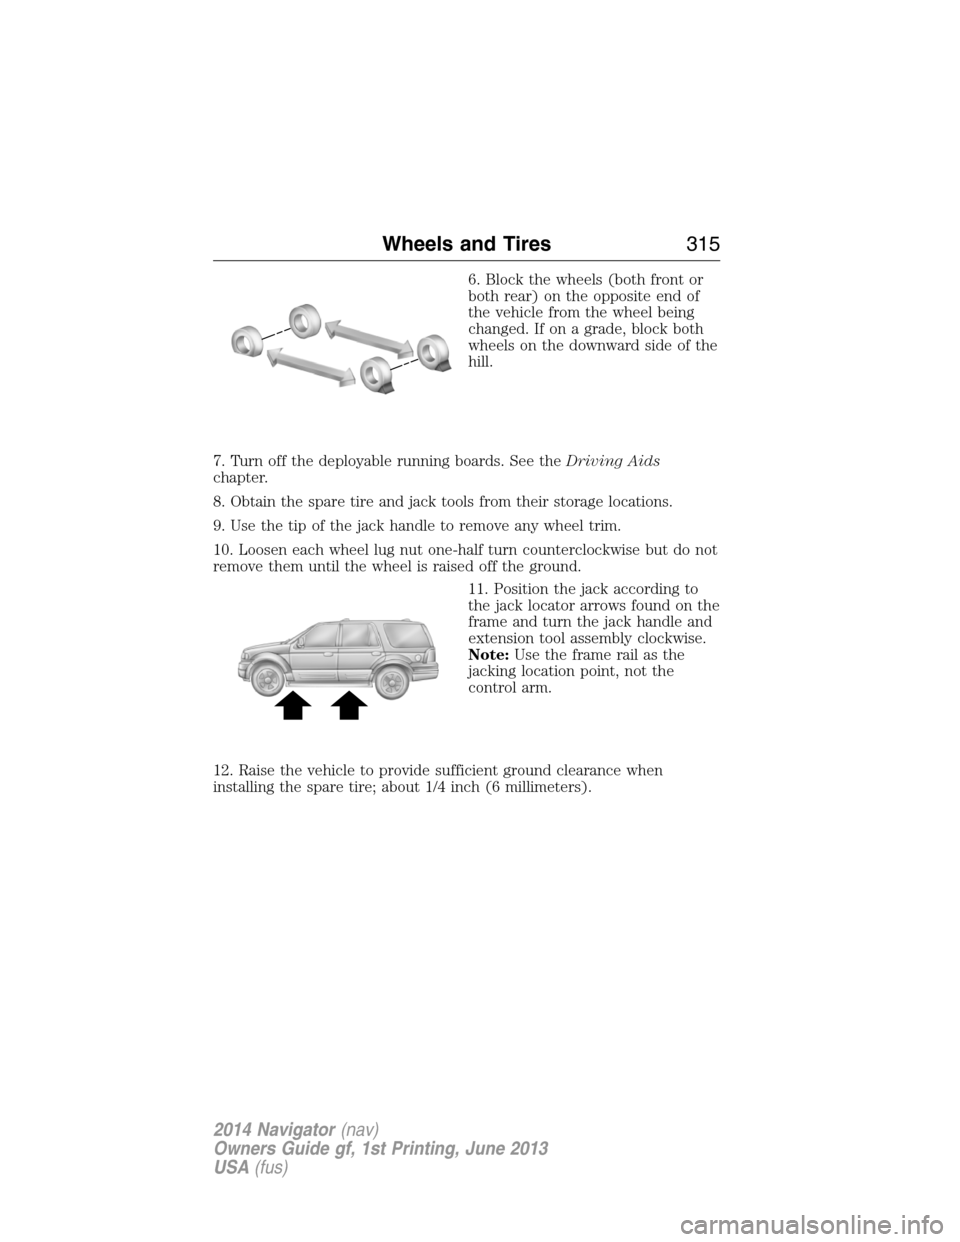
6. Block the wheels (both front or
both rear) on the opposite end of
the vehicle from the wheel being
changed. If on a grade, block both
wheels on the downward side of the
hill.
7. Turn off the deployable running boards. See theDriving Aids
chapter.
8. Obtain the spare tire and jack tools from their storage locations.
9. Use the tip of the jack handle to remove any wheel trim.
10. Loosen each wheel lug nut one-half turn counterclockwise but do not
remove them until the wheel is raised off the ground.
11. Position the jack according to
the jack locator arrows found on the
frame and turn the jack handle and
extension tool assembly clockwise.
Note:Use the frame rail as the
jacking location point, not the
control arm.
12. Raise the vehicle to provide sufficient ground clearance when
installing the spare tire; about 1/4 inch (6 millimeters).
Wheels and Tires315
2014 Navigator(nav)
Owners Guide gf, 1st Printing, June 2013
USA(fus)
Page 317 of 506
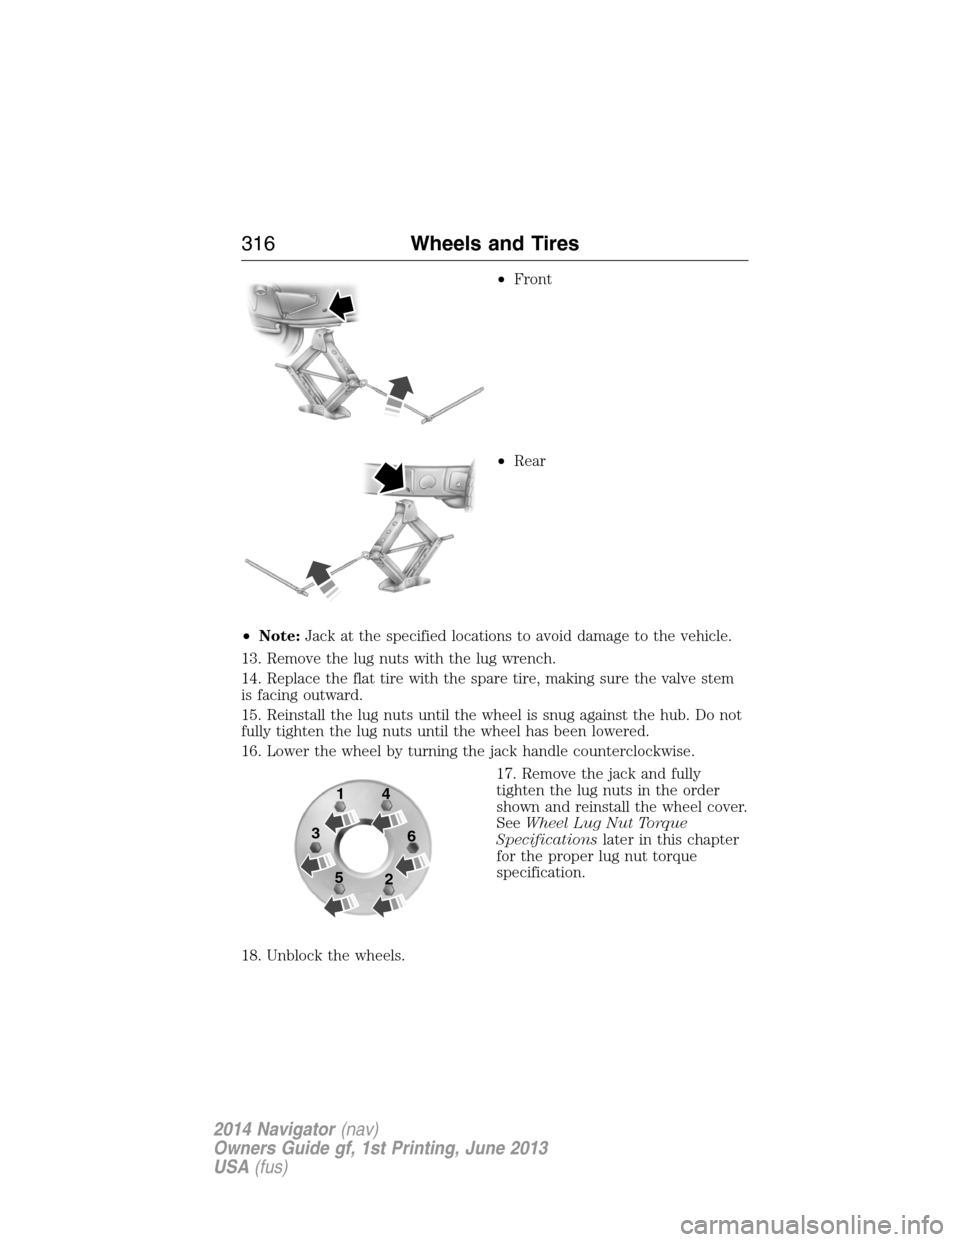
•Front
•Rear
•Note:Jack at the specified locations to avoid damage to the vehicle.
13. Remove the lug nuts with the lug wrench.
14. Replace the flat tire with the spare tire, making sure the valve stem
is facing outward.
15. Reinstall the lug nuts until the wheel is snug against the hub. Do not
fully tighten the lug nuts until the wheel has been lowered.
16. Lower the wheel by turning the jack handle counterclockwise.
17. Remove the jack and fully
tighten the lug nuts in the order
shown and reinstall the wheel cover.
SeeWheel Lug Nut Torque
Specificationslater in this chapter
for the proper lug nut torque
specification.
18. Unblock the wheels.
1
3
54
6
2
316Wheels and Tires
2014 Navigator(nav)
Owners Guide gf, 1st Printing, June 2013
USA(fus)
Page 318 of 506
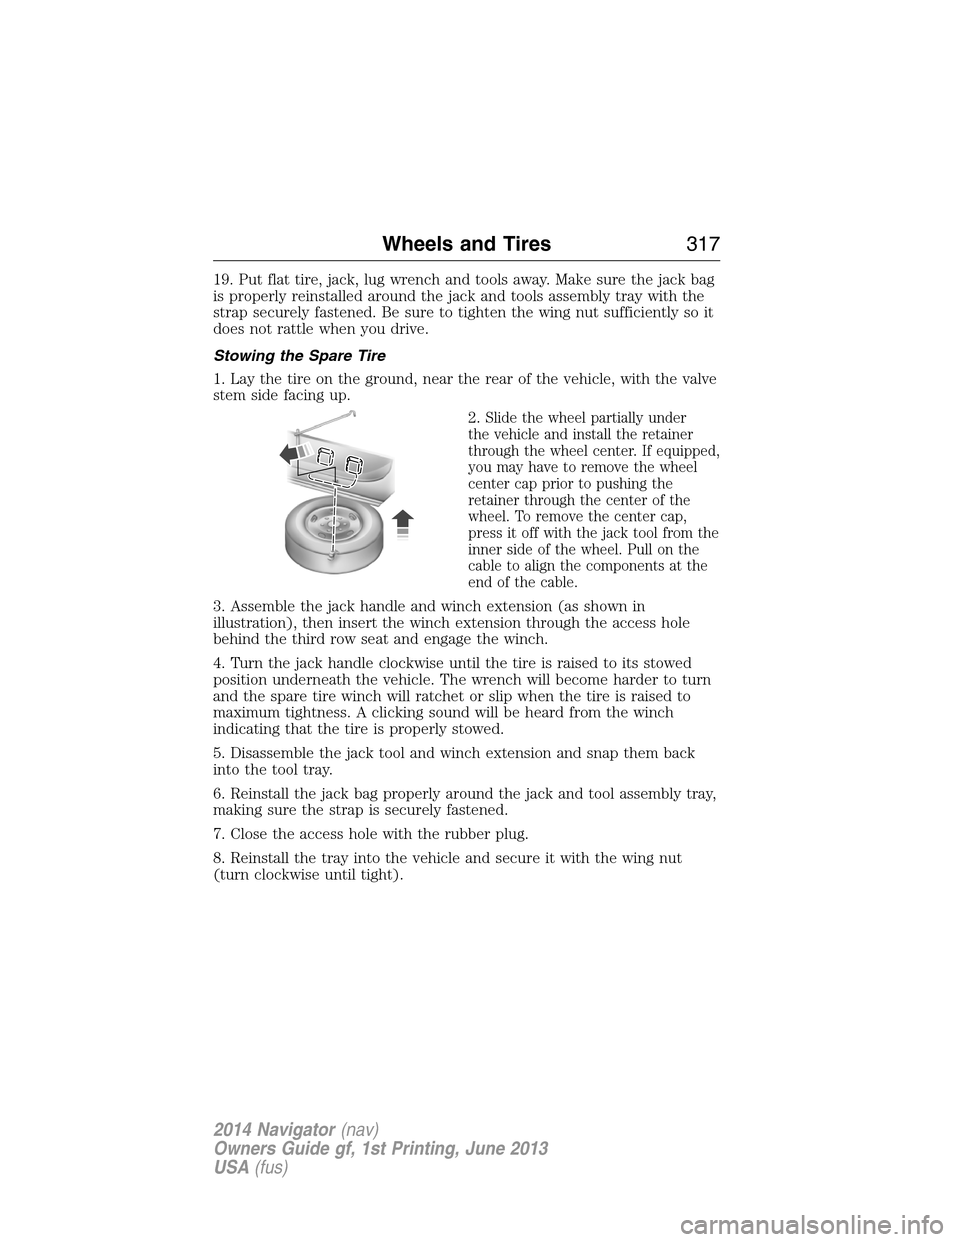
19. Put flat tire, jack, lug wrench and tools away. Make sure the jack bag
is properly reinstalled around the jack and tools assembly tray with the
strap securely fastened. Be sure to tighten the wing nut sufficiently so it
does not rattle when you drive.
Stowing the Spare Tire
1. Lay the tire on the ground, near the rear of the vehicle, with the valve
stem side facing up.
2.
Slide the wheel partially under
the vehicle and install the retainer
through the wheel center. If equipped,
you may have to remove the wheel
center cap prior to pushing the
retainer through the center of the
wheel. To remove the center cap,
press it off with the jack tool from the
inner side of the wheel. Pull on the
cable to align the components at the
end of the cable.
3. Assemble the jack handle and winch extension (as shown in
illustration), then insert the winch extension through the access hole
behind the third row seat and engage the winch.
4. Turn the jack handle clockwise until the tire is raised to its stowed
position underneath the vehicle. The wrench will become harder to turn
and the spare tire winch will ratchet or slip when the tire is raised to
maximum tightness. A clicking sound will be heard from the winch
indicating that the tire is properly stowed.
5. Disassemble the jack tool and winch extension and snap them back
into the tool tray.
6. Reinstall the jack bag properly around the jack and tool assembly tray,
making sure the strap is securely fastened.
7. Close the access hole with the rubber plug.
8. Reinstall the tray into the vehicle and secure it with the wing nut
(turn clockwise until tight).
Wheels and Tires317
2014 Navigator(nav)
Owners Guide gf, 1st Printing, June 2013
USA(fus)
Page 413 of 506
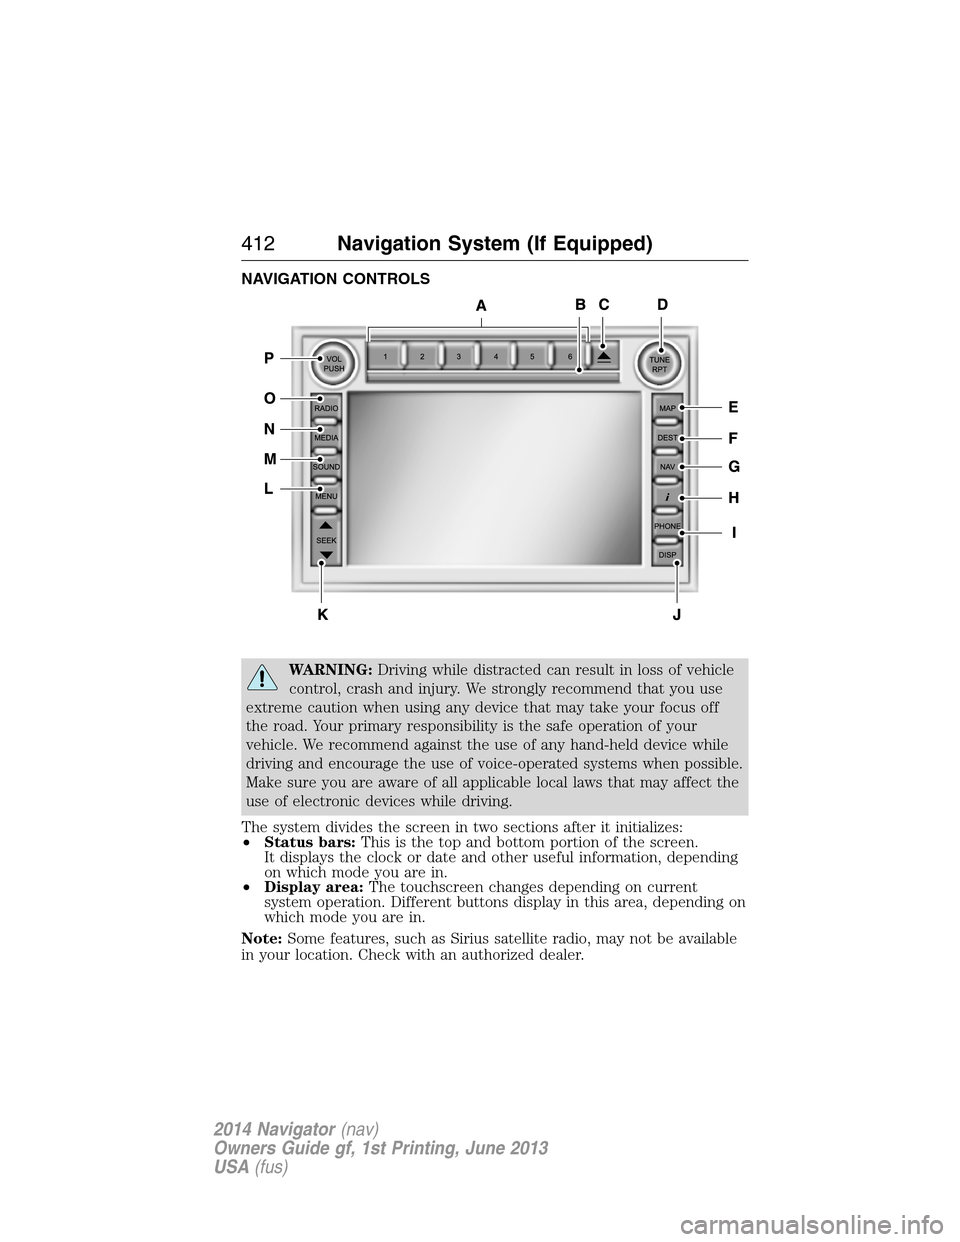
NAVIGATION CONTROLS
WARNING:Driving while distracted can result in loss of vehicle
control, crash and injury. We strongly recommend that you use
extreme caution when using any device that may take your focus off
the road. Your primary responsibility is the safe operation of your
vehicle. We recommend against the use of any hand-held device while
driving and encourage the use of voice-operated systems when possible.
Make sure you are aware of all applicable local laws that may affect the
use of electronic devices while driving.
The system divides the screen in two sections after it initializes:
•Status bars:This is the top and bottom portion of the screen.
It displays the clock or date and other useful information, depending
on which mode you are in.
•Display area:The touchscreen changes depending on current
system operation. Different buttons display in this area, depending on
which mode you are in.
Note:Some features, such as Sirius satellite radio, may not be available
in your location. Check with an authorized dealer.
412Navigation System (If Equipped)
2014 Navigator(nav)
Owners Guide gf, 1st Printing, June 2013
USA(fus)
Page 415 of 506
L.MENU:
•Press this button to access the system menu.
•Press while the system menu is active to access the menu tabs of
Display, Clock, Feedback Settings, System Settings and Valet Mode.
M.SOUND:
•Press this button to access the sound menu.
•Press while the sound menu is active to access the menu tabs of
Bass/Treble, Balance/Fade, SCV (Speed Compensated Volume), DSP
(Digital Signal Processing) and Visualizer.
N.MEDIA:
•Press this button to access the media menu.
•Press while the media menu is active to access the available sources
of CD/DVD, Jukebox and User Device.
O.RADIO:
•Press this button to access the radio menu.
•Press while the radio menu is active to access the available sources of
AM, FM1, FM2, SAT1, SAT2, and SAT3.
P.VOL:Press and hold this button to turn the system off and on. Turn
the control to adjust the volume.
Note:If a navigation route is active when the navigation system is off,
the system resumes the route when you turn the system on.
DISPLAY MODE
You can choose to turn your screen on or off and if you would like to
view the status bars on the top and bottom of the screen. Press DISP to
see the options.
Display Mode Voice Commands
The following voice commands are available in display mode.
If you are not in display mode, press the voice button on the
steering wheel. When prompted, say “Display mode” and then
any of the following commands.
Display mode voice commands
“Display on”
“Display off”
“Status bar”
“Brighter”
“Dimmer”
“Day”
414Navigation System (If Equipped)
2014 Navigator(nav)
Owners Guide gf, 1st Printing, June 2013
USA(fus)