window LINCOLN NAVIGATOR 2014 Owner's Guide
[x] Cancel search | Manufacturer: LINCOLN, Model Year: 2014, Model line: NAVIGATOR, Model: LINCOLN NAVIGATOR 2014Pages: 506, PDF Size: 5.72 MB
Page 255 of 506
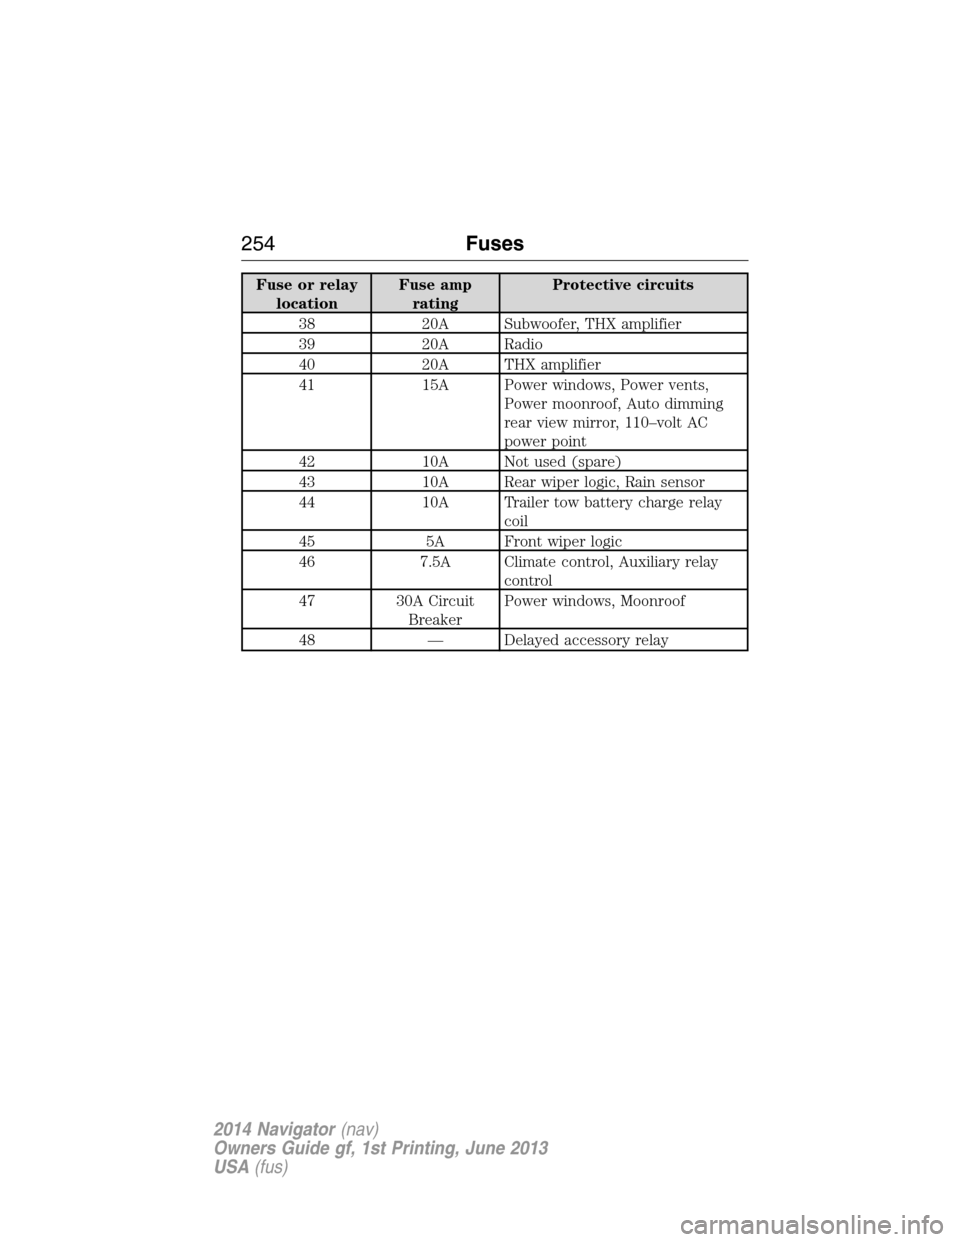
Fuse or relay
locationFuse amp
ratingProtective circuits
38 20A Subwoofer, THX amplifier
39 20A Radio
40 20A THX amplifier
41 15A Power windows, Power vents,
Power moonroof, Auto dimming
rear view mirror, 110–volt AC
power point
42 10A Not used (spare)
43 10A Rear wiper logic, Rain sensor
44 10A Trailer tow battery charge relay
coil
45 5A Front wiper logic
46 7.5A Climate control, Auxiliary relay
control
47 30A Circuit
BreakerPower windows, Moonroof
48 — Delayed accessory relay
254Fuses
2014 Navigator(nav)
Owners Guide gf, 1st Printing, June 2013
USA(fus)
Page 268 of 506

CHECKING THE WIPER BLADES
Run the tip of your fingers over the edge of the blade
to check for roughness.
Clean the wiper blades with washer fluid or water
applied with a soft sponge or cloth.
CHANGING THE WIPER BLADES
Replace wiper blades at least once per year for optimum performance.
To replace the wiper blades:
1. Fold back the wiper arm and
position the wiper blade at a right
angle to the wiper arm.
2. To remove the wiper blade, press
the retaining clip (A) to disengage
the wiper blade, then pull the blade
down toward the windshield to
remove it from the arm.
3. Install the new wiper blade on the arm and press it into place until a
click is heard.
Poor wiper quality can be improved by cleaning the wiper blades and
windshield. Refer toWindows and wiper bladesin theCleaning
chapter.
To prolong the life of the wiper blades, it is highly recommended to
scrape off the ice on the windshield before turning on the wipers.
The layer of ice has many sharp edges and can damage the micro edge
of the wiper rubber element.
A
Maintenance267
2014 Navigator(nav)
Owners Guide gf, 1st Printing, June 2013
USA(fus)
Page 269 of 506
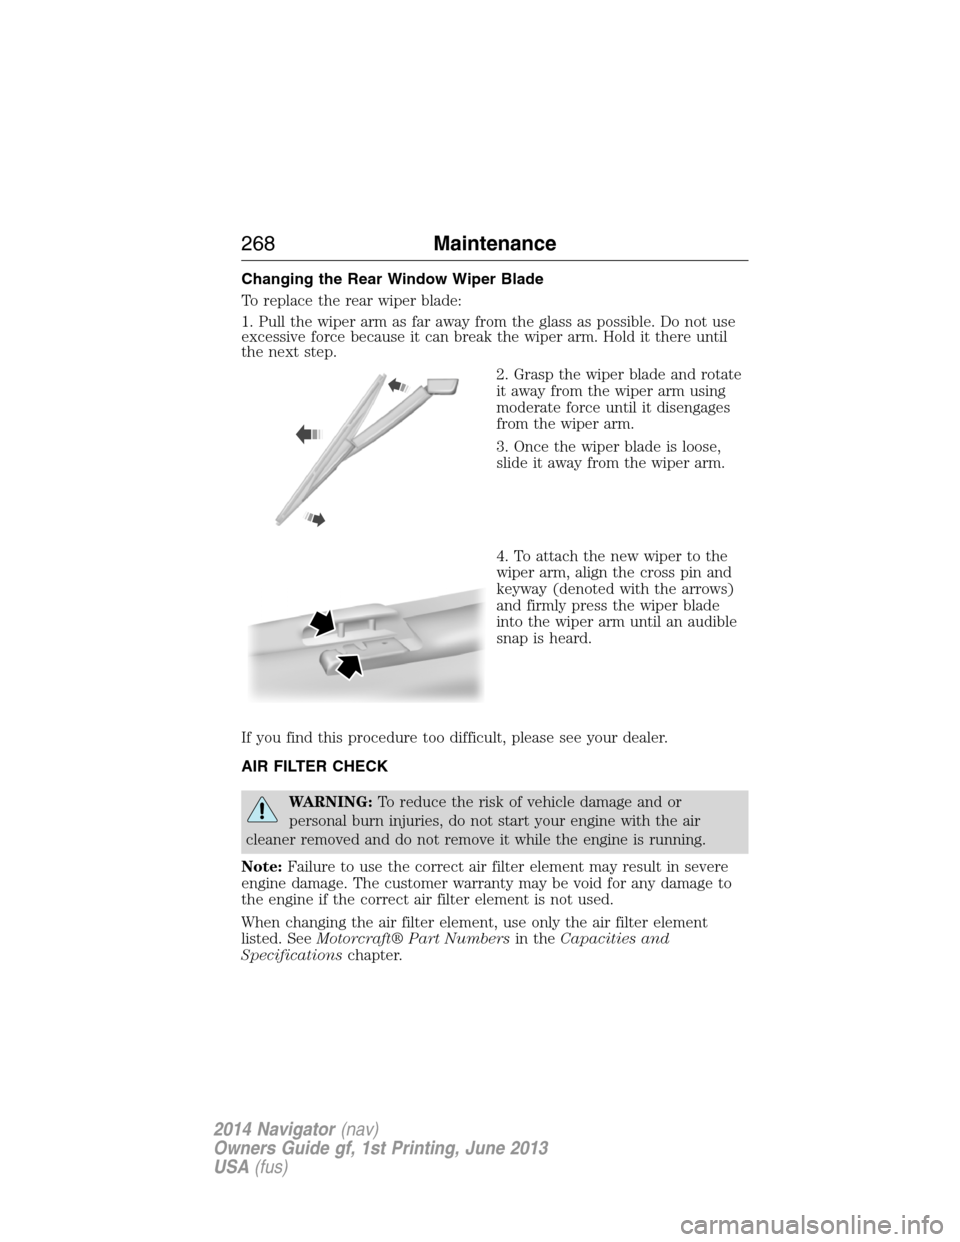
Changing the Rear Window Wiper Blade
To replace the rear wiper blade:
1. Pull the wiper arm as far away from the glass as possible. Do not use
excessive force because it can break the wiper arm. Hold it there until
the next step.
2. Grasp the wiper blade and rotate
it away from the wiper arm using
moderate force until it disengages
from the wiper arm.
3. Once the wiper blade is loose,
slide it away from the wiper arm.
4. To attach the new wiper to the
wiper arm, align the cross pin and
keyway (denoted with the arrows)
and firmly press the wiper blade
into the wiper arm until an audible
snap is heard.
If you find this procedure too difficult, please see your dealer.
AIR FILTER CHECK
WARNING:To reduce the risk of vehicle damage and or
personal burn injuries, do not start your engine with the air
cleaner removed and do not remove it while the engine is running.
Note:Failure to use the correct air filter element may result in severe
engine damage. The customer warranty may be void for any damage to
the engine if the correct air filter element is not used.
When changing the air filter element, use only the air filter element
listed. SeeMotorcraft® Part Numbersin theCapacities and
Specificationschapter.
268Maintenance
2014 Navigator(nav)
Owners Guide gf, 1st Printing, June 2013
USA(fus)
Page 282 of 506
CLEANING THE ENGINE
Engines are more efficient when they are clean because grease and dirt
buildup keep the engine warmer than normal.
When washing:
•Take care when using a power washer to clean the engine.
The high-pressure fluid could penetrate the sealed parts and cause
damage.
•Do not spray a hot engine with cold water to avoid cracking the
engine block or other engine components.
•Spray Motorcraft® Engine Shampoo and Degreaser on all parts that
require cleaning and pressure rinse clean. In Canada, use Motorcraft®
Engine Shampoo.
•Never wash or rinse the engine while it is hot or running; water in the
running engine may cause internal damage.
•Never wash or rinse any ignition coil, spark plug wire or spark plug
well, or the area in and around these locations.
•Cover the battery, power distribution box, and air filter assembly to
prevent water damage when cleaning the engine.
CLEANING THE WINDOWS AND WIPER BLADES
The windows and wiper blades should be cleaned regularly. If the wipers
do not wipe properly, substances on the vehicle’s glass or the wiper
blades may cause squeaking or chatter noise from the blades, and
streaking and smearing of the windshield. To clean these items, follow
these tips:
•The windows may be cleaned with a non-abrasive cleaner such as
Motorcraft® Ultra-Clear Spray Glass Cleaner.
•The wiper blades can be cleaned with isopropyl (rubbing) alcohol or
Motorcraft Premium Windshield Washer Concentrates in the U.S., or
Motorcraft Premium Quality Windshield Washer Fluid in Canada.
Replace your wiper blades when they appear worn or do not function
properly.
•Do not use abrasive materials, as they may cause scratches.
•Do not use fuel, kerosene, or paint thinner to clean any parts.
Vehicle Care281
2014 Navigator(nav)
Owners Guide gf, 1st Printing, June 2013
USA(fus)
Page 283 of 506
If you cannot remove those streaks after cleaning with the glass cleaner
or if the wipers chatter and move in a jerky motion, clean the outer
surface of the windshield and the wiper blades using a sponge or soft
cloth with a neutral detergent or mild-abrasive cleaning solution. After
cleaning, rinse the windshield and wiper blades with clean water. The
windshield is clean if beads do not form when you rinse the windshield
with water.
Note:Do not use sharp objects, such as a razor blade, to clean the
inside of the rear window or to remove decals, as it may cause damage
to the rear window defroster’s heated grid lines.
CLEANING THE INTERIOR
WARNING:Do not use cleaning solvents, bleach or dye on the
vehicle’s safety belts, as these actions may weaken the belt
webbing.
WARNING:On vehicles equipped with seat-mounted airbags, do
not use chemical solvents or strong detergents. Such products
could contaminate the side airbag system and affect performance of the
side airbag in a collision.
For fabric, carpets, cloth seats, safety belts and seats equipped with side
airbags:
•Remove dust and loose dirt with a vacuum cleaner.
•Apply a layer of high quality foam cleaner, designed for automotive
interiors, to the dry stained area (s) of the item you are cleaning and
allow soaking for one minute.
•If grease or tar is present on the material, spot-clean the area first
with Motorcraft Spot and Stain Remover. In Canada, use Motorcraft
Multi-Purpose Cleaner.
•If a ring forms on the fabric after spot cleaning, clean the entire area
immediately (but do not oversaturate) or the ring can set.
•Do not use household cleaning products or glass cleaners, which can
stain and discolor the fabric and affect the flame retardant abilities of
the seat materials.
CLEANING THE CLIMATE CONTROLLED SEATS (IF EQUIPPED)
Remove dust and loose dirt with a whisk broom or a vacuum cleaner.
Remove fresh spots immediately. Clean the seat with a damp cloth, using
a mild soap and water solution, if necessary.
282Vehicle Care
2014 Navigator(nav)
Owners Guide gf, 1st Printing, June 2013
USA(fus)
Page 287 of 506
Cooling system
•Protect against freezing temperatures.
•When removing vehicle from storage, check coolant fluid level.
Confirm there are no cooling system leaks, and fluid is at the
recommended level.
Battery
•Check and recharge as necessary. Keep connections clean.
•If storing your vehicle for more than 30 days without recharging the
battery, it may be advisable to disconnect the battery cables to ensure
battery charge is maintained for quick starting.
Note:If battery cables are disconnected, it will be necessary to reset
memory features.
Brakes
•Make sure brakes and parking brake are fully released.
Tires
•Maintain recommended air pressure.
Miscellaneous
•Make sure all linkages, cables, levers and pins under vehicle are
covered with grease to prevent rust.
•Move vehicles at least 25 feet (8 meters) every 15 days to lubricate
working parts and prevent corrosion.
Removing Vehicle from Storage
When your vehicle is ready to come out of storage, do the following:
•Wash your vehicle to remove any dirt or grease film build-up on
window surfaces.
•Check windshield wipers for any deterioration.
•Check under the hood for any foreign material that may have collected
during storage (mice/squirrel nests).
•Check the exhaust for any foreign material that may have collected
during storage.
•Check tire pressures and set tire inflation per the Tire Label.
•Check brake pedal operation. Drive the vehicle 15 feet (4.5 meters)
back and forth to remove rust build-up.
•Check fluid levels (including coolant, oil and gas) to make sure there
are no leaks and fluids are at recommended levels.
•If the battery was removed, clean the battery cable ends and inspect.
Contact your authorized dealer if you have any concerns or issues.
286Vehicle Care
2014 Navigator(nav)
Owners Guide gf, 1st Printing, June 2013
USA(fus)
Page 350 of 506
J.USB port (optional):Listen to music or view images you stored on a
USB device such as a USB memory stick or a memory card reader.
K.SOURCE:Press this button to select Monitor A, Monitor B, AUX/TV
(if available), and AUX 2 (if available).
L.POWER:Press this button to turn the system off and on.
M.TFT LCD panel:Seven-inch TFT LCD panel.
N.Level lock and release latch:Use this latch to change the viewing
angle of the LCD panel or lock the panel into the secured position.
O.Infrared sensor - forward sensor eye:This allows the remote
control to navigate the on-screen display.
Remote Control
Note:The remote control uses infrared light to send commands to the
DVD player, just as many home video systems do. Just point the remote
control at the DVD player infrared window located above each screen in
order to control that DVD player. While you can connect a second device
such as a VCR through the auxiliary inputs, and view the playback on
the screen, you cannot control that device by aiming its remote control
at the Ford DVD player. The Ford DVD system remote control is the
only remote control you can use with the system. For example, if you
connect a VCR to the DVD system, you must point the VCR remote
control at the VCR to control it.
Installing the Battery
Before using your remote control, install the batteries as follows:
1. Turn the remote control face down. Press down on the ridged area of
the battery cover and slide it off.
2. Install two AAA batteries. Make sure you install the batteries
properly, with the + and – facing the correct way, as shown in the
battery compartment.
3. Slide the cover back until it clicks.
Note:Different types of batteries have different characteristics. Do not
mix different types.
Note:Do not mix old and new batteries. Mixing old and new batteries
can shorten battery life and cause chemical leaks from the old batteries.
Note:Keep the batteries out of the reach of children. If someone
swallows a battery, immediately consult a doctor. When you dispose of
used batteries, keep to governmental regulations or environmental public
institution rules that apply in your area.
Audio System349
2014 Navigator(nav)
Owners Guide gf, 1st Printing, June 2013
USA(fus)
Page 370 of 506
Helpful Hints
•Make sure the interior of the vehicle is as quiet as possible. Wind
noise from open windows and road vibrations may prevent the system
from correctly recognizing spoken commands.
•After pressing the voice icon, wait until after the tone sounds and
Listening appears before saying a command. Any command spoken
prior to this does not register with the system.
•Speak naturally, without long pauses between words.
•At any time you can interrupt the system while it is speaking by
pressing the voice icon.
USING SYNC WITH YOUR PHONE
Hands-free calling is one of the main features of SYNC. While the system
supports a variety of features, many are dependent on your cellular
phone’s functionality. At a minimum, most cellular phones with Bluetooth
wireless technology support the following functions:
•Answering an incoming call
•Ending a call
•Using privacy mode
•Dialing a number
•Redialing
•Call waiting notification
•Caller ID.
Other features, such as text messaging using Bluetooth and automatic
phonebook download, are phone-dependent features. To check your
phone’s compatibility, see your phone’s user manual and visit
www.SYNCMyRide.com, www.SYNCMyRide.ca or www.syncmaroute.ca.
SYNC®369
2014 Navigator(nav)
Owners Guide gf, 1st Printing, June 2013
USA(fus)
Page 386 of 506
Setting 911 Assist On
Perform the following:
1. Press the phone button to enter the Phone Menu.
2. Scroll until 911 Assist is selected.
3. Press OK to confirm and enter the 911 Assist menu.
4. Scroll to select between On and Off selections.
5. Press OK when the desired option appears in the radio display.
Set On or Set Off appears in the display as confirmation.
Off selections include: Off with reminder and Off without reminder.
Off with reminder provides a display and voice reminder at phone
connection at vehicle start. Off without reminder provides a display
reminder only without a voice reminder at phone connection.
To make sure that 911 Assist works properly:
•SYNC must be powered and working properly at the time of the
incident and throughout feature activation and use.
•SYNC 911 Assist feature must be set on prior to the incident.
•A Bluetooth-enabled and compatible phone has to be paired and
connected to SYNC.
•A connected Bluetooth-enabled phone must have the ability to make
and maintain an outgoing call at the time of the incident.
•A connected Bluetooth-enabled phone must have adequate network
coverage, battery power and signal strength.
•The vehicle must have battery power and be located in the United
States, Canada or in a territory in which 911 is the emergency
number.
In the Event of a Crash
Not all crashes deploy an airbag or activate the fuel pump shut-off
(which would activate 911 Assist); however, if 911 Assist is triggered,
SYNC tries to contact emergency services. If a connected phone is
damaged or loses connection to SYNC, SYNC searches for, and tries to
connect to, any available previously paired phone and tries to make the
call to 911.
Before making the call:
•
SYNC provides a short window of time (about 10 seconds) to cancel the
call. Failure to cancel the call results in SYNC attempting to dial 911.
•SYNC says the following, or a similar message: “SYNC will attempt to call
911, to cancel the call, press Cancel on your screen or press and hold the
phone button on your steering wheel.”
SYNC®385
2014 Navigator(nav)
Owners Guide gf, 1st Printing, June 2013
USA(fus)
Page 419 of 506
How To Use Voice Commands with Your System
Press the voice icon; after the tone, speak your command
clearly.
You can say these commands at any time.
“Audio” “Navigation”
“CD” “Radio”
“Disc” “SYNC”
*
“Display mode” “Tutorial”
“DVD” “User profile”
“Jukebox” “Video CD”
“Line in” “Voice settings”
“Mobile apps” “Help”
*See theSYNCchapter for more information on these features.
To access a list of all available voice commands, press the I hard button.
Select the Help tab on the touchscreen, then the Voice Commands tab
and choose the desired category.
Helpful Hints
•Make sure the interior of your vehicle is as quiet as possible. Wind
noise from open windows and road vibrations may prevent the system
from correctly recognizing spoken commands.
•After pressing the voice icon, wait until after the tone sounds and
Listening appears before saying a command. Any command spoken
prior to this does not register with the system.
•Speak naturally, without long pauses between words.
•At any time, you can interrupt the system while it is speaking by
pressing the voice icon.
418Navigation System (If Equipped)
2014 Navigator(nav)
Owners Guide gf, 1st Printing, June 2013
USA(fus)