automatic transmission LINCOLN NAVIGATOR 2019 Owner's Manual
[x] Cancel search | Manufacturer: LINCOLN, Model Year: 2019, Model line: NAVIGATOR, Model: LINCOLN NAVIGATOR 2019Pages: 645, PDF Size: 5.02 MB
Page 231 of 645
HILL START ASSIST
WARNING: The system does notreplace the parking brake. When you leaveyour vehicle, always apply the parkingbrake and shift the transmission into park(P) for automatic transmission or first gearfor manual transmission.
WARNING: You must remain in yourvehicle when the system turns on. At alltimes, you are responsible for controllingyour vehicle, supervising the system andintervening, if required. Failure to take caremay result in the loss of control of yourvehicle, serious personal injury or death.
Note:If the engine is revved excessively, orif a malfunction is detected, the system willbe deactivated.
The system makes it easier to pull awaywhen your vehicle is on a slope without theneed to use the parking brake.
When the system is active, your vehicle willremain stationary on the slope for two tothree seconds after you release the brakepedal. This allows you time to move yourfoot from the brake to the accelerator pedal. The brakes release automatically when theengine has sufficient torque to prevent yourvehicle from rolling down the grade. This isan advantage when pulling away on a slope,for example from a car park ramp, trafficlights or when reversing uphill into a parkingspace.
The system will activate automatically on anyslope that will cause significant vehiclerollback. For vehicles with a manualtransmission, you can switch this feature offusing the information display. SeeInformation Displays (page 120). The systemwill remain on or off depending on how itwas last set.
Note:There is no warning lamp to indicatethe system is either on or off.
Note:If your vehicle is equipped with AutoHold, Hill Start Assist will not be availablewhile Auto Hold is active.
Using Hill Start Assist
1. Bring your vehicle to a completestandstill. Keep the brake pedal pressedand select an uphill gear (for example,drive (D) or first (1) when facing uphill orreverse (R) when facing downhill).
2. If the sensors detect that your vehicle ison a slope, the system will activateautomatically.
3. When you remove your foot from thebrake pedal, your vehicle will remain onthe slope without rolling away for abouttwo or three seconds. This hold time willautomatically be extended if you are inthe process of driving off.
4. Drive off in the normal manner. Thebrakes will release automatically.
Switching the System On and Off
You can switch this feature on or off if yourvehicle is equipped with a manualtransmission and an information display. SeeGeneral Information (page 120). The systemremembers the last setting when you startyour vehicle.
228
Navigator (TB9) Canada/United States of America, enUSA, Edition date: 201808, First-Printing
Brakes
Page 232 of 645
If your vehicle is not equipped with a manualtransmission and an information display, youcannot turn the system on or off. When youswitch the ignition on, the systemautomatically turns on.
AUTO HOLD
WARNING: The system does notreplace the parking brake. When you leaveyour vehicle, always apply the parkingbrake.
WARNING: You must remain in yourvehicle when the system turns on. At alltimes, you are responsible for controllingyour vehicle, supervising the system andintervening, if required. Failure to take caremay result in the loss of control of yourvehicle, serious personal injury or death.
WARNING: The system will turn offif a malfunction is apparent. Failure to takecare may result in the loss of control ofyour vehicle, serious personal injury ordeath.
The system uses your vehicle's brakes tohold your vehicle at a standstill after you stopyour vehicle and release the brake pedal.For example, Auto Hold can assist you whilestopping at traffic lights or while in trafficjams by holding the brake pressure for youonce you bring your vehicle to a stop.
Make sure you switch the system off beforetowing with your vehicle.
Note:In case of a malfunction in the systemwhile Auto Hold actively holds the vehicle(for example, low power supply), a messageappears in the information display askingyou to press the brake pedal. If you see thismessage, press the brake pedalimmediately.
Note:The system only activates if itrecognizes it is applying enough brakepressure. On a steep hill or slope, make sureyou press the brake pedal sufficiently toactivate the system.
Note:In some cases, Auto Hold might handover to the parking brake. When the parkingbrake applies, the red brake lamp appears.This is normal. When you press theaccelerator pedal, the drive away releasefeature releases the parking brake.
Note:Auto Hold works on all road grades.
Press the button to switch the system on andoff. The indicator light illuminates when youswitch the system on.
229
Navigator (TB9) Canada/United States of America, enUSA, Edition date: 201808, First-Printing
BrakesE256165
Page 233 of 645
Note:You can only switch the system on ifyou close the door and fasten your seatbelt.
Note:The system turns off every time youpower down your vehicle.
Note:The system remembers the last settingwhen you start your vehicle.
Note:When in reverse (R), Auto Hold doesnot function.
When the system is off, your vehicle behavesthe same as a vehicle without Auto Hold.
There is an indicator lamp in the instrumentcluster that has two modes, active andunavailable:
The auto hold active indicatorilluminates in the informationdisplay when the system holdsyour vehicle stationary. When in active mode,press the brake pedal and the Auto Holdbutton to switch the system off.
The auto hold unavailable indicatorilluminates in the informationdisplay when the system is on butunavailable to hold your vehicle (for example,during Active Park Assist, Stay in NeutralMode, or when you do not fasten yourseatbelt or close the door).
Note:Make sure you switch off Auto Holdor use the Stay in Neutral mode before youenter a car wash. See AutomaticTransmission (page 210).
Using Auto Hold
1. Use the brakes to bring your vehicle toa complete stop. The auto hold activeindicator illuminates in the informationdisplay.
2. Release the brake pedal. The systemholds your vehicle at a standstill. Theauto hold active indicator remainsilluminated in the information display.
3. When you press the accelerator pedal,the system releases the brakes and youwill be able to drive off. Once you driveoff, the auto hold active indicator nolonger illuminates in the informationdisplay.
Note:The auto-start-stop system (ifequipped) may stop the engine when youpress the brake pedal. If this occurs, itrestarts once you press the acceleratorpedal. Auto Hold still holds your vehicle ata standstill with the engine off.
230
Navigator (TB9) Canada/United States of America, enUSA, Edition date: 201808, First-Printing
BrakesE197933 E197934
Page 236 of 645
Electronic Stability Control
The system enhances your vehicle’s abilityto prevent skids or lateral slides by applyingbrakes to one or more of the wheelsindividually and, if necessary, reducingengine power.
Roll Stability Control
The system enhances your vehicle’s abilityto prevent rollovers by detecting yourvehicle’s roll motion and the rate at which itchanges by applying the brakes to one ormore wheels individually.
Traction Control
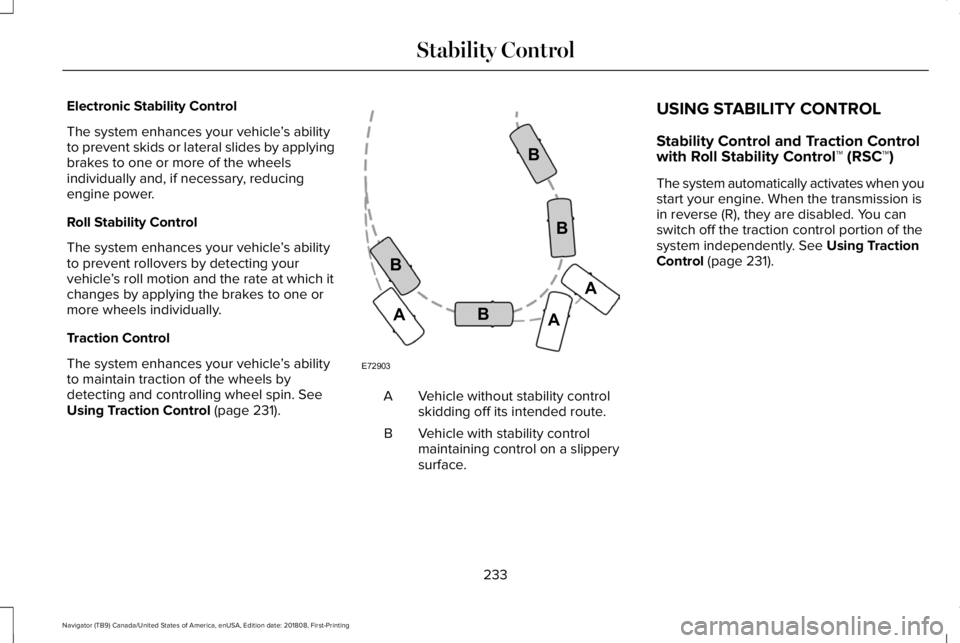
The system enhances your vehicle’s abilityto maintain traction of the wheels bydetecting and controlling wheel spin. SeeUsing Traction Control (page 231).Vehicle without stability controlskidding off its intended route.A
Vehicle with stability controlmaintaining control on a slipperysurface.
B
USING STABILITY CONTROL
Stability Control and Traction Controlwith Roll Stability Control™ (RSC™)
The system automatically activates when youstart your engine. When the transmission isin reverse (R), they are disabled. You canswitch off the traction control portion of thesystem independently. See Using TractionControl (page 231).
233
Navigator (TB9) Canada/United States of America, enUSA, Edition date: 201808, First-Printing
Stability ControlE72903A
AA
B
BB
B
Page 239 of 645
PRINCIPLE OF OPERATION
WARNING: To help avoid personalinjury, always use caution when in reverse(R) and when using the sensing system.
WARNING: The system may notdetect objects with surfaces that absorbreflection. Always drive with due care andattention. Failure to take care may resultin a crash.
WARNING: Traffic control systems,inclement weather, air brakes, externalmotors and fans may affect the correctoperation of the sensing system.This maycause reduced performance or false alerts.
WARNING: The system may notdetect small or moving objects, particularlythose close to the ground.
Note:Certain add-on devices installedaround the bumper or fascia may createfalse beeps. For example, large trailerhitches, bike or surfboard racks, license platebrackets, bumper covers or any other devicethat may block the normal detection zoneof the system.
Note:Keep the sensors, located on thebumper or fascia, free from snow, ice andlarge accumulations of dirt. If the sensorsare covered, the system’s accuracy can beaffected. Do not clean the sensors with sharpobjects.
Note:If your vehicle sustains damage to thebumper or fascia, leaving it misaligned orbent, the sensing zone may be alteredcausing inaccurate measurement ofobstacles or false alarms. See yourauthorized technician.
Note:When a trailer is connected to yourvehicle, the rear parking aid may detect thetrailer and therefore provide warnings.Disable the rear parking aid when a traileris connected to prevent these warnings.
Note:The sensing system cannot be turnedoff when a MyKey is present. See Principleof Operation (page 67).
We recommend that you take some time toget to know the system and its limitations byreading this section.
The sensing system warns the driver ofobstacles within a certain range of yourvehicle. The system automatically turns oneach time you switch the ignition on.
When receiving a detection warning, theradio volume reduces to a predeterminedlevel. After the warning goes away, the radiovolume returns to the previous level.
You can turn the system on or offby pressing the parking aid button.If your vehicle does not have aparking aid button, the system can beswitched off through the information displaymenu or from the pop-up message thatappears once you shift the transmission intoreverse (R). See General Information (page120).
236
Navigator (TB9) Canada/United States of America, enUSA, Edition date: 201808, First-Printing
Parking AidsE139213
Page 255 of 645
The default setting for the rear camera delayis OFF.
When shifting the transmission out of reverse(R) and into any gear other than park (P), thecamera image remains in the display until:
•Your vehicle speed reachesapproximately 6 mph (10 km/h).
•You shift your vehicle into park (P).
360 DEGREE CAMERA (IF EQUIPPED)
WARNING: The 360 degree camerasystem still requires the driver to use it inconjunction with looking out of thewindows, and checking the interior andexterior mirrors for maximum coverage.
WARNING: Objects that are close toeither corner of the bumper or under thebumper, might not be seen on the screendue to the limited coverage of the camerasystem.
WARNING: Use caution when turningcamera features on or off when thetransmission is not in park (P). Make sureyour vehicle is not moving.
Note:The 360 degree camera system turnsoff when your vehicle is in motion at lowspeed, except when in reverse (R).
The 360 degree camera system consists offront, side and rear cameras. The system:
•Allows you to see what is directly in frontor behind your vehicle.
•Provides cross traffic view in front andbehind your vehicle.
•Allows you to see a top-down view of thearea outside your vehicle, including theblind spots.
•Provides visibility around your vehicle toyou in parking maneuvers such as:
•Centering in a parking space.
•Obstacles near vehicle.
•Parallel parking.
Camera Views
The front camera enable button islocated near the display screenand turns on the front camerawhen your vehicle is not in reverse (R).
When in park (P), neutral (N) or drive (D), onlyimages from the front cameras are displayed.Press the camera button to display the frontcamera image on the display screen.
When in reverse (R), only images from therear cameras are displayed. When you shiftinto reverse (R), the rear view camera imageautomatically shows on the display screen.
Advanced Camera Views (If Equipped)
Additional camera views may beavailable for vehicles with specificfeatures. Press the small cameraicon shown on the top left corner of thedisplay screen to open the camera viewmenu.
252
Navigator (TB9) Canada/United States of America, enUSA, Edition date: 201808, First-Printing
Parking AidsE205884 E233726
Page 274 of 645
BLIND SPOT INFORMATION
SYSTEM
WARNING: Do not use the blind spotinformation system as a replacement forusing the interior and exterior mirrors orlooking over your shoulder beforechanging lanes. The blind spot informationsystem is not a replacement for carefuldriving.
WARNING: The system may notoperate properly during severe weatherconditions, for example snow, ice, heavyrain and spray. Always drive with due careand attention. Failure to take care mayresult in a crash.
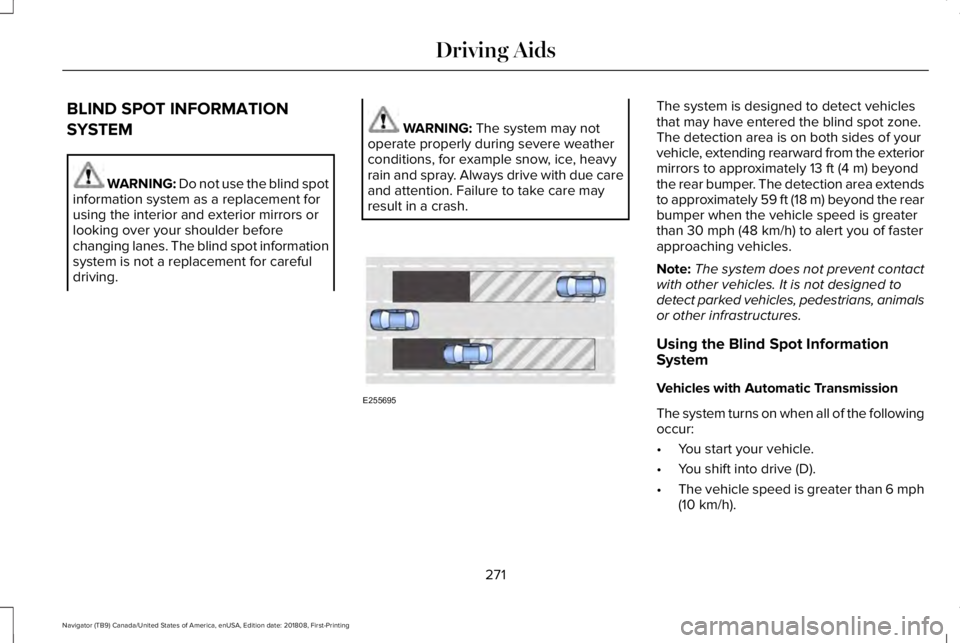
The system is designed to detect vehiclesthat may have entered the blind spot zone.The detection area is on both sides of yourvehicle, extending rearward from the exteriormirrors to approximately 13 ft (4 m) beyondthe rear bumper. The detection area extendsto approximately 59 ft (18 m) beyond the rearbumper when the vehicle speed is greaterthan 30 mph (48 km/h) to alert you of fasterapproaching vehicles.
Note:The system does not prevent contactwith other vehicles. It is not designed todetect parked vehicles, pedestrians, animalsor other infrastructures.
Using the Blind Spot InformationSystem
Vehicles with Automatic Transmission
The system turns on when all of the followingoccur:
•You start your vehicle.
•You shift into drive (D).
•The vehicle speed is greater than 6 mph(10 km/h).
271
Navigator (TB9) Canada/United States of America, enUSA, Edition date: 201808, First-Printing
Driving AidsE255695
Page 288 of 645
Changing the drive mode automaticallychanges the functionality of the followingsystems:
•Electronically power-assisted steeringsystem adjusts steering effort and feelbased on the mode you select. SeeSteering (page 279).
•Electronic stability control and tractioncontrol maintain your vehicle control inadverse conditions or high performancedriving. See Stability Control (page 232).
•Electronic throttle control enhances thepowertrain response to your inputs.
•Transmission controls optimize with shiftschedules tuned to each mode.
•Driveline settings optimize for eachmode.
Using the System
The system automatically tailors your vehicleconfiguration for each mode you select.
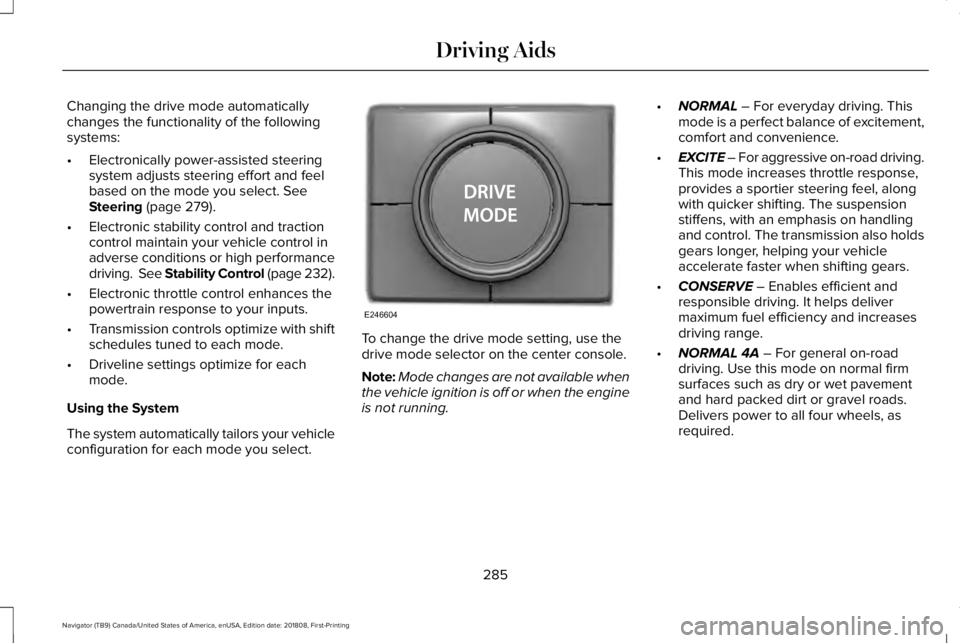
To change the drive mode setting, use thedrive mode selector on the center console.
Note:Mode changes are not available whenthe vehicle ignition is off or when the engineis not running.
•NORMAL – For everyday driving. Thismode is a perfect balance of excitement,comfort and convenience.
•EXCITE – For aggressive on-road driving.This mode increases throttle response,provides a sportier steering feel, alongwith quicker shifting. The suspensionstiffens, with an emphasis on handlingand control. The transmission also holdsgears longer, helping your vehicleaccelerate faster when shifting gears.
•CONSERVE – Enables efficient andresponsible driving. It helps delivermaximum fuel efficiency and increasesdriving range.
•NORMAL 4A – For general on-roaddriving. Use this mode on normal firmsurfaces such as dry or wet pavementand hard packed dirt or gravel roads.Delivers power to all four wheels, asrequired.
285
Navigator (TB9) Canada/United States of America, enUSA, Edition date: 201808, First-Printing
Driving AidsE246604
Page 321 of 645
Before Towing a Trailer
Practice turning, stopping and backing up toget the feel of your vehicle-trailercombination before starting on a trip. Whenturning, make wider turns so the trailerwheels clear curbs and other obstacles.
When Towing a Trailer
•Do not drive faster than 70 mph(113 km/h) during the first 500 mi(800 km).
•Do not make full-throttle starts.
•Check your hitch, electrical connectionsand trailer wheel lug nuts thoroughly afteryou have traveled 50 mi (80 km).
•When stopped in congested or heavytraffic during hot weather, place thetransmission in park (P) to aid engine andtransmission cooling and to help A/Cperformance.
•Turn off the speed control when carryingheavy loads or in hilly terrain. The speedcontrol may turn off automatically whenyou are towing on long, steep grades.
•Shift to a lower gear when driving downa long or steep hill. Do not apply thebrakes continuously, as they mayoverheat and become less effective.
•If your transmission has a Grade Assistor Tow/Haul feature, use this featurewhen towing. This provides enginebraking and helps eliminate excessivetransmission shifting for optimum fueleconomy and transmission cooling.
•If your vehicle has AdvanceTrac withRSC, this system may turn on duringtypical cornering maneuvers with aheavily loaded trailer. This is normal.Turning the corner at a slower speedwhile towing may reduce this tendency.
•If your vehicle has Adaptive suspension,you can select NORMAL or SPORT drivecontrol modes for better experiencewhen towing a trailer. See InformationDisplays (page 120).
•If you are towing a trailer frequently inhot weather, hilly conditions, at the grosscombined weight rating (or anycombination of these factors), considerrefilling your rear axle with synthetic gearlubricant (if the axle is not already filledwith it). See Capacities andSpecifications (page 418).
•Allow more distance for stopping with atrailer attached. Anticipate stops andbrake gradually.
•Avoid parking on a grade. However, ifyou must park on a grade:
1. Turn the steering wheel to point yourvehicle tires away from traffic flow.
2. Set your vehicle parking brake.
3. Place the transmission in park (P).
4.Place wheel chocks in the front and backof the trailer wheels.
Note:Chocks are not included with yourvehicle.
318
Navigator (TB9) Canada/United States of America, enUSA, Edition date: 201808, First-Printing
Towing
Page 323 of 645
Four-wheel Drive Vehicles Without 4x4LOW
If your vehicle does not have 4x4 Low, youcannot tow your vehicle with any wheels onthe ground or vehicle damage may occur.You must tow your vehicle with all fourwheels off the ground, for example whenusing a car-hauling trailer.
Four-wheel Drive Vehicles With 4x4 LOW
You can only tow a vehicle with 4X4 LOWwith all wheels on the ground by placing thetransfer case in its neutral position andengaging the four wheel down towingfeature. Perform the steps outlined in thefollowing section after positioning yourvehicle behind the tow vehicle and properlysecuring them together.
Four-wheel-down Towing
Note:If completed successfully, theinformation display shows Neutral TowEnabled Leave Transmission in Neutral.This indicates that your vehicle is safe to towwith all wheels on the ground.
Note:If you do not see the message in theinformation display, you must perform theprocedure again from the beginning.
Note:Make sure you properly secure yourvehicle to the tow vehicle.
1. Start your vehicle.
2. Confirm that your vehicle is in NORMALmode. See Drive Mode Control (page284).
3. Place your vehicle in stay in neutralmode. See Automatic Transmission(page 210).
4. Switch your vehicle off by pressing theengine START/STOP button once. ATransmission Not in Park messageappears in the information display.
5.Place your vehicle in accessory mode bypressing the start button once withoutpressing the brake pedal.
6. Press and hold the brake pedal.
7. Enable neutral tow through theinformation display by selecting Settingsfrom the menu. See General Information(page 120).
8. Then select Advanced Settings.
9. Then select Vehicle.
10. Then select Neutral Tow.
11. Press and hold the OK button until theinformation display states Neutral TowEnabled Leave Transmission inNeutral.
Note:If completed successfully, theinformation display shows Neutral TowEnabled Leave Transmission in Neutral.This indicates that your vehicle is safe to towwith all wheels on the ground.
Note:If you do not see the message in theinformation display, you must perform theprocedure again from the beginning.
Note:You may hear an audible noise as thetransfer case shifts into neutral, this isnormal.
12. Leave the transmission in neutral (N)and switch the ignition off by pressingthe engine START/STOP button oncewithout pressing the brake pedal. Youdo not need to leave your keys in thevehicle. You can lock and unlock yourvehicle as you normally do.
320
Navigator (TB9) Canada/United States of America, enUSA, Edition date: 201808, First-Printing
Towing