page 32 LINCOLN NAVIGATOR 2020 Owners Manual
[x] Cancel search | Manufacturer: LINCOLN, Model Year: 2020, Model line: NAVIGATOR, Model: LINCOLN NAVIGATOR 2020Pages: 622, PDF Size: 6.47 MB
Page 17 of 622
Note:
Event data recorder data is recorded
by your vehicle only if a non-trivial crash
situation occurs; no data is recorded by the
event data recorder under normal driving
conditions and no personal data or
information (e.g., name, gender, age, and
crash location) is recorded. However, other
parties, such as law enforcement, could
combine the event data recorder data with
the type of personally identifying data
routinely acquired during a crash
investigation.
To read data recorded by an event data
recorder, special equipment is required, and
access to the vehicle or the event data
recorder is needed. In addition to the vehicle
manufacturer, other parties, such as law
enforcement, that have such special
equipment, can read the information if they
have access to the vehicle or the event data
recorder. Comfort, Convenience and
Entertainment Data
Your vehicle has electronic control units that
have the ability to store data based on your
personalized settings. The data is stored
locally in the vehicle or on devices that you
connect to it, for example, a USB drive or
digital music player. You can delete some of
this data and also choose whether to share
it through the services to which you
subscribe. See Settings (page 513).
Comfort and Convenience Data
Data recorded includes, for example:
• Seat and steering wheel position.
• Climate control settings.
• Radio presets.
Entertainment Data
Data recorded includes, for example:
• Music, videos or album art.
• Contacts and corresponding address
book entries.
• Navigation destinations. Services That We Provide
If you use our services, we collect and use
data, for example, account information,
vehicle location and driving characteristics,
that could identify you. We transmit this data
through a dedicated, protected connection.
We only collect and use data to enable your
use of our services to which you have
subscribed, with your consent or where
permitted by law. For additional information,
see the terms and conditions of the services
to which you have subscribed.
Services That Third Parties Provide
We recommend that you review the terms
and conditions and data privacy information
for any services to which you subscribe. We
take no responsibility for services that third
parties provide.
14
Navigator (TB9) Canada/United States of America, enUSA, Edition date: 201907, Second-Printing Introduction
Page 18 of 622

Vehicles With a Modem (If Equipped)
The modem has a SIM. The
modem was enabled when your
vehicle was built and periodically
sends messages to stay connected to the
cell phone network, receive automatic
software updates and send vehicle-related
information to us, for example, diagnostic
information. These messages could include
information that identifies your vehicle, the
SIM and the electronic serial number of the
modem. Cell phone network service
providers could have access to additional
information, for example, cell phone network
tower identification. For additional
information about our privacy policy, visit
www .ConnectedLincoln. com or refer to your
local Lincoln website.
Note: The modem continues to send this
information unless you disable the modem
or stop the modem from sharing vehicle data
by changing the modem settings. .
Note: The service can be unavailable or
interrupted for a number of reasons, for
example, environmental or topographical
conditions and data plan coverage. Note:
To find out if your vehicle has a
modem, visit www .ConnectedLincoln. com .
Vehicles With SYNC
Mobile Device Data
If you connect a mobile device to your
vehicle, you can display data from your
device on the touchscreen for example,
music and album art. You can share your
vehicle data with mobile apps on your device
through the system.
See Apps (page 510).
The mobile apps function operates by your
connected device sending data to us in the
United States. The data is encrypted and
includes the vehicle identification number of
your vehicle, the SYNC module serial
number, odometer, enabled apps, usage
statistics and debugging information. We
retain it only as long as necessary to provide
the service, to troubleshoot, for continuous
improvement and to offer you products and
services that may be of interest to you
according to your preferences and where
allowed by law. If you connect a cell phone to the system,
the system creates a profile that links to that
cell phone. The cell phone profile enables
more mobile features and efficient operation.
The profile contains, for example, data from
your phonebook, read and unread text
messages and call history, including history
of calls when your cell phone was not
connected to the system.
If you connect a media device, the system
creates and retains a media device index of
supported media content. The system also
records a short diagnostic log of
approximately 10 minutes of all recent system
activity.
The cell phone profile, media device index
and diagnostic log remain in your vehicle
unless you delete them and are generally
accessible only in your vehicle when you
connect your cell phone or media device. If
you no longer plan to use the system or your
vehicle, we recommend you use the master
reset function to erase the stored
information.
See Settings (page 513).
15
Navigator (TB9) Canada/United States of America, enUSA, Edition date: 201907, Second-Printing Introduction
Page 22 of 622
Using mobile communications equipment is
becoming increasingly important in the
conduct of business and personal affairs.
However, you must not compromise your
own or others
’ safety when using such
equipment. Mobile communications can
enhance personal safety and security when
appropriately used, particularly in emergency
situations. Safety must be paramount when
using mobile communications equipment to
avoid negating these benefits. Mobile
communication equipment includes, but is
not limited to, cellular phones, pagers,
portable email devices, text messaging
devices and portable two-way radios.
EXPORT UNIQUE OPTIONS
For your particular global region, your vehicle
may be equipped with features and options
that are different from the features and
options that are described in this Owner’ s
Manual. A market unique supplement may
be supplied that complements this book. By
referring to the market unique supplement,
if provided, you can properly identify those
features, recommendations and specifications that are unique to your vehicle.
This Owner’
s Manual is written primarily for
the U.S. and Canadian Markets. Features or
equipment listed as standard may be
different on units built for export. Refer to
this Owner’ s Manual for all other required
information and warnings.
19
Navigator (TB9) Canada/United States of America, enUSA, Edition date: 201907, Second-Printing Introduction
Page 25 of 622
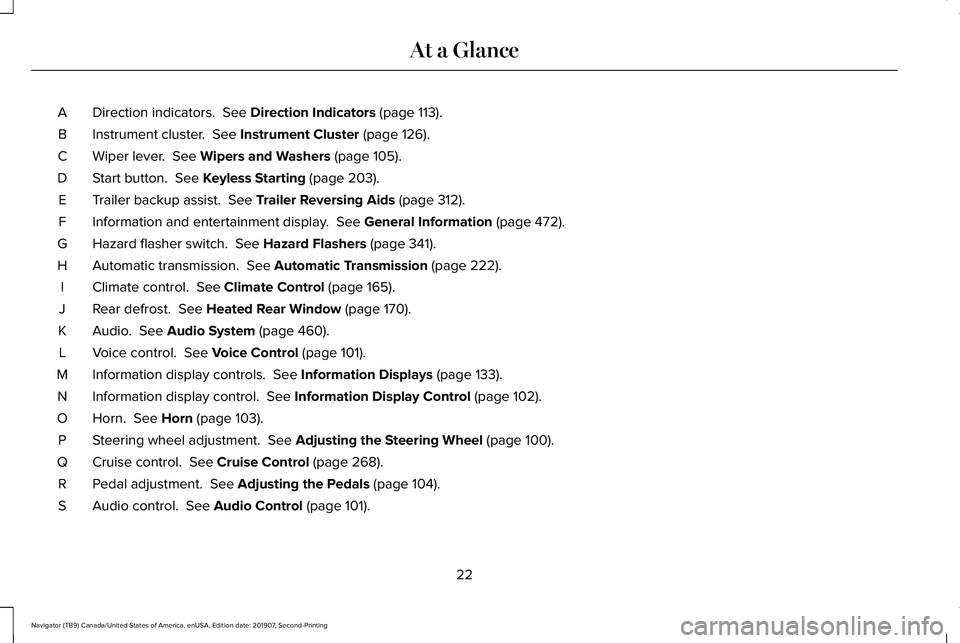
Direction indicators. See Direction Indicators (page 113).
A
Instrument cluster.
See Instrument Cluster (page 126).
B
Wiper lever.
See Wipers and Washers (page 105).
C
Start button.
See Keyless Starting (page 203).
D
Trailer backup assist.
See Trailer Reversing Aids (page 312).
E
Information and entertainment display.
See General Information (page 472).
F
Hazard flasher switch.
See Hazard Flashers (page 341).
G
Automatic transmission.
See Automatic Transmission (page 222).
H
Climate control.
See Climate Control (page 165).
I
Rear defrost.
See Heated Rear Window (page 170).
J
Audio.
See Audio System (page 460).
K
Voice control.
See Voice Control (page 101).
L
Information display controls.
See Information Displays (page 133).
M
Information display control.
See Information Display Control (page 102).
N
Horn.
See Horn (page 103).
O
Steering wheel adjustment.
See Adjusting the Steering Wheel (page 100).
P
Cruise control.
See Cruise Control (page 268).
Q
Pedal adjustment.
See Adjusting the Pedals (page 104).
R
Audio control.
See Audio Control (page 101).
S
22
Navigator (TB9) Canada/United States of America, enUSA, Edition date: 201907, Second-Printing At a Glance
Page 26 of 622
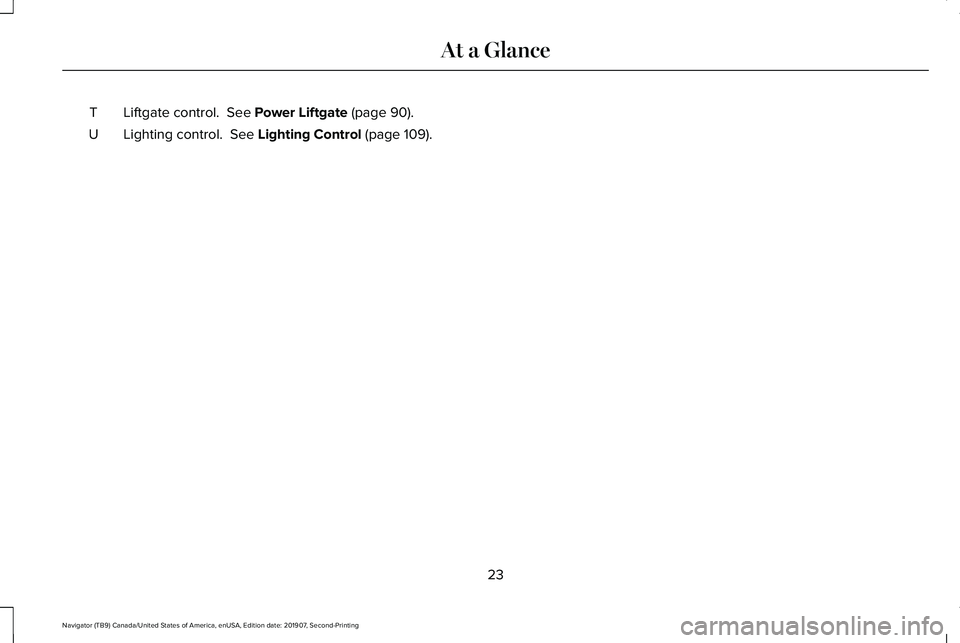
Liftgate control. See Power Liftgate (page 90).
T
Lighting control.
See Lighting Control (page 109).
U
23
Navigator (TB9) Canada/United States of America, enUSA, Edition date: 201907, Second-Printing At a Glance
Page 30 of 622
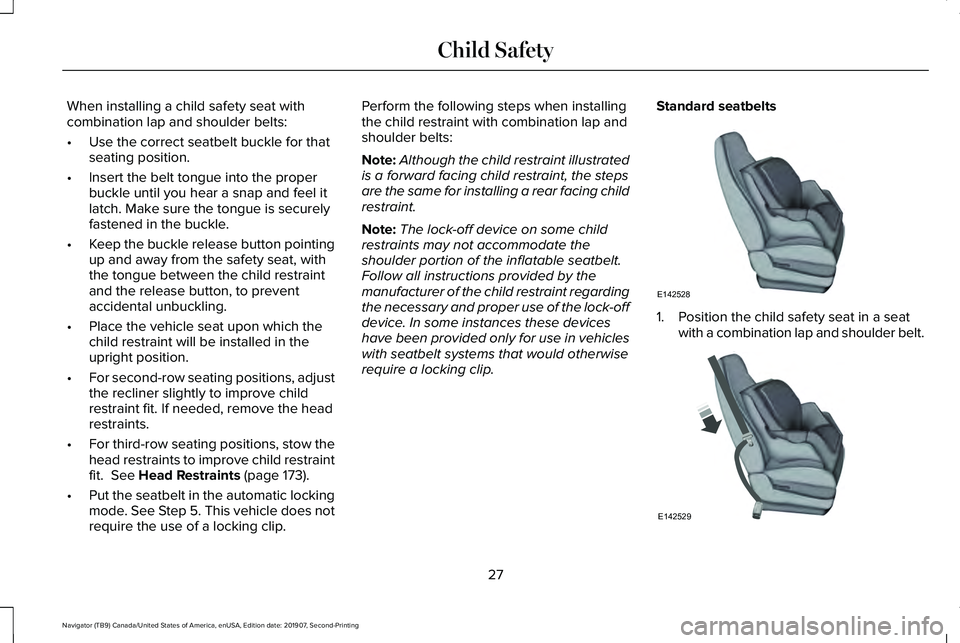
When installing a child safety seat with
combination lap and shoulder belts:
•
Use the correct seatbelt buckle for that
seating position.
• Insert the belt tongue into the proper
buckle until you hear a snap and feel it
latch. Make sure the tongue is securely
fastened in the buckle.
• Keep the buckle release button pointing
up and away from the safety seat, with
the tongue between the child restraint
and the release button, to prevent
accidental unbuckling.
• Place the vehicle seat upon which the
child restraint will be installed in the
upright position.
• For second-row seating positions, adjust
the recliner slightly to improve child
restraint fit. If needed, remove the head
restraints.
• For third-row seating positions, stow the
head restraints to improve child restraint
fit. See Head Restraints (page 173).
• Put the seatbelt in the automatic locking
mode. See Step 5. This vehicle does not
require the use of a locking clip. Perform the following steps when installing
the child restraint with combination lap and
shoulder belts:
Note:
Although the child restraint illustrated
is a forward facing child restraint, the steps
are the same for installing a rear facing child
restraint.
Note: The lock-off device on some child
restraints may not accommodate the
shoulder portion of the inflatable seatbelt.
Follow all instructions provided by the
manufacturer of the child restraint regarding
the necessary and proper use of the lock-off
device. In some instances these devices
have been provided only for use in vehicles
with seatbelt systems that would otherwise
require a locking clip. Standard seatbelts 1. Position the child safety seat in a seat
with a combination lap and shoulder belt. 27
Navigator (TB9) Canada/United States of America, enUSA, Edition date: 201907, Second-Printing Child SafetyE142528 E142529
Page 47 of 622
Note:
The child restraint must rest tightly
against the vehicle seat upon which it is
installed. It may be necessary to lift or
remove the head restraint. See Seats (page
172).
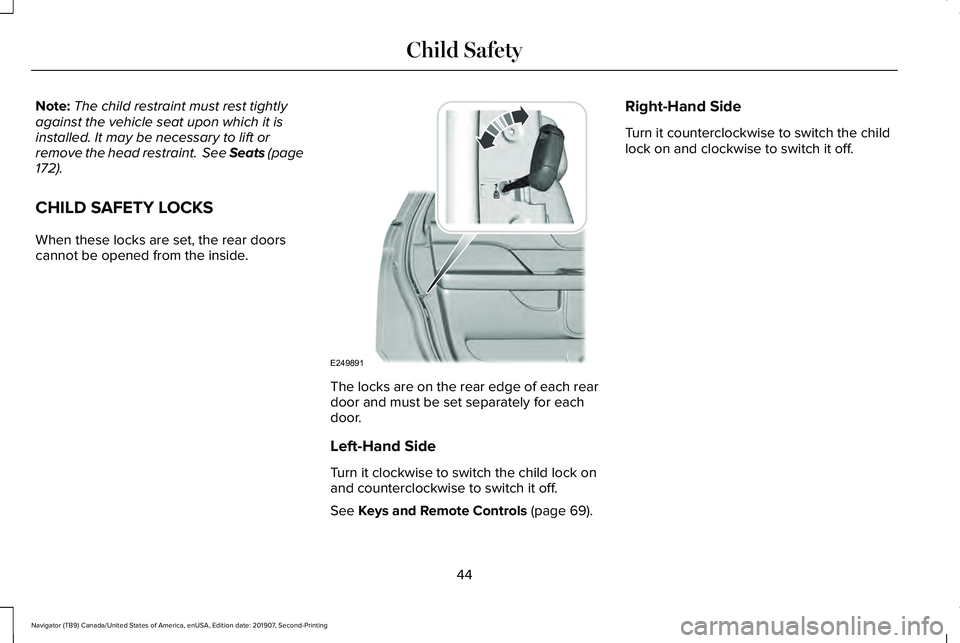
CHILD SAFETY LOCKS
When these locks are set, the rear doors
cannot be opened from the inside. The locks are on the rear edge of each rear
door and must be set separately for each
door.
Left-Hand Side
Turn it clockwise to switch the child lock on
and counterclockwise to switch it off.
See
Keys and Remote Controls (page 69).Right-Hand Side
Turn it counterclockwise to switch the child
lock on and clockwise to switch it off.
44
Navigator (TB9) Canada/United States of America, enUSA, Edition date: 201907, Second-Printing Child SafetyE249891
Page 52 of 622
length of webbing back toward the stowed
position. For rear seatbelts, recline the rear
seat backrest or push the seat backrest
cushion away from the seatbelt. Feed a small
length of webbing back toward the stowed
position.
Automatic Locking Mode
In this mode, the shoulder belt automatically
pre-locks. The belt still retracts to remove
any slack in the shoulder belt. The automatic
locking mode is not available on the driver
seatbelt.
When to Use the Automatic Locking Mode
Use this mode when you install a child safety
seat, except a booster, in the passenger front
or rear seating positions. Properly restrain
children 12 years old and under in a rear
seating position whenever possible. See
Seatbelts (page 45).
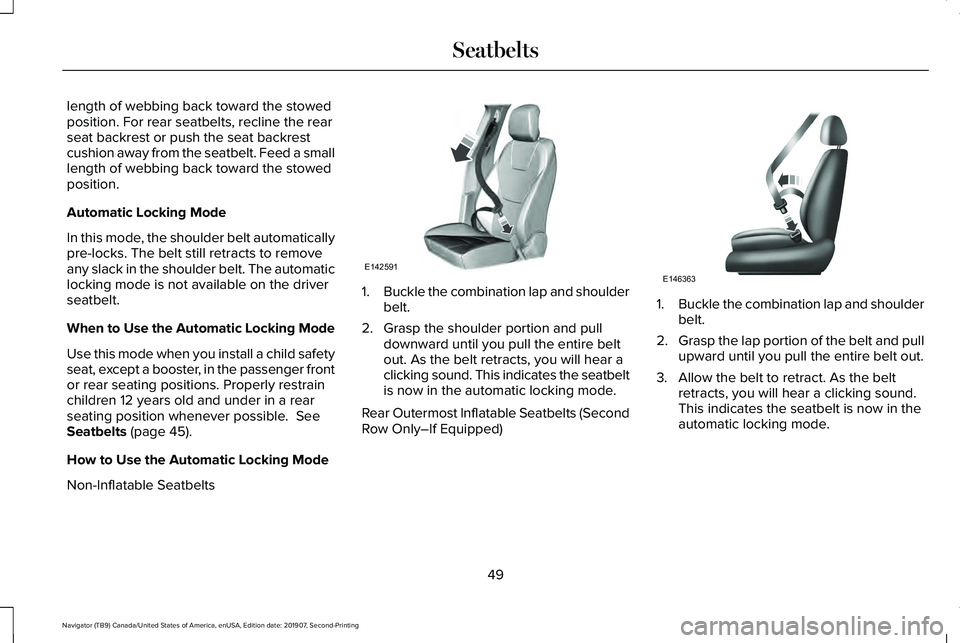
How to Use the Automatic Locking Mode
Non-Inflatable Seatbelts 1.
Buckle the combination lap and shoulder
belt.
2. Grasp the shoulder portion and pull downward until you pull the entire belt
out. As the belt retracts, you will hear a
clicking sound. This indicates the seatbelt
is now in the automatic locking mode.
Rear Outermost Inflatable Seatbelts (Second
Row Only–If Equipped) 1.
Buckle the combination lap and shoulder
belt.
2. Grasp the lap portion of the belt and pull
upward until you pull the entire belt out.
3. Allow the belt to retract. As the belt retracts, you will hear a clicking sound.
This indicates the seatbelt is now in the
automatic locking mode.
49
Navigator (TB9) Canada/United States of America, enUSA, Edition date: 201907, Second-Printing SeatbeltsE142591 E146363
Page 56 of 622
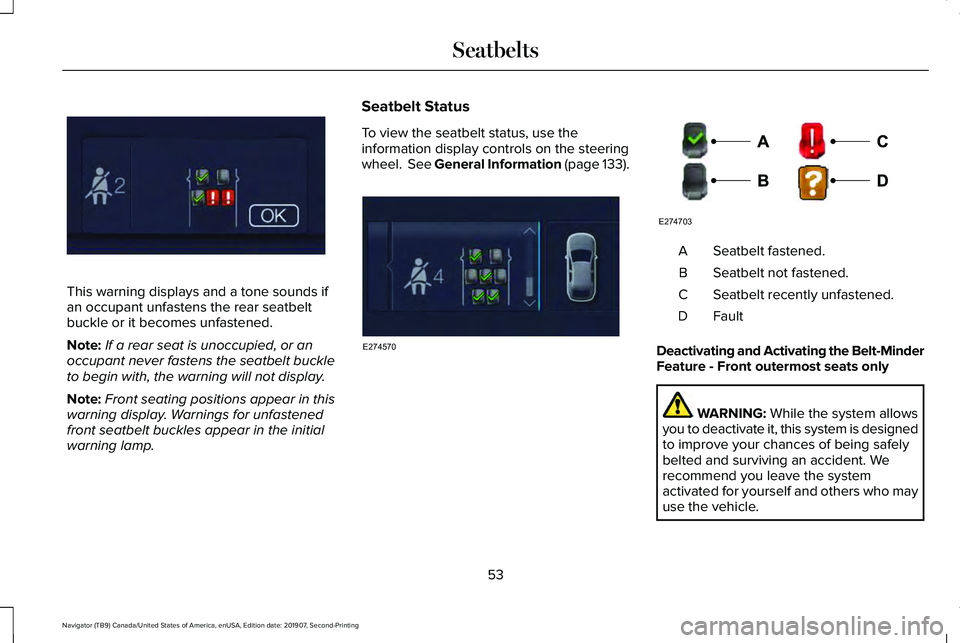
This warning displays and a tone sounds if
an occupant unfastens the rear seatbelt
buckle or it becomes unfastened.
Note:
If a rear seat is unoccupied, or an
occupant never fastens the seatbelt buckle
to begin with, the warning will not display.
Note: Front seating positions appear in this
warning display. Warnings for unfastened
front seatbelt buckles appear in the initial
warning lamp. Seatbelt Status
To view the seatbelt status, use the
information display controls on the steering
wheel. See General Information (page 133). Seatbelt fastened.
A
Seatbelt not fastened.
B
Seatbelt recently unfastened.
C
FaultD
Deactivating and Activating the Belt-Minder
Feature - Front outermost seats only WARNING: While the system allows
you to deactivate it, this system is designed
to improve your chances of being safely
belted and surviving an accident. We
recommend you leave the system
activated for yourself and others who may
use the vehicle.
53
Navigator (TB9) Canada/United States of America, enUSA, Edition date: 201907, Second-Printing SeatbeltsE313730 E274570 E274703
Page 57 of 622
Note:
The driver and front passenger
warnings switch on and off independently.
When you perform this procedure for one
seating position, do not buckle the other
position as this terminates the process.
Read Steps 1 - 4 before starting the
procedure.
Make sure that:
• You set the parking brake.
• The transmission is in park (P).
• The ignition is off.
• You close all vehicle doors.
• You unbuckle the driver and front
passenger seatbelts.
1. Switch the ignition on. Do not start the engine.
2. Wait until the seatbelt warning lamp turns
off (about one minute). After Step 2, wait
an additional five seconds before
proceeding with Step 3. Once you start
Step 3, you must complete the procedure
within 60 seconds. 3.
For the seating position you are switching
off, buckle then unbuckle the seatbelt
three times at a moderate speed, ending
in the unbuckled state. After Step 3, the
seatbelt warning lamp turns on.
4. When the seatbelt warning lamp is on, buckle then unbuckle the seatbelt. After
Step 4, the seatbelt warning lamp flashes
for confirmation.
• This switches the feature off if it is
currently on.
• This switches the feature on if it is
currently off.
CHILD RESTRAINT AND SEATBELT
MAINTENANCE
Inspect the vehicle seatbelts and child safety
seat systems periodically to make sure they
work properly and are not damaged. Inspect
the vehicle and child restraint seatbelts to
make sure there are no nicks, tears or cuts.
Replace if necessary. All vehicle seatbelt
assemblies, including retractors, buckles,
front seatbelt buckle assemblies, buckle
support assemblies (slide bar-if equipped), shoulder belt height adjusters (if equipped),
shoulder belt guide on seat backrest (if
equipped), child safety seat LATCH and
tether anchors, and attaching hardware,
should be inspected after a crash. Read the
child restraint manufacturer's instructions for
additional inspection and maintenance
information specific to the child restraint.
We recommend that all seatbelt assemblies
in use in vehicles involved in a crash be
replaced. However, if the crash was minor
and an authorized dealer finds that the belts
do not show damage and continue to
operate properly, they do not need to be
replaced. Seatbelt assemblies not in use
during a crash should also be inspected and
replaced if either damage or improper
operation is noted.
Properly care for seatbelts. See Vehicle
Care (page 393).
54
Navigator (TB9) Canada/United States of America, enUSA, Edition date: 201907, Second-Printing Seatbelts