technical specifications LINCOLN NAVIGATOR 2020 Owners Manual
[x] Cancel search | Manufacturer: LINCOLN, Model Year: 2020, Model line: NAVIGATOR, Model: LINCOLN NAVIGATOR 2020Pages: 622, PDF Size: 6.47 MB
Page 9 of 622
Cleaning the Interior
...................................397
Cleaning the Instrument Panel and Instrument Cluster Lens ........................
399
Cleaning Leather Seats .............................
400
Repairing Minor Paint Damage ...............
400
Cleaning the Wheels ..................................
400
Vehicle Storage ............................................
401
Body Styling Kits ..........................................
403
Wheels and Tires
General Information ....................................
404
Tire Care ........................................................
406
Using Snow Chains ....................................
420
Tire Pressure Monitoring System .............
421
Changing a Road Wheel ...........................
426
Technical Specifications ............................
433
Capacities and Specifications
Engine Specifications .................................
435
Motorcraft Parts ...........................................
436
Vehicle Identification Number ..................
437
Vehicle Certification Label ........................
437
Transmission Code Designation .............
438Capacities and Specifications
..................
439
Bulb Specification Chart ............................
450
Vehicle Identification
Installing the Vehicle Identification Card ......................................................................
453
Connected Vehicle
Connected Vehicle Requirements ..........
454
Connected Vehicle Limitations ................
454
Connecting the Vehicle to a Mobile Network .....................................................
454
Connecting the Vehicle to a Wi-Fi Network ......................................................................
454
Connected Vehicle – Troubleshooting ......................................................................
455
Vehicle Wi-Fi Hotspot
Creating a Vehicle Wi-Fi Hotspot ............
458
Changing the Vehicle Wi-Fi Hotspot Name or Password .............................................
458
Audio System
General Information ...................................
460Audio Unit
......................................................
461
Digital Radio .................................................
464
Satellite Radio ..............................................
467
USB Port ........................................................
470
SYNC™ 3
General Information ....................................
472
Using Voice Recognition ...........................
474
Entertainment ...............................................
485
Climate ...........................................................
497
Phone .............................................................
500
Navigation .....................................................
502
Apps ................................................................
510
Settings ...........................................................
513
SYNC™ 3 Troubleshooting .........................
515
Accessories
Accessories ..................................................
532
Lincoln Protect
Lincoln Protect .............................................
534
6
Navigator (TB9) Canada/United States of America, enUSA, Edition date: 201907, Second-Printing Table of Contents
Page 72 of 622
GENERAL INFORMATION ON
RADIO FREQUENCIES
This device complies with Part 15 of the FCC
Rules and with Industry Canada
license-exempt RSS standard(s). Operation
is subject to the following two conditions: (1)
This device may not cause harmful
interference, and (2) This device must accept
any interference received, including
interference that may cause undesired
operation.
WARNING: Changes or modifications
not expressively approved by the party
responsible for compliance could void the
user's authority to operate the equipment.
The term "IC:" before the radio certification
number only signifies that Industry Canada
technical specifications were met.
The typical operating range for your
transmitter is approximately 33 ft (10 m).
Vehicles with the remote start feature will
have a greater range. One of the following could cause a decrease
in operating range:
•
Weather conditions.
• Nearby radio towers.
• Structures around the vehicle.
• Other vehicles parked next to your
vehicle.
The radio frequency used by your remote
control can also be used by other radio
transmitters, for example amateur radios,
medical equipment, wireless headphones,
wireless remote controls, cell phones, battery
chargers and alarm systems. If the
frequencies are jammed, you will not be able
to use your remote control. You can lock and
unlock the doors with the key.
Note: Make sure to lock your vehicle before
leaving it unattended.
Note: If you are in range, the remote control
will operate if you press any button
unintentionally.
Note: The remote control contains sensitive
electrical components. Exposure to moisture
or impact may cause permanent damage. Intelligent Access
(If Equipped)
The system uses a radio frequency signal to
communicate with your vehicle and authorize
your vehicle to unlock when one of the
following conditions are met:
• You activate the front exterior door
handle switch.
• You press the luggage compartment
button.
• You press a button on the transmitter.
If excessive radio frequency interference is
present in the area or if the transmitter
battery is low, you may need to mechanically
unlock your door. You can use the
mechanical key blade in your intelligent
access key to open the driver door in this
situation.
See Remote Control (page 69).
REMOTE CONTROL
Intelligent Access Key
Note: You may not be able to shift out of
park (P) unless the intelligent access key is
inside your vehicle.
69
Navigator (TB9) Canada/United States of America, enUSA, Edition date: 201907, Second-Printing Keys and Remote Controls
Page 199 of 622
2. The indicator light begins to flash after
20 seconds. Without releasing the
button, follow Step 1 in the Programming
section.
For questions or comments, contact
HomeLink at www.homelink.com,
www.youtube.com/user/HomeLinkGentex
or by calling the toll-free help line at
1-800-355-3515.
FCC and RSS-210 Industry Canada
Compliance
This device complies with Part 15 of the FCC
Rules and with RSS-210 of Industry Canada.
Operation is subject to the following two
conditions: (1) this device may not cause
harmful interference, and (2) this device must
accept any interference received, including
interference that may cause undesired
operation. WARNING: Changes or modifications
not expressively approved by the party
responsible for compliance could void the
user's authority to operate the equipment.
The term "IC:" before the radio certification
number only signifies that Industry Canada
technical specifications were met.
This equipment complies with FCC radiation
exposure limits set forth for an uncontrolled
environment. End Users must follow the
specific operating instructions for satisfying
RF exposure compliance. This transmitter
must be at least 8 in (20 cm) from the user
and must not be co-located or operating in
conjunction with any other antenna or
transmitter.
The term “IC:” before the
certification/registration number only signifies
that Industry Canada technical specifications
were met.
196
Navigator (TB9) Canada/United States of America, enUSA, Edition date: 201907, Second-Printing Garage Door Opener
Page 201 of 622
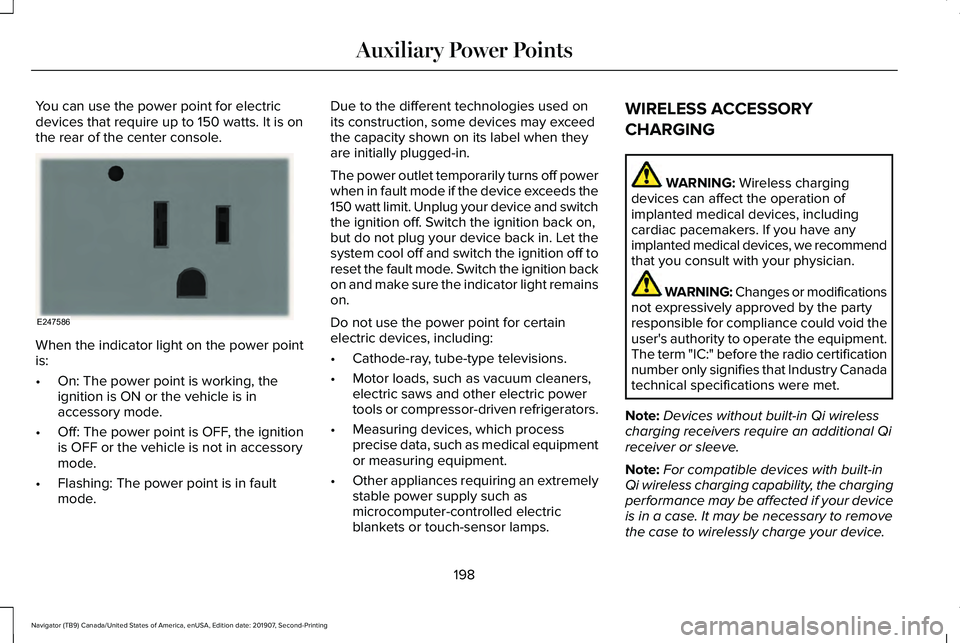
You can use the power point for electric
devices that require up to 150 watts. It is on
the rear of the center console.
When the indicator light on the power point
is:
•
On: The power point is working, the
ignition is ON or the vehicle is in
accessory mode.
• Off: The power point is OFF, the ignition
is OFF or the vehicle is not in accessory
mode.
• Flashing: The power point is in fault
mode. Due to the different technologies used on
its construction, some devices may exceed
the capacity shown on its label when they
are initially plugged-in.
The power outlet temporarily turns off power
when in fault mode if the device exceeds the
150 watt limit. Unplug your device and switch
the ignition off. Switch the ignition back on,
but do not plug your device back in. Let the
system cool off and switch the ignition off to
reset the fault mode. Switch the ignition back
on and make sure the indicator light remains
on.
Do not use the power point for certain
electric devices, including:
•
Cathode-ray, tube-type televisions.
• Motor loads, such as vacuum cleaners,
electric saws and other electric power
tools or compressor-driven refrigerators.
• Measuring devices, which process
precise data, such as medical equipment
or measuring equipment.
• Other appliances requiring an extremely
stable power supply such as
microcomputer-controlled electric
blankets or touch-sensor lamps. WIRELESS ACCESSORY
CHARGING WARNING: Wireless charging
devices can affect the operation of
implanted medical devices, including
cardiac pacemakers. If you have any
implanted medical devices, we recommend
that you consult with your physician. WARNING: Changes or modifications
not expressively approved by the party
responsible for compliance could void the
user's authority to operate the equipment.
The term "IC:" before the radio certification
number only signifies that Industry Canada
technical specifications were met.
Note: Devices without built-in Qi wireless
charging receivers require an additional Qi
receiver or sleeve.
Note: For compatible devices with built-in
Qi wireless charging capability, the charging
performance may be affected if your device
is in a case. It may be necessary to remove
the case to wirelessly charge your device.
198
Navigator (TB9) Canada/United States of America, enUSA, Edition date: 201907, Second-Printing Auxiliary Power PointsE247586
Page 425 of 622
Each tire, including the spare (if
provided), should be checked
monthly when cold and inflated to
the inflation pressure recommended by the
vehicle manufacturer on the vehicle placard
or tire inflation pressure label. (If your vehicle
has tires of a different size than the size
indicated on the vehicle placard or tire
inflation pressure label, you should
determine the proper tire inflation pressure
for those tires).
As an added safety feature, your vehicle has
been equipped with a Tire Pressure
Monitoring System (TPMS) that illuminates a
low tire pressure telltale when one or more
of your tires is significantly under-inflated.
Accordingly, when the low tire pressure
telltale illuminates, you should stop and
check your tires as soon as possible, and
inflate them to the proper pressure. Driving
on a significantly under-inflated tire causes
the tire to overheat and can lead to tire
failure. Under-inflation also reduces fuel
efficiency and tire tread life, and could affect
the vehicle ’s handling and stopping ability. Please note that the TPMS is not a substitute
for proper tire maintenance, and it is the
driver’
s responsibility to maintain correct tire
pressure, even if under-inflation has not
reached the level to trigger illumination of
the TPMS low tire pressure telltale.
Your vehicle has also been equipped with a
TPMS malfunction indicator to indicate when
the system is not operating properly. The
TPMS malfunction indicator is combined with
the low tire pressure telltale. When the
system detects a malfunction, the telltale will
flash for approximately one minute and then
remain continuously illuminated. This
sequence will continue upon subsequent
vehicle start-ups as long as the malfunction
exists.
When the malfunction indicator is illuminated,
the system will not be able to detect or signal
low tire pressure as intended. TPMS
malfunctions could occur for a variety of
reasons, including the installation of
replacement or alternate tires or wheels on
the vehicle that prevent the TPMS from functioning properly. Always check the TPMS
malfunction telltale after replacing one or
more tires or wheels on your vehicle to
ensure that the replacement or alternate tires
and wheels allow the TPMS to continue to
function properly.
This device complies with Part 15 of the FCC
Rules and with License exempt RSS
Standards of Industry Canada. Operation is
subject to the following two conditions:
1. This device will not cause harmful
interference, and
2. This device must accept any interference
received, including interference that
could cause undesired operation.
Note: Changes or modifications not
expressively approved by the party
responsible for compliance could void the
user's authority to operate the equipment.
The term "IC:" before the radio certification
number only signifies that Industry Canada
technical specifications were met.
422
Navigator (TB9) Canada/United States of America, enUSA, Edition date: 201907, Second-Printing Wheels and Tires
Page 434 of 622
WARNING: It is recommended that
the wheels of the vehicle be chocked, and
that no person should remain in a vehicle
that is being jacked. WARNING:
Failure to follow these
guidelines could result in an increased risk
of loss of vehicle control, injury or death.
Note: The jack does not require
maintenance or additional lubrication over
the service life of your vehicle.
Note: Both the front and rear jacking points
are on the frame rails. The correct locations
on the frame rails are marked with an arrow
punched into the frame rail. Jack at the
specified locations to avoid damaging your
vehicle.
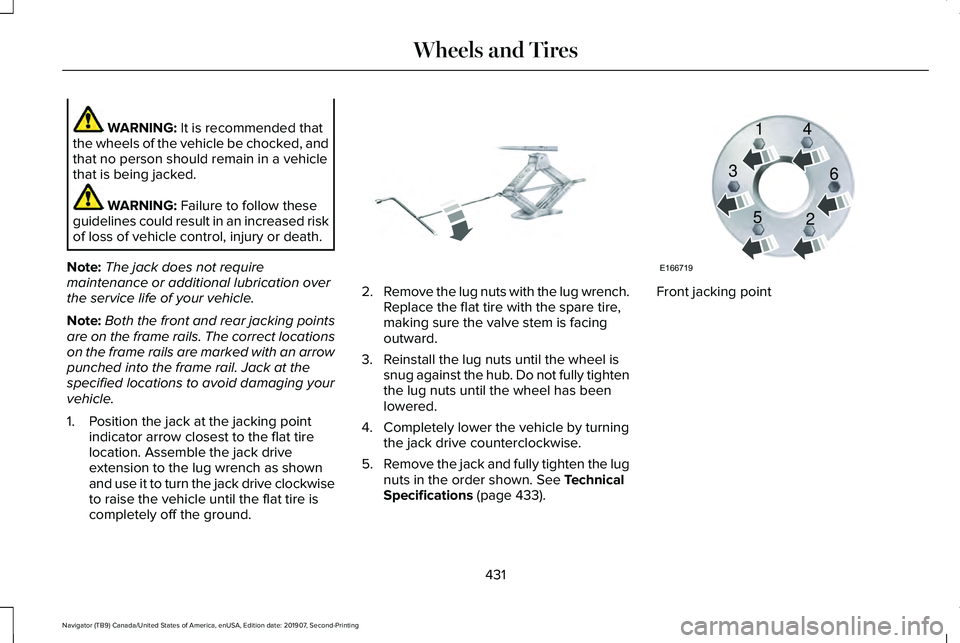
1. Position the jack at the jacking point indicator arrow closest to the flat tire
location. Assemble the jack drive
extension to the lug wrench as shown
and use it to turn the jack drive clockwise
to raise the vehicle until the flat tire is
completely off the ground. 2.
Remove the lug nuts with the lug wrench.
Replace the flat tire with the spare tire,
making sure the valve stem is facing
outward.
3. Reinstall the lug nuts until the wheel is snug against the hub. Do not fully tighten
the lug nuts until the wheel has been
lowered.
4. Completely lower the vehicle by turning the jack drive counterclockwise.
5. Remove the jack and fully tighten the lug
nuts in the order shown.
See Technical
Specifications (page 433). Front jacking point
431
Navigator (TB9) Canada/United States of America, enUSA, Edition date: 201907, Second-Printing Wheels and TiresE325278 E166719
1
3
5 4
6
2
Page 436 of 622
7.
Reinstall the jack properly on the bracket
and secure with the wing nut. 8. Close the access hole with the rubber
plug. 9. If the vehicle has an access panel,
reinstall.
10. Unblock the wheel.
TECHNICAL SPECIFICATIONS
Wheel Lug Nut Torque Specifications WARNING: When you install a wheel, always remove any corrosion, dirt or foreign m\
aterials present on the mounting surfaces of the
wheel or the surface of the wheel hub, brake drum or brake disc that contacts the wheel. Make sure to secure any fasteners that attach
the rotor to the hub so they do not interfere with the mounting surfaces\
of the wheel. Installing wheels without correct metal-to-metal contact
at the wheel mounting surfaces can cause the wheel nuts to loosen and th\
e wheel to come off while your vehicle is in motion, resulting in
loss of vehicle control, personal injury or death. lb.ft (Nm)
1
Bolt Size
150 lb.ft (204 Nm)
M14 x 1.5
1 Torque specifications are for nut and bolt threads free of dirt and rust.\
Use only our recommended replacement fasteners.
Retighten the lug nuts to the specified torque within 100 miles (160 kil\
ometers) after any wheel disturbance, such as tire rotation, changing a
flat tire or wheel removal.
433
Navigator (TB9) Canada/United States of America, enUSA, Edition date: 201907, Second-Printing Wheels and Tires
Page 605 of 622
Gracenote uses a unique identifier to track
queries for statistical purposes. The purpose
of a randomly assigned numeric identifier is
to allow Gracenote to count queries without
knowing anything about who you are. For
more information, see the web page at
www.gracenote.com for the Gracenote
Privacy Policy.
THE GRACENOTE SOFTWARE, EACH ITEM
OF GRACENOTE DATA AND THE
GRACENOTE CONTENT ARE LICENSED TO
YOU "AS IS". NEITHER GRACENOTE MAKES
ANY REPRESENTATIONS OR WARRANTIES,
EXPRESS OR IMPLIED, REGARDING THE
ACCURACY OF ANY GRACENOTE DATA
FROM THE GRACENOTE SERVERS OR
GRACENOTE CONTENT. GRACENOTE
COLLECTIVELY AND SEPARATELY RESERVE
THE RIGHT TO DELETE DATA AND/OR
CONTENT FROM THE COMPANIES'
RESPECTIVE SERVERS OR, IN THE CASE OF
GRACENOTE, CHANGE DATA CATEGORIES
FOR ANY CAUSE THAT GRACENOTE
DEEMS SUFFICIENT. NO WARRANTY IS
MADE THAT EITHER GRACENOTE
CONTENT OR THE GRACENOTE SOFTWARE
OR GRACENOTE SERVERS ARE
ERROR-FREE OR THAT THE FUNCTIONING
OF THE GRACENOTE SOFTWARE OR
GRACENOTE SERVERS WILL BE
UNINTERRUPTED. GRACENOTE IS NOT
OBLIGATED TO PROVIDE YOU WITH ANY
ENHANCED OR ADDITIONAL DATA TYPES
THAT GRACENOTE MAY CHOOSE TO
PROVIDE IN THE FUTURE AND IS FREE TO
DISCONTINUE ITS ONLINE SERVICES AT
ANY TIME. GRACENOTE DISCLAIM ALL
WARRANTIES EXPRESS OR IMPLIED,
INCLUDING, BUT NOT LIMITED TO, IMPLIED
WARRANTIES OF MERCHANTABILITY,
FITNESS FOR A PARTICULAR PURPOSE,
TITLE, AND NON-INFRINGEMENT. NEITHER
GRACENOTE WARRANTS THE RESULTS
THAT WILL BE OBTAINED BY YOUR USE
OF THE GRACENOTE SOFTWARE OR ANY
GRACENOTE SERVER. IN NO CASE WILL
GRACENOTE BE LIABLE FOR ANY
CONSEQUENTIAL OR INCIDENTAL
DAMAGES OR FOR ANY LOST PROFITS OR
LOST REVENUES FOR ANY REASON
WHATSOEVER. © Gracenote 2007.
Radio Frequency Statement
FCC ID: ACJ-SYNCG3-L
IC: 216B-SYNCG3-L
This device complies with Part 15 of the FCC
Rules and with RSS-210 of Industry Canada.
Operation is subject to the following two
conditions:
(1) This device may not cause harmful
interference, and
(2)
this device must accept any interference
received, including interference that may
cause undesired operation. WARNING: Changes or modifications
not expressively approved by the party
responsible for compliance could void the
user's authority to operate the equipment.
The term "IC:" before the radio certification
number only signifies that Industry Canada
technical specifications were met.
The antenna used for this transmitter must
not be co-located or operating in conjunction
with any other antenna or transmitter.
602
Navigator (TB9) Canada/United States of America, enUSA, Edition date: 201907, Second-Printing Appendices
Page 620 of 622
Switching Automatic High Beam Control
On and Off.....................................................116
Activating the Automatic High Beam Control................................................................116
Switching Cruise Control On and Off..................................................................268
Switching Cruise Control Off...........................268
Switching Cruise Control On...........................268
Symbols Glossary..............................................9
SYNC™ 3
..........................................................472
General Information...........................................472
SYNC™ 3 Troubleshooting...........................515 Additional Information and Assistance..........531
Apps......................................................................525
Navigation............................................................524
Personal Profiles.................................................529
Phone.....................................................................521
Resetting the System.........................................531
USB and Bluetooth Audio.................................517
Voice Recognition...............................................515
Wi-Fi Connectivity..............................................527
T
Technical Specifications See: Capacities and Specifications...............435
The Better Business Bureau (BBB) Auto Line Program (U.S. Only)
..........................349 Tire Care
.........................................................406
Glossary of Tire Terminology..........................407
Information About Uniform Tire Quality
Grading.............................................................406
Information Contained on the Tire Sidewall............................................................408
Temperature A B C.............................................407
Traction AA A B C...............................................407
Treadwear.............................................................407
Tire Pressure Monitoring System..............421 Changing Tires With a Tire Pressure
Monitoring System.........................................423
Understanding Your Tire Pressure Monitoring System .............................................................423
Tires See: Wheels and Tires......................................404
Toll Reader......................................................122 Installing the Toll Reader...................................122
Towing a Trailer
...............................................311
Load Placement....................................................311
Towing Points - 4WD...................................345
Towing the Vehicle on Four Wheels........334 Four-wheel-down Towing.................................335
Recreational Towing..........................................334
Towing...............................................................311
Traction Control
............................................243
Principle of Operation.......................................243 Trailer Reversing Aids
..................................312
Principle of Operation........................................312
Pro Trailer Backup Assist™.................................312
Setting Up Pro Trailer Backup Assist..............313
Troubleshooting...................................................318
Using Pro Trailer Backup Assist.......................
316
Trailer Sway Control....................................323
Transfer Case Fluid Check.........................385
Transmission Code Designation
..............438
Transmission..................................................222
Transporting the Vehicle
............................345
U
Under Hood Overview
................................375
Unique Driving Characteristics.................208
Universal Garage Door Opener................193 HomeLink Wireless Control System...............193
USB Port.........................................................470 Locating the USB Ports......................................471
Using Adaptive Cruise Control.................269 Automatic Cancellation.....................................273
Blocked Sensor...................................................275
Canceling the Set Speed..................................
273
Changing the Set Speed..................................272
Detection Issues.................................................273
Following a Vehicle.............................................271
Following a Vehicle to a Complete Stop.......271
617
Navigator (TB9) Canada/United States of America, enUSA, Edition date: 201907, Second-Printing Index
Page 622 of 622
Anti-Lock Brake System Warning Lamp........128
Auto Hold Active.................................................128
Auto Hold Unavailable.......................................128
Automatic Headlamp High Beam Indicator............................................................128
Auto-Start-Stop Indicator...................................128
Battery....................................................................129
Blind Spot Monitor..............................................129
Brake System Warning Lamp...........................129
Cruise Control Indicator....................................129
Direction Indicator...............................................129
Door Ajar...............................................................130
Electric Park Brake..............................................130
Engine Coolant Temperature Warning Lamp..................................................................130
Engine Oil..............................................................130
Fasten Rear Seatbelt..........................................130
Fasten Seatbelt Warning Lamp.......................
130
Four-Wheel Drive Indicators.............................130
Front Airbag..........................................................130
Headlamp High Beam Indicator......................
130
Hill Descent............................................................131
Hood Ajar...............................................................131
Liftgate Ajar............................................................131
Low Beam Malfunction Warning Lamp...........
131
Low Fuel Level Warning Lamp..........................131
Low Tire Pressure Warning Lamp....................131
Low Washer Fluid Level Warning Lamp..........131 Parking Lamps.......................................................131
Powertrain Fault....................................................131
Service Engine Soon...........................................131
Stability Control and Traction Control
Indicator............................................................132
Stability Control and Traction Control Off Warning Lamp..................................................132
Tow Haul Indicator..............................................132
Washer Fluid Check....................................390
Washers See: Cleaning the Exterior...............................394
See: Wipers and Washers.................................105
Waxing............................................................395
Welcome Lighting..........................................113
What Is 911 Assist............................................67
What Is Automatic High Beam Control............................................................116
What Is Cruise Control................................268
What Is Phone As a Key................................75
Wheel Nuts See: Changing a Road Wheel.........................
426
Wheels and Tires.........................................404 General Information...........................................404
Technical Specifications...................................433
Windows and Mirrors....................................118
Windshield Washers.....................................107 Front Camera Washer........................................107 Windshield Wipers
........................................105
Intermittent Wipe.................................................105
Speed Dependent Wipers................................105
Wiper Blades See: Checking the Wiper Blades....................391
Wipers and Washers....................................105
Wireless Accessory Charging....................198
619
Navigator (TB9) Canada/United States of America, enUSA, Edition date: 201907, Second-Printing Index