transmission LINCOLN NAVIGATOR 2020 Owners Manual
[x] Cancel search | Manufacturer: LINCOLN, Model Year: 2020, Model line: NAVIGATOR, Model: LINCOLN NAVIGATOR 2020Pages: 622, PDF Size: 6.47 MB
Page 7 of 622
Refueling
........................................................214
Fuel Consumption ........................................
217
Engine Emission Control
Emission Law .................................................
218
Catalytic Converter ......................................
219
Transmission
Automatic Transmission ............................
222
Four-Wheel Drive
Using Four-Wheel Drive ............................
228
Rear Axle
Limited Slip Differential .............................
236
Brakes
General Information ....................................
237
Hints on Driving With Anti-Lock Brakes ......................................................................
238
Electric Parking Brake ................................
238
Hill Start Assist .............................................
240
Auto Hold .......................................................
241Traction Control
Principle of Operation
................................
243
Using Traction Control ...............................
243
Stability Control
Principle of Operation ................................
244
Using Stability Control ...............................
245
Hill Descent Control
Principle of Operation ................................
246
Using Hill Descent Control .......................
246
Parking Aids
Principle of Operation ................................
247
Rear Parking Aid ..........................................
248
Front Parking Aid ........................................
250
Side Sensing System .................................
252
Active Park Assist ........................................
253
Rear View Camera .......................................
261
360 Degree Camera ..................................
264
Cruise Control
What Is Cruise Control ...............................
268Switching Cruise Control On and Off
.....
268
Setting the Cruise Control Speed ..........
268
Canceling the Set Speed ..........................
269
Resuming the Set Speed ..........................
269
Cruise Control Indicators ..........................
269
Using Adaptive Cruise Control ................
269
Driving Aids
Driver Alert ....................................................
277
Lane Keeping System ................................
278
Blind Spot Information System ................
284
Cross Traffic Alert ........................................
288
Steering .........................................................
293
Pre-Collision Assist .....................................
294
Drive Mode Control ....................................
299
Load Carrying
Rear Under Floor Storage ..........................
301
Cargo Nets ....................................................
303
Roof Racks and Load Carriers .................
304
Load Limit ......................................................
305
4
Navigator (TB9) Canada/United States of America, enUSA, Edition date: 201907, Second-Printing Table of Contents
Page 8 of 622
Towing
Towing a Trailer
..............................................311
Trailer Reversing Aids .................................
312
Trailer Sway Control ...................................
323
Recommended Towing Weights .............
323
Essential Towing Checks ..........................
326
Towing the Vehicle on Four Wheels .......
334
Driving Hints
Reduced Engine Performance .................
337
Economical Driving .....................................
337
Breaking-In ....................................................
338
Driving Through Water ...............................
338
Floor Mats .....................................................
338
Roadside Emergencies
Roadside Assistance ..................................
340
Hazard Flashers ............................................
341
Fuel Shutoff ....................................................
341
Jump Starting the Vehicle .........................
342
Post-Crash Alert System ............................
344
Transporting the Vehicle ...........................
345
Towing Points - 4WD ..................................
345Customer Assistance
Getting the Services You Need
...............
347
In California (U.S. Only) ..............................
348
The Better Business Bureau (BBB) Auto Line Program (U.S. Only) .......................
349
Utilizing the Mediation/Arbitration Program (Canada Only) ..........................................
350
Getting Assistance Outside the U.S. and Canada .......................................................
351
Ordering Additional Owner's Literature ......................................................................
353
Reporting Safety Defects (U.S. Only) ......
354
Reporting Safety Defects (Canada Only) ......................................................................
354
Fuses
Fuse Specification Chart ...........................
356
Changing a Fuse .........................................
370
Maintenance
General Information ....................................
373
Opening and Closing the Hood ...............
373
Under Hood Overview ...............................
375
Engine Oil Dipstick ......................................
377Engine Oil Check
.........................................
377
Oil Change Indicator Reset .......................
378
Changing the Engine Air Filter .................
379
Engine Coolant Check ...............................
380
Automatic Transmission Fluid Check ......
384
Transfer Case Fluid Check .......................
385
Brake Fluid Check ......................................
385
Changing the 12V Battery .........................
387
Adjusting the Headlamps .........................
389
Washer Fluid Check ...................................
390
Fuel Filter .......................................................
391
Checking the Wiper Blades .......................
391
Changing the Wiper Blades ......................
391
Changing a Bulb ..........................................
392
Vehicle Care
General Information ....................................
393
Cleaning Products .......................................
393
Cleaning the Exterior .................................
394
Waxing ...........................................................
395
Cleaning the Engine ...................................
396
Cleaning the Windows and Wiper Blades ......................................................................
396
5
Navigator (TB9) Canada/United States of America, enUSA, Edition date: 201907, Second-Printing Table of Contents
Page 9 of 622
Cleaning the Interior
...................................397
Cleaning the Instrument Panel and Instrument Cluster Lens ........................
399
Cleaning Leather Seats .............................
400
Repairing Minor Paint Damage ...............
400
Cleaning the Wheels ..................................
400
Vehicle Storage ............................................
401
Body Styling Kits ..........................................
403
Wheels and Tires
General Information ....................................
404
Tire Care ........................................................
406
Using Snow Chains ....................................
420
Tire Pressure Monitoring System .............
421
Changing a Road Wheel ...........................
426
Technical Specifications ............................
433
Capacities and Specifications
Engine Specifications .................................
435
Motorcraft Parts ...........................................
436
Vehicle Identification Number ..................
437
Vehicle Certification Label ........................
437
Transmission Code Designation .............
438Capacities and Specifications
..................
439
Bulb Specification Chart ............................
450
Vehicle Identification
Installing the Vehicle Identification Card ......................................................................
453
Connected Vehicle
Connected Vehicle Requirements ..........
454
Connected Vehicle Limitations ................
454
Connecting the Vehicle to a Mobile Network .....................................................
454
Connecting the Vehicle to a Wi-Fi Network ......................................................................
454
Connected Vehicle – Troubleshooting ......................................................................
455
Vehicle Wi-Fi Hotspot
Creating a Vehicle Wi-Fi Hotspot ............
458
Changing the Vehicle Wi-Fi Hotspot Name or Password .............................................
458
Audio System
General Information ...................................
460Audio Unit
......................................................
461
Digital Radio .................................................
464
Satellite Radio ..............................................
467
USB Port ........................................................
470
SYNC™ 3
General Information ....................................
472
Using Voice Recognition ...........................
474
Entertainment ...............................................
485
Climate ...........................................................
497
Phone .............................................................
500
Navigation .....................................................
502
Apps ................................................................
510
Settings ...........................................................
513
SYNC™ 3 Troubleshooting .........................
515
Accessories
Accessories ..................................................
532
Lincoln Protect
Lincoln Protect .............................................
534
6
Navigator (TB9) Canada/United States of America, enUSA, Edition date: 201907, Second-Printing Table of Contents
Page 21 of 622

WARNING: NEVER use a rearward
facing child restraint on a seat protected
by an ACTIVE AIRBAG in front of it, DEATH
or SERIOUS INJURY to the CHILD can
occur.
On Board Diagnostics Data Link
Connector WARNING: Do not connect wireless
plug-in devices to the data link connector.
Unauthorized third parties could gain
access to vehicle data and impair the
performance of safety related systems.
Only allow repair facilities that follow our
service and repair instructions to connect
their equipment to the data link connector.
Your vehicle has an OBD Data Link
Connector (DLC) that is used in conjunction
with a diagnostic scan tool for vehicle
diagnostics, repairs and reprogramming
services. Installing an aftermarket device that
uses the DLC during normal driving for
purposes such as remote insurance company monitoring, transmission of vehicle data to
other devices or entities, or altering the
performance of the vehicle, may cause
interference with or even damage to vehicle
systems. We do not recommend or endorse
the use of unapproved aftermarket plug-in
devices. The vehicle Warranty will not cover
damage caused by an aftermarket plug-in
device.
Notice to Owners of Pickup Trucks and
Utility Type Vehicles
WARNING:
Utility vehicles have a
significantly higher rollover rate than other
types of vehicles.
Before you drive your vehicle, please read
this Owner’ s Guide carefully. Your vehicle is
not a passenger car. As with other vehicles
of this type, failure to operate this vehicle
correctly may result in loss of vehicle control,
vehicle rollover, personal injury or death.
Using Your Vehicle With a Snowplow
Do not use this vehicle for snowplowing. Your vehicle does not have a snowplowing
package.
Using Your Vehicle as an Ambulance
Do not use this vehicle as an ambulance.
Your vehicle does not have the Ambulance
Preparation Package.
MOBILE COMMUNICATIONS
EQUIPMENT
WARNING: Driving while distracted
can result in loss of vehicle control, crash
and injury. We strongly recommend that
you use extreme caution when using any
device that may take your focus off the
road. Your primary responsibility is the safe
operation of your vehicle. We recommend
against the use of any hand-held device
while driving and encourage the use of
voice-operated systems when possible.
Make sure you are aware of all applicable
local laws that may affect the use of
electronic devices while driving.
18
Navigator (TB9) Canada/United States of America, enUSA, Edition date: 201907, Second-Printing Introduction
Page 25 of 622
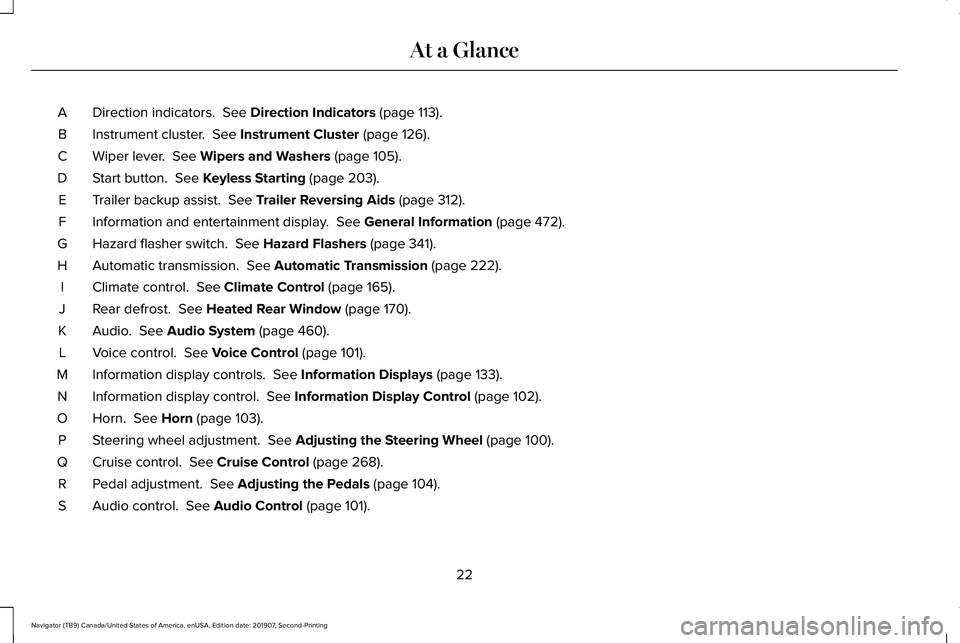
Direction indicators. See Direction Indicators (page 113).
A
Instrument cluster.
See Instrument Cluster (page 126).
B
Wiper lever.
See Wipers and Washers (page 105).
C
Start button.
See Keyless Starting (page 203).
D
Trailer backup assist.
See Trailer Reversing Aids (page 312).
E
Information and entertainment display.
See General Information (page 472).
F
Hazard flasher switch.
See Hazard Flashers (page 341).
G
Automatic transmission.
See Automatic Transmission (page 222).
H
Climate control.
See Climate Control (page 165).
I
Rear defrost.
See Heated Rear Window (page 170).
J
Audio.
See Audio System (page 460).
K
Voice control.
See Voice Control (page 101).
L
Information display controls.
See Information Displays (page 133).
M
Information display control.
See Information Display Control (page 102).
N
Horn.
See Horn (page 103).
O
Steering wheel adjustment.
See Adjusting the Steering Wheel (page 100).
P
Cruise control.
See Cruise Control (page 268).
Q
Pedal adjustment.
See Adjusting the Pedals (page 104).
R
Audio control.
See Audio Control (page 101).
S
22
Navigator (TB9) Canada/United States of America, enUSA, Edition date: 201907, Second-Printing At a Glance
Page 57 of 622
Note:
The driver and front passenger
warnings switch on and off independently.
When you perform this procedure for one
seating position, do not buckle the other
position as this terminates the process.
Read Steps 1 - 4 before starting the
procedure.
Make sure that:
• You set the parking brake.
• The transmission is in park (P).
• The ignition is off.
• You close all vehicle doors.
• You unbuckle the driver and front
passenger seatbelts.
1. Switch the ignition on. Do not start the engine.
2. Wait until the seatbelt warning lamp turns
off (about one minute). After Step 2, wait
an additional five seconds before
proceeding with Step 3. Once you start
Step 3, you must complete the procedure
within 60 seconds. 3.
For the seating position you are switching
off, buckle then unbuckle the seatbelt
three times at a moderate speed, ending
in the unbuckled state. After Step 3, the
seatbelt warning lamp turns on.
4. When the seatbelt warning lamp is on, buckle then unbuckle the seatbelt. After
Step 4, the seatbelt warning lamp flashes
for confirmation.
• This switches the feature off if it is
currently on.
• This switches the feature on if it is
currently off.
CHILD RESTRAINT AND SEATBELT
MAINTENANCE
Inspect the vehicle seatbelts and child safety
seat systems periodically to make sure they
work properly and are not damaged. Inspect
the vehicle and child restraint seatbelts to
make sure there are no nicks, tears or cuts.
Replace if necessary. All vehicle seatbelt
assemblies, including retractors, buckles,
front seatbelt buckle assemblies, buckle
support assemblies (slide bar-if equipped), shoulder belt height adjusters (if equipped),
shoulder belt guide on seat backrest (if
equipped), child safety seat LATCH and
tether anchors, and attaching hardware,
should be inspected after a crash. Read the
child restraint manufacturer's instructions for
additional inspection and maintenance
information specific to the child restraint.
We recommend that all seatbelt assemblies
in use in vehicles involved in a crash be
replaced. However, if the crash was minor
and an authorized dealer finds that the belts
do not show damage and continue to
operate properly, they do not need to be
replaced. Seatbelt assemblies not in use
during a crash should also be inspected and
replaced if either damage or improper
operation is noted.
Properly care for seatbelts. See Vehicle
Care (page 393).
54
Navigator (TB9) Canada/United States of America, enUSA, Edition date: 201907, Second-Printing Seatbelts
Page 76 of 622
Remote Start
WARNING: To avoid exhaust fumes,
do not use remote start if your vehicle is
parked indoors or in areas that are not well
ventilated.
Note: Do not use remote start if your fuel
level is low. The remote start button is on the
transmitter.
This feature allows you to start your vehicle
from outside the vehicle. The transmitter has
an extended operating range.
Vehicles with automatic climate control can
be configured to operate when the vehicle
is remote started.
See Automatic Climate
Control (page 165).
Many states and provinces have restrictions
for the use of remote start. Check your local
and state or provincial laws for specific
requirements regarding remote start
systems. The system does not work if:
•
The ignition is on.
• The anti-theft alarm triggers.
• You switch off the feature in the
information display.
See General
Information (page 133).
• The hood is open.
• The transmission is not in park (P).
• The battery voltage is below the
minimum operating voltage.
Remote Control Feedback
An LED on the remote control provides status
feedback of remote start or stop commands. Status
LED
Remote startsuccessful
Solid green
Remote stopsuccessful
Solid red
Request failed or
status not received
Blinking red
Status incomplete
Blinking green Remote Starting Your Vehicle
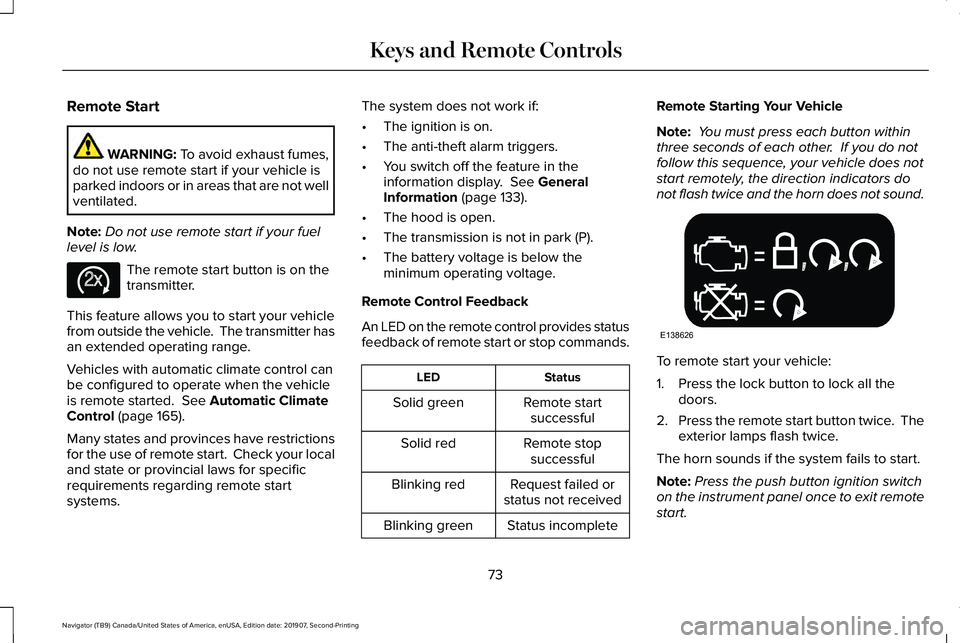
Note:
You must press each button within
three seconds of each other. If you do not
follow this sequence, your vehicle does not
start remotely, the direction indicators do
not flash twice and the horn does not sound. To remote start your vehicle:
1. Press the lock button to lock all the
doors.
2. Press the remote start button twice. The
exterior lamps flash twice.
The horn sounds if the system fails to start.
Note: Press the push button ignition switch
on the instrument panel once to exit remote
start.
73
Navigator (TB9) Canada/United States of America, enUSA, Edition date: 201907, Second-Printing Keys and Remote ControlsE138625 E138626
Page 89 of 622
Locking and Unlocking the Doors with
the Key Blade
A key cylinder is located under the driver
side door handle. You can use your key
blade to manually lock and unlock the driver
side door. See Remote Control (page 69).
Smart Unlocks for Intelligent Access
Keys
This helps to prevent you from locking your
key inside the passenger compartment or
rear cargo area.
When you electronically lock your vehicle
with any door open, the transmission is in
park (P) and the ignition is off, the system
searches for an intelligent access key inside
your vehicle after you close the last door. If
the system finds a key, all the doors
immediately unlock and the horn sounds
twice, indicating that a key is inside.
You can override the smart unlock feature
and intentionally lock the intelligent access
key inside your vehicle. To do this, lock your vehicle after you have
closed all the doors by:
•
Using the keyless entry keypad.
• Pressing the lock button on another
intelligent access key.
When you open one of the front doors and
lock your vehicle using the power door lock
control, all doors will lock then unlock if:
• The ignition is on.
• The ignition is off and the transmission
is not in park (P).
Autolock
(If Equipped)
Autolock locks all the doors when:
• All doors are closed.
• The ignition is on.
• You shift into any gear putting your
vehicle in motion.
• Your vehicle reaches a speed greater
than
12.4 mph (20 km/h). Autolock repeats when:
•
You open then close any door while the
ignition is on and your vehicle speed is
9 mph (15 km/h)
or lower.
• Your vehicle reaches a speed greater
than
12 mph (20 km/h).
Autounlock
Autounlock unlocks all the doors when:
• The ignition is on, all the doors are
closed, and your vehicle has been
moving at a speed greater than 12.4 mph
(20 km/h)
.
• Your vehicle comes to a stop and you
switch the ignition off, or to the accessory
position.
• You open the driver door within 10
minutes of switching the ignition off or to
accessory.
Note: The doors do not autounlock if you
electronically lock your vehicle after you
switch the ignition off and before you open
the driver door.
86
Navigator (TB9) Canada/United States of America, enUSA, Edition date: 201907, Second-Printing Doors and Locks
Page 93 of 622

POWER LIFTGATE
WARNING: It is extremely dangerous
to ride in a cargo area, inside or outside of
a vehicle. In a crash, people riding in these
areas are more likely to be seriously
injured or killed. Do not allow people to
ride in any area of your vehicle that is not
equipped with seats and seatbelts. Make
sure everyone in your vehicle is in a seat
and properly using a seatbelt. Failure to
follow this warning could result in serious
personal injury or death. WARNING: Make sure that you fully
close the liftgate to prevent exhaust fumes
from entering your vehicle. If you are
unable to fully close the liftgate, open the
air vents or the windows to allow fresh air
to enter your vehicle. Failure to follow this
instruction could result in personal injury
or death. WARNING:
Make sure that you fully
close the liftgate to prevent passengers
and cargo from falling out. Failure to follow
this instruction could result in personal
injury or death. WARNING:
Keep keys out of reach
of children. Do not allow children to
operate or play near an open or moving
power liftgate. You should supervise the
operation of the power liftgate at all times.
Note: Make sure that you close the liftgate
before operating or moving your vehicle,
especially in an enclosure, like a garage or
a parking structure. This could damage the
liftgate and its components.
Note: Do not hang anything, for example a
bike rack, from the glass or liftgate. This
could damage the liftgate and its
components.
The liftgate only operates with the
transmission in park (P). Three warning tones sound as the liftgate
begins to power close. If there is a problem
with the open or close request, one of the
following may occur:
•
One tone sounds if the ignition is on and
the transmission is not in park (P).
• Three tones sound if the battery voltage
is below the minimum operating voltage.
• One tone sounds if the vehicle speed is
at or above
3 mph (5 km/h)
If the liftgate starts to close after it has fully
opened, this indicates there may be
excessive weight on the liftgate or a possible
strut failure. A repetitive tone sounds and
the liftgate closes under control. Remove
any excessive weight from the liftgate. If the
liftgate continues to close after opening,
have the system checked as soon as
possible.
Opening and Closing the Liftgate WARNING:
Make sure all persons
are clear of the power liftgate area before
using the power liftgate control.
90
Navigator (TB9) Canada/United States of America, enUSA, Edition date: 201907, Second-Printing Liftgate
Page 94 of 622
Note:
Make sure the area behind your
vehicle is free from obstruction and that
there is enough room for you to operate the
liftgate. Objects too close to your vehicle,
for example a wall, garage door or another
vehicle may come into contact with the
moving liftgate. This could damage the
liftgate and its components.
Note: Be careful when opening or closing
the liftgate in a garage or other enclosed
area to avoid damaging the liftgate.
Note: Do not leave the liftgate open when
driving. This could damage the liftgate and
its components.
From the Instrument Panel With the transmission in park (P),
press the button on the instrument
panel.
Remote Control Press the button twice within a few
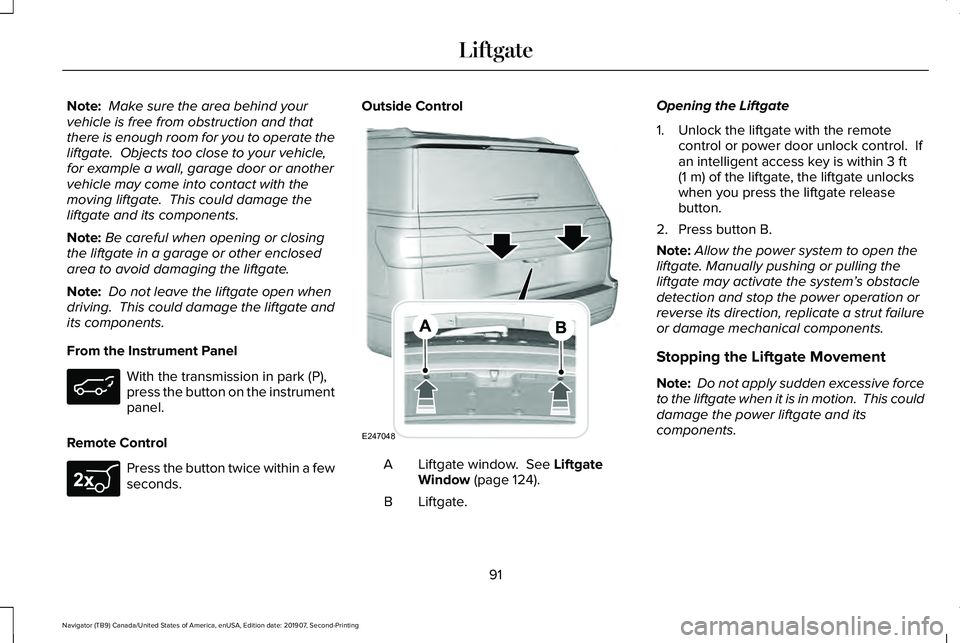
seconds. Outside Control
Liftgate window. See Liftgate
Window (page 124).
A
Liftgate.
B Opening the Liftgate
1. Unlock the liftgate with the remote
control or power door unlock control. If
an intelligent access key is within
3 ft
(1 m) of the liftgate, the liftgate unlocks
when you press the liftgate release
button.
2. Press button B.
Note: Allow the power system to open the
liftgate. Manually pushing or pulling the
liftgate may activate the system’ s obstacle
detection and stop the power operation or
reverse its direction, replicate a strut failure
or damage mechanical components.
Stopping the Liftgate Movement
Note: Do not apply sudden excessive force
to the liftgate when it is in motion. This could
damage the power liftgate and its
components.
91
Navigator (TB9) Canada/United States of America, enUSA, Edition date: 201907, Second-Printing Liftgate E267940 E247048