automatic transmission LINCOLN NAVIGATOR 2021 Owners Manual
[x] Cancel search | Manufacturer: LINCOLN, Model Year: 2021, Model line: NAVIGATOR, Model: LINCOLN NAVIGATOR 2021Pages: 639, PDF Size: 6.09 MB
Page 7 of 639
Power Outlet - Vehicles With:
110V Power Outlet
What Is the Power Outlet ..........................202
Power Outlet Precautions .........................
202
Locating the Power Outlet ........................
202
Power Outlet Indicators ............................
202
Wireless Accessory Charger
What Is the Wireless Accessory Charger ......................................................................
203
Wireless Accessory Charger Precautions ......................................................................
203
Locating the Wireless Accessory Charger ......................................................................
204
Charging a Wireless Device .....................
204
Storage Compartments
Center Console ...........................................
205
Overhead Console .....................................
205
Starting and Stopping the Engine
General Information ....................................
207
Keyless Starting ...........................................
207Starting a Gasoline Engine
.......................
208
Engine Block Heater ...................................
210
Unique Driving Characteristics
Auto-Start-Stop .............................................
212
Fuel and Refueling
Safety Precautions .......................................
215
Fuel Quality ...................................................
216
Fuel Filler Funnel Location ........................
216
Running Out of Fuel .....................................
217
Refueling ........................................................
218
Fuel Consumption .......................................
221
Engine Emission Control
Emission Law ................................................
223
Catalytic Converter .....................................
224
Transmission
Automatic Transmission ............................
227
Four-Wheel Drive
Using Four-Wheel Drive ............................
233Rear Axle
Limited Slip Differential
.............................
240
Brakes
General Information .....................................
241
Hints on Driving With Anti-Lock Brakes ......................................................................
242
Electric Parking Brake ................................
242
Hill Start Assist .............................................
244
Auto Hold ......................................................
245
Traction Control
Principle of Operation ................................
247
Using Traction Control ...............................
247
Stability Control
Principle of Operation ................................
248
Using Stability Control ...............................
249
Hill Descent Control
Principle of Operation ................................
250
Using Hill Descent Control .......................
250
4
Navigator (TB9) Canada/United States of America, enUSA, First-Printing Table of Contents
Page 9 of 639
Reporting Safety Defects (Canada Only)
......................................................................358
Fuses
Fuse Specification Chart ...........................
360
Changing a Fuse ..........................................
374
Maintenance
General Information ....................................
377
Opening and Closing the Hood ...............
377
Under Hood Overview ...............................
379
Engine Oil Dipstick .....................................
380
Engine Oil Check ........................................
380
Oil Change Indicator Reset .......................
381
Changing the Engine Air Filter ................
382
Engine Coolant Check ...............................
383
Automatic Transmission Fluid Check ......
388
Transfer Case Fluid Check .......................
388
Brake Fluid Check ......................................
389
Power Steering Fluid Check ....................
390
Changing the 12V Battery .........................
390
Adjusting the Headlamps .........................
392
Washer Fluid Check ...................................
394Fuel Filter
.......................................................
394
Checking the Wiper Blades ......................
394
Changing the Wiper Blades .....................
394
Changing a Bulb ..........................................
395
Vehicle Care
General Information ...................................
396
Cleaning Products ......................................
396
Cleaning the Exterior ..................................
397
Waxing ...........................................................
398
Cleaning the Engine ...................................
399
Cleaning the Windows and Wiper Blades ......................................................................
399
Cleaning the Interior ..................................
400
Cleaning the Instrument Panel and Instrument Cluster Lens ........................
402
Cleaning Leather Seats .............................
403
Repairing Minor Paint Damage ................
403
Cleaning the Wheels ..................................
403
Vehicle Storage ...........................................
404
Body Styling Kits .........................................
406Wheels and Tires
General Information
....................................
407
Tire Care ........................................................
409
Using Snow Chains .....................................
423
Tire Pressure Monitoring System ............
424
Changing a Road Wheel ...........................
429
Technical Specifications ............................
436
Capacities and Specifications
Engine Specifications .................................
438
Motorcraft Parts ...........................................
439
Vehicle Identification Number .................
440
Capacities and Specifications ..................
440
Bulb Specification Chart .............................
451
Vehicle Identification
Installing the Vehicle Identification Card ......................................................................
454
Connected Vehicle
Connected Vehicle Requirements ..........
455
Connected Vehicle Limitations ................
455
6
Navigator (TB9) Canada/United States of America, enUSA, First-Printing Table of Contents
Page 25 of 639
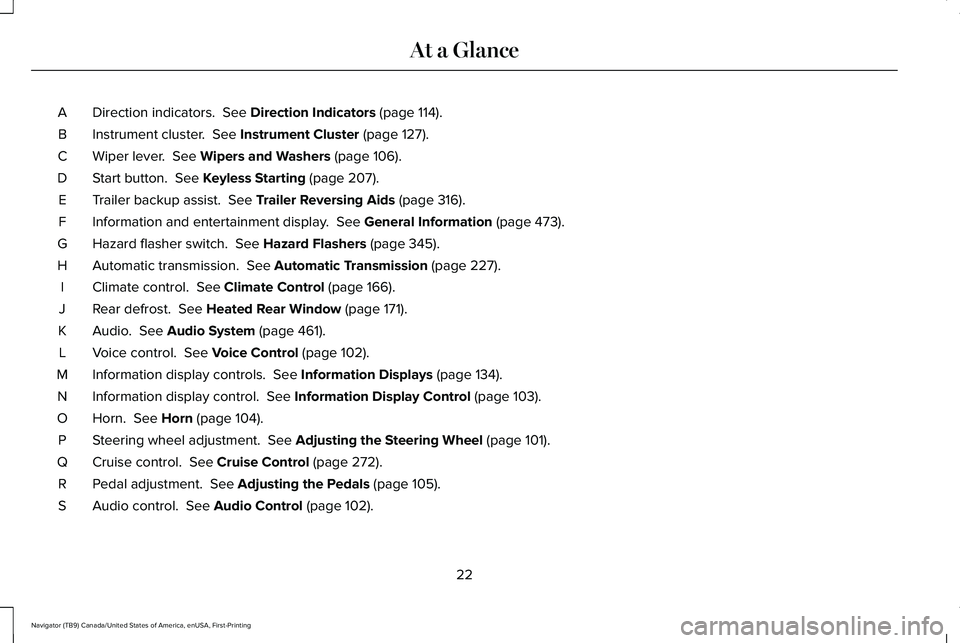
Direction indicators. See Direction Indicators (page 114).
A
Instrument cluster.
See Instrument Cluster (page 127).
B
Wiper lever.
See Wipers and Washers (page 106).
C
Start button.
See Keyless Starting (page 207).
D
Trailer backup assist.
See Trailer Reversing Aids (page 316).
E
Information and entertainment display.
See General Information (page 473).
F
Hazard flasher switch.
See Hazard Flashers (page 345).
G
Automatic transmission.
See Automatic Transmission (page 227).
H
Climate control.
See Climate Control (page 166).
I
Rear defrost.
See Heated Rear Window (page 171).
J
Audio.
See Audio System (page 461).
K
Voice control.
See Voice Control (page 102).
L
Information display controls.
See Information Displays (page 134).
M
Information display control.
See Information Display Control (page 103).
N
Horn.
See Horn (page 104).
O
Steering wheel adjustment.
See Adjusting the Steering Wheel (page 101).
P
Cruise control.
See Cruise Control (page 272).
Q
Pedal adjustment.
See Adjusting the Pedals (page 105).
R
Audio control.
See Audio Control (page 102).
S
22
Navigator (TB9) Canada/United States of America, enUSA, First-Printing At a Glance
Page 76 of 639
Remote Start
WARNING: Do not start the engine
in a closed garage or in other enclosed
areas. Exhaust fumes are toxic. Always
open the garage door before you start the
engine. Failure to follow this instruction
could result in personal injury or death.
Note: Do not use remote start if your fuel
level is low. The remote start button is on the
transmitter.
This feature allows you to start your vehicle
from outside the vehicle. The transmitter has
an extended operating range.
Vehicles with automatic climate control can
be configured to operate when the vehicle
is remote started.
See Automatic Climate
Control (page 166). Many states and provinces have restrictions
for the use of remote start. Check your local
and state or provincial laws for specific
requirements regarding remote start
systems.
The system does not work if:
•
The ignition is on.
• The anti-theft alarm triggers.
• You switch off the feature in the
information display.
See General
Information (page 134).
• The hood is open.
• The transmission is not in park (P).
• The battery voltage is below the
minimum operating voltage.
Remote Control Feedback
An LED on the remote control provides status
feedback of remote start or stop commands. Status
LED
Remote startsuccessful
Solid green
Remote stopsuccessful
Solid red
Request failed or
status not received
Blinking red
Status incomplete
Blinking green
Remote Starting Your Vehicle
Note: You must press each button within
three seconds of each other. If you do not
follow this sequence, your vehicle does not
start remotely, the direction indicators do
not flash twice and the horn does not sound.
73
Navigator (TB9) Canada/United States of America, enUSA, First-Printing Keys and Remote ControlsE138625
Page 115 of 639
Note:
If you switch the autolamps and the
autowipers on, the headlamps turn on when
the windshield wipers continuously operate.
INSTRUMENT LIGHTING DIMMER
The instrument lighting dimmer buttons are
on the lighting control. Repeatedly press one of the
buttons to adjust the brightness.
HEADLAMP EXIT DELAY
After you switch the ignition off, you can
switch the headlamps on by pulling the
direction indicator lever toward you. You will
hear a short tone. The headlamps will switch
off automatically after three minutes with any
door open or 30 seconds after the last door
has been closed. You can cancel this feature
by pulling the direction indicator lever toward
you again or switching the ignition on. DAYTIME RUNNING LAMPS -
VEHICLES WITH: CONFIGURABLE
DAYTIME RUNNING LAMPS WARNING: The daytime running
lamps system does not activate the rear
lamps and may not provide adequate
lighting during low visibility driving
conditions. Make sure you switch the
headlamps on, as appropriate, during all
low visibility conditions. Failure to do so
may result in a crash.
Switch the daytime running lamps on or off
using the information display.
See General
Information (page 134).
The daytime running lamps turn on when:
1. The lamps are on in the information display.
2. You switch the ignition on.
3. The transmission is not in park (P) for vehicles with automatic transmissions or
you release the parking brake for
vehicles with manual transmissions. 4. The lighting control is in the autolamps
position.
5. The headlamps are off.
The other lighting control switch positions
do not turn on the daytime running lamps.
If the daytime running lamps are off in the
information display, the lamps stay off in all
switch positions.
DAYTIME RUNNING LAMPS -
VEHICLES WITH: DAYTIME
RUNNING LAMPS (DRL) WARNING: The daytime running
lamps system does not activate the rear
lamps and may not provide adequate
lighting during low visibility driving
conditions. Make sure you switch the
headlamps on, as appropriate, during all
low visibility conditions. Failure to do so
may result in a crash.
The system turns the lamps on in daylight
conditions.
112
Navigator (TB9) Canada/United States of America, enUSA, First-Printing LightingE291299 E291298
Page 124 of 639
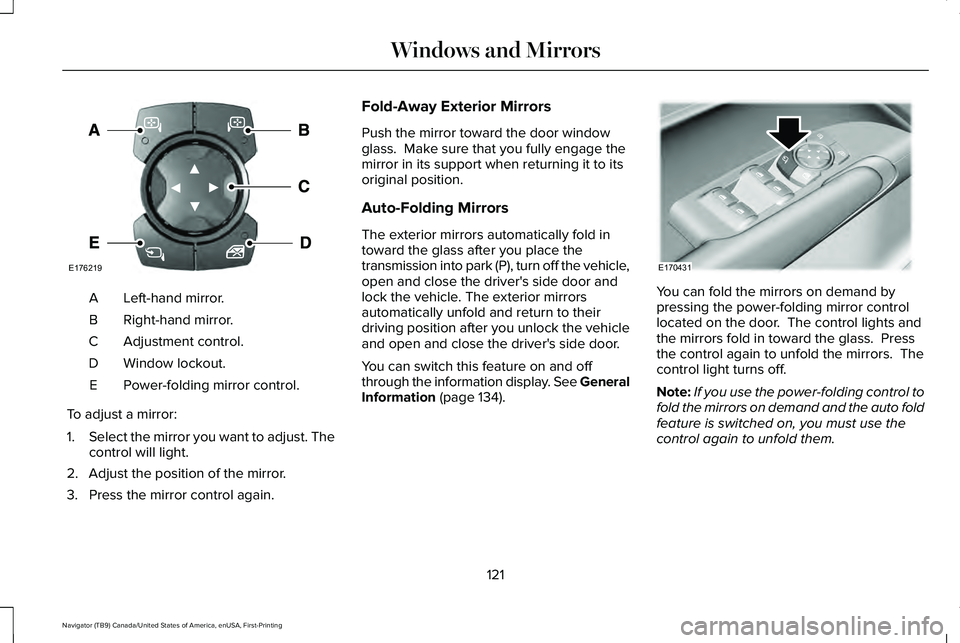
Left-hand mirror.
A
Right-hand mirror.
B
Adjustment control.
C
Window lockout.
D
Power-folding mirror control.
E
To adjust a mirror:
1. Select the mirror you want to adjust. The
control will light.
2. Adjust the position of the mirror.
3. Press the mirror control again. Fold-Away Exterior Mirrors
Push the mirror toward the door window
glass. Make sure that you fully engage the
mirror in its support when returning it to its
original position.
Auto-Folding Mirrors
The exterior mirrors automatically fold in
toward the glass after you place the
transmission into park (P), turn off the vehicle,
open and close the driver's side door and
lock the vehicle. The exterior mirrors
automatically unfold and return to their
driving position after you unlock the vehicle
and open and close the driver's side door.
You can switch this feature on and off
through the information display. See General
Information (page 134).
You can fold the mirrors on demand by
pressing the power-folding mirror control
located on the door. The control lights and
the mirrors fold in toward the glass. Press
the control again to unfold the mirrors. The
control light turns off.
Note:
If you use the power-folding control to
fold the mirrors on demand and the auto fold
feature is switched on, you must use the
control again to unfold them.
121
Navigator (TB9) Canada/United States of America, enUSA, First-Printing Windows and MirrorsE176219 E170431
Page 142 of 639
INFO/TRIP/FUEL
TIRE PRESSURE
TRAILER INFORMATION
• NO CONTENT - Displays a blank area.
• TRIP 1
- Displays distance traveled,
average fuel economy, and time spent
for trip. Press and hold
OK to reset.
• TRIP 2
information is the same as
TRIP 1.
• FUEL ECONOMY
- Displays your
vehicle's average fuel economy. Press
and hold
OK to reset.
• SEATBELTS
- Displays a graphic of the
connection status of the rear seatbelts.
• TIRE PRESSURE
- Displays a graphic of
current vehicle tire pressures.
• TRAILER INFORMATION
- Displays the
transmission temperature and trailer gain. Head Up Display
(If Equipped)
See
Head Up Display (page 162).
Phone
See
General Information (page 473).
Audio
See
General Information (page 473).
Navigation
(If Equipped)
See
General Information (page 473).
INFORMATION MESSAGES
Note: Depending on your vehicle options
and instrument cluster type, not all of the
messages will display or be available.
Certain messages may be abbreviated or
shortened depending upon which cluster
type you have. Press the
OK button to acknowledge and
remove some messages from the information
display. Other messages will be removed
automatically after a short time.
Certain messages need to be confirmed
before you can access the menus.
139
Navigator (TB9) Canada/United States of America, enUSA, First-Printing Information DisplaysE222314
Page 165 of 639
Action
Message
Displays when the brake pedal needs to be pressed to enable the transmission to shift from park.
Depress Brake to Shift from Park
Displays when Stay in Neutral Mode is active. See Automatic Transmission (page 227).
Stay in Neutral Mode Engaged
Displays when the neutral button N needs to be pressed again to enter Stay in Neutral Mode.See
Automatic Transmission (page 227).
To Stay in Neutral When Exiting Vehicle Select
N Again
HEAD UP DISPLAY
(IF EQUIPPED)
Head Up Display (HUD)
This is a visual system that shows information
in your field of view as you drive. The
information comes from various vehicle
systems and includes vehicle speed, speed
limit, navigation, and advanced driver
assistance systems (ADAS), such as adaptive
cruise control (ACC) and the lane keeping
system. This system projects the information
off the windshield, and focuses the image near the end of the hood approximately
7 ft
(2 m) in front of the driver. Viewing this
information does not require you to
significantly move your head, allowing you
to keep your eyes on the road while having
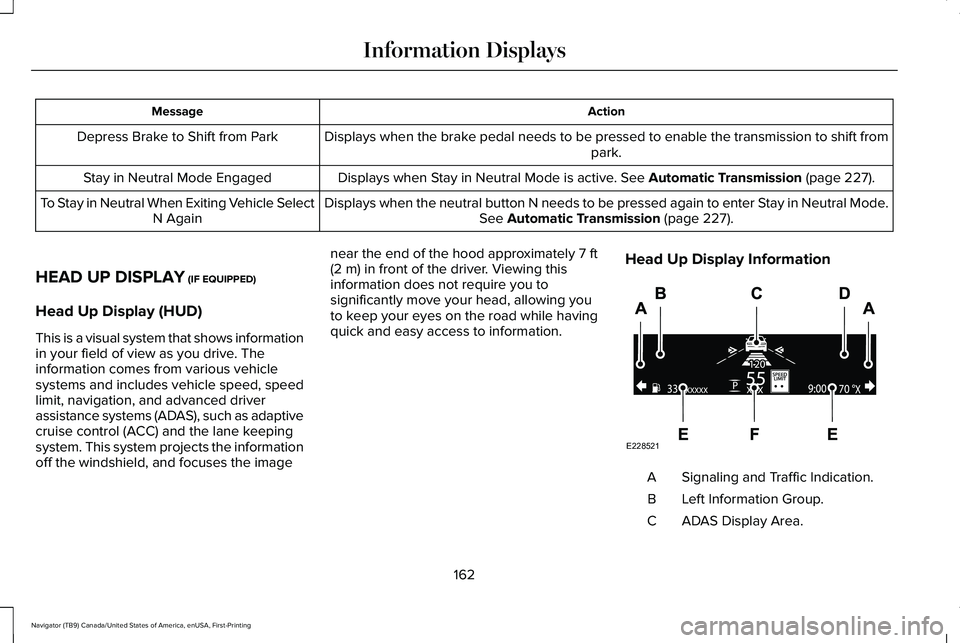
quick and easy access to information. Head Up Display Information Signaling and Traffic Indication.
A
Left Information Group.
B
ADAS Display Area.
C
162
Navigator (TB9) Canada/United States of America, enUSA, First-Printing Information DisplaysE228521
Page 166 of 639
Navigation Display Area.
D
Status Bar.
E
Speedometer Display Area.
F
Signaling and Traffic Indication
Displays direction indicators, blind spot
information (if direction indicators are active)
and cross traffic alert.
Left Information Group
Displays incoming call information.
ADAS Display Area
Displays ACC and lane keeping system
status and warnings.
Navigation Display Area
Displays navigation next turn instructions. Status Bar
Displays distance to empty (DTE), time and
outside air temperature. Next to DTE, the
fuel gauge fill color changes to yellow in low
fuel conditions. You can switch off the status
bar in the HUD settings menu.
Speedometer Display Area
Displays current vehicle speed, speed limit
(if available in the map database) and your
transmission gear selection.
Configuring The Head Up Display
You can control the system's options through
the information display by using the HUD,
OK and arrow buttons on the right-hand side
of your steering wheel.
See General
Information (page 134). You can adjust the
display according to your height to make
viewing the content easier. You can also
adjust what content displays and the
brightness of the content. The system's
options appear in the instrument cluster
while the updates happen in the HUD. Note:
If HUD On is unchecked, other options
of the system are hidden.
Note: The HUD menu automatically closes
after a certain period of inactivity.
Note: The HUD image brightness
automatically adjusts to the brightness of
the ambient environment. You have the
ability to adjust the brightness further
according to your preference.
Note: In some instances, sunlight can cause
some reflections in and around the HUD
image.
163
Navigator (TB9) Canada/United States of America, enUSA, First-Printing Information Displays
Page 187 of 639
You can save up to three preset memory
positions. You can save a memory preset at
any time.
Recalling a PreSet Position
Press and release the preset button
associated with your preferred driving
position. The memory features move to the
position stored for that preset.
Note:
You can only recall a driver seat preset
memory position when the ignition is off, or
when the transmission is in park (P) or
neutral (N) (and your vehicle is not moving)
if the ignition is on.
You can also recall a preset memory position
by:
• Pressing the unlock button on your
intelligent access key fob if it is linked to
a preset position.
• Unlocking the intelligent driver door
handle if a linked key fob is present.
• Recalling a personal profile in your SYNC
3 menu. Note:
Using a linked remote control to recall
your memory position when the ignition is
off moves the seat to the Easy Entry position.
Note: Pressing any active memory feature
adjustment control (or any memory button)
during a memory recall cancels the
operation.
Easy Entry and Exit Feature
If you enable the easy entry and exit feature,
it automatically moves the driver seat
position rearward up to 2 in (5 cm) when you
switch the ignition off.
The driver seat returns to its previous
position when you switch the ignition on.
You can switch this feature on or off in the
information display.
See Information
Displays (page 134).
Passenger Seat Memory
This feature recalls the position of the
passenger seat. The memory control is on
the passenger door. Saving a PreSet Position
1. Adjust the passenger seat to your
preferred position.
2. Press and hold the preferred preset button until you hear a single tone.
You can save up to three preset memory
positions. You can save a memory preset at
any time.
Recalling a PreSet Position
Press and release the preset button
associated with your preferred position. The
passenger seat features move to the position
stored for that preset. You can recall a
passenger seat preset memory at any time.
184
Navigator (TB9) Canada/United States of America, enUSA, First-Printing Seats