height LINCOLN NAVIGATOR 2022 User Guide
[x] Cancel search | Manufacturer: LINCOLN, Model Year: 2022, Model line: NAVIGATOR, Model: LINCOLN NAVIGATOR 2022Pages: 646, PDF Size: 7.29 MB
Page 62 of 646
Read Steps 1 - 4 before proceeding with the
programming procedure.
Make sure that:
•
You set the parking brake.
• The transmission is in park (P).
• The ignition is off.
• You close all vehicle doors.
• You unfasten the driver and front
passenger seatbelts.
1. Switch the ignition on. Do not start the engine.
2. Wait about one minute until the seatbelt warning light switches off. After Step 2,
wait an additional five seconds before
proceeding with Step 3. Once you start
Step 3, you must complete the procedure
within 30 seconds.
3. For the seating position you are switching
off, fasten then unfasten the seatbelt
three times at a moderate speed, ending
in the unfastened state. After Step 3, the
seatbelt warning light switches on. 4. When the seatbelt warning light is on,
fasten then unfasten the seatbelt. After
Step 4, the seatbelt warning light flashes
for confirmation.
This switches the feature off for that seating
position if it is currently on.
This switches the feature on for that seating
position if it is currently off.
CHECKING THE SEATBELTS
Check the seatbelts and child restraints
periodically to make sure they work properly
and are not damaged. Make sure there are
no nicks, tears or cuts. Replace if necessary.
Check the following seatbelt assemblies after
a crash.
• Retractors.
• Buckles.
• Front seatbelt buckle assemblies.
• Shoulder belt height adjusters.
• Shoulder belt guide on seat backrest.
• Child restraint LATCH and tether anchors.
• Attaching hardware. Read the child restraint manufacturer's
instructions for additional inspection and
maintenance information specific to the child
restraint.
We recommend that all seatbelt assemblies
in use in vehicles involved in a crash be
replaced. However, if the crash was minor
and an authorized dealer finds that the belts
do not show damage and continue to
operate properly, they do not need to be
replaced. Seatbelt assemblies not in use
during a crash should also be checked and
replaced if either damage or improper
operation is noted.
Properly care for seatbelts. See Cleaning
Seatbelts (page 434).
SEATBELT EXTENSIONS WARNING:
Persons who fit into the
vehicle's seatbelt should not use an
extension. Unnecessary use could result
in serious personal injury in the event of a
crash.
58
2022 Navigator (TB9) Canada/United States of America, enUSA, Edition date: 202109, First-Printing Seatbelts
Page 104 of 646
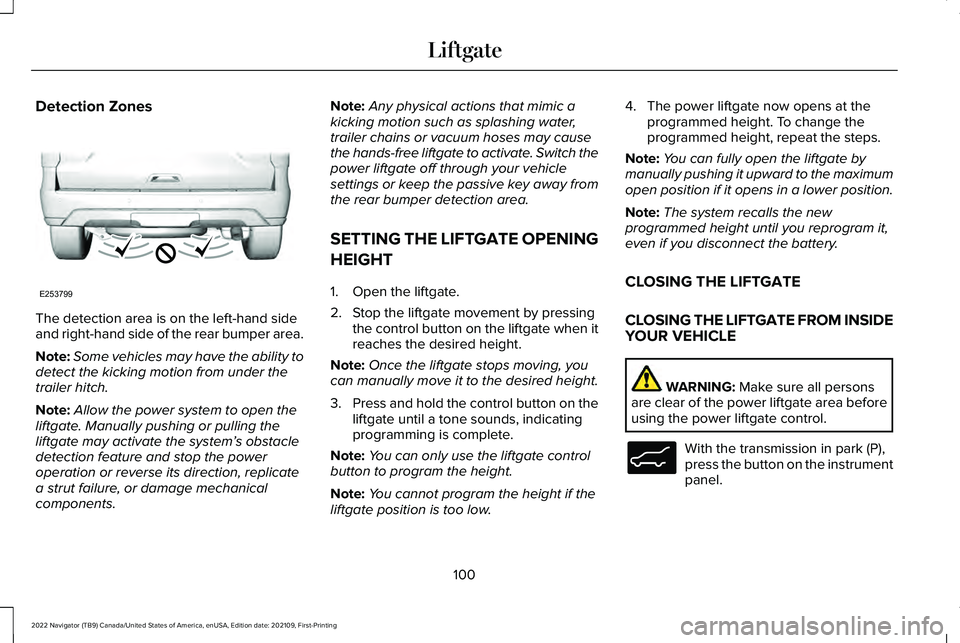
Detection Zones
The detection area is on the left-hand side
and right-hand side of the rear bumper area.
Note:
Some vehicles may have the ability to
detect the kicking motion from under the
trailer hitch.
Note: Allow the power system to open the
liftgate. Manually pushing or pulling the
liftgate may activate the system’ s obstacle
detection feature and stop the power
operation or reverse its direction, replicate
a strut failure, or damage mechanical
components. Note:
Any physical actions that mimic a
kicking motion such as splashing water,
trailer chains or vacuum hoses may cause
the hands-free liftgate to activate. Switch the
power liftgate off through your vehicle
settings or keep the passive key away from
the rear bumper detection area.
SETTING THE LIFTGATE OPENING
HEIGHT
1. Open the liftgate.
2. Stop the liftgate movement by pressing the control button on the liftgate when it
reaches the desired height.
Note: Once the liftgate stops moving, you
can manually move it to the desired height.
3. Press and hold the control button on the
liftgate until a tone sounds, indicating
programming is complete.
Note: You can only use the liftgate control
button to program the height.
Note: You cannot program the height if the
liftgate position is too low. 4. The power liftgate now opens at the
programmed height. To change the
programmed height, repeat the steps.
Note: You can fully open the liftgate by
manually pushing it upward to the maximum
open position if it opens in a lower position.
Note: The system recalls the new
programmed height until you reprogram it,
even if you disconnect the battery.
CLOSING THE LIFTGATE
CLOSING THE LIFTGATE FROM INSIDE
YOUR VEHICLE WARNING: Make sure all persons
are clear of the power liftgate area before
using the power liftgate control. With the transmission in park (P),
press the button on the instrument
panel.
100
2022 Navigator (TB9) Canada/United States of America, enUSA, Edition date: 202109, First-Printing LiftgateE253799 E138633
Page 155 of 646
WHAT IS THE HEAD UP DISPLAY
The system displays information on a display
screen in your field of vision, allowing you to
keep your eyes on the road. You can select
which information the system displays.
SWITCHING THE HEAD UP
DISPLAY ON AND OFF
Use the instrument cluster controls on the
steering wheel to navigate to the head up
display menu.
Action
Menu Item
Press the OK button.
HUD
Press the OK button.
HUD On
Note: The system remembers the last setting
when you start the engine.
HEAD UP DISPLAY SETTINGS
You can control the system's options through
the instrument cluster display by using the
HUD, OK and arrow buttons on your steering
wheel. See Using the Instrument Cluster
Display Controls (page 147). You can adjust the display according to your
height to make viewing the content easier.
You can also adjust what content displays
and the brightness of the content. The
system's options appear in the instrument
cluster while the updates happen in the head
up display.
Note:
If HUD On is unchecked, other options
of the system are hidden.
Note: The head up display menu
automatically closes after a certain period
of inactivity.
Note: The head up display image brightness
automatically adjusts to the brightness of
the ambient environment. You have the
ability to adjust the brightness further
according to your preference.
Note: In some instances, sunlight can cause
some reflections in and around the head up
display image.
151
2022 Navigator (TB9) Canada/United States of America, enUSA, Edition date: 202109, First-Printing Head Up Display
(If Equipped)
Page 175 of 646
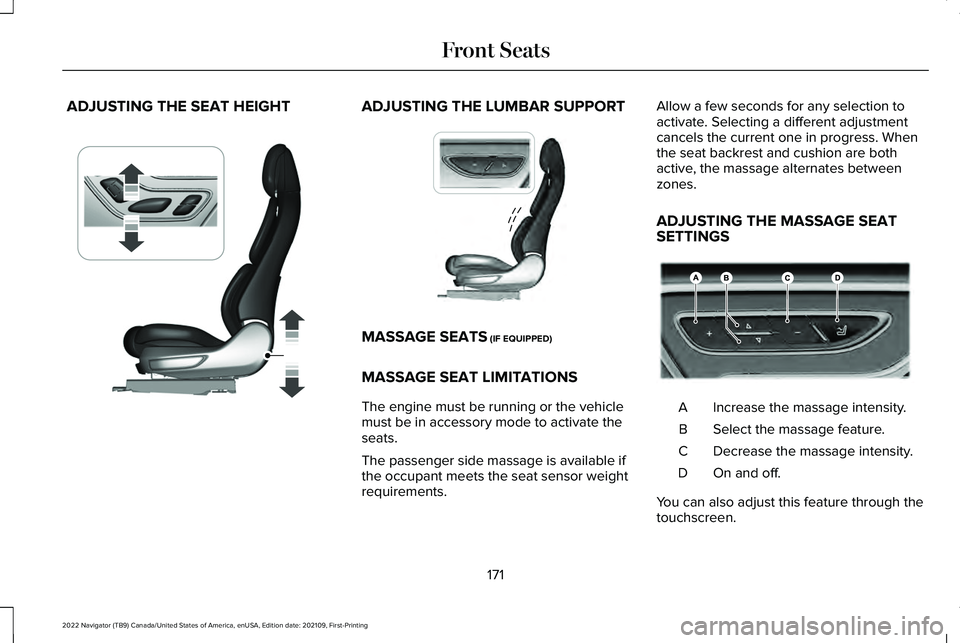
ADJUSTING THE SEAT HEIGHT ADJUSTING THE LUMBAR SUPPORT
MASSAGE SEATS (IF EQUIPPED)
MASSAGE SEAT LIMITATIONS
The engine must be running or the vehicle
must be in accessory mode to activate the
seats.
The passenger side massage is available if
the occupant meets the seat sensor weight
requirements. Allow a few seconds for any selection to
activate. Selecting a different adjustment
cancels the current one in progress. When
the seat backrest and cushion are both
active, the massage alternates between
zones.
ADJUSTING THE MASSAGE SEAT
SETTINGS
Increase the massage intensity.
A
Select the massage feature.
B
Decrease the massage intensity.
C
On and off.
D
You can also adjust this feature through the
touchscreen.
171
2022 Navigator (TB9) Canada/United States of America, enUSA, Edition date: 202109, First-Printing Front SeatsE349633 E222308 E222219
Page 430 of 646
Remove and Reinstall the Battery
Install a battery approved for use by our
specifications. See Capacities and
Specifications (page 469).
To disconnect or remove the battery, do the
following:
1. Apply the parking brake and switch the ignition off.
2. Switch all electrical equipment off, for example lights and radio.
3. Wait a minimum of two minutes before disconnecting the battery.
Note: The engine management system has
a power hold function and remains powered
for a period of time after you switch the
ignition off. This is to allow the system to
store diagnostic and adaptive tables.
Disconnecting the battery without waiting
can cause damage not covered by the
vehicle warranty.
4. Disconnect the negative battery cable terminal.
5. Disconnect the positive battery cable terminal. 6. Remove the battery securing clamp.
7. Remove the battery.
8.
To install, reverse the removal procedure.
Note: Before reconnecting the battery, make
sure the ignition remains switched off.
Note: Make sure to fully tighten the battery
cables.
If you disconnect or replace the vehicle
battery, you must reset the following
features:
• Window bounce-back.
See Opening and
Closing the Windows (page 133).
• Clock Settings.
• Pre-set radio stations.
Battery Disposal Make sure that you dispose of old
batteries in an environmentally
friendly way. Seek advice from
your local authority about recycling old
batteries. ADJUSTING THE HEADLAMPS
Vertical Aim Adjustment
The headlamps on your vehicle are properly
aimed at the assembly plant. If your vehicle
has been in an accident, contact an
authorized dealer to check and realign your
headlamps.
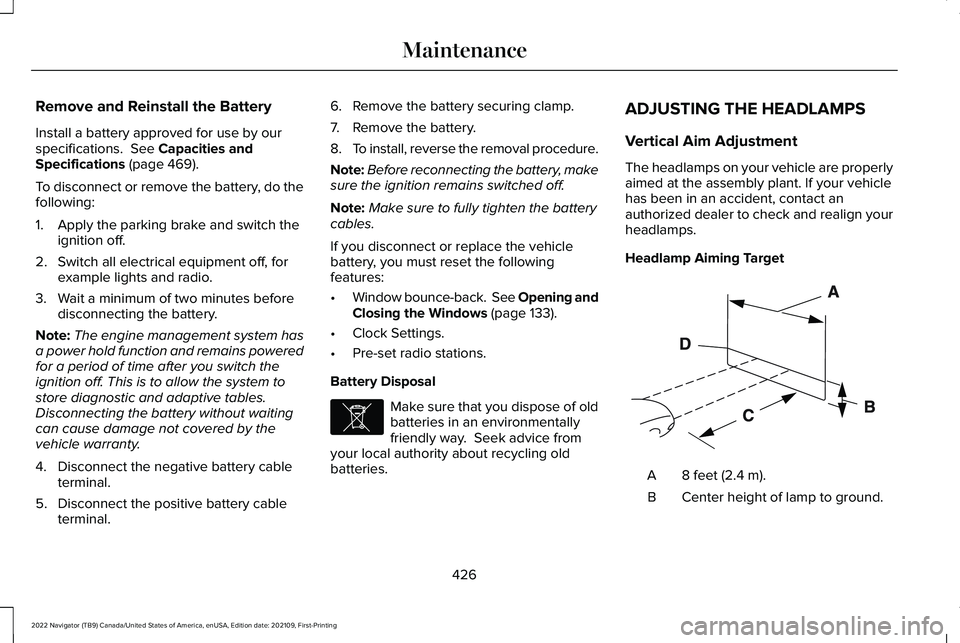
Headlamp Aiming Target
8 feet (2.4 m).
A
Center height of lamp to ground.
B
426
2022 Navigator (TB9) Canada/United States of America, enUSA, Edition date: 202109, First-Printing MaintenanceE107998 E142592
Page 431 of 646
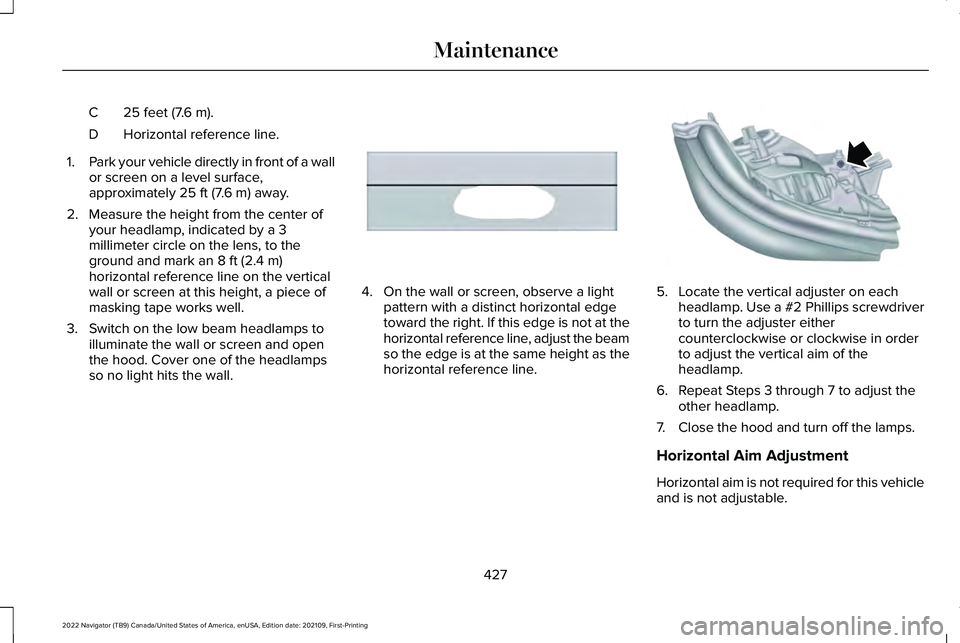
25 feet (7.6 m).
C
Horizontal reference line.
D
1. Park your vehicle directly in front of a wall
or screen on a level surface,
approximately 25 ft (7.6 m) away.
2. Measure the height from the center of your headlamp, indicated by a 3
millimeter circle on the lens, to the
ground and mark an
8 ft (2.4 m)
horizontal reference line on the vertical
wall or screen at this height, a piece of
masking tape works well.
3. Switch on the low beam headlamps to illuminate the wall or screen and open
the hood. Cover one of the headlamps
so no light hits the wall. 4. On the wall or screen, observe a light
pattern with a distinct horizontal edge
toward the right. If this edge is not at the
horizontal reference line, adjust the beam
so the edge is at the same height as the
horizontal reference line. 5. Locate the vertical adjuster on each
headlamp. Use a #2 Phillips screwdriver
to turn the adjuster either
counterclockwise or clockwise in order
to adjust the vertical aim of the
headlamp.
6. Repeat Steps 3 through 7 to adjust the other headlamp.
7. Close the hood and turn off the lamps.
Horizontal Aim Adjustment
Horizontal aim is not required for this vehicle
and is not adjustable.
427
2022 Navigator (TB9) Canada/United States of America, enUSA, Edition date: 202109, First-Printing MaintenanceE167358 E163806
Page 443 of 646
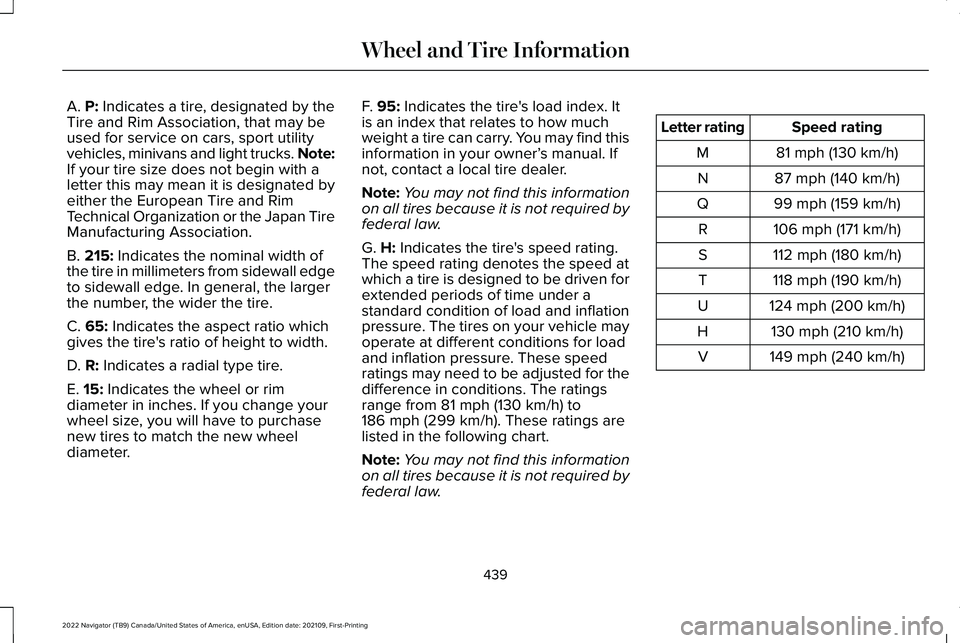
A. P: Indicates a tire, designated by the
Tire and Rim Association, that may be
used for service on cars, sport utility
vehicles, minivans and light trucks.
Note:
If your tire size does not begin with a
letter this may mean it is designated by
either the European Tire and Rim
Technical Organization or the Japan Tire
Manufacturing Association.
B.
215: Indicates the nominal width of
the tire in millimeters from sidewall edge
to sidewall edge. In general, the larger
the number, the wider the tire.
C.
65: Indicates the aspect ratio which
gives the tire's ratio of height to width.
D.
R: Indicates a radial type tire.
E.
15: Indicates the wheel or rim
diameter in inches. If you change your
wheel size, you will have to purchase
new tires to match the new wheel
diameter. F.
95: Indicates the tire's load index. It
is an index that relates to how much
weight a tire can carry. You may find this
information in your owner’ s manual. If
not, contact a local tire dealer.
Note: You may not find this information
on all tires because it is not required by
federal law.
G.
H: Indicates the tire's speed rating.
The speed rating denotes the speed at
which a tire is designed to be driven for
extended periods of time under a
standard condition of load and inflation
pressure. The tires on your vehicle may
operate at different conditions for load
and inflation pressure. These speed
ratings may need to be adjusted for the
difference in conditions. The ratings
range from
81 mph (130 km/h) to
186 mph (299 km/h). These ratings are
listed in the following chart.
Note: You may not find this information
on all tires because it is not required by
federal law. Speed rating
Letter rating
81 mph (130 km/h)
M
87 mph (140 km/h)
N
99 mph (159 km/h)
Q
106 mph (171 km/h)
R
112 mph (180 km/h)
S
118 mph (190 km/h)
T
124 mph (200 km/h)
U
130 mph (210 km/h)
H
149 mph (240 km/h)
V
439
2022 Navigator (TB9) Canada/United States of America, enUSA, Edition date: 202109, First-Printing Wheel and Tire Information
Page 446 of 646
B. Load Range and Load Inflation
Limits: Indicates the tire's load-carrying
capabilities and its inflation limits.
C.
Maximum Load Dual lb (kg) at psi
(kPa) cold: Indicates the maximum load
and tire pressure when the tire is used
as a dual, defined as four tires on the
rear axle (a total of six or more tires on
the vehicle).
D.
Maximum Load Single lb (kg) at psi
(kPa) cold: Indicates the maximum load
and tire pressure when the tire is used
as a single, defined as two tires (total)
on the rear axle.
Information on T Type Tires
T145/80D16 is an example of a tire size.
Note: The temporary tire size for your
vehicle may be different from this
example. Tire Quality Grades do not
apply to this type of tire. T type tires have some additional
information beyond those of P type tires;
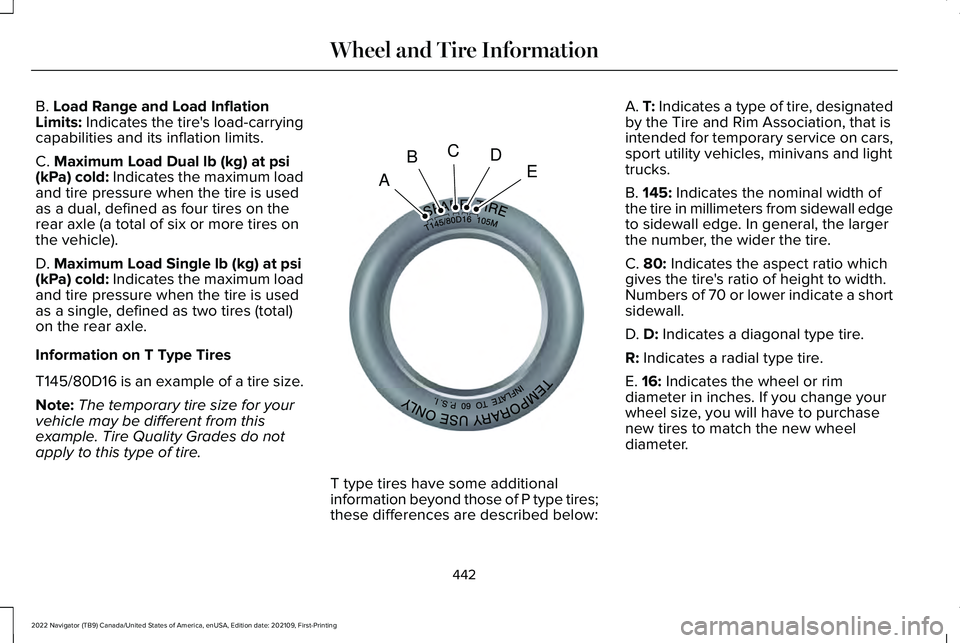
these differences are described below:A.
T: Indicates a type of tire, designated
by the Tire and Rim Association, that is
intended for temporary service on cars,
sport utility vehicles, minivans and light
trucks.
B.
145: Indicates the nominal width of
the tire in millimeters from sidewall edge
to sidewall edge. In general, the larger
the number, the wider the tire.
C.
80: Indicates the aspect ratio which
gives the tire's ratio of height to width.
Numbers of 70 or lower indicate a short
sidewall.
D.
D: Indicates a diagonal type tire.
R:
Indicates a radial type tire.
E.
16: Indicates the wheel or rim
diameter in inches. If you change your
wheel size, you will have to purchase
new tires to match the new wheel
diameter.
442
2022 Navigator (TB9) Canada/United States of America, enUSA, Edition date: 202109, First-Printing Wheel and Tire InformationA
BCDEE142545
Page 454 of 646
When the tread is worn down to one
sixteenth of an inch (2 mm), tires must
be replaced to help prevent your vehicle
from skidding and hydroplaning. Built-in
treadwear indicators, or wear bars,
which look like narrow strips of smooth
rubber across the tread will appear on
the tire when the tread is worn down to
one sixteenth of an inch (2 mm).
When the tire tread wears down to the
same height as these wear bars, the tire
is worn out and must be replaced.
The tires should also be balanced
periodically. An unbalanced tire and
wheel assembly may result in irregular
tire wear.
Periodically inspect the tire treads for
uneven or excessive wear and remove
objects such as stones, nails or glass
that may be wedged in the tread
grooves.
INSPECTING THE TIRE FOR
DAMAGE
Inspect the tire sidewalls for cracking,
cuts, bruises and other signs of damage
or excessive wear. If internal damage to
the tire is suspected, have the tire
dismounted and inspected in case it
needs to be repaired or replaced. For
your safety, tires that are damaged or
show signs of excessive wear should
not be used because they are more
likely to blow out or fail.
Periodically inspect the tire treads and
sidewalls for damage, such as bulges in
the tread or sidewalls, cracks in the
tread groove and separation in the tread
or sidewall. If damage is observed or
suspected, have the tire inspected by a
tire professional.
Safety Practices WARNING: If your vehicle is
stuck in snow, mud or sand, do not
rapidly spin the tires; spinning the tires
can tear the tire and cause an
explosion. A tire can explode in as little
as three to five seconds. WARNING:
Do not spin the
wheels at over 34 mph (55 km/h). The
tires may fail and injure a passenger
or bystander.
Highway Hazards
No matter how carefully you drive, there
is always the possibility that you could
eventually have a flat tire on the
highway. Drive slowly to the closest safe
area out of traffic. This could further
damage the flat tire, but your safety is
more important.
450
2022 Navigator (TB9) Canada/United States of America, enUSA, Edition date: 202109, First-Printing Tire Care
Page 622 of 646
Adjusting the Luggage Compartment
Divider..........................................................343
Adjusting the Luggage Compartment Load Floor..............................................................342
Adjusting the Map.........................................518
Changing the Format of the Map....................518
Zooming the Map In and Out...........................518
Adjusting the Pedals......................................113
Adjusting the Seatbelt Height
.....................56
Adjusting the Seatbelts During Pregnancy......................................................55
Adjusting the Sound Settings
...................489
Adjusting the Steering Wheel.....................112
Adjusting the Volume..................................489
Aid Mode.........................................................301 How Does Aid Mode Work...............................301
What Is Aid Mode................................................301
Airbag Precautions
.........................................63
Airbags...............................................................61
Front Passenger Sensing System....................65
Air Conditioning See: Climate Control..........................................158
Air Conditioning System Capacity and Specification................................................475
Alert and Aid Mode.....................................302 How Does Alert and Aid Mode Work............302
What Is Alert and Aid Mode............................302 Alert Mode
......................................................301
Adjusting the Steering Wheel Vibration
Intensity.............................................................301
How Does Alert Mode Work............................301
What Is Alert Mode.............................................301
AM/FM Radio.................................................490 AM/FM Radio Limitations.................................490
Selecting a Radio Station..................................
491
Ambient Lighting
...........................................132
Adjusting Ambient Lighting..............................132
Switching Ambient Lighting On and Off........132
Anti-Lock Braking System..........................233 Anti-Lock Braking System Limitations...........233
Anti-Theft Alarm System.............................106 Arming the Anti-Theft Alarm System..............107
Disarming the Anti-Theft Alarm System........107
How Does the Anti-Theft Alarm System
Work...................................................................106
What Are the Inclination Sensors....................107
What Are the Interior Sensors.........................106
What Is the Anti-Theft Alarm System.............106
What Is the Perimeter Alarm............................106
Anti-Theft Alarm System Settings.............107 Setting the Alarm Security Level.....................107
Switching Ask on Exit On and Off...................107
What are the Alarm Security Levels...............107
What Is Ask on Exit.............................................107
Appendices......................................................611 Applying the Electric Parking Brake........236
Applying the Electric Parking Brake in an
Emergency..................................................236
App Precautions
............................................513
App Requirements........................................513
Apps..................................................................513
Audio System................................................488
AM/FM Radio.......................................................490
Audio System – Troubleshooting..................496
Digital Radio..........................................................491
Satellite Radio.....................................................493
Audio System Precautions
.........................488
Audio System – Troubleshooting............496 Audio System – Information Messages.......
496
Auto-Dimming Exterior Mirror....................138 What Is the Auto-Dimming Exterior
Mirror..................................................................138
Auto-Dimming Interior Mirror.....................136 Auto-Dimming Interior Mirror
Limitations .........................................................136
What Is the Auto-Dimming Interior Mirror..................................................................136
Auto Hold
.......................................................244
Auto Hold Indicators...................................245
Autolamps........................................................121 Autolamp Settings................................................121
What Are Autolamps...........................................121
618
2022 Navigator (TB9) Canada/United States of America, enUSA, Edition date: 202109, First-Printing Index