ignition LINCOLN NAVIGATOR 2022 Repair Manual
[x] Cancel search | Manufacturer: LINCOLN, Model Year: 2022, Model line: NAVIGATOR, Model: LINCOLN NAVIGATOR 2022Pages: 646, PDF Size: 7.29 MB
Page 398 of 646
SWITCHING THE POST-CRASH ALERT
SYSTEM OFF
Press the hazard flasher switch or the unlock
button on the remote control to switch the
system off.
Note:
The alert turns off when the vehicle
battery runs out of charge.
AUTOMATIC CRASH SHUTOFF
WHAT IS AUTOMATIC CRASH
SHUTOFF
The automatic crash shutoff is designed to
stop the fuel going to the engine in the event
of a moderate or severe crash.
Note: Not every impact causes a shutoff. AUTOMATIC CRASH SHUTOFF
PRECAUTIONS WARNING: If your vehicle has been
involved in a crash, have the fuel system
checked. Failure to follow this instruction
could result in fire, personal injury or death.
RE-ENABLING YOUR VEHICLE
1. Switch the ignition off.
2. Attempt to start your vehicle.
3. Switch the ignition off.
4. Attempt to start your vehicle.
Note: If your vehicle does not start after the
third attempt, have your vehicle checked as
soon as possible. RECOVERY TOWING
ACCESSING THE FRONT TOWING
POINT WARNING:
Using recovery hooks is
dangerous and should only be done by a
person familiar with proper vehicle
recovery safety practices. Improper use of
recovery hooks may cause hook failure or
separation from the vehicle and could
result in serious injury or death. WARNING:
Slowly remove the slack
from the recovery strap prior to pulling.
Failure to do so can introduce significantly
higher loads which can cause the recovery
hooks to break off, or the recovery strap
to fail which can cause serious injury or
death. WARNING:
Never link two straps
together with a clevis pin. These heavy
metal objects could become projectiles if
the strap breaks and can cause serious
injury or death.
394
2022 Navigator (TB9) Canada/United States of America, enUSA, Edition date: 202109, First-Printing Crash and Breakdown Information
Page 399 of 646
WARNING: Switch the ignition off
before removing the recovery hook. Failure
to do so could result in personal injury. WARNING:
The recovery hook can
become hot. Let the recovery hook cool
down before removing it. Failure to do so
could result in personal injury.
Your vehicle has frame-mounted front
recovery hooks.
Note: Do not apply a load to the recovery
hooks that is greater than the gross vehicle
weight rating of your vehicle.
Before using recovery hooks:
• Make sure all attaching points are secure
and capable of withstanding the applied
load.
• Do not use chains, cables or tow straps
with metal hook ends.
• Only use recovery straps that have a
minimum breaking strength two to three
times the gross vehicle weight of the
stuck vehicle. •
Make sure the recovery strap is in good
condition and free of visible cuts, tears
or damage.
• Use a damper device such as a tarp,
heavy blanket or piece of carpet, and
place it over the recovery strap to help
absorb the energy in the event the strap
breaks.
• Make sure the stuck vehicle is not loaded
heavier than its gross vehicle weight
rating specified on the certification label.
• Align the tow vehicle and stuck vehicle
in a straight line, within 10 degrees.
• Keep bystanders to the sides of the
vehicle, at a distance of at least twice the
length of the recovery strap. This helps
avoid injury from the hazard of a recovery
hook or strap breaking, or a vehicle
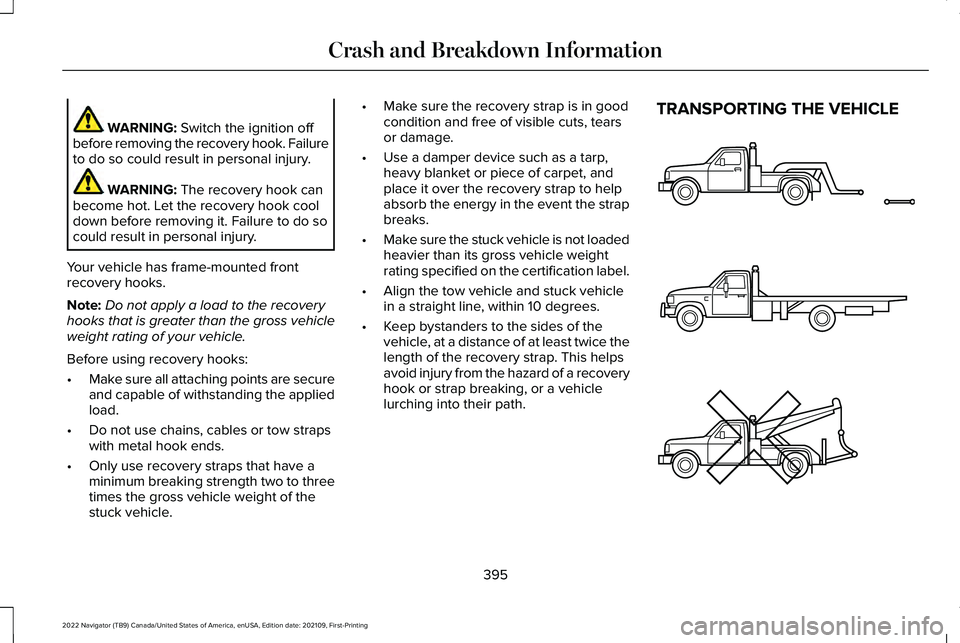
lurching into their path. TRANSPORTING THE VEHICLE
395
2022 Navigator (TB9) Canada/United States of America, enUSA, Edition date: 202109, First-Printing Crash and Breakdown InformationE143886
Page 401 of 646
TOWING YOUR VEHICLE
PRECAUTIONS
Use the following guidelines when towing
your vehicle. Failure to follow this instruction
could result in vehicle damage not covered
by the vehicle warranty.
Note:
Make sure you properly secure your
vehicle to the tow vehicle.
Note: If you are unsure of the vehicle ’s
configuration, contact an authorized dealer.
RECREATIONALLY TOWING YOUR
VEHICLE - 4X4 WARNING: Do not disconnect the
battery when recreationally towing your
vehicle. This prevents the transfer case
from shifting properly and could cause the
vehicle to roll, even if the transmission is
in park (P). WARNING:
Placing the transfer case
in its neutral position could cause your
vehicle to freely roll. Make sure you press
and hold the brake pedal and the vehicle
is in a secure, safe position when you place
the transfer case in its neutral position.
Follow these guidelines if you have a need
for recreational towing. An example of
recreational towing would be towing your
vehicle behind a motorhome. These
guidelines are to make sure that you do not
damage the transmission.
You can only tow your vehicle with all wheels
on the ground by placing the transfer case
in its neutral position and engaging the
recreational tow feature. Perform the
following steps after positioning your vehicle
behind the tow vehicle and properly securing
them together.
Note: Put your climate control system in
recirculated air mode to prevent exhaust
fumes from entering your vehicle. Note:
Failure to put the transfer case in its
neutral position can damage vehicle
components.
Note: You can check the towing status at
any time by opening the driver door or
turning the ignition to the accessory or on
position.
Neutral Tow Enabled Leave
Transmission in Neutral appears in the
instrument cluster display to confirm you can
recreationally tow your vehicle.
Note: If your vehicle has an anti-theft alarm,
make sure you switch perimeter sensing on
when towing.
See Setting the Alarm
Security Level (page 107).
Switching
Neutral Tow On
1. Start your vehicle.
2. Make sure your vehicle is in
NORMAL
mode. See Selecting a Drive Mode
(page 294).
3. Place your vehicle in temporary neutral mode.
See Entering Temporary Neutral
Mode (page 221).
397
2022 Navigator (TB9) Canada/United States of America, enUSA, Edition date: 202109, First-Printing Towing Your Vehicle
Page 402 of 646
4. Switch your vehicle off by pressing the
push button ignition switch once. A
message appears in the instrument
cluster display.
5. Switch your vehicle to accessory mode by pressing the push button ignition
switch once without pressing the brake
pedal.
6. Press and hold the brake pedal.
7. Using the instrument cluster controls on the steering wheel, select Settings.
8. Select
Neutral Tow.
9. Press and hold the
OK button until a
confirmation message appears in the
information display.
Note: If completed successfully, the
information display shows
Neutral Tow
Enabled Leave Transmission in Neutral.
This indicates that your vehicle is safe to tow
with all wheels on the ground.
Note: If you do not see a confirmation
message in the instrument cluster display,
you must perform the procedure again from
the beginning. Note:
You may hear noise as the transfer
case shifts into its neutral position. This is
normal.
10. Release the brake pedal.
11. Leave the transmission in neutral (N) and switch your vehicle off by pressing
the push button ignition switch once
without pressing the brake pedal.
Switching
Neutral Tow Off
1. With your vehicle properly secured to the
tow vehicle, press and hold the brake
pedal and start the engine.
2. Switch your vehicle off by pressing the push button ignition switch once and
release the brake pedal.
3. Place your vehicle in accessory mode by
pressing the push button ignition switch
once without pressing the brake pedal.
4. Press and hold the brake pedal.
5. Shift into park (P).
6. Release the brake pedal. Note:
If completed successfully, the
instrument cluster displays
2H and Neutral
Tow Disabled.
Note: You must perform the switching
neutral tow on and switching neutral tow off
procedures again from the beginning if the
indicator light and message do not display.
Note: You may hear a noise as the transfer
case shifts out of its neutral position. This is
normal.
7. Apply the parking brake, then disconnect
your vehicle from the tow vehicle.
8. Release the parking brake, start the engine, and shift into drive (D) to make
sure the transfer case is out of the neutral
tow position.
9. If the transfer case does not successfully
shift out of its neutral position, set the
parking brake. Have your vehicle
checked as soon as possible.
Resolving the Shift Delayed Drive Forward
Message
1. Press and hold the brake pedal.
2. Start your vehicle.
398
2022 Navigator (TB9) Canada/United States of America, enUSA, Edition date: 202109, First-Printing Towing Your Vehicle
Page 429 of 646
If you disconnect or replace the battery and
your vehicle has an automatic transmission,
it must relearn its adaptive strategy. Because
of this, the transmission may shift firmly when
first driven. This is normal operation while
the transmission fully updates its operation
to optimum shift feel.
Battery Sensor Reset
When you install a new battery, reset the
battery sensor by doing the following:
1. Switch the ignition on, and leave the
engine off.
Note: Complete Steps 2 and 3 within 10
seconds.
2. Flash the high beam headlamps five times, ending with the high beams off.
3. Press and release the brake pedal three
times.
The battery warning lamp flashes three times
to confirm that the reset is successful. Battery Management System (If Equipped)
The system monitors battery conditions and
takes actions to extend battery life. If
excessive battery drain is detected, the
system temporarily disables some electrical
systems to protect the battery.
Systems included are:
• Heated rear window.
• Heated seats.
• Climate control.
• Heated steering wheel.
• Audio unit.
• Navigation system.
A message may appear in the information
display to alert you that battery protection
actions are active. This message is only for
notification that an action is taking place, and
not intended to indicate an electrical problem
or that the battery requires replacement. After battery replacement, or in some cases
after charging the battery with an external
charger, the battery management system
requires eight hours of vehicle sleep time to
relearn the battery state of charge. During
this time, your vehicle must remain fully
locked with the ignition switched off.
Note:
Prior to relearning the battery state of
charge, the battery management system
may temporarily disable some electrical
systems.
Electrical Accessory Installation
To make sure the battery management
system works correctly, do not connect an
electrical device ground connection directly
to the battery negative post. This can cause
inaccurate measurements of the battery
condition and potential incorrect system
operation.
Note: If you add electrical accessories or
components to the vehicle, it may adversely
affect battery performance and durability.
This may also affect the performance of
other electrical systems in the vehicle.
425
2022 Navigator (TB9) Canada/United States of America, enUSA, Edition date: 202109, First-Printing Maintenance
Page 430 of 646
Remove and Reinstall the Battery
Install a battery approved for use by our
specifications. See Capacities and
Specifications (page 469).
To disconnect or remove the battery, do the
following:
1. Apply the parking brake and switch the ignition off.
2. Switch all electrical equipment off, for example lights and radio.
3. Wait a minimum of two minutes before disconnecting the battery.
Note: The engine management system has
a power hold function and remains powered
for a period of time after you switch the
ignition off. This is to allow the system to
store diagnostic and adaptive tables.
Disconnecting the battery without waiting
can cause damage not covered by the
vehicle warranty.
4. Disconnect the negative battery cable terminal.
5. Disconnect the positive battery cable terminal. 6. Remove the battery securing clamp.
7. Remove the battery.
8.
To install, reverse the removal procedure.
Note: Before reconnecting the battery, make
sure the ignition remains switched off.
Note: Make sure to fully tighten the battery
cables.
If you disconnect or replace the vehicle
battery, you must reset the following
features:
• Window bounce-back.
See Opening and
Closing the Windows (page 133).
• Clock Settings.
• Pre-set radio stations.
Battery Disposal Make sure that you dispose of old
batteries in an environmentally
friendly way. Seek advice from
your local authority about recycling old
batteries. ADJUSTING THE HEADLAMPS
Vertical Aim Adjustment
The headlamps on your vehicle are properly
aimed at the assembly plant. If your vehicle
has been in an accident, contact an
authorized dealer to check and realign your
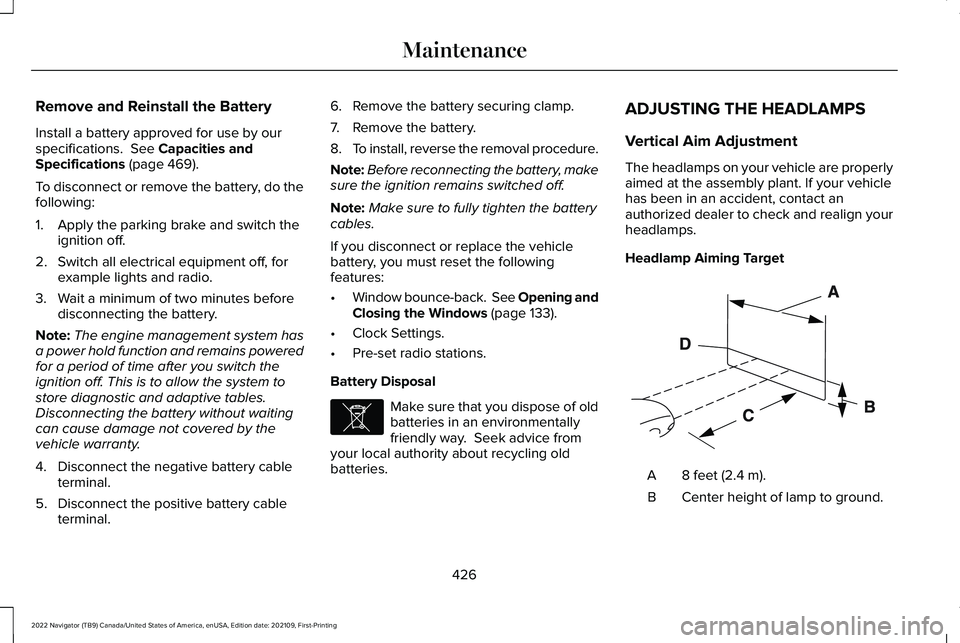
headlamps.
Headlamp Aiming Target
8 feet (2.4 m).
A
Center height of lamp to ground.
B
426
2022 Navigator (TB9) Canada/United States of America, enUSA, Edition date: 202109, First-Printing MaintenanceE107998 E142592
Page 435 of 646
CLEANING CHROME, ALUMINIUM OR
STAINLESS STEEL
We recommend that you only use a car
shampoo, a soft cloth and water on bumpers
and other chrome, aluminium or stainless
steel parts.
Note:
For additional information and
assistance, we recommend that you contact
an authorized dealer.
Note: Rinse the area well after cleaning.
Note: Do not use abrasive materials, for
example steel wool or plastic pads, as they
can scratch these surfaces.
Note: Do not use chrome cleaner, metal
cleaner or polish on wheels or wheel covers.
CLEANING WHEELS
Only use a recommended wheel and tire
cleaner to clean the wheels weekly. For
additional information and assistance, we
recommend that you contact an authorized
dealer. 1.
Use a sponge to remove heavy deposits
of dirt and brake dust.
2. Rinse well after cleaning.
Note: Do not apply a cleaning chemical to
warm or hot wheel rims and covers.
If you intend on parking your vehicle for an
extended period after cleaning the wheels
with a wheel cleaner, drive your vehicle for
a few minutes before parking your vehicle.
This reduces the risk of corrosion of the
brake discs, brake pads and linings.
Do not clean the wheels when they are hot.
Note: Some car washes could damage
wheel rims and covers.
Note: Using non-recommended cleaners,
harsh cleaning products, chrome wheel
cleaners or abrasive materials could
damage wheel rims and covers.
CLEANING THE ENGINE
COMPARTMENT
Use a vacuum cleaner to remove debris from
the screen area below windshield. Note:
If you are not familiar with the parts
around the engine do not wash the engine
compartment. Avoid frequent engine
washes.
When washing the engine compartment:
• Never wash or rinse the engine while it
is hot or running.
• Never wash or rinse any ignition coil,
spark plug wire or spark plug well.
• Cover the battery, power distribution box,
and air filter assembly to prevent water
damage.
Note: If your vehicle has an engine cover
remove the cover before application of
shampoo and degreaser.
• Spray an approved engine shampoo and
degreaser on all parts that require
cleaning and rinse with water.
CLEANING STRIPES OR GRAPHICS
It is recommended to wash your vehicle by
hand however, pressure washing may be
used under the following conditions:
431
2022 Navigator (TB9) Canada/United States of America, enUSA, Edition date: 202109, First-Printing Vehicle Care
Page 460 of 646
Note:
To reduce the chances of
interference from another vehicle,
perform the system reset procedure at
least three feet, one meter, away from
another vehicle undergoing the system
reset procedure at the same time.
Note: Do not wait more than two
minutes between resetting each tire
sensor or the system can time-out and
you need to repeat the entire procedure
on all four wheels.
1. Drive the vehicle above 20 mph
(32 km/h) for at least two minutes,
then park in a safe location where
you can easily get to all four tires and
have access to an air pump.
2. Switch the ignition off.
3. Switch the ignition on but do not start
the engine.
4. Switch the hazard flashers on then off three times. Note:
You must accomplish this within
10 seconds. If you successfully enter the
reset mode, the horn sounds once, the
system indicator flashes and a message
shows in the information display.
Note: If the system does not enter reset
mode, try again starting at Step 2. If
after repeated attempts to enter the
reset mode, the horn does not sound,
the system indicator does not flash and
no message shows in the information
display, contact your authorized dealer.
5. Remove the valve cap from the valve
stem on the left front tire. Decrease
the air pressure until the horn
sounds.
Note: The single horn tone confirms that
the sensor identification code has been
learned by the module for this position.
If the horn sounds twice, the reset
procedure was unsuccessful, and you
must repeat it.
6. Remove the valve cap from the valve
stem on the right front tire. Decrease
the air pressure until the horn
sounds. 7.
Repeat the previous step on the right
rear tire and then on the left rear tire.
8. Switch the ignition off.
Note: If the horn sounds twice again
after switching the ignition off, and
repeating the procedure, contact your
authorized dealer and have your vehicle
checked as soon as possible.
9. Set all four tires to the recommended
air pressure as indicated on the
Safety Compliance Certification
Label.
Trailer Tire Pressure Monitoring
System
(If Equipped)
Note: Additional equipment may be
required for your vehicle to support
trailer tire pressure and temperature
monitoring. See your authorized dealer
for more information.
Note: The trailer tire pressure
monitoring system is not a substitute for
proper tire maintenance. It is your
responsibility to maintain correct tire
pressures at all times.
456
2022 Navigator (TB9) Canada/United States of America, enUSA, Edition date: 202109, First-Printing Tire Pressure Monitoring System
Page 467 of 646
Tire Change Procedure
WARNING: Only use replacement
tires and wheels that are the same size,
load index, speed rating and type (such as
P-metric versus LT-metric or all-season
versus all-terrain) as those originally
provided by Ford. The recommended tire
and wheel size may be found on either the
Safety Compliance Certification Label
(affixed to either the door hinge pillar,
door-latch post, or the door edge that
meets the door-latch post, next to the
driver's seating position), or the Tire Label
which is located on the B-Pillar or edge of
the driver's door. If this information is not
found on these labels, then you should
contact your authorized dealer as soon as
possible. Use of any tire or wheel not
recommended by Ford can affect the
safety and performance of your vehicle,
which could result in an increased risk of
loss of vehicle control, vehicle rollover,
personal injury and death. WARNING:
To help prevent your
vehicle from moving when changing a
wheel, shift the transmission into park (P),
set the parking brake and use an
appropriate block or wheel chock to
secure the wheel diagonally opposite to
the wheel being changed. For example,
when changing the front left wheel, place
an appropriate block or wheel chock on
the right rear wheel. WARNING: Do not attempt to change
a tire on the side of the vehicle close to
moving traffic. Pull far enough off the road
to avoid the danger of being hit when
operating the jack or changing the wheel. WARNING:
Only use the jack
provided as original equipment with your
vehicle. WARNING:
Switch off the running
boards before jacking or placing any object
under your vehicle. Never place your hand
between the extended running board and
your vehicle. A moving running board may
cause injury. WARNING: Only use the spare wheel
carrier to stow wheels provided with your
vehicle. WARNING:
Ensure screwthread is
adequately lubricated before use. WARNING:
Switch the ignition off
and apply the park brake fully before lifting
vehicle. WARNING:
Use only the specified
jacking points. If you use other locations,
you could damage the body, steering,
suspension, engine, braking system or the
fuel lines.
463
2022 Navigator (TB9) Canada/United States of America, enUSA, Edition date: 202109, First-Printing Changing a Road Wheel
Page 468 of 646
WARNING: Park your vehicle so that
you do not obstruct the flow of traffic or
place yourself in any danger and set up a
warning triangle.
1. Park the vehicle on firm, level ground and
activate the hazard flashers.
2. Apply the parking brake, place the transmission in park (P) and switch the
ignition off.
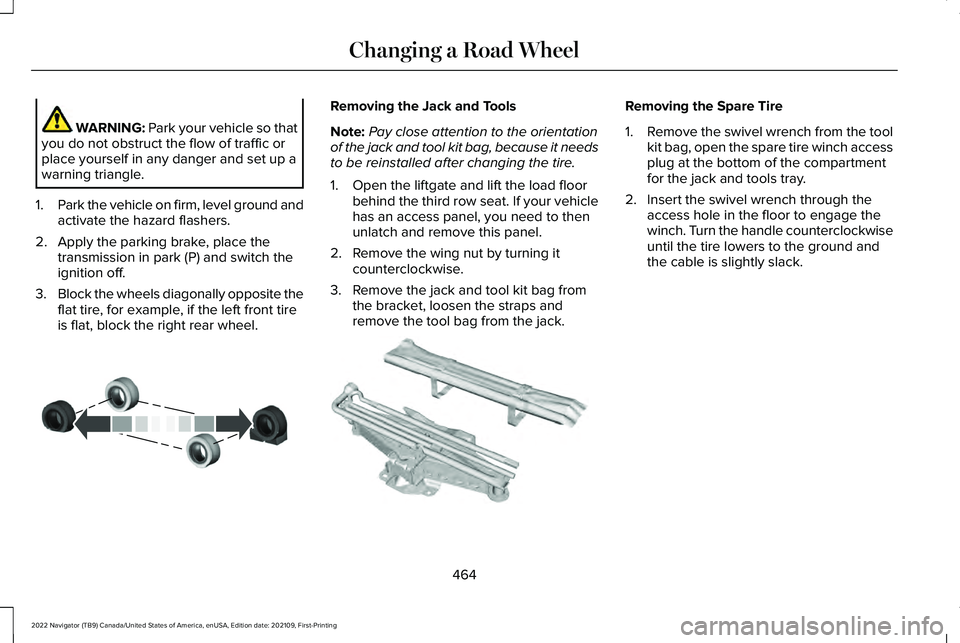
3. Block the wheels diagonally opposite the
flat tire, for example, if the left front tire
is flat, block the right rear wheel. Removing the Jack and Tools
Note:
Pay close attention to the orientation
of the jack and tool kit bag, because it needs
to be reinstalled after changing the tire.
1. Open the liftgate and lift the load floor behind the third row seat. If your vehicle
has an access panel, you need to then
unlatch and remove this panel.
2. Remove the wing nut by turning it counterclockwise.
3. Remove the jack and tool kit bag from the bracket, loosen the straps and
remove the tool bag from the jack. Removing the Spare Tire
1.
Remove the swivel wrench from the tool
kit bag, open the spare tire winch access
plug at the bottom of the compartment
for the jack and tools tray.
2. Insert the swivel wrench through the access hole in the floor to engage the
winch. Turn the handle counterclockwise
until the tire lowers to the ground and
the cable is slightly slack.
464
2022 Navigator (TB9) Canada/United States of America, enUSA, Edition date: 202109, First-Printing Changing a Road WheelE175447 E252435