check engine light LINCOLN NAVIGATOR 2022 Owners Manual
[x] Cancel search | Manufacturer: LINCOLN, Model Year: 2022, Model line: NAVIGATOR, Model: LINCOLN NAVIGATOR 2022Pages: 646, PDF Size: 7.29 MB
Page 62 of 646
Read Steps 1 - 4 before proceeding with the
programming procedure.
Make sure that:
•
You set the parking brake.
• The transmission is in park (P).
• The ignition is off.
• You close all vehicle doors.
• You unfasten the driver and front
passenger seatbelts.
1. Switch the ignition on. Do not start the engine.
2. Wait about one minute until the seatbelt warning light switches off. After Step 2,
wait an additional five seconds before
proceeding with Step 3. Once you start
Step 3, you must complete the procedure
within 30 seconds.
3. For the seating position you are switching
off, fasten then unfasten the seatbelt
three times at a moderate speed, ending
in the unfastened state. After Step 3, the
seatbelt warning light switches on. 4. When the seatbelt warning light is on,
fasten then unfasten the seatbelt. After
Step 4, the seatbelt warning light flashes
for confirmation.
This switches the feature off for that seating
position if it is currently on.
This switches the feature on for that seating
position if it is currently off.
CHECKING THE SEATBELTS
Check the seatbelts and child restraints
periodically to make sure they work properly
and are not damaged. Make sure there are
no nicks, tears or cuts. Replace if necessary.
Check the following seatbelt assemblies after
a crash.
• Retractors.
• Buckles.
• Front seatbelt buckle assemblies.
• Shoulder belt height adjusters.
• Shoulder belt guide on seat backrest.
• Child restraint LATCH and tether anchors.
• Attaching hardware. Read the child restraint manufacturer's
instructions for additional inspection and
maintenance information specific to the child
restraint.
We recommend that all seatbelt assemblies
in use in vehicles involved in a crash be
replaced. However, if the crash was minor
and an authorized dealer finds that the belts
do not show damage and continue to
operate properly, they do not need to be
replaced. Seatbelt assemblies not in use
during a crash should also be checked and
replaced if either damage or improper
operation is noted.
Properly care for seatbelts. See Cleaning
Seatbelts (page 434).
SEATBELT EXTENSIONS WARNING:
Persons who fit into the
vehicle's seatbelt should not use an
extension. Unnecessary use could result
in serious personal injury in the event of a
crash.
58
2022 Navigator (TB9) Canada/United States of America, enUSA, Edition date: 202109, First-Printing Seatbelts
Page 155 of 646
WHAT IS THE HEAD UP DISPLAY
The system displays information on a display
screen in your field of vision, allowing you to
keep your eyes on the road. You can select
which information the system displays.
SWITCHING THE HEAD UP
DISPLAY ON AND OFF
Use the instrument cluster controls on the
steering wheel to navigate to the head up
display menu.
Action
Menu Item
Press the OK button.
HUD
Press the OK button.
HUD On
Note: The system remembers the last setting
when you start the engine.
HEAD UP DISPLAY SETTINGS
You can control the system's options through
the instrument cluster display by using the
HUD, OK and arrow buttons on your steering
wheel. See Using the Instrument Cluster
Display Controls (page 147). You can adjust the display according to your
height to make viewing the content easier.
You can also adjust what content displays
and the brightness of the content. The
system's options appear in the instrument
cluster while the updates happen in the head
up display.
Note:
If HUD On is unchecked, other options
of the system are hidden.
Note: The head up display menu
automatically closes after a certain period
of inactivity.
Note: The head up display image brightness
automatically adjusts to the brightness of
the ambient environment. You have the
ability to adjust the brightness further
according to your preference.
Note: In some instances, sunlight can cause
some reflections in and around the head up
display image.
151
2022 Navigator (TB9) Canada/United States of America, enUSA, Edition date: 202109, First-Printing Head Up Display
(If Equipped)
Page 205 of 646
Note:
Your vehicle has a battery saver
feature that shuts your vehicle off when it
detects a certain amount of battery drain, or
after approximately 30 minutes of inactivity
in accessory mode.
Starting the Engine
With the transmission in park (P), press the
brake pedal and press the push button
ignition switch. An indicator light on the
button illuminates when the ignition is on
and when the engine starts.
Note: The system may not function if the
passive key is close to metal objects or
electronic devices, for example keys or a
cell phone.
Note: A valid key must be inside your vehicle
to switch the ignition on and start the engine. STARTING THE ENGINE
STARTING A GASOLINE ENGINE
Before starting your vehicle, check the
following:
•
Make sure that the headlamps and
electrical accessories are off.
• Make sure that the parking brake is on.
• Make sure that the transmission is in park
(P).
1. Fully press the brake pedal.
Note: Do not touch the accelerator pedal. 2. Press the push button ignition switch.
Note:
The engine may continue cranking for
up to 15 seconds or until it starts.
Note: The engine takes longer to start at
lower temperatures. It may crank for several
seconds when very cold. RESTARTING THE ENGINE AFTER
STOPPING IT
The system allows you to start the engine
within 10 seconds of switching it off, even if
it does not detect a valid passive key.
Within 10 seconds of switching the engine
off, fully press the brake pedal and press the
push button ignition switch. After 10 seconds,
you can no longer start the engine if the
system does not detect a valid passive key.
When you start the engine, it remains running
until you press the push button ignition
switch, even if your vehicle does not detect
a valid passive key. If you open and close a
door when the engine is running, the system
searches for a valid passive key.
201
2022 Navigator (TB9) Canada/United States of America, enUSA, Edition date: 202109, First-Printing Starting and Stopping the EngineE321258
Page 211 of 646
WHAT IS AUTO-START-STOP
The system is designed to help reduce fuel
consumption and CO
2 emissions by stopping
the engine when it is idling, for example at
traffic lights.
AUTO-START-STOP PRECAUTIONS WARNING: Apply the parking brake,
shift into park (P), switch the ignition off
and remove the key before you leave your
vehicle. Failure to follow this instruction
could result in personal injury or death. WARNING: Apply the parking brake,
shift into park (P), switch the ignition off
and remove the key before you open the
hood or have any service or repair work
completed. If you do not switch the ignition
off, the engine could restart at any time.
Failure to follow this instruction could result
in personal injury or death. SWITCHING AUTO-START-STOP
ON AND OFF
The system turns on when you switch the
ignition on. Press the button to switch the
system off.
Note: OFF illuminates in the switch.
Note: Deactivating the system using the
button lasts only one key cycle.
Press the button again to switch the system
back on.
Note: The system turns off if it detects a
malfunction. If the system malfunctions,
have your vehicle checked as soon as
possible.
STOPPING THE ENGINE
Stop your vehicle, keep your foot on the
brake pedal and the transmission in drive
(D). RESTARTING THE ENGINE
Release the brake pedal or press the
accelerator pedal.
A message appears in the information
display if the system requires you to take
action.
AUTO-START-STOP INDICATORS
WARNING:
The system may require
the engine to automatically restart when
the auto-start-stop indicator illuminates
green or flashes amber. Failure to follow
this instruction could result in personal
injury. The Auto-Start-Stop indicator
illuminates green when the engine
stops. It flashes amber and a
message appears when you need to take
action.
207
2022 Navigator (TB9) Canada/United States of America, enUSA, Edition date: 202109, First-Printing Auto-Start-Stop
Page 354 of 646
The rating for the tow vehicle's braking
system operation is at the gross vehicle
weight rating, not the gross combined weight
rating.
Certain states require functioning trailer
brakes for trailers over a specified weight.
Be sure to check state regulations for this
specified weight.
Ford Motor Company recommends separate
functioning brake systems for trailers
weighing more than 1,500 lb (680 kg) when
loaded.
TOWING A TRAILER LIMITATIONS
The vehicle's load capacity designation
is by weight, not by volume, so you
cannot necessarily use all available
space when loading a vehicle or trailer. Note:
Your vehicle could have reduced
performance when operating at high
altitudes and when heavily loaded or
towing a trailer. When driving at
elevation, to match driving performance
as perceived at sea level, reduce gross
vehicle weight and gross combination
weight by 2% per
1,000 ft (300 m)
elevation.
LOADING YOUR TRAILER
To help minimize how trailer movement
affects your vehicle when driving:
• Load the heaviest items closest to
the trailer floor.
• Load the heaviest items centered
between the left and right side trailer
tires. •
Load the heaviest items above the
trailer axles or just slightly forward
toward the trailer tongue. Do not
allow the final trailer tongue weight
to go above or below 10-15% of the
loaded trailer weight. The trailer
tongue weight should never exceed
10% of the maximum towing capacity.
• Select a ball mount with the correct
rise or drop. When both the loaded
vehicle and trailer are connected, the
trailer frame should be level, or
slightly angled down toward your
vehicle, when viewed from the side.
TRAILER TOWING HINTS
Towing a trailer places an extra load on your
vehicle's engine, transmission, axle, brakes,
tires and suspension. Periodically inspect
these components during and after any
towing operation.
When driving with a trailer or payload, a slight
takeoff vibration or shudder may be present
due to the increased payload weight.
350
2022 Navigator (TB9) Canada/United States of America, enUSA, Edition date: 202109, First-Printing Towing a Trailer
Page 390 of 646
DRIVING THROUGH MUD AND WATER
Mud
Be cautious of sudden changes in vehicle
speed or direction when you are driving in
mud. Even all-wheel drive and four-wheel
drive vehicles can lose traction in mud. If
your vehicle slides, steer in the direction of
the slide until you regain control of your
vehicle. After driving through mud, clean off
residue stuck to rotating driveshafts and tires.
Excess residue can cause an imbalance that
could damage drive components.
Note:
If your vehicle gets stuck in mud, it
could be rocked out by shifting between
forward and reverse gears, stopping
between shifts in a steady pattern. Press
lightly on the accelerator in each gear.
Note: Do not rock your vehicle if the engine
is not at normal operating temperature, as
damage to the transmission could occur.
Note: Do not rock your vehicle for more than
a minute, as damage to the transmission
and tires could occur or the engine could
overheat. Water
If you must drive though deep water, drive
slowly. The water could limit traction or brake
capability. See Driving Through Shallow
Water (page 387).
When driving though water, determine the
depth and avoid water higher than the center
of the wheel.
Once through water, always try the brakes.
Wet brakes do not stop your vehicle as
quickly as dry brakes. Apply light pressure
to the brake pedal while slowly moving the
vehicle to dry the brakes.
Note: Driving through deep water could
cause damage to the transmission. If the
front or rear axle is submerged in water,
have the axle lubricant and power transfer
unit lubricant checked and changed if
necessary. DRIVING ON HILLY OR SLOPING
TERRAIN WARNING: Extreme care should be
used when steering the vehicle in reverse
down a slope so as not to cause the
vehicle to swerve out of control.
Although natural obstacles could make it
necessary to travel diagonally up or down a
hill or steep incline, you should try to drive
straight up or straight down.
Note: Avoid turning on steep slopes or hills.
A danger lies in losing traction, slipping
sideways and possible vehicle roll over.
Whenever driving on a hill, determine
beforehand the route you can use. Do not
drive over the crest of a hill without seeing
what conditions are on the other side. Do
not drive in reverse over a hill without the
aid of an observer.
386
2022 Navigator (TB9) Canada/United States of America, enUSA, Edition date: 202109, First-Printing Driving Hints
Page 391 of 646
Apply just enough power to the wheels to
climb the hill. Too much power causes the
tires to slip, spin or lose traction, and you
could lose control of your vehicle. When
descending a steep hill, do not descend the
hill in neutral. Avoid sudden hard braking to
keep the front wheels rolling and to maintain
your vehicle's steering.
Note:
Your vehicle has anti-lock brakes,
apply the brakes steadily. Do not pump the
brakes.
Note: If your vehicle gets stuck driving on
hilly or sloping terrain, it could be rocked out
by shifting between forward and reverse
gears, stopping between shifts in a steady
pattern. Press lightly on the accelerator in
each gear.
Note: Do not rock your vehicle if the engine
is not at normal operating temperature, as
damage to the transmission could occur.
Note: Do not rock your vehicle for more than
a minute, as damage to the transmission
and tires could occur or the engine could
overheat. DRIVING IN SAND
When driving over sand, try to keep all four
wheels on the most solid area of the trail.
Steadily drive through the terrain. Apply the
accelerator slowly and avoid excessive
wheel slip. Do not drive your vehicle in deep
sand for an extended period of time. This
could overheat the system. A message
appears in the instrument cluster display.
Note:
If your vehicle gets stuck driving on
hilly or sloping terrain, it could be rocked out
by shifting between forward and reverse
gears, stopping between shifts in a steady
pattern. Press lightly on the accelerator in
each gear.
Note: Do not rock your vehicle if the engine
is not at normal operating temperature, as
damage to the transmission could occur.
Note: Do not rock your vehicle for more than
a minute, as damage to the transmission
and tires could occur or the engine could
overheat DRIVING THROUGH SHALLOW
WATER WARNING: Do not attempt to cross
a deep or flowing body of water. Failure to
follow this instruction could result in the
loss of control of your vehicle, personal
injury or death.
Note: Driving through standing water can
cause vehicle damage.
Note: Engine damage can occur if water
enters the air filter.
Before driving through standing water, check
the depth. Never drive through water that is
higher than the bottom of the front rocker
area of your vehicle.
387
2022 Navigator (TB9) Canada/United States of America, enUSA, Edition date: 202109, First-Printing Driving Hints
Page 402 of 646
4. Switch your vehicle off by pressing the
push button ignition switch once. A
message appears in the instrument
cluster display.
5. Switch your vehicle to accessory mode by pressing the push button ignition
switch once without pressing the brake
pedal.
6. Press and hold the brake pedal.
7. Using the instrument cluster controls on the steering wheel, select Settings.
8. Select
Neutral Tow.
9. Press and hold the
OK button until a
confirmation message appears in the
information display.
Note: If completed successfully, the
information display shows
Neutral Tow
Enabled Leave Transmission in Neutral.
This indicates that your vehicle is safe to tow
with all wheels on the ground.
Note: If you do not see a confirmation
message in the instrument cluster display,
you must perform the procedure again from
the beginning. Note:
You may hear noise as the transfer
case shifts into its neutral position. This is
normal.
10. Release the brake pedal.
11. Leave the transmission in neutral (N) and switch your vehicle off by pressing
the push button ignition switch once
without pressing the brake pedal.
Switching
Neutral Tow Off
1. With your vehicle properly secured to the
tow vehicle, press and hold the brake
pedal and start the engine.
2. Switch your vehicle off by pressing the push button ignition switch once and
release the brake pedal.
3. Place your vehicle in accessory mode by
pressing the push button ignition switch
once without pressing the brake pedal.
4. Press and hold the brake pedal.
5. Shift into park (P).
6. Release the brake pedal. Note:
If completed successfully, the
instrument cluster displays
2H and Neutral
Tow Disabled.
Note: You must perform the switching
neutral tow on and switching neutral tow off
procedures again from the beginning if the
indicator light and message do not display.
Note: You may hear a noise as the transfer
case shifts out of its neutral position. This is
normal.
7. Apply the parking brake, then disconnect
your vehicle from the tow vehicle.
8. Release the parking brake, start the engine, and shift into drive (D) to make
sure the transfer case is out of the neutral
tow position.
9. If the transfer case does not successfully
shift out of its neutral position, set the
parking brake. Have your vehicle
checked as soon as possible.
Resolving the Shift Delayed Drive Forward
Message
1. Press and hold the brake pedal.
2. Start your vehicle.
398
2022 Navigator (TB9) Canada/United States of America, enUSA, Edition date: 202109, First-Printing Towing Your Vehicle
Page 430 of 646
Remove and Reinstall the Battery
Install a battery approved for use by our
specifications. See Capacities and
Specifications (page 469).
To disconnect or remove the battery, do the
following:
1. Apply the parking brake and switch the ignition off.
2. Switch all electrical equipment off, for example lights and radio.
3. Wait a minimum of two minutes before disconnecting the battery.
Note: The engine management system has
a power hold function and remains powered
for a period of time after you switch the
ignition off. This is to allow the system to
store diagnostic and adaptive tables.
Disconnecting the battery without waiting
can cause damage not covered by the
vehicle warranty.
4. Disconnect the negative battery cable terminal.
5. Disconnect the positive battery cable terminal. 6. Remove the battery securing clamp.
7. Remove the battery.
8.
To install, reverse the removal procedure.
Note: Before reconnecting the battery, make
sure the ignition remains switched off.
Note: Make sure to fully tighten the battery
cables.
If you disconnect or replace the vehicle
battery, you must reset the following
features:
• Window bounce-back.
See Opening and
Closing the Windows (page 133).
• Clock Settings.
• Pre-set radio stations.
Battery Disposal Make sure that you dispose of old
batteries in an environmentally
friendly way. Seek advice from
your local authority about recycling old
batteries. ADJUSTING THE HEADLAMPS
Vertical Aim Adjustment
The headlamps on your vehicle are properly
aimed at the assembly plant. If your vehicle
has been in an accident, contact an
authorized dealer to check and realign your
headlamps.
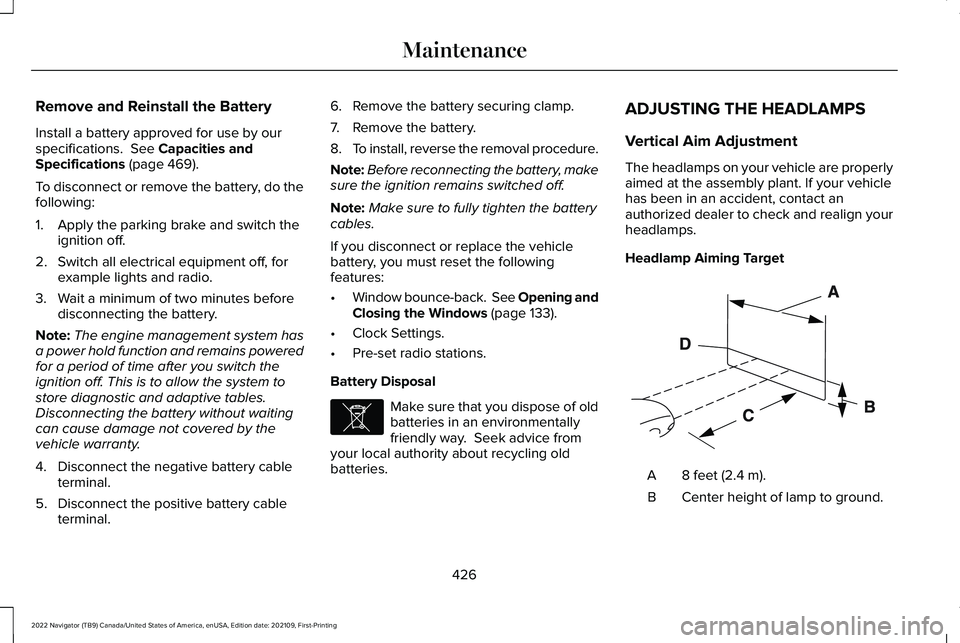
Headlamp Aiming Target
8 feet (2.4 m).
A
Center height of lamp to ground.
B
426
2022 Navigator (TB9) Canada/United States of America, enUSA, Edition date: 202109, First-Printing MaintenanceE107998 E142592
Page 533 of 646

If your information display resets prematurely
or becomes inoperative, you should perform
the oil change interval at six months or
5,000 mi (8,000 km) from your last oil
change. Never exceed one year or 10,000 mi
(16,000 km)
between oil change intervals.
You can drive high performance vehicles in
such a way that may lead to higher oil
consumption including extended time at high
engine speeds, high loads, engine braking,
hard cornering maneuvers, track and off-road
usage. Under these conditions, oil
consumption of approximately 1 quart per
500 miles (1 liter per 800 km) is possible.
Check the engine oil level at every refueling
and adjust to maintain proper levels to avoid
engine damage.
It is important to rely upon your dealership
to properly diagnose and repair your vehicle. We strongly recommend only using our
genuine or our authorized re-manufactured
replacement parts engineered for your
vehicle.
Additives and Chemicals
We do not recommend using chemicals or
additives not approved by us as part of your
vehicle
’s normal maintenance. Please consult
your warranty information.
Oils, Fluids and Flushing
In many cases, fluid discoloration is a normal
operating characteristic and, by itself, does
not necessarily indicate a concern or that the
fluid needs to be changed. Have discolored
fluids that also show signs of overheating or
foreign material contamination checked
immediately. Make sure to change the vehicle
’s oils and
fluids at the specified intervals or in
conjunction with a repair. Flushing is a viable
way to change fluid for many vehicle
sub-systems during scheduled maintenance.
It is critical that systems are flushed only with
new fluid that is the same as that required
to fill and operate the system or using our
approved flushing chemical.
Owner Checks and Services
Make sure you perform the following basic
maintenance checks and inspections. Check Every Month
The air filter restriction gauge. 1
The engine oil level.
Function of all interior and the exterior lights.
529
2022 Navigator (TB9) Canada/United States of America, enUSA, Edition date: 202109, First-Printing Scheduled Maintenance