charging LINCOLN NAVIGATOR 2023 Owners Manual
[x] Cancel search | Manufacturer: LINCOLN, Model Year: 2023, Model line: NAVIGATOR, Model: LINCOLN NAVIGATOR 2023Pages: 660, PDF Size: 14.04 MB
Page 10 of 660
How Does the Rear Occupant Alert SystemWork............................................................184
Rear Occupant Alert System Precautions.......................................................................184
Rear Occupant Alert System Limitations.......................................................................184
Switching Rear Occupant Alert System Onand Off........................................................185
Rear Occupant Alert System Indicators.......................................................................185
Rear Occupant Alert System AudibleWarnings....................................................185
Memory Function
What Is the Memory Function...................186
Memory Function Precautions..................186
Locating the Memory Function Buttons.......................................................................186
Saving a Preset Position............................186
Recalling a Preset Position........................186
Garage Door Opener
Garage Door Opener Introduction..........188
Garage Door Opener Precautions andFrequencies..............................................188
Programming the Garage Door Opener.......................................................................189
Garage Door Opener AdditionalAssistance.................................................192
USB Ports
Locating the USB Ports...............................193
Playing Media Using the USB Port..........193
Charging a Device.......................................194
Power Outlet - Vehicles With: 12V
Power Outlet
What Is the Power Outlet...........................195
Power Outlet Precautions..........................195
Locating the Power Outlets.......................195
Power Outlet - Vehicles With:
110V Power Outlet
What Is the Power Outlet...........................196
Power Outlet Precautions..........................196
Power Outlet Limitations............................196
Locating the Power Outlets.......................196
Power Outlet Indicators..............................197
Wireless Accessory Charger
What Is the Wireless Accessory Charger.......................................................................198
Wireless Accessory Charger Precautions.......................................................................198
Locating the Wireless Accessory Charger.......................................................................198
Charging a Wireless Device......................198
Storage
Overhead Storage......................................200
Glove Compartment...................................200
Center Console...........................................200
Starting and Stopping the Engine
Starting and Stopping the Engine –Precautions...............................................201
Push Button Ignition Switch......................201
Starting the Engine.....................................202
Engine Block Heater..................................203
Stopping the Engine...................................204
Automatic Engine Stop..............................204
6
2023 Navigator (TB9) Canada/United States of America, enUSA, Edition date: 202207, DOMTable of Contents
Page 198 of 660
Press and hold to fast rewind.
CHARGING A DEVICE
Connect your device to the USB port.
Data Transfer USB Ports
You can charge your device through the datatransfer USB port when SYNC is on.
Charge Only USB Ports
You can charge your device through thecharge only USB port when the vehicle is inaccessory mode or when the vehicle isrunning.
194
2023 Navigator (TB9) Canada/United States of America, enUSA, Edition date: 202207, DOMUSB PortsE250655 E263583
Page 202 of 660
WHAT IS THE WIRELESS
ACCESSORY CHARGER
The wireless accessory charger allows youto charge one compatible Qi wirelesscharging device on the charging area.
WIRELESS ACCESSORY CHARGER
PRECAUTIONS
WARNING: Wireless chargingdevices can affect the operation ofimplanted medical devices, includingcardiac pacemakers. If you have anyimplanted medical devices, we recommendthat you consult with your physician.
Keep the charging area clean and removeforeign objects prior to charging a device.
Do not place items with a magnetic strip orradio-frequency identification chip, forexample passports, parking tickets,transportation passes or credit cards, nearthe charging area when charging a device.Damage could occur to the magnetic stripor radio-frequency identification chip.
Do not place metal objects, for exampleremote controls, coins and candy wrappers,on or near the charging area when charginga device. Metal objects may heat up anddegrade the charging performance, inaddition to causing interruptions in charging.
Charging could be interrupted, degraded, orcould stop if any of the following occur:
•The system detects a foreign object.
•The device is misaligned on the chargingarea.
•The device moves on the active chargingarea when the vehicle is in motion.
•The vehicle ambient temperature is toohigh.
•You attempt to charge a non-Qicompatible device on the wirelesscharger.
Note:During charging, the device and thecharger could heat up, this is normal. If thebattery gets hotter than usual, the devicemay stop charging.
LOCATING THE WIRELESS
ACCESSORY CHARGER
The charging area is on the centerconsole or in the media bin belowthe instrument panel.
CHARGING A WIRELESS DEVICE
Place the device on the center of thecharging surface with the charging sidedown. The charging stops after your devicereaches a full charge.
You can use the charger when the vehicleis in accessory mode, when the vehicle isrunning, or when SYNC is on.
Displays on the status bar whenwireless charging is in progress.
198
2023 Navigator (TB9) Canada/United States of America, enUSA, Edition date: 202207, DOMWireless Accessory ChargerE297549 E263583
Page 203 of 660
Displays on the status bar whenwireless charging has beeninterrupted.
Note:The charging performance may beaffected if your device is in a case. It may benecessary to remove the case to wirelesslycharge your device.
Note:Software and firmware updates mayaffect device compatibility, including the useof unofficial software or firmware. You shouldverify charging functionality with yourspecific devices in-vehicle.
199
2023 Navigator (TB9) Canada/United States of America, enUSA, Edition date: 202207, DOMWireless Accessory ChargerE372644
Page 352 of 660
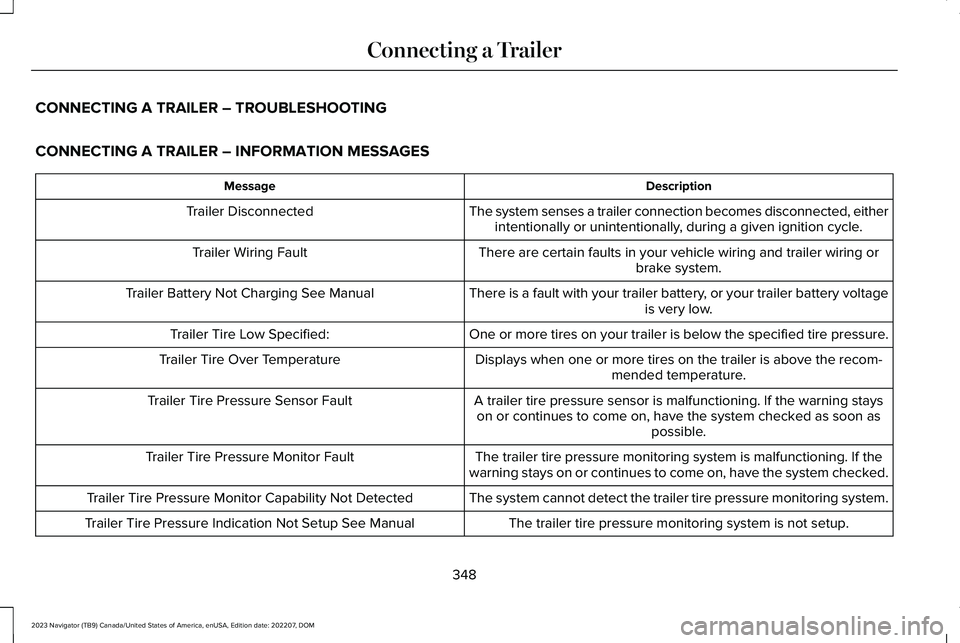
CONNECTING A TRAILER – TROUBLESHOOTING
CONNECTING A TRAILER – INFORMATION MESSAGES
DescriptionMessage
The system senses a trailer connection becomes disconnected, eitherintentionally or unintentionally, during a given ignition cycle.Trailer Disconnected
There are certain faults in your vehicle wiring and trailer wiring orbrake system.Trailer Wiring Fault
There is a fault with your trailer battery, or your trailer battery voltageis very low.Trailer Battery Not Charging See Manual
One or more tires on your trailer is below the specified tire pressure.Trailer Tire Low Specified:
Displays when one or more tires on the trailer is above the recom-mended temperature.Trailer Tire Over Temperature
A trailer tire pressure sensor is malfunctioning. If the warning stayson or continues to come on, have the system checked as soon aspossible.
Trailer Tire Pressure Sensor Fault
The trailer tire pressure monitoring system is malfunctioning. If thewarning stays on or continues to come on, have the system checked.Trailer Tire Pressure Monitor Fault
The system cannot detect the trailer tire pressure monitoring system.Trailer Tire Pressure Monitor Capability Not Detected
The trailer tire pressure monitoring system is not setup.Trailer Tire Pressure Indication Not Setup See Manual
348
2023 Navigator (TB9) Canada/United States of America, enUSA, Edition date: 202207, DOMConnecting a Trailer
Page 358 of 660
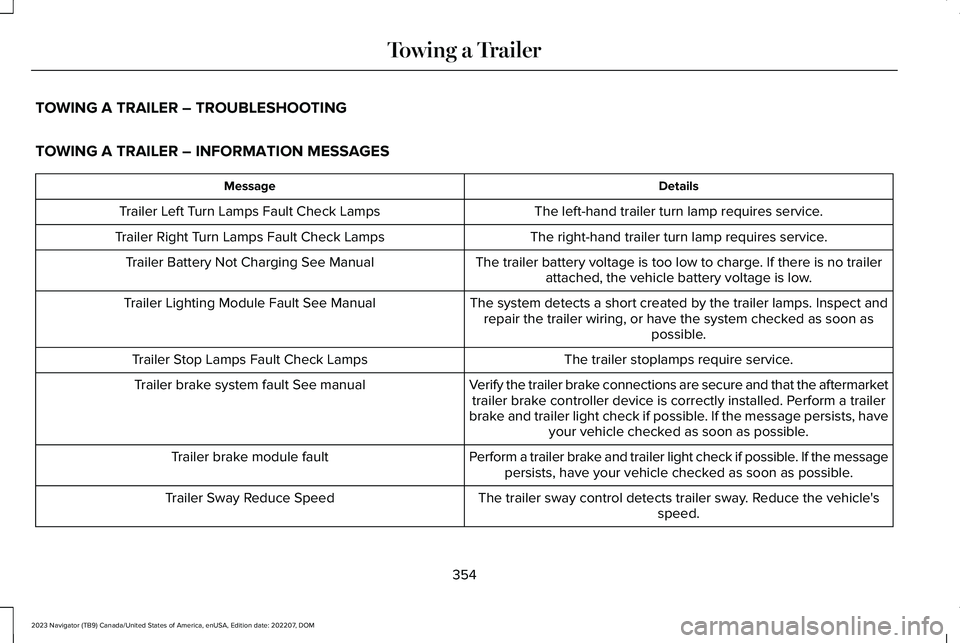
TOWING A TRAILER – TROUBLESHOOTING
TOWING A TRAILER – INFORMATION MESSAGES
DetailsMessage
The left-hand trailer turn lamp requires service.Trailer Left Turn Lamps Fault Check Lamps
The right-hand trailer turn lamp requires service.Trailer Right Turn Lamps Fault Check Lamps
The trailer battery voltage is too low to charge. If there is no trailerattached, the vehicle battery voltage is low.Trailer Battery Not Charging See Manual
The system detects a short created by the trailer lamps. Inspect andrepair the trailer wiring, or have the system checked as soon aspossible.
Trailer Lighting Module Fault See Manual
The trailer stoplamps require service.Trailer Stop Lamps Fault Check Lamps
Verify the trailer brake connections are secure and that the aftermarkettrailer brake controller device is correctly installed. Perform a trailerbrake and trailer light check if possible. If the message persists, haveyour vehicle checked as soon as possible.
Trailer brake system fault See manual
Perform a trailer brake and trailer light check if possible. If the messagepersists, have your vehicle checked as soon as possible.Trailer brake module fault
The trailer sway control detects trailer sway. Reduce the vehicle'sspeed.Trailer Sway Reduce Speed
354
2023 Navigator (TB9) Canada/United States of America, enUSA, Edition date: 202207, DOMTowing a Trailer
Page 430 of 660
After battery replacement, or in some casesafter charging the battery with an externalcharger, the battery management systemrequires eight hours of vehicle sleep time torelearn the battery state of charge. Duringthis time, your vehicle must remain fullylocked with the ignition switched off.
Note:Prior to relearning the battery state ofcharge, the battery management systemmay temporarily disable some electricalsystems.
Electrical Accessory Installation
To make sure the battery managementsystem works correctly, do not connect anelectrical device ground connection directlyto the battery negative post. This can causeinaccurate measurements of the batterycondition and potential incorrect systemoperation.
Note:If you add electrical accessories orcomponents to the vehicle, it may adverselyaffect battery performance and durability.This may also affect the performance ofother electrical systems in the vehicle.
Remove and Reinstall the Battery
Install a battery approved for use by ourspecifications. See Capacities andSpecifications (page 467).
To disconnect or remove the battery, do thefollowing:
1.Apply the parking brake and switch theignition off.
2.Switch all electrical equipment off, forexample lights and radio.
3.Wait a minimum of two minutes beforedisconnecting the battery.
Note:The engine management system hasa power hold function and remains poweredfor a period of time after you switch theignition off. This is to allow the system tostore diagnostic and adaptive tables.Disconnecting the battery without waitingcan cause damage not covered by thevehicle warranty.
4.Disconnect the negative battery cableterminal.
5.Disconnect the positive battery cableterminal.
6.Remove the battery securing clamp.
7.Remove the battery.
8.To install, reverse the removal procedure.
Note:Before reconnecting the battery, makesure the ignition remains switched off.
Note:Make sure to fully tighten the batterycables.
If you disconnect or replace the vehiclebattery, you must reset the followingfeatures:
•Window bounce-back. See Opening andClosing the Windows (page 134).
•Clock Settings.
•Pre-set radio stations.
Battery Disposal
Make sure that you dispose of oldbatteries in an environmentallyfriendly way. Seek advice fromyour local authority about recycling oldbatteries.
426
2023 Navigator (TB9) Canada/United States of America, enUSA, Edition date: 202207, DOMMaintenanceE107998
Page 524 of 660
This introduces new features and providesupdates to the vehicle's software systems.Make sure to switch Automatic Updates on,set a recurring update schedule and connectyour vehicle to Wi-Fi. Updates could takelonger when not connected to Wi-Fi or couldnot download at all. See Connecting theVehicle to a Wi-Fi Network (page 482). SeeConnecting the Vehicle to a Wi-Fi Network(page 482).
Your vehicle may be able to receive drivablesoftware updates, non-drivable softwareupdates or both. Drivable software updateshappen during normal vehicle usage andrequire limited input from you. You arenotified on your touchscreen and connecteddevice prior to a non-drivable update.
Most updates complete in less than 30minutes, although some updates could takeup to a few hours. Check your touchscreenor connected device for the most accurateestimated update time.
You are notified of the status of the vehiclesoftware update in the touchscreen and onyour connected device. See SoftwareUpdate Indicators (page 521).
Vehicle Software Update Requirements
Non-drivable software updates do not installif any of the following occur:
•Your vehicle is running.
•Your vehicle is switched on.
•Your vehicle is not parked.
•The 12 V battery charge is too low.
•The hazard indicators are switched on.
•The alarm is sounding.
•The doors are open.
•The parking lamps are switched on.
•You are pressing the brake pedal.
•An emergency call is in process.
•Your vehicle is in limp home mode.
Vehicle Software Update Limitations
Once you begin a non-drivable softwareupdate, you cannot:
•Cancel the update.
•Lock, unlock or enter your vehicle unlessyou have a key blade.
•You can open the doors using themechanical latch if child locks are noton.
•Drive your vehicle.
•Start your vehicle.
•Use the remote control to lock, unlock orstart your vehicle.
•Use the alarm, central locks or doortones.
•Use the electronic door locks.
•Charge your vehicle.
•Charging resumes once the updatecompletes.
SOFTWARE UPDATE SETTINGS
To access the Software Updates menu:
520
2023 Navigator (TB9) Canada/United States of America, enUSA, Edition date: 202207, DOMVehicle Software Updates
Page 586 of 660
United Arab Emirates
United Kingdom
WIRELESS ACCESSORY CHARGINGMODULE
Argentina
582
2023 Navigator (TB9) Canada/United States of America, enUSA, Edition date: 202207, DOMCustomer InformationE338025 E362840 E368925 E368926 E368927
Page 639 of 660
Catalytic Converter.......................................218Catalytic Converter – Troubleshooting.........219
Catalytic Converter Precautions...............218Catalytic Converter –Troubleshooting..........................................219Catalytic Converter – Warning Lamps...........219
Center Console............................................200Opening the Center Console.........................200
Center Display Limitations.........................498Center Display Overview...........................498Center Display Precautions.......................498Changing a Flat Tire....................................459Changing a Road Wheel............................459Changing the 12V Battery..........................424Changing the Fuel Filter.............................424Changing the Language...............................151Changing the Measurement Unit...............151Changing the Radio Station.......................497Changing the Remote Control Battery......73Changing the Temperature Unit.................151Changing the Tire Pressure Unit................151Changing the Vehicle Wi-Fi Hotspot Nameor Password................................................484Charging a Device........................................194Charging a Wireless Device.......................198Checking MyKey System Status.................84Checking the Brake Fluid..........................232Checking the Coolant..................................418
Checking the Seatbelts.................................58Checking the Tire Pressures.....................449Checking the Wiper Blades.........................116Childminder Mirror........................................136Childminder Mirror Precautions.......................136Locating the Childminder Mirror......................136
Children and Airbags.....................................65Child Restraint Anchor Points......................40Locating the Child Restraint Lower AnchorPoints...................................................................40Locating the Child Restraint Top TetherAnchor Points.....................................................41What Are the Child Restraint AnchorPoints...................................................................40
Child Restraints................................................41Child Restraint Position Information..................41Child Restraints Recommendation...................43
Child Safety......................................................39Child Restraint Anchor Points............................40Child Restraints.......................................................41Installing Child Restraints....................................44
Child Safety Locks...........................................51Child Safety Precautions...............................39Cleaning Products.......................................429Cleaning the Exterior..................................430Cleaning Camera Lenses and Sensors........432Cleaning Chrome, Aluminium or StainlessSteel..................................................................430
Cleaning Headlamps and Rear Lamps.........430Cleaning Stripes or Graphics............................431Cleaning the Engine Compartment................431Cleaning the Exterior Precautions.................430Cleaning the Underbody..................................432Cleaning Wheels..................................................431Cleaning Windows and Wiper Blades..........430
Cleaning the Interior....................................432Cleaning Carpets and Floor Mats..................433Cleaning Displays and Screens......................432Cleaning Fabric Seats and Headliners.........433Cleaning Leather and Vinyl..............................433Cleaning Moonroof Tracks...............................434Cleaning Plastic..................................................432Cleaning Seatbelts.............................................434Cleaning the Instrument Panel.......................432
Clearing All MyKeys.......................................84Climate Control..............................................159Auto Mode.............................................................161
Climate Control Hints...................................162Closing the Liftgate......................................100Closing the Hands-Free Liftgate.....................102Closing the Liftgate From Inside YourVehicle...............................................................100Closing the Liftgate From Outside YourVehicle................................................................101Closing the Liftgate Using the RemoteControl................................................................101
635
2023 Navigator (TB9) Canada/United States of America, enUSA, Edition date: 202207, DOMIndex