LOTUS ELISE 2005 Manual Online
Manufacturer: LOTUS, Model Year: 2005, Model line: ELISE, Model: LOTUS ELISE 2005Pages: 205, PDF Size: 4.51 MB
Page 81 of 205

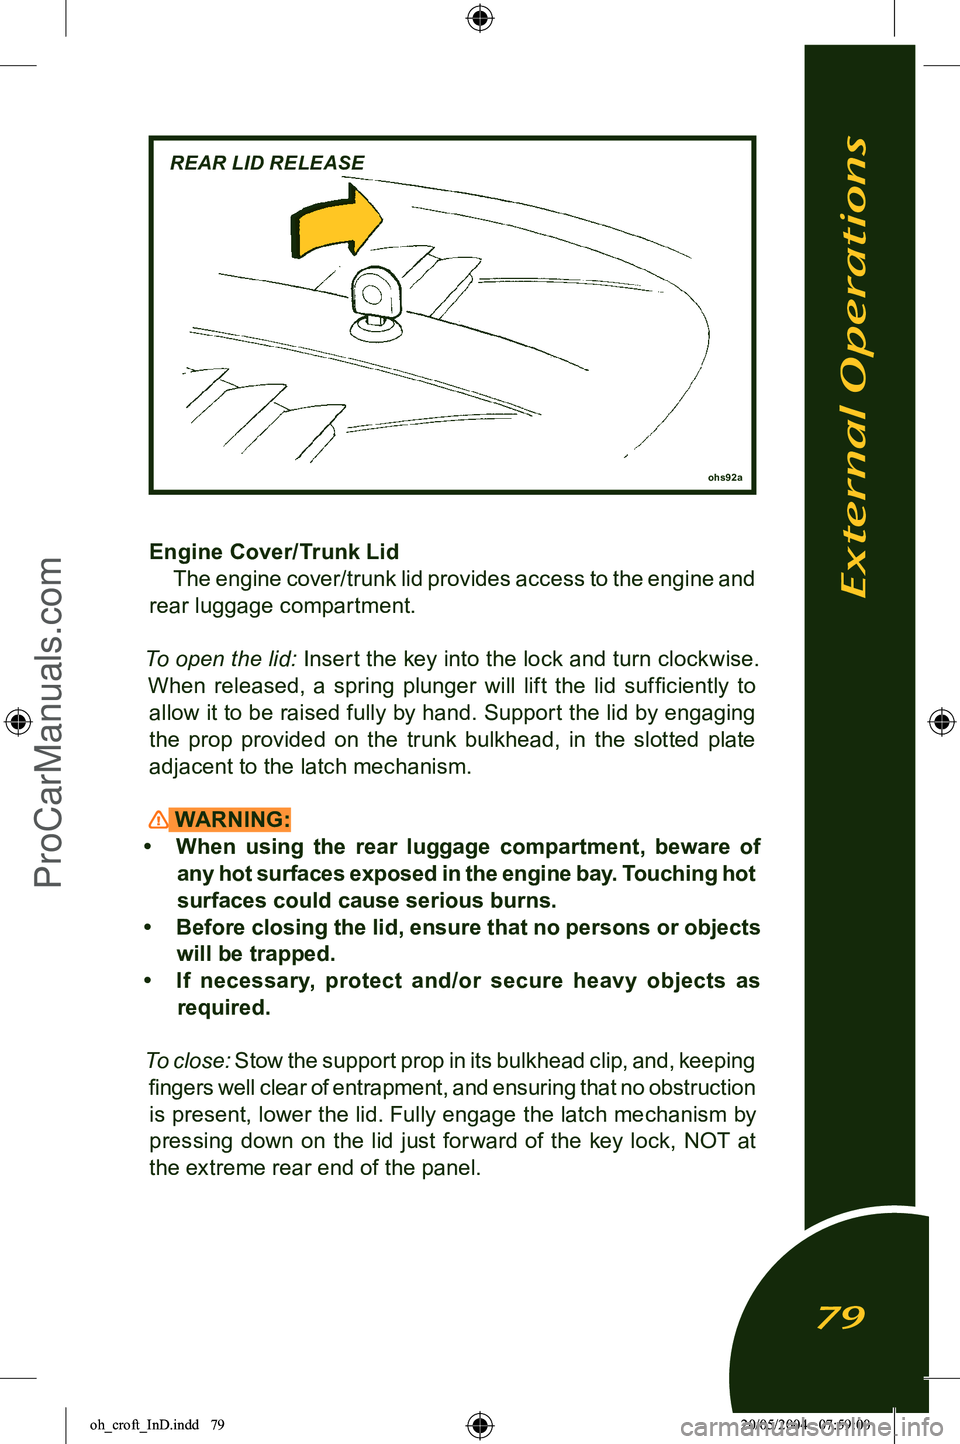
Engine Cover/Trunk LidThe engine cover/trunk lid provides access to the engine and
rear luggage compartment.
To open the lid: Insert the key into the lock and turn clockwise. When released, a spring plunger will lift the lid sufficiently to allow it to be raised fully by hand. Support the lid by engaging
the prop provided on the trunk bulkhead, in the slotted plate adjacent to the latch mechanism.
WARNING:
• When using the rear luggage compartment, beware of any hot surfaces exposed in the engine bay. Touching hot
surfaces could cause serious burns.
• Before closing the lid, ensure that no persons or objects
will be trapped.
• If necessary, protect and/or secure heavy objects as required.
To close: Stow the support prop in its bulkhead clip, and, keeping
fingers well clear of entrapment, and ensuring that no obstruction is present, lower the lid. Fully engage the latch mechanism by pressing down on the lid just forward of the key lock, NOT at
the extreme rear end of the panel.
ohs92a
REAR LID RELEASE
External Operations
79
oh_croft_InD.indd 7920/05/2004 07:59:00ProCarManuals.com
Page 82 of 205

ohs148
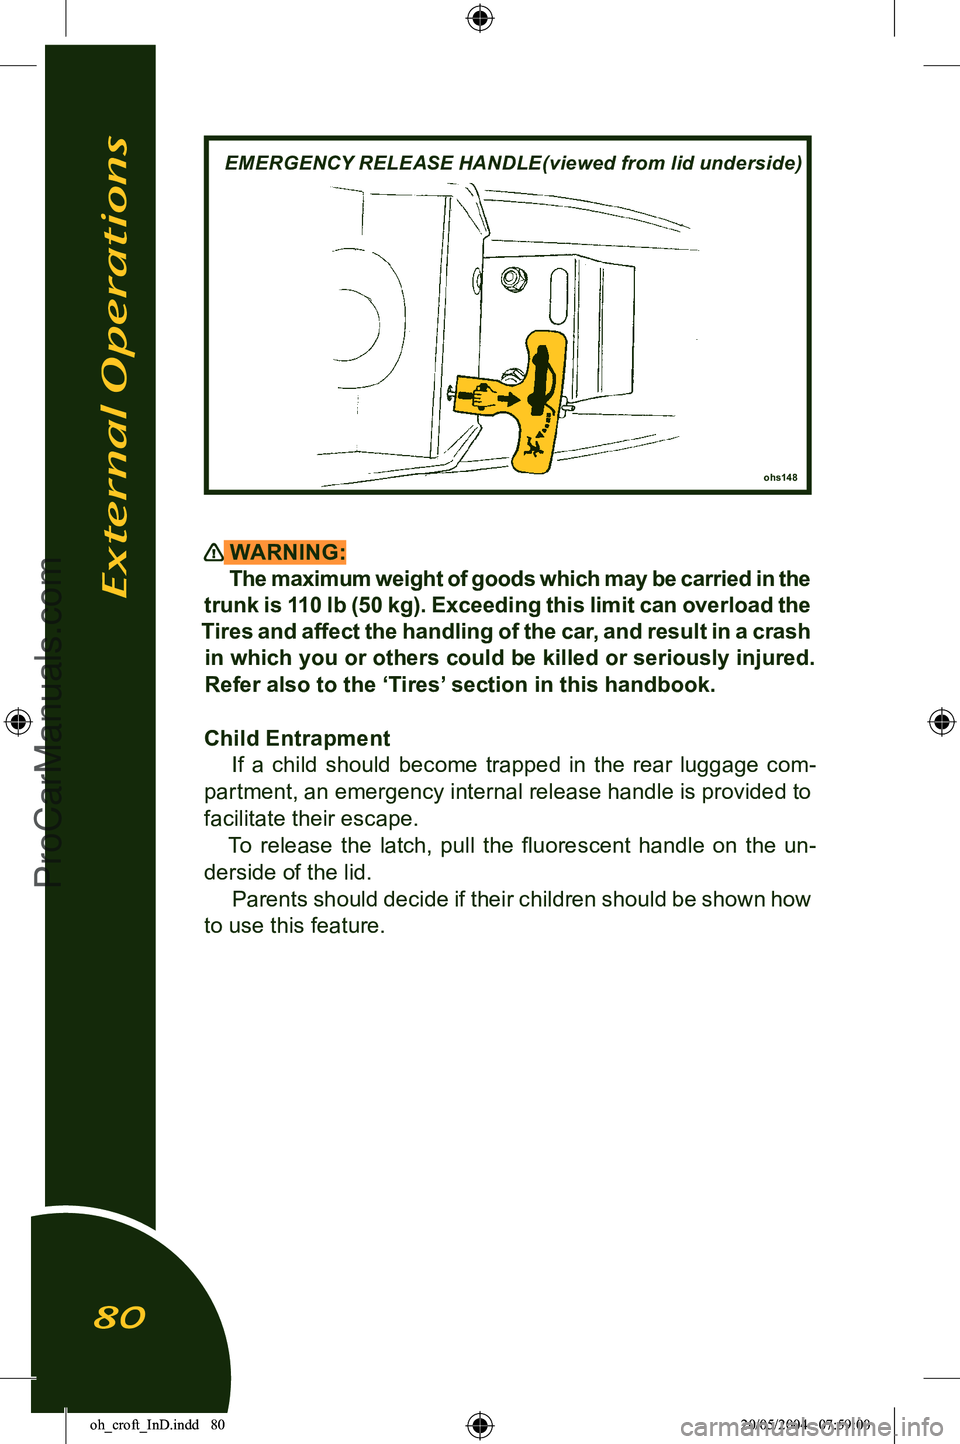
EMERGENCY RELEASE HANDLE (viewed from lid underside)
WARNING:The maximum weight of goods which may be carried in the
trunk is 110 lb (50 kg). Exceeding this limit can overload the
Tires and affect the handling of the car, and result in a crash in which you or others could be killed or seriously injured.
Refer also to the ‘Tires’ section in this handbook.
Child Entrapment If a child should become trapped in the rear luggage com
-
partment, an emergency internal release handle is provided to facilitate their escape.
To release the latch, pull the fluorescent handle on the un
-
derside of the lid. Parents should decide if their children should be shown how
to use this feature.
External Operations
80
oh_croft_InD.indd 8020/05/2004 07:59:00ProCarManuals.com
Page 83 of 205

REMOVABLE ROOF CONCEPTThe Lotus Elise has been designed to exploit the pleasures
of open top motoring, the better to enjoy exposure to the natu
-
ral environment, without the restrictions and confinement of a
cockpit roof.
In order to provide some weather protection to the occupants
and car interior, and allow the continued enjoyment of the car in unfavourable weather conditions, a simple hard or soft top roof may be fitted. The constant changing of loads and strains
to which a car is subject to when driving on roads, and the
tolerances required to allow for repeated removal and refitting of the roof, means that minor wind noise, and seepage at joints between the roof, body and doors cannot be completely sealed
in certain areas. Therefore small leaks are considered normal
for this model.
NOTICE: Do not take the car through an automatic car wash.
The soft top may suffer damage by the brushes or suffer leaks due to the high pressure water streams directed in areas which
would not apply in normal driving conditions.
WARNING: The soft or hard top roofs should be removed only whilst
the car is safely parked. Do not attempt to remove the soft
or hard top roof whilst the car is in motion.
External Operations
81
oh_croft_InD.indd 8120/05/2004 07:59:00ProCarManuals.com
Page 84 of 205

b332
FITTING ROOF STAYS
Soft Top Roof - Fitting
WARNING:Do not attempt to fit the soft top roof whilst the car is in
motion. This could cause a crash in which you or others
could be killed or seriously injured.
1. From its stowage bag in the rear luggage compartment, with-
draw the roof assembly and support stays. Lower both door
windows, or open both doors.
2. Insert the two, identical, roof support stays, with the arrows pointing forwards, into the slots above the rear window, and
in the windscreen header rail. Note that the slots are keyed
to allow fitment of the stays in only the correct orientation.
3. Lay the soft top roof across the centre of the roof space with
the arrows on the side rails pointing forwards.
External Operations
82
Arrows
point for ward
Rear end keyway
oh_croft_InD.indd 8220/05/2004 07:59:01ProCarManuals.com
Page 85 of 205

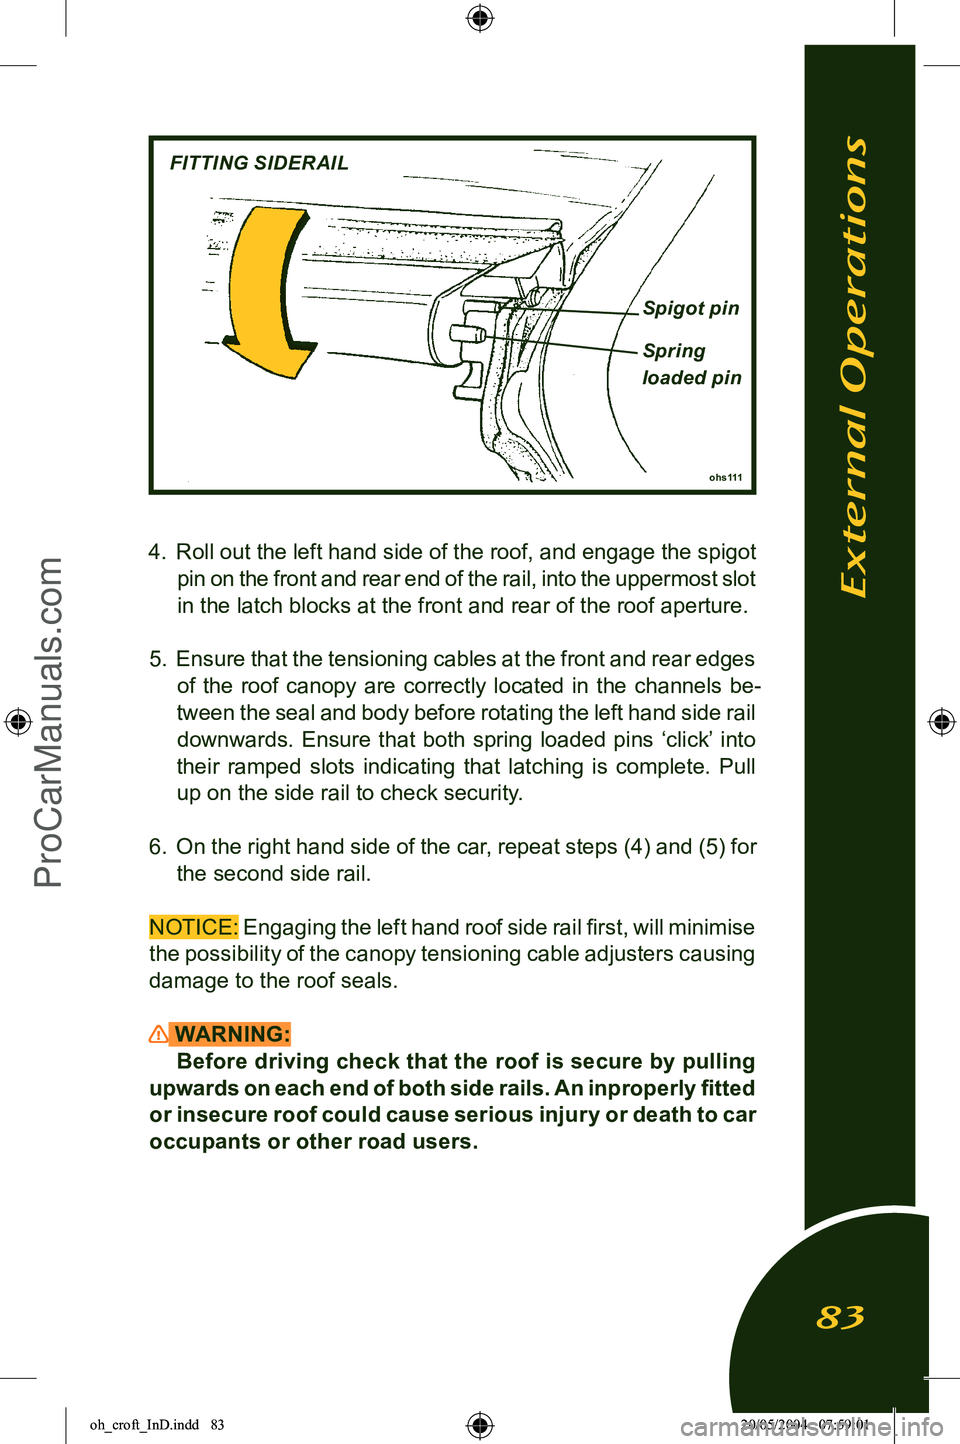
4. Roll out the left hand side of the roof, and engage the spigot
pin on the front and rear end of the rail, into the uppermost slot
in the latch blocks at the front and rear of the roof aperture.
5. Ensure that the tensioning cables at the front and rear edges of the roof canopy are correctly located in the channels be
-
tween the seal and body before rotating the left hand side rail downwards. Ensure that both spring loaded pins ‘click’ into
their ramped slots indicating that latching is complete. Pull up on the side rail to check security.
6. On the right hand side of the car, repeat steps (4) and (5) for
the second side rail.
NOTICE: Engaging the left hand roof side rail first, will minimise
the possibility of the canopy tensioning cable adjusters causing damage to the roof seals.
WARNING: Before driving check that the roof is secure by pulling
upwards on each end of both side rails. An inproperly fitted
or insecure roof could cause serious injury or death to car
occupants or other road users.
External Operations
83
ohs111
FITTING SIDERAIL
Spigot pin
Spring
loaded pin
oh_croft_InD.indd 8320/05/2004 07:59:01ProCarManuals.com
Page 86 of 205

ohs149
RELEASING ROOF SIDE RAIL
Soft Top - Removal
WARNING:Do not attempt to remove the soft top roof whilst the
car is in motion. This could cause a crash in which you or
others could be killed or seriously injured.
1. With the car stationary, open both doors or lower both door windows.
2. On the inside face of the right hand roof side rail, locate the
two latch release levers: Pull the two lever handles towards each other to release the side rail latches (press down on the
side rail if necessary to relieve the load on the latch pins), and rotate the rail upwards to release the canopy tension.
3. Repeat step (2) for the
left hand side rail.
NOTICE: Releasing the right hand roof side rail first, will minimise
the possibility of the canopy tensioning cable adjusters causing damage to the roof seals.
4. Free the front and rear tensioning cables from the gutters be
-
fore carefully rolling up each side of the roof canopy towards the centre. Lift the roof assembly off the car, and pack in the
roof bag.
External Operations
84
oh_croft_InD.indd 8420/05/2004 07:59:01ProCarManuals.com
Page 87 of 205

5. Unhook the two roof stays and pack in the roof bag. Stow the
bag in the rear luggage compartment.
NOTICE: If the roof is not fully dry, it should be stowed for no longer than 1 or 2 days before unrolling or refitting and allowing
to air dry completely. Prolonged stowage of a wet or damp roof
will promote rotting of the fabric.
HARD TOP ROOF
NOTICE:
• The hard top roof has been designed to provide a seasonal,
rather than single trip option. Some owners may prefer to
entrust the fitting and removal of the hard top roof to their
dealer.
• When stowing the roof off the car, care should be taken to
avoid damage to the roof corners; e.g. use a suitable soft
floor covering on which to stand the roof. Note that there is
no provision for on-board hard top roof stowage.
• Fitment or removal of the hardtop is made considerably easier
with the assistance of a second person.
• Use only the ‘Torx’ tool supplied in the car tool kit (in the
battery cover rear pocket), to tighten or release the roof
fixing screws.
• The hardtop roof fixings are tethered to the roof panel to guard
against their loss.
WARNING:
Take care to avoid trapping hands or fingers when fitting
or removing the hard top.
External Operations
85
oh_croft_InD.indd 8520/05/2004 07:59:01ProCarManuals.com
Page 88 of 205

b330
FRONT SPIGOT BRACKET
Hard Top - Fitting
1. Open both doors, and preferably with the aid of an assistant, lower the roof onto the car holding aside the loose tethered
fixings to avoid their entrapment or their causing paint damage. Position the rear edge of the roof first before locating the front
edge against the windscreen header rail.
2. Locate a front spigot bracket into its latch plate lower slot (lifting the roof slightly to allow this) and retain to the roof with the Torx bolt. Use only the special Torx tool supplied in the car tool kit (stowed in the battery cover pocket), and do not
fully tighten at this stage.
3. Repeat step (2) for the opposite front spigot bracket.
External Operations
86
oh_croft_InD.indd 8620/05/2004 07:59:02ProCarManuals.com
Page 89 of 205

4. Engage a rear hook bracket with the lower tongue on its rear latch plate, and retain to the roof with the Torx bolt. Use only
the special tool supplied, and do not fully tighten at this stage.
Ensure that the hook is fully located onto the tongue.
5. Repeat step (4) for the opposite rear hook bracket. 6. Push the roof fully forwards before tightening the front spigot brackets using only the special Torx tool supplied. Hold each
rear hook bracket in alignment whilst tightening the single
fixing screw for each bracket. Do not overtighten.
h2
FITTING REAR HOOK BRACKET
External Operations
87
oh_croft_InD.indd 8720/05/2004 07:59:02ProCarManuals.com
Page 90 of 205

REAR CORNER COVER PANEL
7. Fit the trimmed cover panels to each rear corner of the roof, noting that the panels are handed for left and right sides. Press
the panels firmly into position fully to engage the ‘Velcro’ fixing
patches.
WARNING: Do not drive the car with the cover panels removed.
Injury could result from contact with the roof brackets in
a car collision.
External Operations
88
oh_croft_InD.indd 8820/05/2004 07:59:02ProCarManuals.com