parking LOTUS ELISE 2005 Owners Manual
[x] Cancel search | Manufacturer: LOTUS, Model Year: 2005, Model line: ELISE, Model: LOTUS ELISE 2005Pages: 205, PDF Size: 4.51 MB
Page 4 of 205
8. INSTRUMENTS & SWITCHES
Ignition Switch/Steering Lock ..........................................
44
Engine Start Button .........................................................
45
Warning āTell Taleā Lamps ...............................................
46
Bulb Check ................................................................
46
Turn Tell Tale .............................................................
46
Seat Belt Tell Tale ......................................................
47
Brake Tell Tale ...........................................................
47
Oil Pressure Tell Tale ................................................
47
Low Fuel Level Tell Tale ............................................
48
ABS Tell Tale ............................................................
48
High Beam Tell Tale ..................................................
48
Airbag Tell Tale ..........................................................
48
Battery Charging Tell Tale .........................................
48
Engine Malfunction Indicator Lamp ...........................
49
Security/RPM Tell Tale ..............................................
49
Instruments .................................................................
51
Speedometer .............................................................
51
Tachometer ...............................................................
51
LCD Display Panel ....................................................
52
Fuel Level Display ...............................................
52
Coolant Temperature Display ..............................
53
Odometer ............................................................
53
Trip Recorder .......................................................
53
Dashboard Switches .......................................................
54
Parking Lamp Switch ................................................
54
Headlamp Switch ......................................................
54
Lights-on Buzzer .......................................................
55
Hazard Warning Lamps Switch .................................
55
Instrument Illumination ..............................................
56
Auxiliary Power Socket .............................................
57
Column Switches & Horn ................................................
58
Headlamp High/Low Beam/Flasher/Turn Indicators .
58
Windscreen Wiper/Washer .......................................
59
Horn .................................................................
60
Audio Equipment ............................................................
60
9. HEATING, VENTILATION & AIR CONDITIONING
Air Conditioning ..............................................................
61
Air Re-circulation ............................................................
62
Heater Temperature ........................................................
62
Fan Speed .................................................................
62
Air Distribution ................................................................
63
Engine Bay Ventilation ....................................................
65
Contents
2
oh_croft_InD.indd 220/05/2004 07:58:39ProCarManuals.com
Page 5 of 205
10. DRIVING CONTROLS
Foot Pedals .................................................................
66
Footwell Carpets .............................................................
66
Clutch Pedal .................................................................
66
Footbrake .................................................................
67
Anti-Lock Brake System .................................................
67
Parking Brake .................................................................
70
Gear Lever .................................................................
71
11. STARTING PROCEDURE & ENGINE BREAK-IN
Starting a Cold or Warm Engine .....................................
72
Idle Speed .................................................................
73
Engine Break-In ..............................................................
73
Engine Special Features .................................................
74
12. EXTERNAL OPERATIONS
Fuel Requirement ...........................................................
75
Fuel Filling .................................................................
76
Front Service Access Panels ..........................................
78
Engine Cover/Trunk Lid ..................................................
79
Child Entrapment ......................................................
80
Removable Roof Concept ...............................................
81
Soft Top Roof Fitting ..................................................
82
Soft Top Roof Removal .............................................
84
Hard Top Roof Fitting ................................................
85
Hard Top Roof Removal ............................................
90
13. SERVICING & MAINTENANCE
Bodycare .................................................................
93
B
ody Features ...........................................................93
Paint Care .................................................................
94
Ventilation .................................................................
94
Paintwork Polishing ...................................................
95
Washing .................................................................
95
Soft Top Roof ............................................................
96
Windscreen Cleaning ................................................
96
Alloy Road Wheels ....................................................
96
Upholstery Cleaning ..................................................
97
Seat Belts Cleaning ...................................................
97
Footwell Cleaning ......................................................
97
Owner Maintenance ........................................................
98
Engine Oil Level Check .............................................
99
Engine Oil Change ..................................................
100
Oil Filter ...............................................................
102
Used Engine Oil ......................................................
103
Contents
3
oh_croft_InD.indd 320/05/2004 07:58:40ProCarManuals.com
Page 6 of 205
Transmission Oil .....................................................103
Cooling System .......................................................
106
Anti-Freeze/Corrosion Inhibitor ...............................
107
Coolant Drain/Reļ¬ll Procedure ................................
108
Washer Reservoir ...................................................
109
Wiper Blade .............................................................
109
Brake Fluid Reservoir ............................................... 110
Brake Pads ............................................................... 111
Brake Pipes and Hoses ............................................112
Air Cleaner Element ................................................. 113
Auxiliary Drive Belt ................................................... 114
Sparking Plugs ......................................................... 114
14. TIRES & WHEE
LS
Tires ................................................................ 115
Glossary of Terms .................................................... 115
T
ire Safety ................................................................ 115
Tire Care ................................................................ 117
Replacement Tires ................................................... 118
Tire Characteristics .................................................. 119
Winter T
ires .............................................................. 119
Tire Cha
ins ..............................................................120
Uniform T
ire Quality Grading ...................................120
Tire Placard
/Label ...................................................121
Steps
for Determining Correct Load Limit ...............122
Tire Ma
rkings ..........................................................123
T ire Inļ¬ator Aerosol .................................................
124
Wheels ...............................................................
126
Wheel Bolts .............................................................
126
Wheel Alignment & Tire Balance .............................
126
Wheel Replacement ................................................
127
15. ELECTRICAL
Battery ...............................................................129
Battery Access ........................................................
129
Disconnecting the Battery .......................................
129
Reconnecting the Battery ........................................
131
Battery Charging .....................................................
131
āJumpā Starting ........................................................
133
Electrical Accessories ...................................................
134
Inertia Switch ...............................................................
135
Fuses ...............................................................
135
Contents
4
oh_croft_InD.indd 420/05/2004 07:58:40ProCarManuals.com
Page 33 of 205
car, enquire with the dealer immediately.
Engine Immobiliser In order to provide a measure of car security, independent
of any driver action, the system will āpassivelyā immobilise the
engineās cranking and running circuits after the ļ¬rst occurring of the following:
i) Four minutes after switching off the ignition;
ii) Two minutes after a mobilising command (see below); or
iii) One minute after switching off the ignition and opening the driverās door.
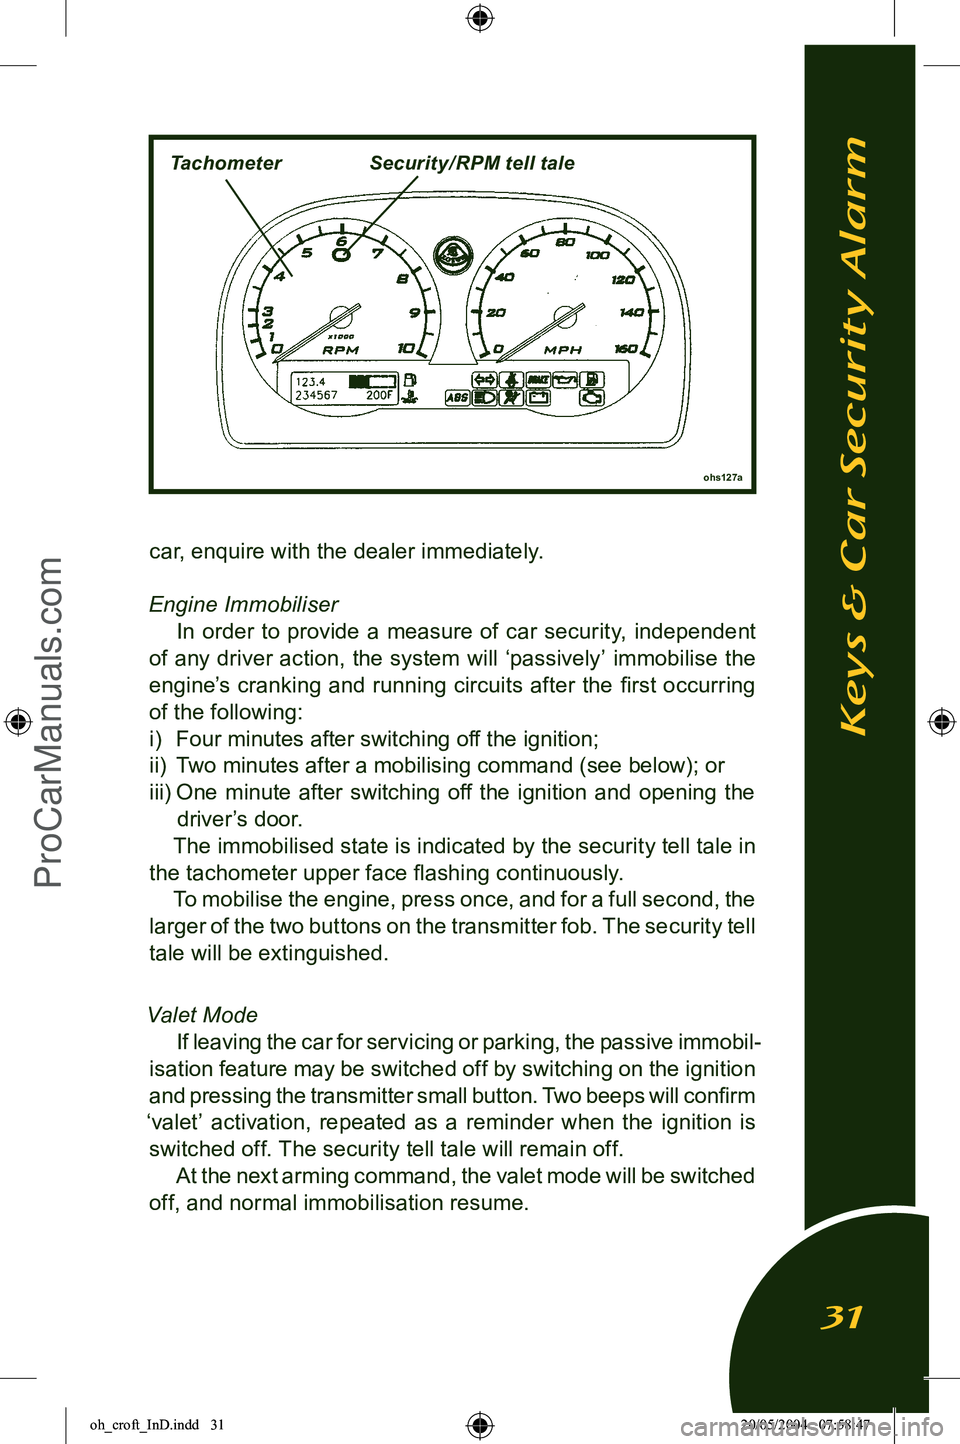
The immobilised state is indicated by the security tell tale in
the tachometer upper face ļ¬ashing continuously. To mobilise the engine, press once, and for a full second, the
larger of the two buttons on the transmitter fob. The security tell
tale will be extinguished.
Valet Mode
If leaving the car for servicing or parking, the passive immobil
-
isation feature may be switched off by switching on the ignition
and pressing the transmitter small button. Two beeps will conļ¬rm
āvaletā activation, repeated as a reminder when the ignition is switched off. The security tell tale will remain off. At the next arming command, the valet mode will be switched
off, and normal immobilisation resume.
ohs127a
Keys & Car Security Alarm
31
TachometerSecurity/ RPM tell tale
oh_croft_InD.indd 3120/05/2004 07:58:47ProCarManuals.com
Page 43 of 205
ohs99
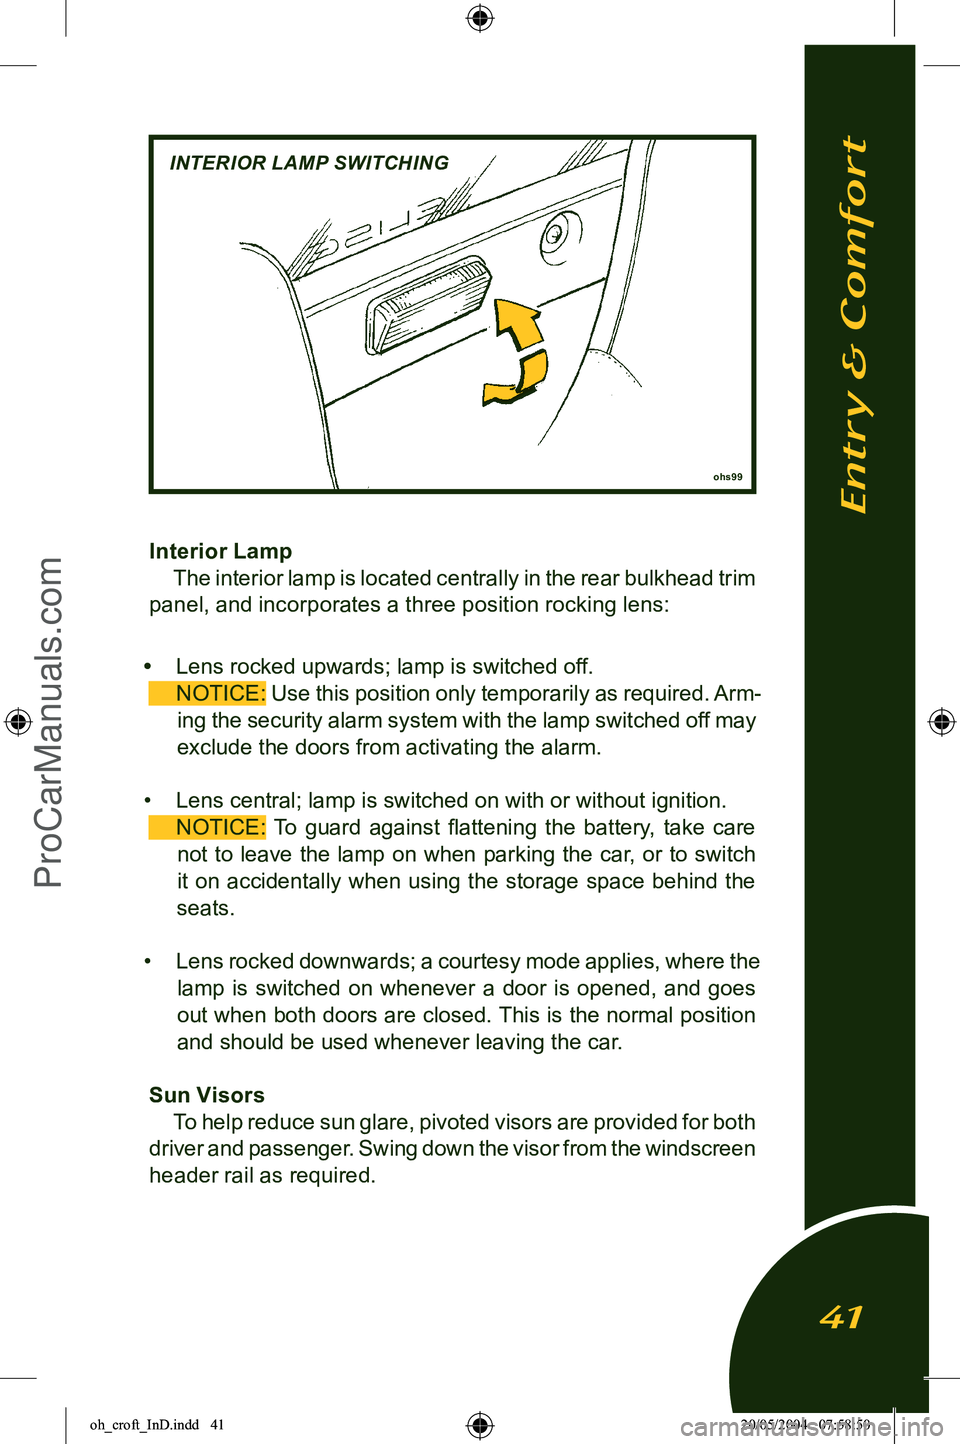
Interior LampThe interior lamp is located centrally in the rear bulkhead trim
panel, and incorporates a three position rocking lens:
ā¢ Lens rocked upwards; lamp is switched off.
NOTICE:
Use this position only temporarily as required. Arm-
ing the security alarm system with the lamp switched off may
exclude the doors from activating the alarm.
ā¢ Lens central; lamp is switched on with or without ignition.
NOTICE: To guard against ļ¬attening the battery, take care
not to leave the lamp on when parking the car, or to switch
it on accidentally when using the storage space behind the
seats.
ā¢ Lens rocked downwards; a courtesy mode applies, where the
lamp is switched on whenever a door is opened, and goes out when both doors are closed. This is the normal position
and should be used whenever leaving the car.
Sun Visors To help reduce sun glare, pivoted visors are provided for both
driver and passenger. Swing down the visor from the windscreen
header rail as required.
Entry & Comfort
41
INTERIOR LAMP SWITCHING
oh_croft_InD.indd 4120/05/2004 07:58:50ProCarManuals.com
Page 49 of 205
Seat Belt Tell Tale
The red seat belt tell tale is provided as a reminder that both
driver and passenger should always wear the seat belts, no
matter how short the journey. The lamp will ļ¬ash until the driv
-
erās seat belt is fastened, accompanied for the ļ¬rst 8 seconds by a buzzer.
Brake Tell Tale
This tell tale will glow red with the ignition switched on
whenever the parking brake is applied. Driving the car with the brake not fully released will cause overheat damage to the rear
brakes. Each time the parking brake is released, check that the
tell tale is extinguished. With the parking brake released, if the tell tale should light
at any time after the six second check period, stop the car im
-
mediately, as the circuit has detected a dangerously low level of brake ļ¬uid in the master cylinder reservoir, possibly caused
by a hydraulic leak in one of the separate front or rear brake
circuits. In the event of a leak there is a danger that air may enter the hydraulic system and cause spongy operation and
extended pedal travel. The divided brake circuit should ensure
that emergency braking remains, but the car should not be driven until the fault has been identiļ¬ed and rectiļ¬ed.
WARNING: If the tell tale remains lit when the parking brake has been
released, the footbrake may not be working properly. Stop
the car immediately it is safe to do so, and do not continue until the fault has been rectiļ¬ed. Continuing to drive could cause a crash and result in death or serious injury.
Oil Pressure Tell Tale
This red tell tale warns of low engine oil pressure. The lamp
will be lit whenever the ignition is on and the engine is stopped, but should go out as soon as the engine is started. If the lamp
fails to go out after engine start up, or comes on when the engine is running, stop the engine immediately and do not restart until
the cause has been investigated and rectiļ¬ed.
Instruments & Switches
47
oh_croft_InD.indd 4720/05/2004 07:58:52ProCarManuals.com
Page 56 of 205
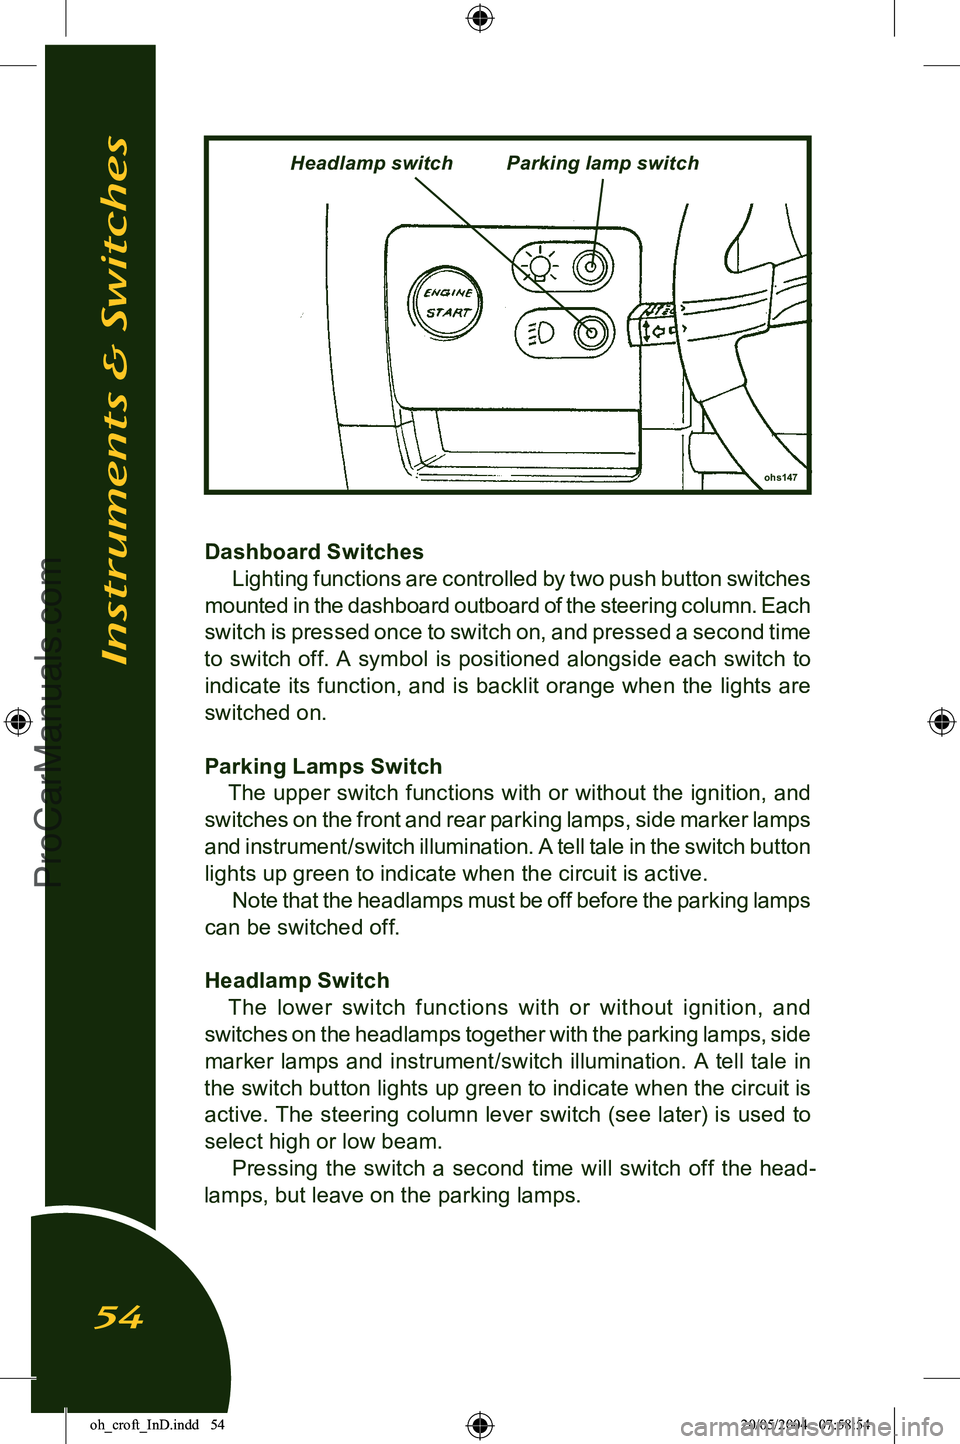
Dashboard SwitchesLighting functions are controlled by two push button switches
mounted in the dashboard outboard of the steering column. Each
switch is pressed once to switch on, and pressed a second time
to switch off. A symbol is positioned alongside each switch to indicate its function, and is backlit orange when the lights are
switched on.
Parking Lamps Switch The upper switch functions with or without the ignition, and
switches on the front and rear parking lamps, side marker lamps and instrument/switch illumination. A tell tale in the switch button
lights up green to indicate when the circuit is active. Note that the headlamps must be off before the parking lamps
can be switched off.
Headlamp Switch The lower switch functions with or without ignition, and
switches on the headlamps together with the parking lamps, side marker lamps and instrument/switch illumination. A tell tale in
the switch button lights up green to indicate when the circuit is
active. The steering column lever switch (see later) is used to
select high or low beam. Pressing the switch a second time will switch off the head
-
lamps, but leave on the parking lamps.
Instruments & Switches
54
ohs147
Headlamp switchParking lamp switch
oh_croft_InD.indd 5420/05/2004 07:58:54ProCarManuals.com
Page 68 of 205
DRIVING CONTROLS
Foot PedalsThe clutch pedal, brake pedal and accelerator pedal are ar
-
ranged in the usual positions, and are grouped closely together for ready access and reļ¬ned driving technique.
WARNING: Do not attempt to drive the car without suitable narrow
soled, ļ¬at heeled footwear. Bare feet may inhibit the ap
-
plication of full pressure to the brake pedal, and adversely affect your control of the car. Bare feet could also suffer
burns from sun heated metal surfaces in the car
Footwell Carpets
WARNING: It is essential that any ļ¬oor covering in the footwell is
properly secured. Loose mats can interfere with the opera
-
tion of the pedals causing possible loss of control and a crash in which you or others could be killed or seriously
injured.
The carpets ļ¬tted in the footwells of the Elise are secured by
two button screws at the rear, and Velcro strips beneath the front edge. Always ensure that the carpets are replaced and secured
correctly, and never ļ¬t any loose mats on top.
Clutch Pedal NOTICE:
ā¢ To avoid unnecessary clutch wear, do not, for more than
a few moments, slip the clutch to āholdā the car on a slope;
apply the parking brake until ready to drive off.
ā¢ The clutch pedal must be fully depressed during each
gear shift.
ā¢ Do not drive with the left foot resting on the clutch pedal, as
rapid wear of the clutch components can result. A left foot rest
is provided for comfort and convenience.
Driving Controls
66
oh_croft_InD.indd 6620/05/2004 07:58:57ProCarManuals.com
Page 72 of 205
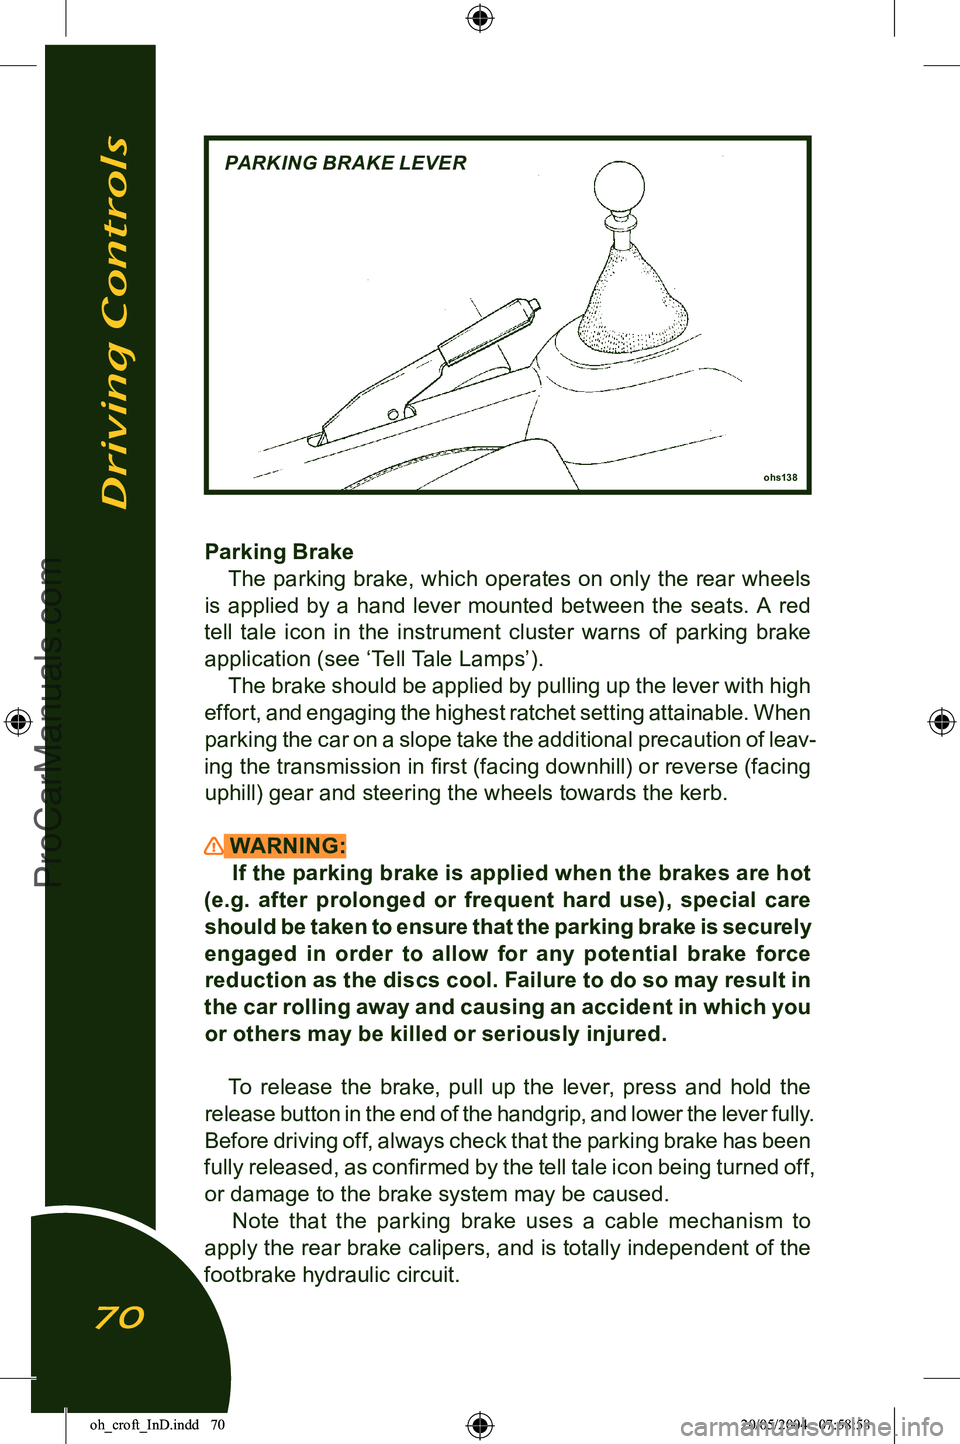
Parking BrakeThe parking brake, which operates on only the rear wheels
is applied by a hand lever mounted between the seats. A red
tell tale icon in the instrument cluster warns of parking brake application (see āTell Tale Lampsā). The brake should be applied by pulling up the lever with high
effort, and engaging the highest ratchet setting attainable. When
parking the car on a slope take the additional precaution of leav
-
ing the transmission in ļ¬rst (facing downhill) or reverse (facing uphill) gear and steering the wheels towards the kerb.
WARNING: If the parking brake is applied when the brakes are hot
(e.g. after prolonged or frequent hard use), special care
should be taken to ensure that the parking brake is securely engaged in order to allow for any potential brake force
reduction as the discs cool. Failure to do so may result in
the car rolling away and causing an accident in which you
or others may be killed or seriously injured.
To release the brake, pull up the lever, press and hold the
release button in the end of the handgrip, and lower the lever fully.
Before driving off, always check that the parking brake has been
fully released, as conļ¬rmed by the tell tale icon being turned off,
or damage to the brake system may be caused. Note that the parking brake uses a cable mechanism to
apply the rear brake calipers, and is totally independent of the
footbrake hydraulic circuit.
Driving Controls
70
ohs138
PARKING BRAKE LEVER
oh_croft_InD.indd 7020/05/2004 07:58:58ProCarManuals.com
Page 74 of 205
STARTING PROCEDURE & ENGINE BREAK-IN
WARNING:CARBON MONOXIDE - Be aware of the danger of carbon
monoxide! Never run the engine in an enclosed space. The
exhaust gases contain carbon monoxide, a deadly gas
which is particularly dangerous, as being colourless odour
-
less and tasteless, its presence is very difļ¬cult to detect.
Before starting the engine, always check that the parking
brake is ļ¬rmly applied, the transmission is in neutral, and as
an extra precaution, depress the clutch pedal. Switch off any
unnecessary electrical loads.
Starting a Cold or Warm Engine
The fuel injection and engine management system controls fuel delivery and engine settings under all normal operating conditions.
i) Insert the key into the steering lock/ignition switch and turn to
position ālā to unlock the column. Before turning on the igni
-
tion; if the security tell tale in the tachometer face is ļ¬ashing, mobilise the engine by pressing once, and for a full second,
the larger of the two buttons on the transmitter fob.
ii) Turn the key to position āIIā to switch on the ignition, and pause
for a moment to allow the fuel system to prime.
iii) Depress the clutch pedal as a precaution, and without moving
the accelerator, press the āStartā button at the left hand end of
the dashboard to engage the starter motor. Release the button
as soon as the engine starts. Allow a cold engine to idle for
10 seconds before driving off, but if ambient temperatures are below freezing, allow the engine and screen heating systems
to warm up for a few minutes before driving.
iv) If the engine fails to start within 15 seconds, stop cranking
and pause for 10 seconds before a second attempt.
v) If further efforts are unsuccessful, contact your dealer or seek
other expert help.
WARNING:
An unattended car with a running engine is potentially
hazardous. Turn off the engine before leaving the car.
Starting & Engine Break-In
72
oh_croft_InD.indd 7220/05/2004 07:58:58ProCarManuals.com