tow MASERATI GHIBLI 2019 Service Manual
[x] Cancel search | Manufacturer: MASERATI, Model Year: 2019, Model line: GHIBLI, Model: MASERATI GHIBLI 2019Pages: 384, PDF Size: 13.33 MB
Page 320 of 384
(Continued)
ignition switch is in the OFF position. If
this is not observed, when the ESC is
active, the ECU will store a
malfunction and the relative warning
light
will illuminate on the
instrument cluster display. This
requires the intervention of an
Authorized Maserati Dealer to reset
the system.
Towing an AWD Vehicle
WARNING!
Single axle towing or use of a tow
dolly is not allowed since it will
severely damage components of an
AWD vehicle.
WARNING!
Use of a tow dolly on front wheels is
strictly forbidden since front wheels
may still receive a residual amount of
torque and disengage the vehicle from
the tow dolly and affect safety of
both rescuers and other road users. Use the Tow Hook of the Tool
Kit CAUTION!
The tow hook should only be used for
towing the car on flat roads. Do not
use the tow hook to remove the car
that is stuck on off road stretches.
The tow hook is also used to tow the
vehicle
on the
platform of a tow truck.
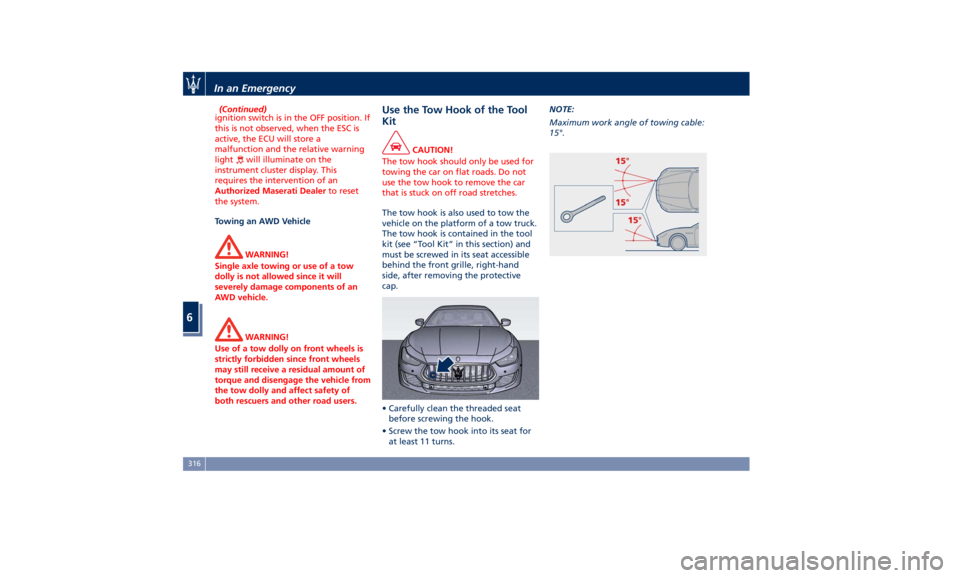
The tow hook is contained in the tool
kit (see “Tool Kit” in this section) and
must be screwed in its seat accessible
behind the front grille, right-hand
side, after removing the protective
cap.
• Carefully clean the threaded seat
before screwing the hook.
• Screw the tow hook into its seat for
at least 11 turns. NOTE:
Maximum work angle of towing cable:
15°.
In an Emergency
6
316
Page 326 of 384
Heavy-Duty Vehicle Use If the car is mainly used under one of
the following conditions:
• off-road;
• short, repeated journeys (less than
4–5 mi/7-8 km) at sub-zero outside
temperatures;
• engine often idling or driving long
distances at low speeds or long
periods of idleness;
you should perform the following
inspections more frequently than
recommended on the “Scheduled
Service Plan”:
• check front disc brake pad conditions
and wear;
• check cleanliness of hood and trunk
locks, cleanliness and lubrication of
linkage;
• visually inspect conditions of: engine,
transmission, pipes and hoses
(exhaust - fuel system - brakes) and
rubber elements (boots - sleeves -
bushes - etc.);
• check battery charge;
• visually inspect condition of the
accessory drive belts;
• check and, if necessary, change
engine oil and replace oil filter; • check and, if necessary, replace
pollen filter of the A/C system;
• check and, if necessary, replace air
cleaner filter.
CAUTION!
All maintenance operations for the
vehicle must be carried out by an
Authorized Maserati Dealer . For
routine and minor maintenance
operations which you can carry out
yourself, make sure that you have the
necessary experience and always use
suitable equipment, original Maserati
spare parts and the prescribed fluids.
Shall this not be the case, do not carry
any operation on your own and
contact an Authorized Maserati
Dealer .
On Board Diagnostic System Your vehicle is equipped with a
sophisticated on board diagnostic
system called OBD II. This system
monitors the performance of the
emissions, engine, and automatic
transmission control systems. When
these systems are operating properly,
your vehicle will provide excellent
performance and fuel economy, as well as engine emissions suited to
current government regulations.
If any of these systems require service,
the OBD II system will turn on the
Malfunction Indicator Light
on the
instrument cluster display (refer to
“Instrument Cluster” in section
“Dashboard Instruments and
Controls”). The system stores as well
diagnostic codes and other
information to assist your service
technician by performing repairs.
Although the vehicle will be driveable
and will not need towing, contact an
Authorized Maserati Dealer for service
as soon as possible.
CAUTION!
• Prolonged driving with the MIL
on could cause further damage to
the emissions control system. It could
also affect fuel economy and
driveability. The vehicle must be
serviced before any emissions tests
can be performed.
• If the MIL
is flashing while the
engine is running, severe catalytic
converter damage and power loss
will soon occur. Immediate service at
an Authorized Maserati Dealer is
required.Maintenance and Care
7
322
Page 332 of 384
The fluid reservoir may contain nearly
3.7 Quarts (3.5 litres) of washer fluid.
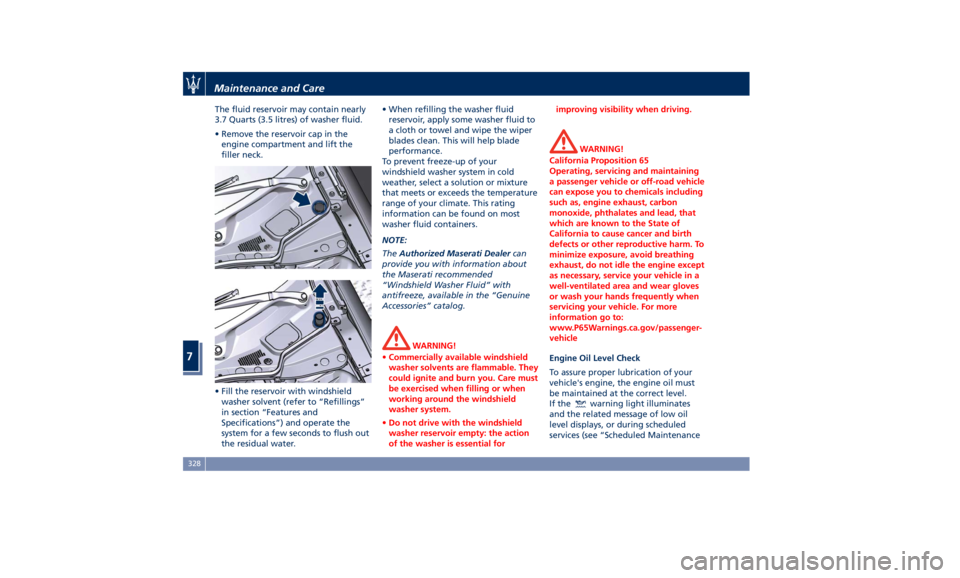
• Remove the reservoir cap in the
engine compartment and lift the
filler neck.
• Fill the reservoir with windshield
washer solvent (refer to “Refillings”
in section “Features and
Specifications”) and operate the
system for a few seconds to flush out
the residual water. • When refilling the washer fluid
reservoir, apply some washer fluid to
a cloth or towel and wipe the wiper
blades clean. This will help blade
performance.
To prevent freeze-up of your
windshield washer system in cold
weather, select a solution or mixture
that meets or exceeds the temperature
range of your climate. This rating
information can be found on most
washer fluid containers.
NOTE:
The Authorized Maserati Dealer can
provide you with information about
the Maserati recommended
“Windshield Washer Fluid” with
antifreeze, available in the “Genuine
Accessories” catalog.
WARNING!
• Commercially available windshield
washer solvents are flammable. They
could ignite and burn you. Care must
be exercised when filling or when
working around the windshield
washer system.
• Do not drive with the windshield
washer reservoir empty: the action
of the washer is essential for improving visibility when driving.
WARNING!
California Proposition 65
Operating, servicing and maintaining
a passenger vehicle or off-road vehicle
can expose you to chemicals including
such as, engine exhaust, carbon
monoxide, phthalates and lead, that
which are known to the State of
California to cause cancer and birth
defects or other reproductive harm. To
minimize exposure, avoid breathing
exhaust, do not idle the engine except
as necessary, service your vehicle in a
well-ventilated area and wear gloves
or wash your hands frequently when
servicing your vehicle. For more
information go to:
www.P65Warnings.ca.gov/passenger-
vehicle
Engine Oil Level Check
T
o assure
proper lubrication of your
vehicle's engine, the engine oil must
be maintained at the correct level.
If the
warning light illuminates
and the related message of low oil
level displays, or during scheduled
services (see “Scheduled MaintenanceMaintenance and Care
7
328
Page 334 of 384
Fluid Level Check for Coolant
Transmission System
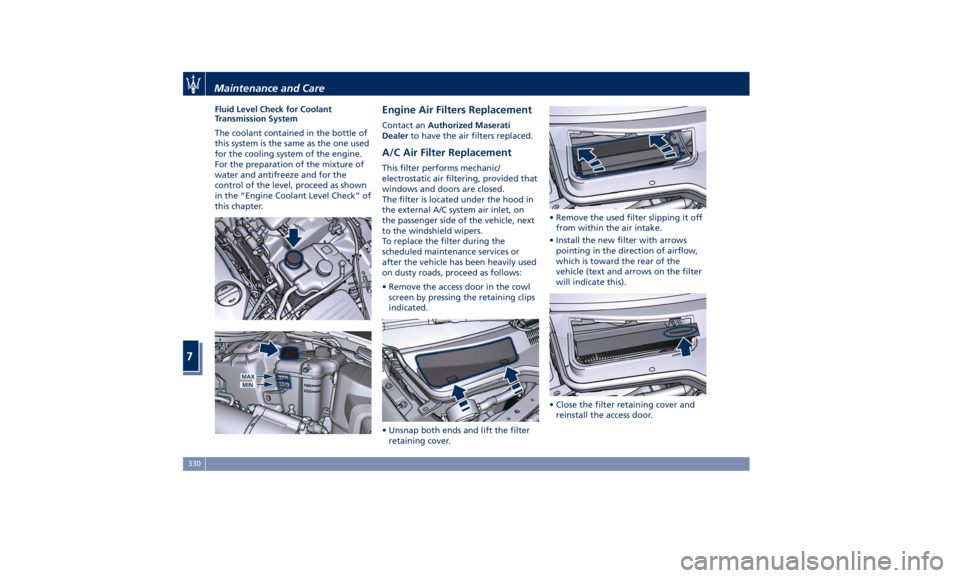
The coolant contained in the bottle of
this system is the same as the one used
for the cooling system of the engine.
For the preparation of the mixture of
water and antifreeze and for the
control of the level, proceed as shown
in the “Engine Coolant Level Check” of
this chapter. Engine Air Filters Replacement Contact an Authorized Maserati
Dealer to have the air filters replaced.
A/C Air Filter Replacement This filter performs mechanic/
electrostatic air filtering, provided that
windows and doors are closed.
The filter is located under the hood in
the external A/C system air inlet, on
the passenger side of the vehicle, next
to the windshield wipers.
To replace the filter during the
scheduled maintenance services or
after the vehicle has been heavily used
on dusty roads, proceed as follows:
• Remove the access door in the cowl
screen by pressing the retaining clips
indicated.
• Unsnap both ends and lift the filter
retaining cover. • Remove the used filter slipping it off
from within the air intake.
• Install the new filter with arrows
pointing in the direction of airflow,
which is toward the rear of the
vehicle (text and arrows on the filter
will indicate this).
• Close the filter retaining cover and
reinstall the access door.Maintenance and Care
7
330
Page 344 of 384
Ref. Type Function
36 Mini – 30A PCM module
primary load
37 Mini – 15A Engine secondary
load
38 Mini – 15A Lambda sensor
39 Mini – 7,5A Flow meters,
tank lackage,
canister, exhaust
by-pass valve and
relay coil
48 – –
49 Mini – 10A Pedal brake
switch - TCM
module
50 Mini – 15A +30 PCM module
51 Mini – 30A Fuel pump relay
input
52 Mini – 5A Starter solenoid
signal for PCM
and voltage
stabilizer
53 Mini – 10A AWD module
(AWD version
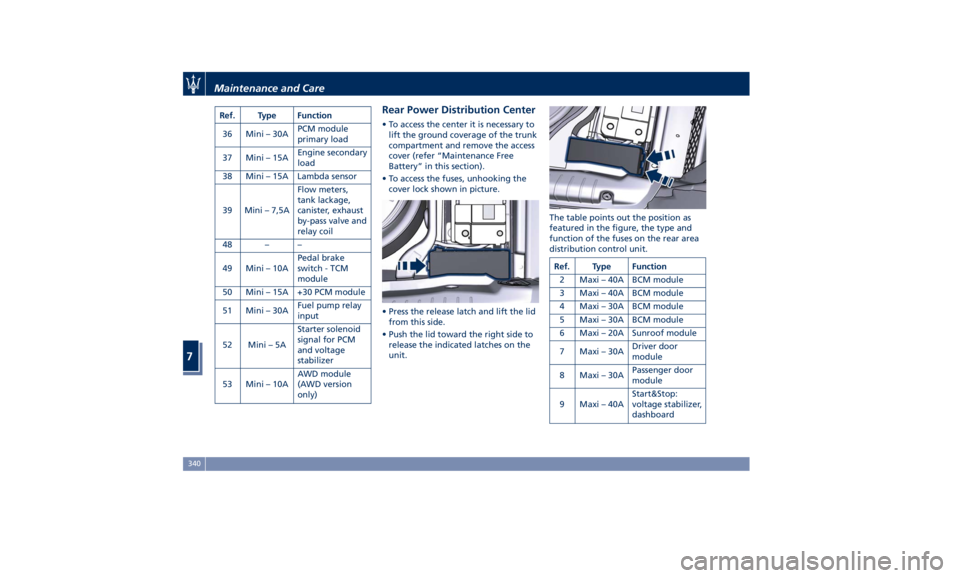
only) Rear Power Distribution Center • To access the center it is necessary to
lift the ground coverage of the trunk
compartment and remove the access
cover (refer “Maintenance Free
Battery” in this section).
• To access the fuses, unhooking the
cover lock shown in picture.
• Press the release latch and lift the lid
from this side.
• Push the lid toward the right side to
release the indicated latches on the
unit. The table points out the position as
featured in the figure, the type and
function of the fuses on the rear area
distribution control unit.
Ref. Type Function
2 Maxi – 40A BCM module
3 Maxi – 40A BCM module
4 Maxi – 30A BCM module
5 Maxi – 30A BCM module
6 Maxi – 20A Sunroof module
7 Maxi – 30A Driver door
module
8 Maxi – 30A Passenger door
module
9 Maxi – 40A Start&Stop:
voltage stabilizer,
dashboardMaintenance and Care
7
340
Page 356 of 384
External plastic parts must be cleaned
with the same procedure followed for
the normal washing of the bodywork.
Avoid, as far as possible, parking the
vehicle under trees; the resinous
substances that very often drop from
the trees give the paint a dull
appearance and increase the possibility
of originating corrosive processes.
It is important that the drain holes in
the lower sides of the doors, rocker
panels, and trunk bottom be kept clear
and open.
CAUTION!
• Bird droppings must be washed off
immediately and thoroughly, since
their acidity is particularly corrosive.
• To provide better protection for the
paint, polish the vehicle at intervals
with a suitable product leaving a
protective film on the paint.
• If the vehicle is washed using
high-pressure water jets or cleaners,
it is important that the nozzle of the
jet be kept at a distance of at least
16 in (40 cm) from the bodywork to
avoid damaging it. Glass Surfaces
All
glass surfaces
should be cleaned on
a regular basis with any commercial
household-type glass cleaner.
Never use an abrasive type cleaner.
Use caution when cleaning the inside
rear window equipped with electric
defrosters. Do not use scrapers or
other sharp instrument that may
scratch the elements.
When cleaning the rearview mirror,
spray cleaner on the towel or rag that
you are using. Do not spray cleaner
directly on the mirror.
Labels can be peeled off after soaking
with warm water.
When cleaning is performed, keep all
metal objects at a safe distance from
the window.
Cleaning Headlights
Your vehicle has plastic headlights that
are lighter and less susceptible to
stone breakage than glass headlights.
Plastic is not as scratch-resistant as
glass and therefore different lens
cleaning procedures must be followed.
To minimize the possibility of
scratching the lenses and reducing
light output, avoid wiping with a dry
cloth. To remove road dirt, wash with
a mild soap solution followed by
rinsing. Do not use abrasive cleaning
components, solvents, steel wool or
other aggressive material to clean the
lenses.
Condensation and Fogging on the
Light Clusters
With cold or humid climates, after a
driving rain or after cleaning the car,
the surface of the front and rear light
clusters could fog and/or form
condensate drops on the inside. This is
a natural phenomenon due to the
temperature and humidity differences
between the lens internal and external
surface, which nevertheless does not
indicate a fault and does not
compromise the regular operation of
the lights. The fogging/condensate
disappears when switching on the
lights, starting from the centre of the
diffuser and gradually going to the
edges.
Moldings and Aluminum Trims
• For cleaning moldings and aluminum
trims, avoid the use of acidic or
alkaline cleaning agents that can
destroy the protecting surface
treatment.
• After washing aluminum trim with
warm water, apply the cleaning
agent with a clean tissue or a soft
sponge on the surface. Do not useMaintenance and Care
7
352
Page 380 of 384
Spare parts service
Genuine Parts ..............13
Scheduled Maintenance .......13
Spare Parts Service .............13
SRS (Supplemental Restraint
System) ....................64
Start&Stop System ........... .210
Occupant Safety Function .... .212
Start&Stop Active Indicator . . . .148
Start&Stop Disable Indicator . . . .167
Start&Stop Failure Indicator
Light ................... .167
Start&Stop Function Disabling
Indicator ................ .212
Start&Stop Menu .......... .158
Start&Stop System Failure .... .214
Start the Engine
Engine Start Failure ......... .209
Engine Turn Off ........... .210
Steering Wheel
Heated Steering Wheel ...... .106
Phone and Voice Controls on
Steering Wheel ............ .204
Sunroof
Pinch Protect Feature ....... .137
Slide Opening Sunroof ....... .137
Sunroof Maintenance ....... .138
Venting Sunroof ........... .137
Sunshades ................. .136
Power Sunshades ............47
Sun Visors ................. .130
Surround View Camera System ....80
Symbols ....................14 Danger Symbols .............14
Symbols of Prohibitions and
Compulsory Measures .........14
TCS (Traction Control System) .... .240
Technical Data .............. .364
Telltales
Telltales on Speedometer ..... .146
Telltales on Tachometer ...... .148
Warning/Indicator Lights of Set
Modes/Functions on Display . . . .163
TFT Display: Menus and Settings . . .150
Tires
Change a Tire ............. .306
Compact spare tire ......... .289
Department of Transportation
Uniform Tire Quality Grades . . . .285
General Information ........
.281
Inflation
Pressure .......... .370
Punctured Tire, use ......... .306
Replacement Tires .......... .287
Tire Pressure .............. .286
Tire Pressure Checkup ....... .286
Tire Safety Information ...... .281
TPMS - Tire Pressure Monitoring
System .................. .289
Winter Tires .............. .288
ToolKit................... .304
Towing
Towing a Disabled Vehicle .... .315
Towing the Vehicle ......... .315
Vehicle Towing Conditions .... .315
TPMS System ............... .289 Tire Pressure Low Warning .... .291
TPMS Deactivation ......... .293
Traffic Sign Assist - TSA ........ .279
Transmission, Automatic ....... .214
Automatic Transmission Lever . . .215
Automatic Transmission Range . .218
Malfunction and Overheating
Conditions ............... .222
Transmission Manual Release of P
(Park) Position ............ .312
Transmitter, Key fob RKE
Preventing Inadvertent Locking of
Key fob RKE Transmitter Inside the
Vehicle ...................43
Trunk
Power Trunk Lid/Hand Free
(optional) .................50
Trunk Safety ...............54
Trunk Lid
Power Trunk Lid/Hand Free
(optional) .................50
Trunk Lid Emergency Release from
inside the Trunk .............53
Trunk Lid Operation ..........49
Updating ....................9
Vehicle Identification Number (VIN) .18
Vehicle Stored for Long Periods . . .355
Voice Commands ............ .205
Warning icons .................8
Warnings when Driving .........15Index
9 376