battery MASERATI GRANTURISMO CONVERTIBLE 2019 User Guide
[x] Cancel search | Manufacturer: MASERATI, Model Year: 2019, Model line: GRANTURISMO CONVERTIBLE, Model: MASERATI GRANTURISMO CONVERTIBLE 2019Pages: 296, PDF Size: 9.01 MB
Page 57 of 296

• how far (if at all) the driver was
depressing the accelerator and/or
brake pedal; and
• how fast the vehicle was traveling.
These data can help provide a better
understanding of the circumstances in
which crashes and injuries occur.
NOTE:
EDR data are recorded by your vehicle
only if a non-trivial crash situation
occurs; no data are recorded by the
EDR under normal driving conditions
and no personal data (e.g., name,
gender, age, and crash location) are
recorded. However, other parties, such
as law enforcement, could combine
the EDR data with the type of
personally identifying data routinely
acquired during a crash investigation.
To read data recorded by an EDR,
special equipment is required, and
access to the vehicle or the EDR is
needed.
In addition to the vehicle
manufacturer, other parties, such as
law enforcement, that have the
special equipment, can read the
information if they have access to
vehicle or the EDR. Active Roll Bars The active roll bars that equip the
vehicle have been designed for
protecting passengers in the event of
a vehicle rollover.
They are fitted behind the rear seat
headrests, usually in a hidden position,
and are activated by a specific ECU
which, only in the case of high-severity
rollover, deploys them in a few tenths
of a second. A cross member then
locks them in this position.
The roll bars have been designed in
such a way that they can be fully
deployed also with the soft top closed.
This is ensured by a device which
breaks the rear window when it comes
in contact with it.
In combination with the windshield
outer frame, they help creating an
anti-intrusion safety cell. In addition to being deployed in the
case of rollovers around the vehicle
longitudinal axis (as shown in the
figure) the active roll bars activate as a
precautionary measure in the event of
sufficiently severe side and rear
collisions, and in all cases where the
battery might be disconnected. They
do not activate in the event of
spinning.
WARNING!
• The active roll bars do not prevent
the risk of the occupants being
thrown out of the vehicle or hitting
against its internal structures. Only
the seat belts are designed for these
purposes and must always be
properly fastened when traveling.
(Continued)Before Starting
2
53
Page 80 of 296
(Continued)
rear seats only when the front seat is
stopped. Make sure that passengers in
the rear seats (especially children) do
not touch the seat or any of it's
components when it's moving.
Comfort Pack Front Seats This includes:
• heating of the front seats;
• driver seat, steering wheel and
outside rearview mirrors memory
position (see paragraph "Driver
Memory Seat" in this chapter).
Front Heated Seats The front seats are equipped with
heaters in both seat cushions and
seatbacks.
WARNING!
• Persons with low skin sensitivity
because of advanced age, chronic
illness, diabetes, spinal cord injury,
medication, alcohol use, exhaustion
or other physical conditions must be
careful when using the seat heater. It
may cause irritation even at low
temperatures, especially if used for
long periods of time.
• Do not place anything on the seat
that insulates against heat, such as a
blanket or cushion. This may cause
the seat heater to overheat. NOTE:
Seat
heating also works with engine
off and key in ignition switch in ACC
or MAR (ON) position. To avoid
discharging the battery, it is
recommended to activate the feature
with engine running.
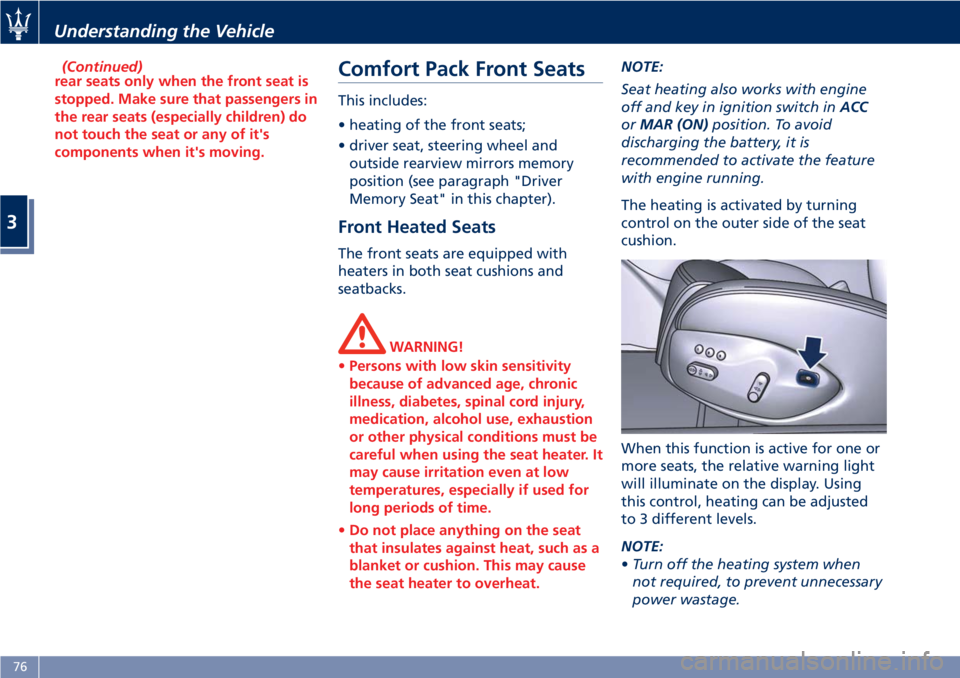
The heating is activated by turning
control on the outer side of the seat
cushion.
When this function is active for one or
more seats, the relative warning light
will illuminate on the display. Using
this control, heating can be adjusted
to 3 different levels.
NOTE:
• Turn off the heating system when
not required, to prevent unnecessary
power wastage.Understanding the Vehicle
3
76
Page 82 of 296
To recall one of the stored positions
with the door open, press the relative
button “1”, “2” or “3” briefly.
To recall a stored position with the
door closed, press the corresponding
button until hearing a tone that
confirms the seat has stopped.
NOTE:
• To stop the seat, press one of the
buttons - “1”, “2” or “3” -, or one of
the adjustment controls.
• Malfunctioning of the seat control
unit is indicated by a sequence of 5
tones emitted when the key in the
ignition switch is turned to STOP
(OFF) position. Contact an
Authorized Maserati Dealer to have
the malfunction corrected.
Each system is independent of the
others and can be operated separately
using specific buttons for each seat.
System Initialization Procedure
Following any power cut-out (e.g.
after using the battery master switch
or dead battery), check the seats to
ensure that they are operating
properly when the power supply is
available.
Perform the following procedures on
both seats in the event of a
malfunction. The key in the ignition switch must be
in STOP (OFF) position and the door on
the side of the seat concerned closed.
Open the door and begin the
following procedure within 5 seconds,
then complete it within 10 seconds:
• forward - STOP;
• backward - STOP;
• forward - STOP;
• backward - STOP;
• tilt the seatback fully forward and
wait until the seat performs two
complete travels (forward and
backward);
• move the seatback to its normal
upright position.
NOTE:
If you need to disconnect the battery,
wait at least 30 seconds from the last
seat movement. If you disconnect the
battery before, you will have to run
the initialization procedure.
Seatback Facilitated Tilt
This function only active when the
door is open, moves the seat forward
automatically when the seatback is
reclined forward to facilitate access to
the rear seat or exiting the vehicle. The
seat returns to their original position
when the seatback is tilted back again. Rear Seats Rear seats can fit two passengers.
Seats and seat belts are parts of the
occupant restraint system of the
vehicle.
WARNING!
Be sure everyone in your vehicle is in a
seat and using a seat belt properly.
NOTE:
See
chapter “Occupants Restraint
Systems” in section “Before Starting”
for seat belt positioning.
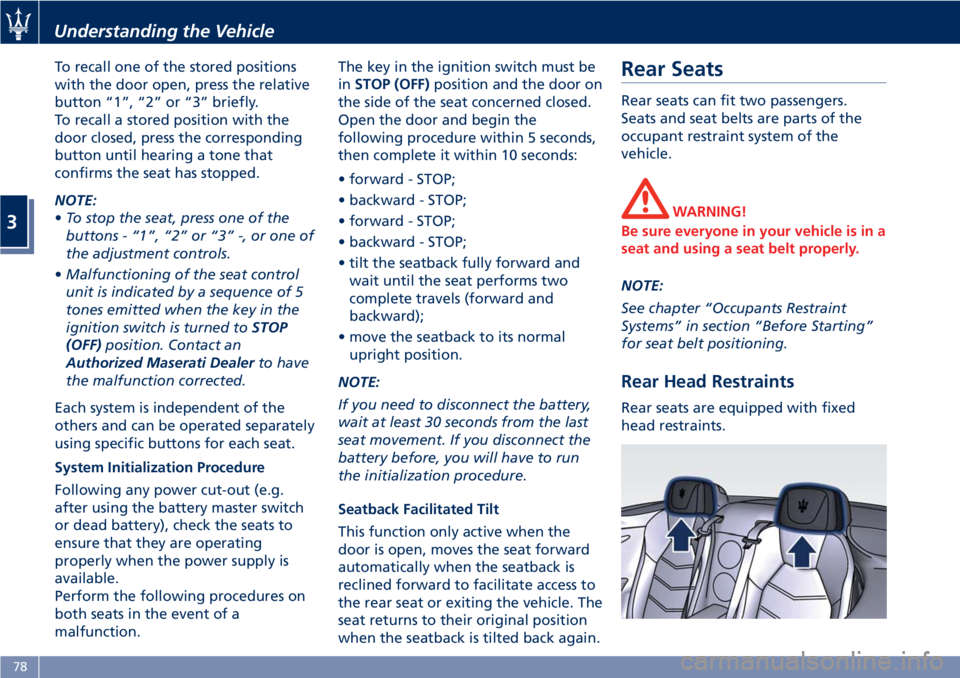
Rear Head Restraints Rear seats are equipped with fixed
head restraints.Understanding the Vehicle
3
78
Page 92 of 296

If they are turned on by pressing the
button, both central and reading lights
and the rear side interior lights will
stay on for about 15 minutes after
turning the engine off, and will then
turn off gradually.
In the event of a collision causing the
inertia switch activation, the
domelights turn on automatically for
approx. 15 minutes. If one or more doors are opened, the
front domelights and rear side interior
lights will turn on for approx. 3
minutes. If the door is closed before
this time, the lights will dim and
subsequently switch off after about 10
seconds.
Upon removing the key from the
ignition switch and activating the
centralized door locking system with
the remote control buttons, the
domelights and the rear side interior
lights turn on for about 10 seconds.
Cargo Light To illuminate the cargo area there is a
light inside the trunk, at the top. This
light turn on when trunk lid is opened
and turn off when it is closed.
If trunk lid is left open for a long time,
lights will turn off after a few minutes
to save battery charge. Hazard Warning Flashers Press the indicated button on the
central console to turn on the hazard
warning flashers. The operation is
independent from the key position in
the ignition switch.
Press the button again to turn them
off.
When these lights are on, the turn
signals, the related arrow indicator on
the instrument cluster and the button
itself will flash.
NOTE:
When the hazard warning flashers are
activated, the turn signals control is
disabled.
Door Courtesy Light
Each door panel is fitted on the lower
side with a courtesy light to illuminateUnderstanding the Vehicle
3
88
Page 97 of 296

this problem let more air into the
passenger compartment.
• It is advisable to close the soft top
when parking the vehicle. This not
only protects the passenger
compartment against weather
agents, but is also a safeguard
against theft.
• If possible, park in the shade as
prolonged exposure to the sun will
alter the canvas fiber and color.
• Before disconnecting the battery,
lower the side windows by about 1.6
- 2 in (4 - 5 cm) to prevent damaging
the soft top strip when the doors are
opened and closed. When the
battery is connected and fully
charged, this operation is performed
automatically whenever the doors
are opened or closed. The windows
must remain lowered until the
recharged battery is reconnected. If
the battery is dead and the windows
are fully up, only open the doors
when strictly necessary and being
extremely careful: do not close them
again until the windows can be
lowered.
• Cover the soft top with a protective
cloth when it is going to be parked
outdoor for a long period of time. • To avoid damaging the soft top, the
vehicle must not be washed with
high-pressure water jet systems, be it
a manual nozzle or an automatic car
wash with turning rollers.
• Organic residues must be
immediately removed, as they may
damage both the soft top fabric and
its strips.
• Do not use solvents, alcohol, petrol
or other generic detergents to clean
the soft top.
"Summer open" Strategy Using the key inserted in the external
driver's door lock, you can control the
soft top opening/closing strategy
referred to as “Summer open”.
NOTE:
• The opening and closing cycle can be
interrupted at any time, moving the
key back to its initial position.
• The following operations are
performed with the engine off. This
involves an extremely high power
consumption, which causes the
battery to discharge faster.
With the soft top fully closed :
• insert the key in the external driver’s
door lock; • turn the key clockwise until
unlocking the doors and hold it in
this position. The automatic soft top
opening cycle will begin after
approx. 2 seconds;
• do not move the key for the entire
opening cycle.
With the soft top fully open :
• insert the key in the external driver’s
door lock;
• turn the key counterclockwise until
locking the doors and hold it in this
position. The automatic soft top
closing cycle will begin after approx.
2 seconds;
• do not move the key for the entire
closing cycle.Understanding the Vehicle
3
93
Page 98 of 296

Soft Top Operation The soft top must be opened and
closed with the vehicle stationary and,
as a rule, with the engine running at
idle speed.
If necessary (e.g. in closed places) the
operation can be performed with the
engine off and the key in the ignition
switch in MAR (ON) position. This
operation involves an extremely high
power consumption, which causes the
battery to discharge faster.
For moving the soft top, use the two
buttons on the central console:
( C ): soft top closing button.
( O ): soft top opening button.
Opening Cycle
Press the ( O ) soft top opening button
and hold it pressed for the entire
opening cycle. The soft top will perform the
following steps which are also shown
on the instrument cluster display (see
picture).
1 Side window lowering; first the
front and then the rear windows
will lower. Soft top released from
the windshield frame.
2 Rear shelf edge raising.
3 Soft top compartment cover
opening.
4 Soft top folding back inside its
compartment.
5 Soft top compartment cover
closing.Understanding the Vehicle
3
94
Page 100 of 296

Interruption/Inhibition of Soft
Top Movement Automatic movement of the soft top is
interrupted in the following cases:
• If the button is released before the
soft top has completed its movement
cycle.
• Exceeding a speed of 30 km/h
(19 mph).
Automatic movement of the soft top is
inhibited in the following cases: • Vehicle moving (at a speed above
19 mph/30 km/h).
• Trunk compartment open or not
properly closed.
• Failure of the front windows.
CAUTION!
Contact the Authorized Maserati
Dealer to have the system properly
repaired. • Movement system overheated.
•
Low battery voltage.
CAUTION!
Contact the Authorized Maserati
Dealer to have the battery voltage
corrected.Understanding the Vehicle
3
96
Page 107 of 296
blow the fuse. Damages caused by
improper use of the power outlet
are not covered by the New Vehicle
Limited Warranty.
WARNING!
To avoid serious injury or death:
• Only devices designed for use in this
type of outlet should be inserted
into any 12 Volt outlet.
• Replacing the fuses that protect
power outlets with others of higher
amperage, there is the risk of fire.
• Do not touch with wet hands.
• If this outlet is mishandled, it may
cause an electric shock and failure.
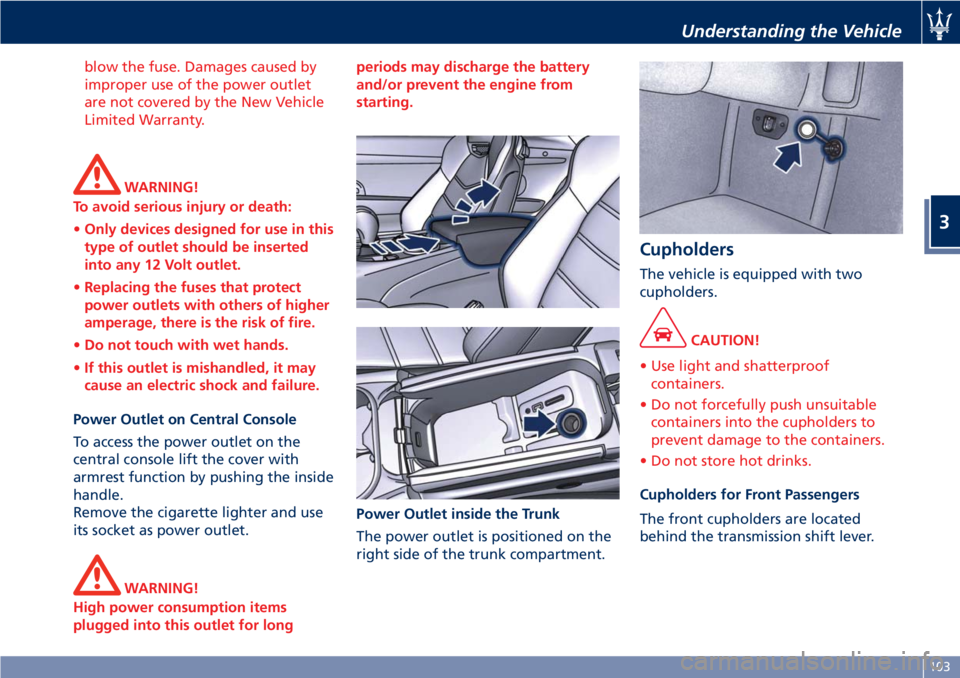
Power Outlet on Central Console
T o access the power outlet on the
central console lift the cover with
armrest function by pushing the inside
handle.
Remove the cigarette lighter and use
its socket as power outlet.
WARNING!
High power consumption items
plugged into this outlet for long periods may discharge the battery
and/or prevent the engine from
starting.
Power Outlet inside the Trunk
The
power outlet is positioned on the
right side of the trunk compartment. Cupholders The vehicle is equipped with two
cupholders.
CAUTION!
• Use light and shatterproof
containers.
• Do not forcefully push unsuitable
containers into the cupholders to
prevent damage to the containers.
• Do not store hot drinks.
Cupholders for Front Passengers
The
front cupholders are located
behind the transmission shift lever.Understanding the Vehicle
3
103
Page 112 of 296
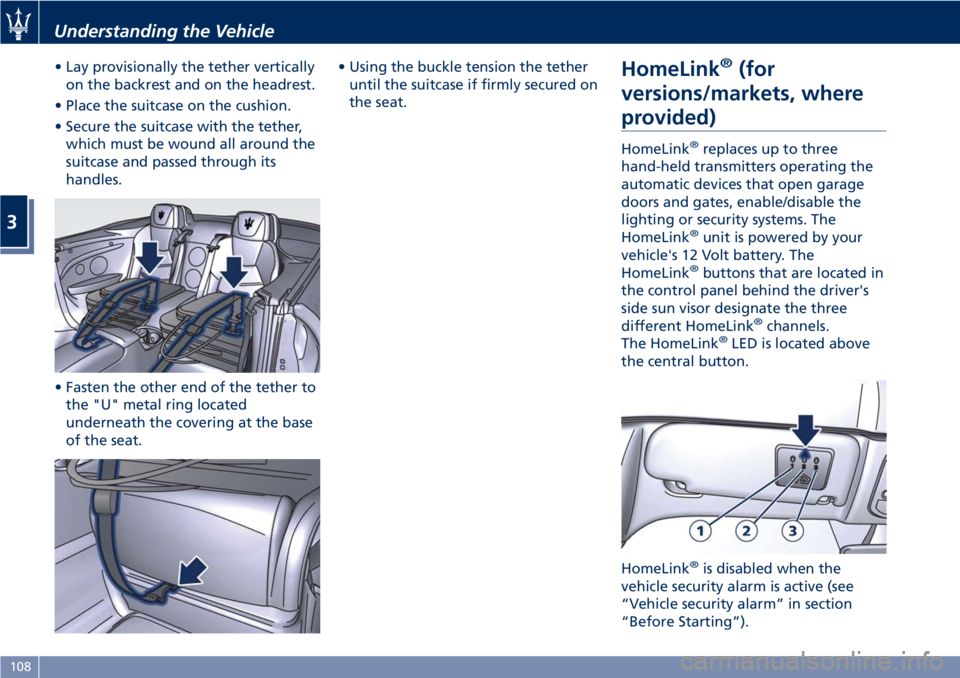
• Lay provisionally the tether vertically
on the backrest and on the headrest.
• Place the suitcase on the cushion.
• Secure the suitcase with the tether,
which must be wound all around the
suitcase and passed through its
handles.
• Fasten the other end of the tether to
the "U" metal ring located
underneath the covering at the base
of the seat. • Using the buckle tension the tether
until the suitcase if firmly secured on
the seat.
HomeLink ®
(for
versions/markets, where
provided) HomeLink ®
replaces up to three
hand-held transmitters operating the
automatic devices that open garage
doors and gates, enable/disable the
lighting or security systems. The
HomeLink ®
unit is powered by your
vehicle's 12 Volt battery. The
HomeLink ®
buttons that are located in
the control panel behind the driver's
side sun visor designate the three
different HomeLink ®
channels.
The HomeLink ®
LED is located above
the central button.
HomeLink ®
is disabled when the
vehicle security alarm is active (see
“Vehicle security alarm” in section
“Before Starting”).Understanding the Vehicle
3
108
Page 113 of 296
WARNING!
Vehicle exhaust contains carbon
monoxide, a dangerous gas. Do not
run your vehicle in the garage while
programming the transceiver. Exhaust
gas can cause serious injury or death.
Customer Service If you have problems with training the
HomeLink Universal Transceiver, or
would like information on home
products that can be operated by the
transmitter, call (800) 355-3515. On the
Internet, go to www.Homelink.com.
Safety Precautions Always refer to the operating
instructions and safety information
that came with your garage door
opener or other equipment you
intend to operate with the HomeLink
Universal Transceiver. If you do not
have this information, you should
contact the manufacturer of the
equipment.
While training or using HomeLink,
make sure you have a clear view of
the garage door or gate, and that no
one will be injured by its movement. General Information While programming HomeLink ®
,itis
advisable to disconnect the drive
motor of the gate/door to be remote
controlled, since the numerous driving
pulses launched for this operation
might damage it.
If the battery fails or is disconnected,
the stored settings are not deleted.
If the gate/door was manufactured
prior to April 1982 (not equipped with
safety systems or automatic stop in the
event of an obstacle in the range of
action), the gate/door cannot be
controlled by HomeLink ®
.
If you have questions, call (800)
355-3515.
WARNING!
California Proposition 65
Operating, servicing and maintaining
a passenger vehicle or off-road vehicle
can expose you to chemicals including
such as, engine exhaust, carbon
monoxide, phthalates and lead, that
which are know to the State of
California to cause cancer and birth
defects or other reproductive harm. To
minimize exposure, avoid breathing
exhaust, do not idle the engine except
as necessary, service your vehicle in a well-ventilated area and wear gloves
or wash your hands frequently when
servicing your vehicle. For more
information go to:
www.P65Warnings.ca.gov/passenger-
vehicle
Programming • Press and hold buttons "1" and "3".
• After about 20 seconds, the LED
starts flashing.
• Release the buttons.
• Hold the remote control for the
device to be controlled close to the
HomeLink ®
control panel (0-30 cm/
0-12 in).
• Simultaneously press and hold the
button on the hand-held remote
control and one of the three
HomeLink ®
buttons "1", "2" or "3".
• Successful programming is signaled
by the LED flashing faster.
• Release the buttons.
To program the other buttons, repeat
the operations skipping the first three
steps.Understanding the Vehicle
3
109