MASERATI LEVANTE 2019 Owners Manual
Manufacturer: MASERATI, Model Year: 2019, Model line: LEVANTE, Model: MASERATI LEVANTE 2019Pages: 436, PDF Size: 15.24 MB
Page 261 of 436
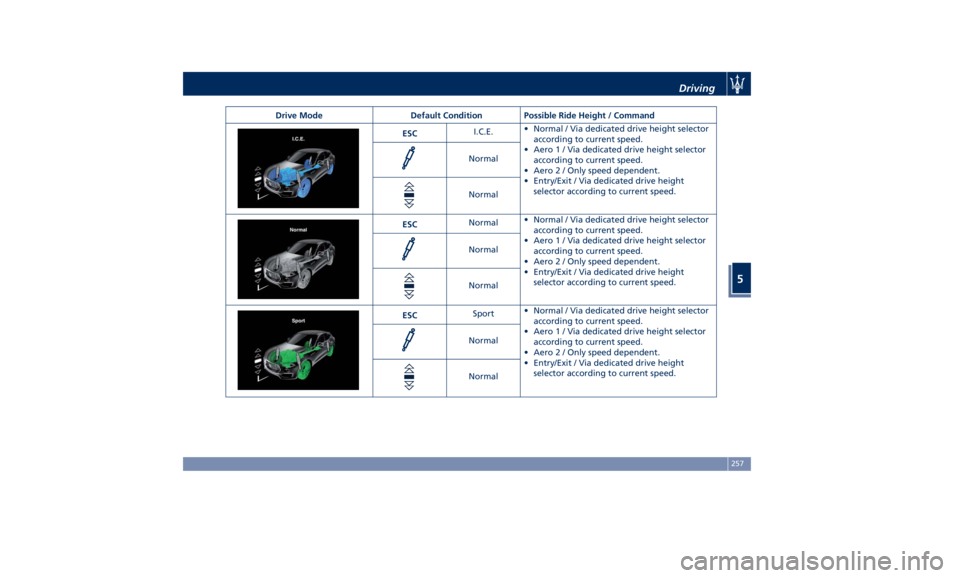
Drive Mode Default Condition Possible Ride Height / Command
ESC I.C.E. • Normal / Via dedicated drive height selector
according to current speed.
• Aero1/Via dedicated drive height selector
according to current speed.
• Aero 2 / Only speed dependent.
• Entry/Exit / Via dedicated drive height
selector according to current speed.Normal
Normal
ESC Normal • Normal / Via dedicated drive height selector
according to current speed.
• Aero1/Via dedicated drive height selector
according to current speed.
• Aero 2 / Only speed dependent.
• Entry/Exit / Via dedicated drive height
selector according to current speed.Normal
Normal
ESC Sport • Normal / Via dedicated drive height selector
according to current speed.
• Aero1/Via dedicated drive height selector
according to current speed.
• Aero 2 / Only speed dependent.
• Entry/Exit / Via dedicated drive height
selector according to current speed.Normal
Normal Driving
5
257
Page 262 of 436
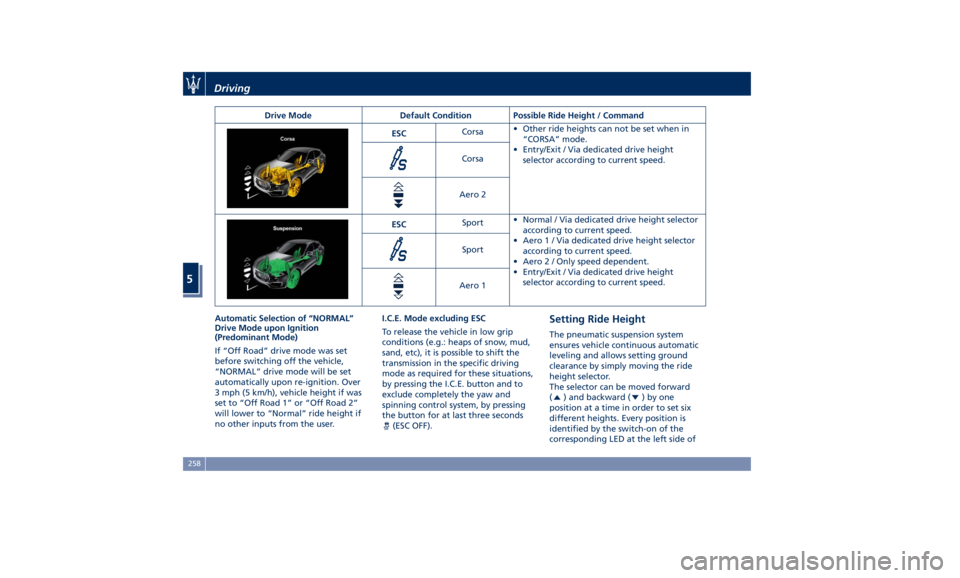
Drive Mode Default Condition Possible Ride Height / Command
ESC Corsa • Other ride heights can not be set when in
“CORSA” mode.
• Entry/Exit / Via dedicated drive height
selector according to current speed.Corsa
Aero 2
ESC Sport • Normal / Via dedicated drive height selector
according to current speed.
• Aero1/Via dedicated drive height selector
according to current speed.
• Aero 2 / Only speed dependent.
• Entry/Exit / Via dedicated drive height
selector according to current speed.Sport
Aero 1
Automatic Selection of “NORMAL”
Drive Mode upon Ignition
(Predominant Mode)
If “Off Road” drive mode was set
before switching off the vehicle,
“NORMAL” drive mode will be set
automatically upon re-ignition. Over
3 mph (5 km/h), vehicle height if was
set to “Off Road 1” or “Off Road 2”
will lower to “Normal” ride height if
no other inputs from the user. I.C.E. Mode excluding ESC
To release the vehicle in low grip
conditions (e.g.: heaps of snow, mud,
sand, etc), it is possible to shift the
transmission in the specific driving
mode as required for these situations,
by pressing the I.C.E. button and to
exclude completely the yaw and
spinning control system, by pressing
the button for at last three seconds
(ESC OFF). Setting Ride Height The pneumatic suspension system
ensures vehicle continuous automatic
leveling and allows setting ground
clearance by simply moving the ride
height selector.
The selector can be moved forward
(
) and backward ( )byone
position at a time in order to set six
different heights. Every position is
identified by the switch-on of the
corresponding LED at the left side ofDriving
5
258
Page 263 of 436
the selector and in the dedicated area
at top right of the display.
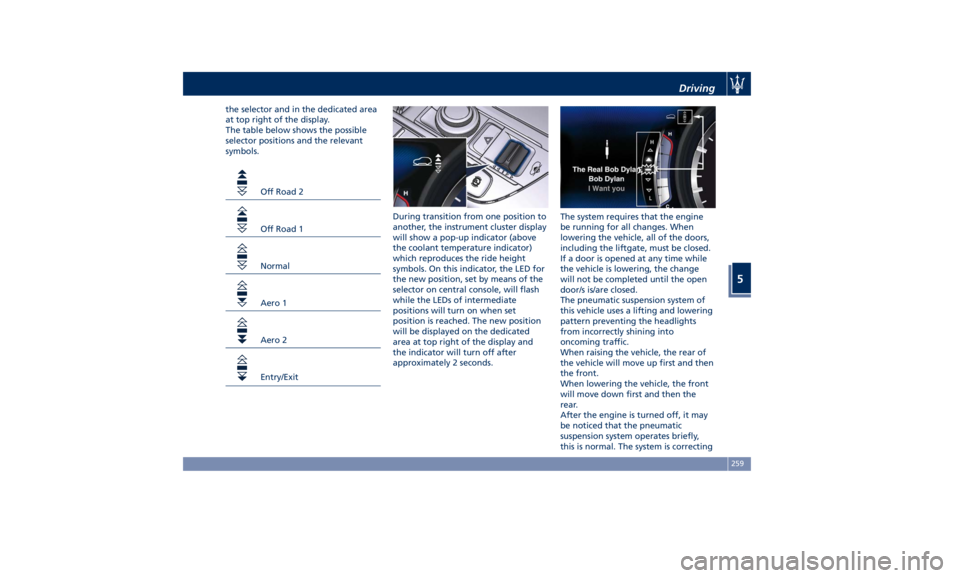
The table below shows the possible
selector positions and the relevant
symbols.
Off Road 2
Off Road 1
Normal
Aero 1
Aero 2
Entry/Exit During transition from one position to
another, the instrument cluster display
will show a pop-up indicator (above
the coolant temperature indicator)
which reproduces the ride height
symbols. On this indicator, the LED for
the new position, set by means of the
selector on central console, will flash
while the LEDs of intermediate
positions will turn on when set
position is reached. The new position
will be displayed on the dedicated
area at top right of the display and
the indicator will turn off after
approximately 2 seconds. The system requires that the engine
be running for all changes. When
lowering the vehicle, all of the doors,
including the liftgate, must be closed.
If a door is opened at any time while
the vehicle is lowering, the change
will not be completed until the open
door/s is/are closed.
The pneumatic suspension system of
this vehicle uses a lifting and lowering
pattern preventing the headlights
from incorrectly shining into
oncoming traffic.
When raising the vehicle, the rear of
the vehicle will move up first and then
the front.
When lowering the vehicle, the front
will move down first and then the
rear.
After the engine is turned off, it may
be noticed that the pneumatic
suspension system operates briefly,
this is normal. The system is correctingDriving
5
259
Page 264 of 436
the position of the vehicle with little
suspension movements to ensure a
proper appearance.
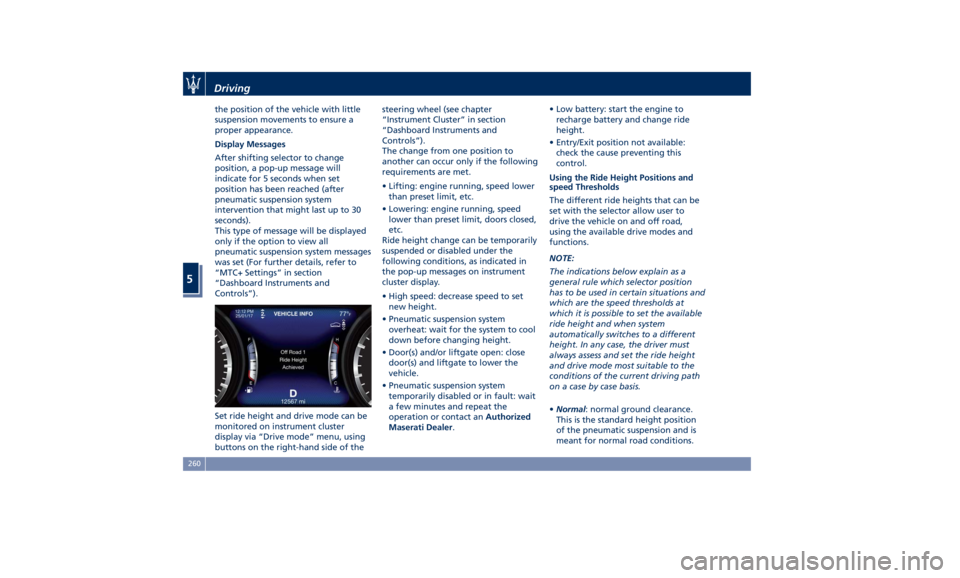
Display Messages
After shifting selector to change
position, a pop-up message will
indicate for 5 seconds when set
position has been reached (after
pneumatic suspension system
intervention that might last up to 30
seconds).
This type of message will be displayed
only if the option to view all
pneumatic suspension system messages
was set (For further details, refer to
“MTC+ Settings” in section
“Dashboard Instruments and
Controls”).
Set ride height and drive mode can be
monitored on instrument cluster
display via “Drive mode” menu, using
buttons on the right-hand side of the steering wheel (see chapter
“Instrument Cluster” in section
“Dashboard Instruments and
Controls”).
The change from one position to
another can occur only if the following
requirements are met.
• Lifting: engine running, speed lower
than preset limit, etc.
• Lowering: engine running, speed
lower than preset limit, doors closed,
etc.
Ride height change can be temporarily
suspended or disabled under the
following conditions, as indicated in
the pop-up messages on instrument
cluster display.
• High speed: decrease speed to set
new height.
• Pneumatic suspension system
overheat: wait for the system to cool
down before changing height.
• Door(s) and/or liftgate open: close
door(s) and liftgate to lower the
vehicle.
• Pneumatic suspension system
temporarily disabled or in fault: wait
a few minutes and repeat the
operation or contact an Authorized
Maserati Dealer . • Low battery: start the engine to
recharge battery and change ride
height.
• Entry/Exit position not available:
check the cause preventing this
control.
Using the Ride Height Positions and
speed Thresholds
The different ride heights that can be
set with the selector allow user to
drive the vehicle on and off road,
using the available drive modes and
functions.
NOTE:
The indications below explain as a
general rule which selector position
has to be used in certain situations and
which are the speed thresholds at
which it is possible to set the available
ride height and when system
automatically switches to a different
height. In any case, the driver must
always assess and set the ride height
and drive mode most suitable to the
conditions of the current driving path
on a case by case basis.
• Normal : normal ground clearance.
This is the standard height position
of the pneumatic suspension and is
meant for normal road conditions.Driving
5
260
Page 265 of 436
In this ride height position driver can
set the “NORMAL” and “I.C.E. drive
modes. After the engine is switched
off, the drive mode is set to
“NORMAL”. If “OFF ROAD” drive
mode was set, “NORMAL” mode will
be set, but the user-set ride height
will remain until the speed threshold
is reached.
• Off Road 1 : raises the vehicle by
approx. 1 in (25 mm).
This is the height suitable for most
off road driving conditions until the
other off road option is needed. This
ride height can set only in “OFF
ROAD” drive mode. Select this
height while the vehicle speed is
below 50 mph (80 km/h). When in
the “Off Road 1” height, if the
vehicle speed remains between
80 km/h (50 mph) and 56 mph
(90 km/h) for over 30 seconds or if
vehicle speed exceeds 56 mph
(90 km/h), the vehicle will be
automatically lowered to
“NORMAL” height. For further
details, refer to "Off-road Drive" in
this section.
• Off Road 2 : raises the vehicle by
approx. 1.5 in (40 mm).
This height is intended for off-road
use only where maximum ground
clearance is required. This ride height can be set only in “OFF
ROAD” drive mode.
Select this height while the vehicle
speed is below 18 mph (30 km/h).
When in the “Off Road 2” height, if
the vehicle speed remains between
18 mph (30 km/h) and 25 mph (40
km/h) for over 30 seconds or if
vehicle speed exceeds 25 mph
(40 km/h), the vehicle will be
automatically lowered to “Off Road
1” height. For further details, refer
to "Off-road drive" in this section.
• Aero 1 : lowers the vehicle by approx.
0.8 in (20 mm).
This height provides improved
aerodynamics by lowering the
vehicle. This ride height is available
in “NORMAL”, “SPORT ”, “
(Suspension)“ or “I.C.E.” drive
mode. System automatically lowers
the vehicle when speed remains
between 74 mph (120 km/h) and
80 mph (130 km/h) for over 15
seconds or if the vehicle speed
exceeds 80 mph (130 km/h). The
system will return to “NORMAL”
height when the vehicle speed
remains between 62 mph (100 km/h)
and 56 mph (90 km/h) for over 15
seconds or if the vehicle speed falls
below 56 mph (90 km/h). The vehicle
will enter “Aero 1” height, regardless of vehicle speed if the
“SPORT” mode is set.
• Aero 2 : lowers the vehicle by approx.
1.4 in (35 mm).
It is the height ensuring excellent
aerodynamics for top performance
by further lowering the vehicle. This
ride height is available in
“NORMAL”, “SPORT ”, “
(Suspension)“ or “I.C.E.” drive
mode.
This is the default ride height when
“CORSA” drive mode (TROFEO
version only) is set. System
automatically lowers the vehicle
when speed exceeds 105 mph
(170 km/h) or when it remains
between 105 mph (170 km/h) and
115 mph (185 km/h) for over 15
seconds. The system will return to
Aero 1 height when the vehicle
speed remains between 96 mph
(155 km/h) and 87 mph (140 km/h)
for over 15 seconds or if the vehicle
speed falls below 87 mph (140 km/h).
• Easy/Entry : lowers the vehicle by
approx. 1.8 in (45 mm).
This mode lowers the vehicle for
easier passenger entry and exit as
well as lowering the rear of the
vehicle for easier loading and
unloading of cargo from the trunk.
This ride height can be set only inDriving
5
261
Page 266 of 436
“NORMAL”, “SPORT ”, “
(Suspension)“ or “I.C.E.” After
selecting this height, once the vehicle
speed goes below 15 mph (24 km/h),
the vehicle height will begin to
lower. To exit “Entry/Exit” mode,
move selector to another position or
drive the vehicle over 15 mph (24
km/h). Automatic lowering of the
vehicle into “Entry/Exit” mode can be
enabled through the MTC+ (refer to
“MTC+ Settings” in section
“Dashboard Instruments and
Controls”). If this feature is enabled,
the vehicle will only lower if the
gearshift lever is in P (Park), the
engine is running, doors and liftgate
are closed and the Pneumatic
Suspension System should be either
in “NORMAL” or “Aero”. The Vehicle
will not automatically lower if the
pneumatic suspension system is in
“Off Road 2” or “Off Road 1” mode.
The lowering will be suppressed
when the ignition is switched off and
a door is opened to prevent setting
the alarm off.
Lowering Vehicle Height for Inactivity
Lowering of vehicle ground clearance
after a long period of inactivity should
be considered normal since it is due to a drop of pressure in the pneumatic
suspension system.
Approximately, after one week of
inactivity, vehicle ground clearance will
lower by 0.4 in (10 mm). To set off the
drop of pressure due to inactivity, it is
necessary to start the engine and allow
some time until system reaches
operating pressure and lifts the vehicle
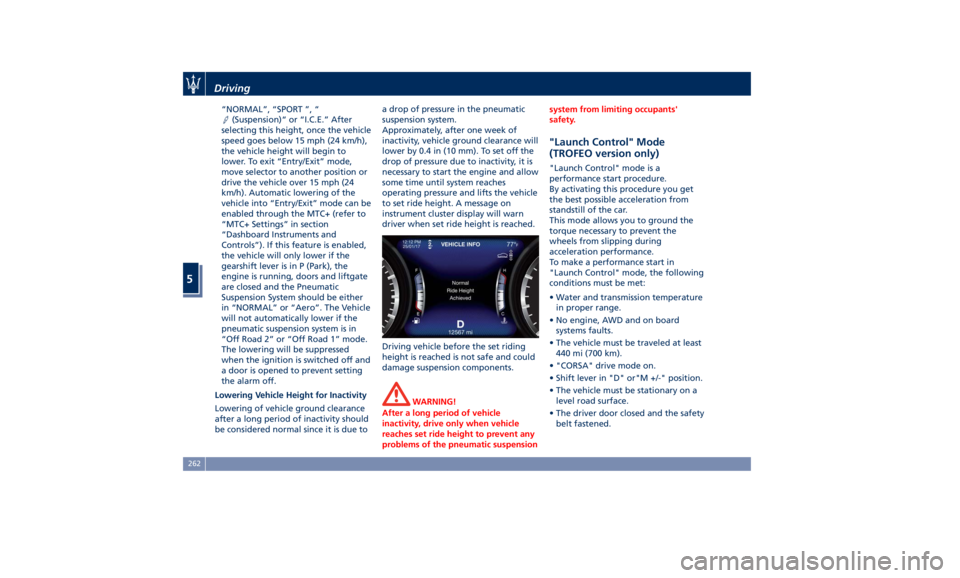
to set ride height. A message on
instrument cluster display will warn
driver when set ride height is reached.
Driving vehicle before the set riding
height is reached is not safe and could
damage suspension components.
WARNING!
After a long period of vehicle
inactivity, drive only when vehicle
reaches set ride height to prevent any
problems of the pneumatic suspension system from limiting occupants'
safety.
"Launch Control" Mode
(TROFEO version only) "Launch Control" mode is a
performance start procedure.
By activating this procedure you get
the best possible acceleration from
standstill of the car.
This mode allows you to ground the
torque necessary to prevent the
wheels from slipping during
acceleration performance.
To make a performance start in
"Launch Control" mode, the following
conditions must be met:
• Water and transmission temperature
in proper range.
• No engine, AWD and on board
systems faults.
• The vehicle must be traveled at least
440 mi (700 km).
• "CORSA" drive mode on.
• Shift lever in "D" or"M +/-" position.
• The vehicle must be stationary on a
level road surface.
• The driver door closed and the safety
belt fastened.Driving
5
262
Page 267 of 436
Launch Control Sequence
NOTE:
• All the above mentioned conditions
must be verified in order to activate
"Launch Control" performance start
procedure.
• During “Launch Control” ACC, FCW
and HAS (if equipped) are
temporarily disabled.
• Each step displayed on the
instrument cluster has a time out
approximately of 5 seconds.
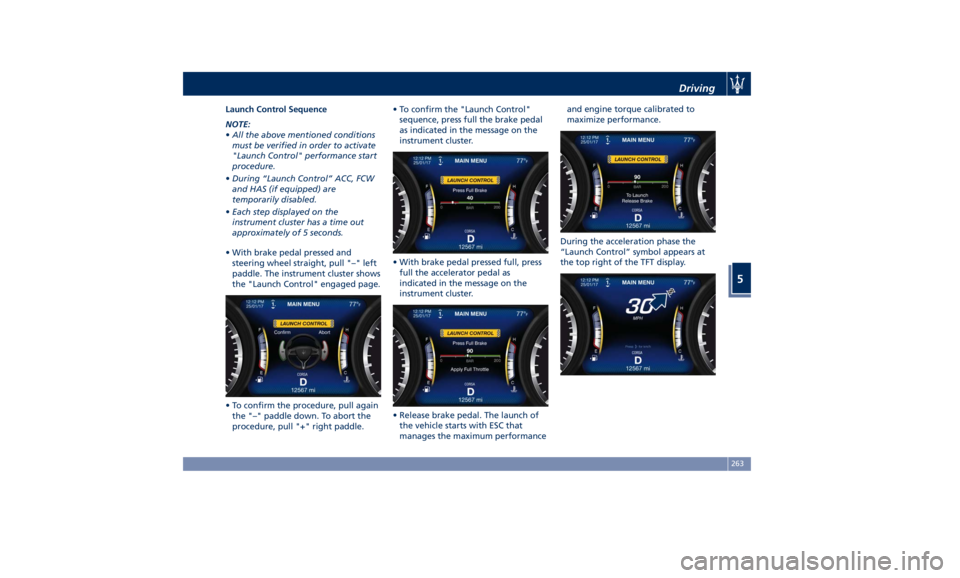
• With brake pedal pressed and
steering wheel straight, pull "–" left
paddle. The instrument cluster shows
the "Launch Control" engaged page.
• To confirm the procedure, pull again
the "–" paddle down. To abort the
procedure, pull "+" right paddle. • To confirm the "Launch Control"
sequence, press full the brake pedal
as indicated in the message on the
instrument cluster.
• With brake pedal pressed full, press
full the accelerator pedal as
indicated in the message on the
instrument cluster.
• Release brake pedal. The launch of
the vehicle starts with ESC that
manages the maximum performance and engine torque calibrated to
maximize performance.
During the acceleration phase the
“Launch Control” symbol appears at
the top right of the TFT display.Driving
5
263
Page 268 of 436
Active Alternator To improve overall efficiency by
reducing the auxiliary loads on the
engine, the vehicle is equipped with a
smart alternator that is mainly active
in the latter energy balance phases
(for example, during braking, coasting
and overloading). The alternator
becomes active when the battery
charge is insufficient and when the
vehicle exits from the braking and
overload situations.
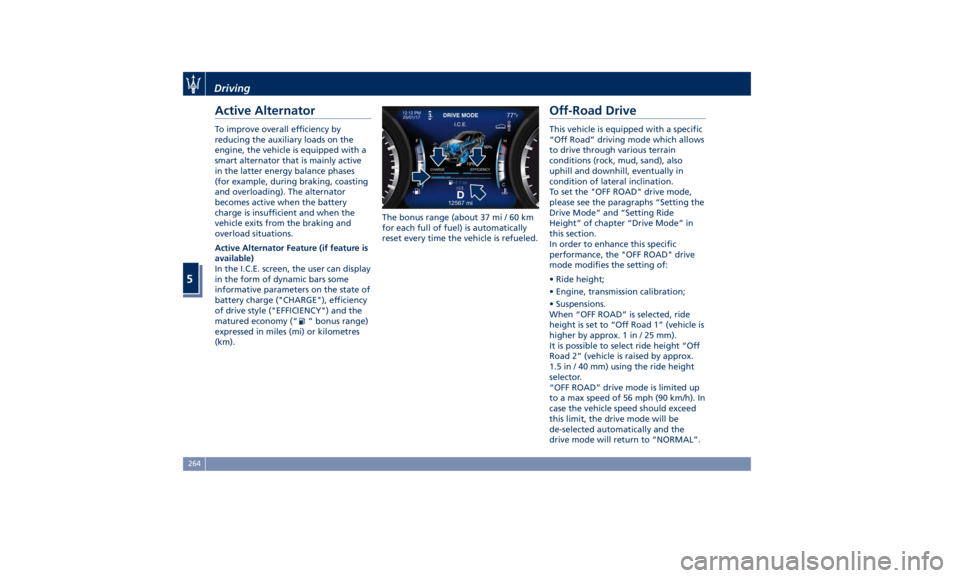
Active Alternator Feature (if feature is
available)
In the I.C.E. screen, the user can display
in the form of dynamic bars some
informative parameters on the state of
battery charge ("CHARGE"), efficiency
of drive style ("EFFICIENCY") and the
matured economy (“
” bonus range)
expressed in miles (mi) or kilometres
(km). The bonus range (about 37 mi / 60 km
for each full of fuel) is automatically
reset every time the vehicle is refueled.
Off-Road Drive This vehicle is equipped with a specific
“Off Road” driving mode which allows
to drive through various terrain
conditions (rock, mud, sand), also
uphill and downhill, eventually in
condition of lateral inclination.
To set the "OFF ROAD" drive mode,
please see the paragraphs “Setting the
Drive Mode” and “Setting Ride
Height” of chapter “Drive Mode” in
this section.
In order to enhance this specific
performance, the "OFF ROAD" drive
mode modifies the setting of:
• Ride height;
• Engine, transmission calibration;
• Suspensions.
When “OFF ROAD” is selected, ride
height is set to “Off Road 1” (vehicle is
higher by approx. 1 in / 25 mm).
It is possible to select ride height “Off
Road 2” (vehicle is raised by approx.
1.5 in / 40 mm) using the ride height
selector.
“OFF ROAD” drive mode is limited up
to a max speed of 56 mph (90 km/h). In
case the vehicle speed should exceed
this limit, the drive mode will be
de-selected automatically and the
drive mode will return to “NORMAL”.Driving
5
264
Page 269 of 436

“Off Road 2” ride height is limited
instead up to a max speed of 25 mph
(40 km/h). In case the vehicle speed
should exceed this limit, ride height
will be put automatically to “Off Road
1” while driving mode will remain
“OFF ROAD”.
An advantage of the higher ground
clearance is a better view of the road,
allowing you to anticipate problems.
A higher clearance and the longer
travel of the suspension might allow
the vehicle to overcome some
obstacles.
A higher ground clearance means a
higher center of gravity. If at all
possible, avoid sharp turns or abrupt
maneuvers. Failure to operate this
vehicle correctly may result in loss of
control or vehicle rollover .
Although the pneumatic suspension
system contributes to limiting these
risks by setting precautionary speed
thresholds, the driver must always pay
utmost attention and drive carefully.
WARNING!
“Off Road 2” ride height must always
be selected in case of water fording.
Please remember water fording limits:
max depth of the water must be lower than 19 in (50 cm) and crossing
speed lower than 5 mph (8 km/h).
In “OFF ROAD” drive mode, also
engine,
transmission settings are
changed in order to provide the most
suitable level of torque and selected
gear to improve traction on
low-adherence condition and uphill
climbing.
WARNING!
In case of downhill, the use of the Hill
Descent Control (HDC) is
recommended, especially for relevant
slope and in case of low-adherence
conditions.
Also suspensions (Skyhook Continuous
Damping
Control) are set
to a specific
calibration in “OFF ROAD” drive
mode, in order to obtain the right
damping force provided by the shock
absorbers, combined with the
increased ride heights “Off Road 1”
and “Off Road 2”.
Driving Through Water Set maximum ride height “Off Road
2” before driving through water.
Although your vehicle is capable of
driving through water, a number precautions must be considered
before entering the water.
NOTE:
Your vehicle is capable of water
fording to a maximum of 19 in (50 cm)
of water. To maintain optimal
performance of your vehicle’s heating
and ventilation system it is
recommended to switch the system
into recirculation mode during water
fording.
CAUTION!
When driving through water, do not
exceed 5 mph (8 km/h). Always check
water depth before entering, as a
precaution. Check all fluids
afterwards: driving through water
may cause damage to engine and
driveline that may not be covered by
the new vehicle limited warranty.
Driving through water more than a
few
inches/centimeters deep will
require extra caution to ensure safety
and prevent damage to your vehicle. If
you must drive through water, try to
determine the depth and the bottom
condition (and location of any
obstacles) prior to entering. Proceed
with caution and maintain a steadyDriving
5
265
Page 270 of 436
controlled speed lower than 5 mph
(8 km/h) while in water to minimize
wave effects that might cause serious
damage to all components, especially
the engine.
WARNING!
Avoid driving through flowing or
standing water. Doing so can be
highly dangerous and can be very
difficult to determine the depth of the
water you are driving through. If
driving through water cannot be
avoided, and after driving through it,
apply the brakes lightly to ensure the
brakes are operating correctly.
Flowing Water
If
the water is
swift flowing and rising
(as in storm run-off), avoid crossing
until the water level recedes and/or
the flow rate is reduced. If you must
cross flowing water avoid depths in
excess of 9 in (25 cm).
Standing Water
Do not drive in standing water deeper
than 19 in (50 cm), and reduce speed
appropriately to minimize wave
effects. Maintenance
After driving through water, have your
vehicle fluids and lubricants inspected
at an Authorized Maserati Dealer to
assure the fluids have not been
contaminated.
Driving in Snow and Wet Grass In heavy snow, when pulling a load, or
for additional control at slower speeds,
set “I.C.E.” drive mode with
transmission in M +/- (Manual) and
shift the transmission to a low gear.
See “Drive Mode” in this section for
further details. Do not shift to a lower
gear than necessary to maintain
forward motion. Over-revving the
engine can spin the wheels and
traction will be lost.
Avoid abrupt downshifts on icy or
slippery roads, because engine braking
may cause skidding and loss of control.
Follow these instructions even when
driving through a path section covered
with wet grass.
Driving in Mud and Sand In general, when driving in mud and
sand, if your wheels spin, always
reduce the throttle in order to slow
the tires and regain traction. • When driving in mud, avoid using
low gear that could cause wheel
spin. Follow the tire and vehicle
manufacturer’s advice on tire
pressure.
• When driving in sand, adopt lowest
gear possible.
Hill Climbing Before climbing a hill, determine the
conditions at the crest and/or on the
other side and shift the transmission to
a lower gear.
The vehicle is equipped with Hill Start
Assist (HSA) that helps the driver to
manage the brake intervention in
acceleration when driving uphill (for
further details, refer to “Brake and
Stability Control System” in this
section).
WARNING!
If you lose forward motion, or cannot
make it to the top of a hill or grade,
never attempt to turn around. Always
back carefully straight down a hill in R
(Reverse) gear. Never back down a hill
in N (Neutral) using only the brake.
Remember, never drive diagonally
across
a hill; always
drive straight up or
down.Driving
5
266