MASERATI QUATTROPORTE 2019 Owners Manual
Manufacturer: MASERATI, Model Year: 2019, Model line: QUATTROPORTE, Model: MASERATI QUATTROPORTE 2019Pages: 396, PDF Size: 13.9 MB
Page 341 of 396
Level Checks ENVIRONMENTAL!
• The engine oils and fluids used
contain substances that are
dangerous to the environment. For
replacement you are advised to
contact the Authorized Maserati
Dealer, where all the necessary
equipment is available to dispose of
the used oil and fluids in compliance
with the regulations in force and in
an environment-friendly manner.
• All equipment used for fluids
replacement (gloves, cloths,
containers, etc) must be disposed of
in compliance with the regulations
in force.
Engine Coolant Level Check
Your vehicle has been equipped with
an improved engine coolant
(antifreeze) that offers high
protection against corrosion, freezing
and allows extended maintenance
intervals. To prevent reducing
extended maintenance periods, it is
important to use original engine
coolant (antifreeze) when adding
coolant throughout the life of your
vehicle. When adding engine coolant
(antifreeze) use pure water only, such
as distilled or deionized water when
mixing the water/engine coolant
(antifreeze) solution. The use of
impure water will reduce the amount
of corrosion protection in the engine
cooling system.
• Mix a minimum solution of 50%
engine coolant (antifreeze) and
distilled water. Use higher
concentrations (do not exceed 70%)
if temperatures below −35°F (−37°C)
are forecast.
Please note that it is the owner's
responsibility to maintain the proper
level of protection against freezing
according to the temperatures
occurring in the circulation area of the
vehicle.
The coolant bottle provides a quick
visual method to determine that the
coolant level is adequate. As long as
the engine operating temperature is
satisfactory, the coolant bottle only
needs to be checked once a month.
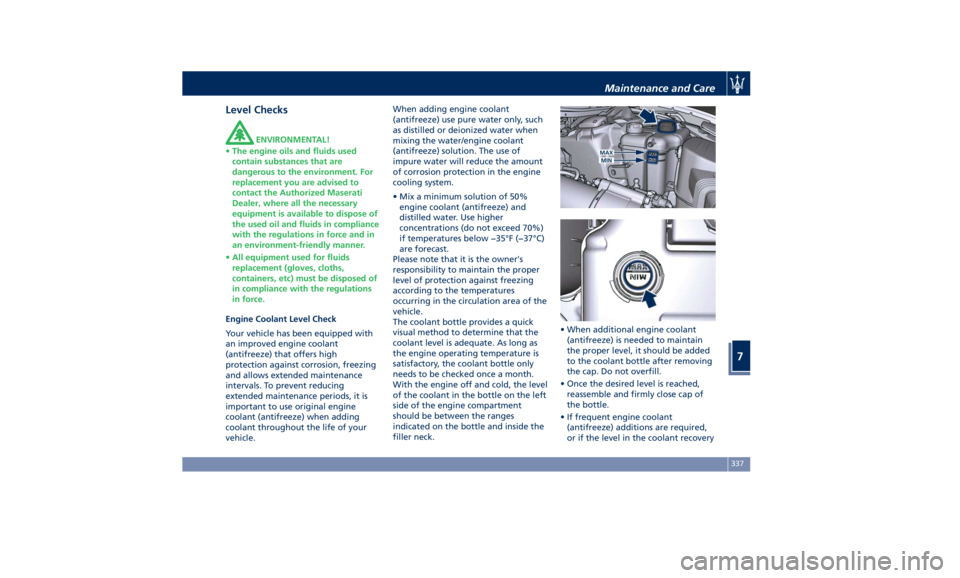
With the engine off and cold, the level
of the coolant in the bottle on the left
side of the engine compartment
should be between the ranges
indicated on the bottle and inside the
filler neck. • When additional engine coolant
(antifreeze) is needed to maintain
the proper level, it should be added
to the coolant bottle after removing
the cap. Do not overfill.
• Once the desired level is reached,
reassemble and firmly close cap of
the bottle.
• If frequent engine coolant
(antifreeze) additions are required,
or if the level in the coolant recoveryMaintenance and Care
7
337
Page 342 of 396
bottle does not drop when the
engine cools, the cooling system
should be tested by an Authorized
Maserati Dealer .
• Keep the front of the radiator and
the condenser clean.
WARNING!
• Never add engine coolant
(antifreeze) when the engine is hot.
Do not loosen or remove the cap of
the engine coolant bottle to cool a
hot engine. Heat causes pressure to
build up in the cooling system. To
prevent scalding or injury, do not
remove the pressure cap while the
system is hot or under pressure.
• When adding coolant do not use a
pressure cap other than the one
specified for your vehicle. Personal
injury or engine damage may result.
WARNING!
California Proposition 65
Operating, servicing and maintaining
a passenger vehicle or off-road vehicle
can expose you to chemicals including
such as, engine exhaust, carbon
monoxide, phthalates and lead, that which are known to the State of
California to cause cancer and birth
defects or other reproductive harm. To
minimize exposure, avoid breathing
exhaust, do not idle the engine except
as necessary, service your vehicle in a
well-ventilated area and wear gloves
or wash your hands frequently when
servicing your vehicle. For more
information go to:
www.P65Warnings.ca.gov/passenger-
vehicle
Brake Fluid Level Check
Check
the fluid level immediately if
the brake system warning light
and the related message turn on
indicating a low level of brake fluid.
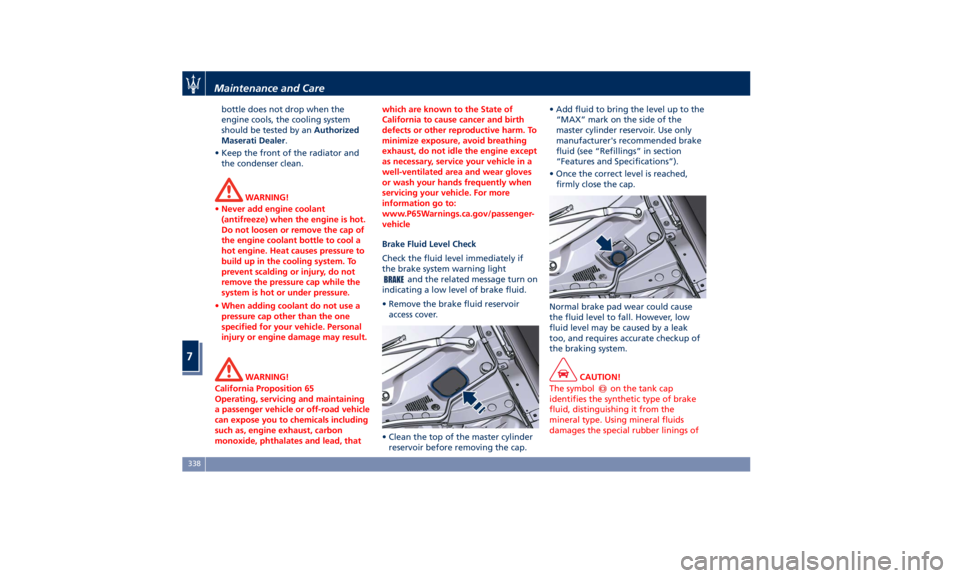
• Remove the brake fluid reservoir
access cover.
• Clean the top of the master cylinder
reservoir before removing the cap. • Add fluid to bring the level up to the
“MAX” mark on the side of the
master cylinder reservoir. Use only
manufacturer's recommended brake
fluid (see “Refillings” in section
“Features and Specifications”).
• Once the correct level is reached,
firmly close the cap.
Normal brake pad wear could cause
the fluid level to fall. However, low
fluid level may be caused by a leak
too, and requires accurate checkup of
the braking system.
CAUTION!
The symbol
on the tank cap
identifies the synthetic type of brake
fluid, distinguishing it from the
mineral type. Using mineral fluids
damages the special rubber linings ofMaintenance and Care
7
338
Page 343 of 396
the brake system irreparably.
WARNING!
• To avoid contamination from foreign
materials or moisture, use only new
brake fluid or fluid that has been in
a tightly closed container. Keep the
master cylinder reservoir cap
secured at all times.
• Overfilling the brake fluid reservoir
can result in spilling brake fluid.
Brake fluid can also damage painted
and vinyl surfaces, make sure it does
not spill over these surfaces.
• Do not allow petroleum based fluid
to contaminate the brake fluid.
Brake seal components could be
damaged.
Adding Washer Fluid
The
reservoir on
the left side of the
engine compartment contains the
fluid to wash the windshield.
During scheduled services or when the
message of low level of the washer
fluid appears together with the
related telltale
add more fluid as
soon as possible.
The fluid reservoir may contain nearly
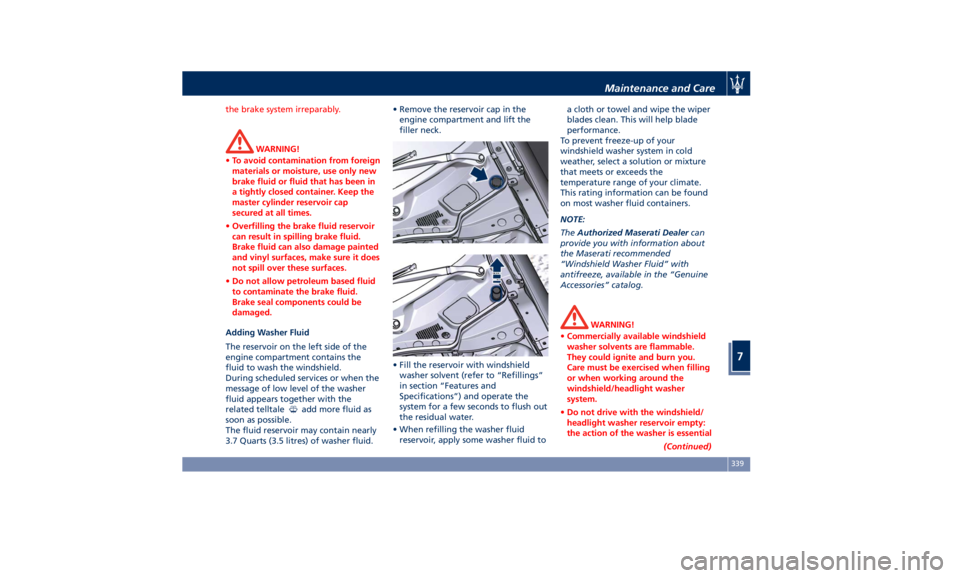
3.7 Quarts (3.5 litres) of washer fluid. • Remove the reservoir cap in the
engine compartment and lift the
filler neck.
• Fill the reservoir with windshield
washer solvent (refer to “Refillings”
in section “Features and
Specifications”) and operate the
system for a few seconds to flush out
the residual water.
• When refilling the washer fluid
reservoir, apply some washer fluid to a cloth or towel and wipe the wiper
blades clean. This will help blade
performance.
To prevent freeze-up of your
windshield washer system in cold
weather, select a solution or mixture
that meets or exceeds the
temperature range of your climate.
This rating information can be found
on most washer fluid containers.
NOTE:
The Authorized Maserati Dealer can
provide you with information about
the Maserati recommended
“Windshield Washer Fluid” with
antifreeze, available in the “Genuine
Accessories” catalog.
WARNING!
• Commercially available windshield
washer solvents are flammable.
They could ignite and burn you.
Care must be exercised when filling
or when working around the
windshield/headlight washer
system.
• Do not drive with the windshield/
headlight washer reservoir empty:
the action of the washer is essential
(Continued)Maintenance and Care
7
339
Page 344 of 396
(Continued)
for improving visibility when
driving.
WARNING!
California Proposition 65
Operating, servicing and maintaining
a passenger vehicle or off-road vehicle
can expose you to chemicals including
such as, engine exhaust, carbon
monoxide, phthalates and lead, that
which are known to the State of
California to cause cancer and birth
defects or other reproductive harm. To
minimize exposure, avoid breathing
exhaust, do not idle the engine except
as necessary, service your vehicle in a
well-ventilated area and wear gloves
or wash your hands frequently when
servicing your vehicle. For more
information go to:
www.P65Warnings.ca.gov/passenger-
vehicle
Engine Oil Level Check
T
o assure
proper lubrication of your
vehicle's engine, the engine oil must
be maintained at the correct level.
If the
warning light illuminates
and the related message of low oil
level displays, or during scheduled services (see “Scheduled Maintenance
Service” in this section) it is necessary
to check the engine oil level.
The best time to check the engine oil
level is about five minutes after a fully
warmed up engine is shut off or
before starting the engine after it has
sat overnight. In both cases the vehicle
should be parked on level ground to
improve the accuracy of the oil level
readings.
CAUTION!
• Do not top up with oil with different
characteristics than the engine one
(refer to “Refillings” in section
“Features and Specifications”).
• Overfilling or underfilling the oil pan
will cause aeration or loss of oil
pressure. This could damage your
engine.
• Do not add any supplemental
materials to the engine oil. Engine
oil is an engineered product, and its
performance may be impaired by
supplemental additives.
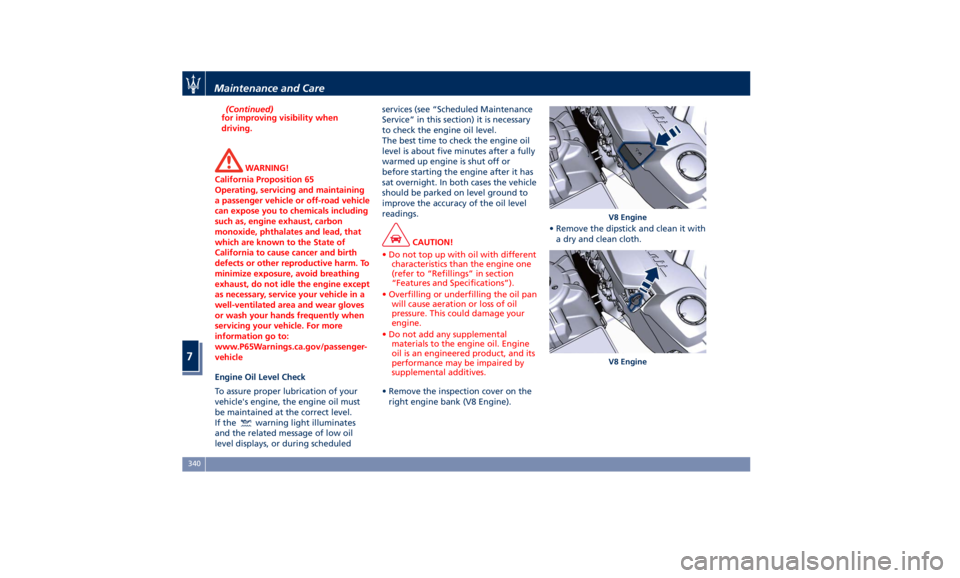
• Remove the inspection cover on the
right
engine bank
(V8 Engine). • Remove the dipstick and clean it with
a dry and clean cloth. V8 Engine
V8 EngineMaintenance and Care
7
340
Page 345 of 396
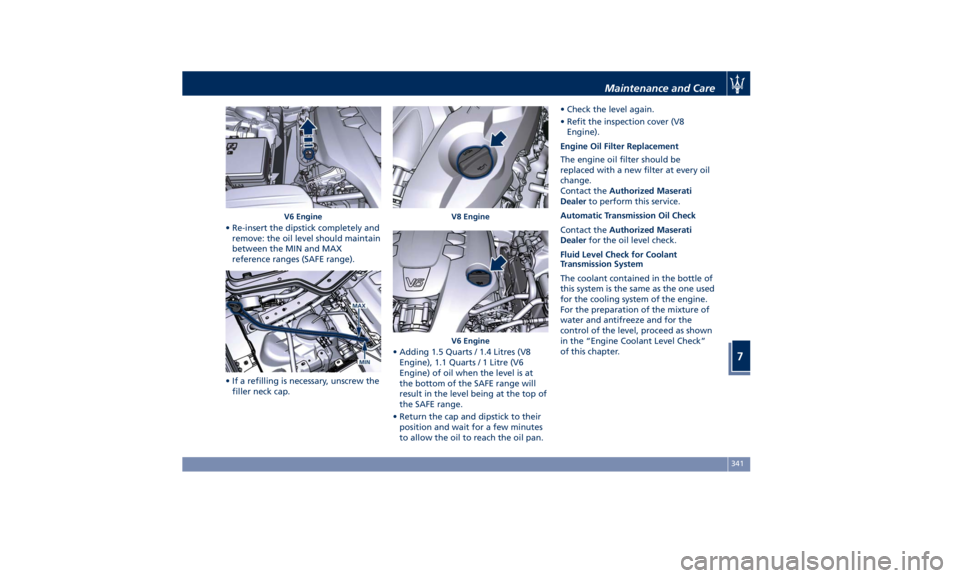
• Re-insert the dipstick completely and
remove: the oil level should maintain
between the MIN and MAX
reference ranges (SAFE range).
• If a refilling is necessary, unscrew the
filler neck cap. • Adding 1.5 Quarts / 1.4 Litres (V8
Engine), 1.1 Quarts / 1 Litre (V6
Engine) of oil when the level is at
the bottom of the SAFE range will
result in the level being at the top of
the SAFE range.
• Return the cap and dipstick to their
position and wait for a few minutes
to allow the oil to reach the oil pan. • Check the level again.
• Refit the inspection cover (V8
Engine).
Engine Oil Filter Replacement
The engine oil filter should be
replaced with a new filter at every oil
change.
Contact the Authorized Maserati
Dealer to perform this service.
Automatic Transmission Oil Check
Contact the Authorized Maserati
Dealer for the oil level check.
Fluid Level Check for Coolant
Transmission System
The coolant contained in the bottle of
this system is the same as the one used
for the cooling system of the engine.
For the preparation of the mixture of
water and antifreeze and for the
control of the level, proceed as shown
in the “Engine Coolant Level Check”
of this chapter.V6 Engine V8 Engine
V6 Engine Maintenance and Care
7
341
Page 346 of 396
Engine Air Filters Replacement Contact an Authorized Maserati
Dealer to have the air filters replaced.
A/C Air Filter Replacement This filter performs mechanic/
electrostatic air filtering, provided that
windows and doors are closed.
The filter is located under the hood in
the external A/C system air inlet, on
the passenger side of the vehicle, next
to the windshield wipers.
To replace the filter during the
scheduled maintenance services or
after the vehicle has been heavily used
on dusty roads, proceed as follows:
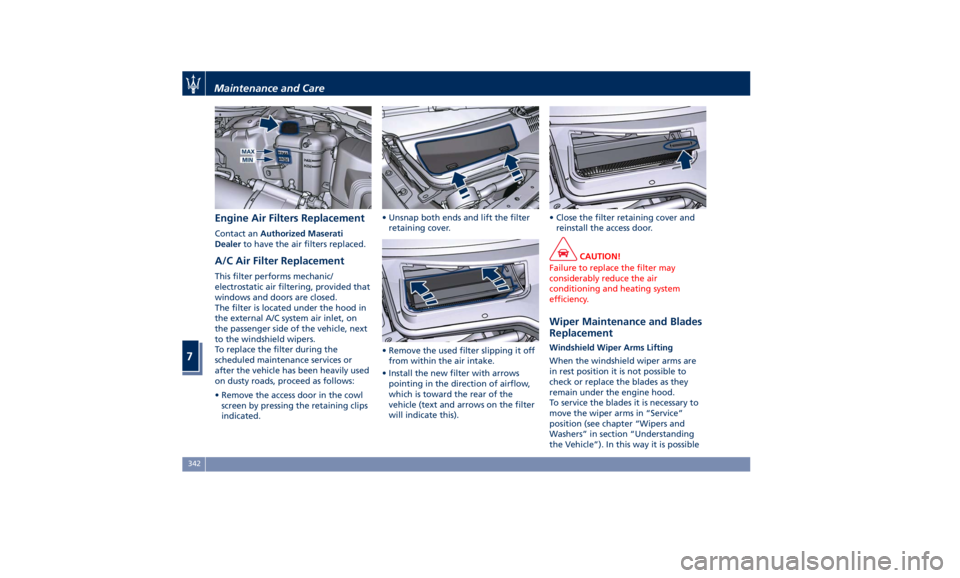
• Remove the access door in the cowl
screen by pressing the retaining clips
indicated. • Unsnap both ends and lift the filter
retaining cover.
• Remove the used filter slipping it off
from within the air intake.
• Install the new filter with arrows
pointing in the direction of airflow,
which is toward the rear of the
vehicle (text and arrows on the filter
will indicate this). • Close the filter retaining cover and
reinstall the access door.
CAUTION!
Failure to replace the filter may
considerably reduce the air
conditioning and heating system
efficiency.
Wiper Maintenance and Blades
Replacement Windshield Wiper Arms Lifting
When the windshield wiper arms are
in rest position it is not possible to
check or replace the blades as they
remain under the engine hood.
To service the blades it is necessary to
move the wiper arms in “Service”
position (see chapter “Wipers and
Washers” in section “Understanding
the Vehicle”). In this way it is possibleMaintenance and Care
7
342
Page 347 of 396
to lift the arms for cleaning or
replacing the wiper blades.
WARNING!
It is dangerous to operate or service
the wiper blades with the windshield
wipers in an active position (any
position different from “OFF”) and
with the ignition switch in the RUN
position. The rain sensors may
suddenly activate the wipers. Always
use the “Service” position for any
intervention on the windshield wiper
blades.
Windshield Wiper Maintenance
Life
expectancy of wiper blades varies
depending on the geographical area’s
weather conditions where the car is
used and frequency of use. Poor
performance of blades may be present
with chattering, marks on the glass,
water lines or wet spots. If any of
these conditions are present, clean the
wiper blades or replace if necessary.
Clean the rubber edges of the wiper
blades and the windshield/rear
window glasses periodically with a
sponge or soft cloth and a mild
nonabrasive cleaner. This will remove
accumulations of salt or road film. Operation of the wipers on dry glass
for long periods may cause
deterioration of the wiper blades.
Always use washer fluid when using
the wipers to remove salt or dirt from
a dry windshield.
Avoid using the wiper blades to
remove frost or ice from the
windshield. Keep the blade rubber out
of contact with petroleum products
such as engine oil, gasoline, etc.
Spray nozzles
If the jet does not work, first check
that there is fluid in the tank (see
paragraph “Level checks” in this
section) then check that the nozzles
are not clogged.
Windshield Wiper Blades Replacement
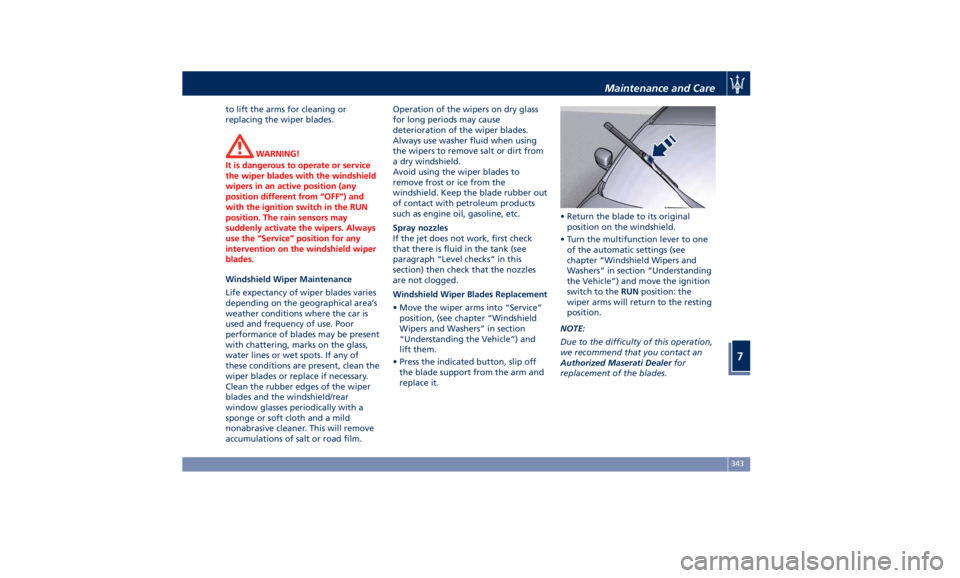
• Move the wiper arms into “Service”
position, (see chapter “Windshield
Wipers and Washers” in section
“Understanding the Vehicle”) and
lift them.
• Press the indicated button, slip off
the blade support from the arm and
replace it. • Return the blade to its original
position on the windshield.
• Turn the multifunction lever to one
of the automatic settings (see
chapter “Windshield Wipers and
Washers” in section “Understanding
the Vehicle”) and move the ignition
switch to the RUN position: the
wiper arms will return to the resting
position.
NOTE:
Due to the difficulty of this operation,
we recommend that you contact an
Authorized Maserati Dealer for
replacement of the blades.Maintenance and Care
7
343
Page 348 of 396
Maintenance-Free Battery This vehicle is equipped with a sealed
type maintenance-free battery. You
will never have to add water, nor is
periodic maintenance required.
WARNING!
• Battery fluid is a corrosive acid
solution and can burn or damage the
eyes. Do not allow battery fluid to
contact your eyes, skin, or clothing.
If acid splashes in eyes or on skin,
flush the area immediately with
large amounts of water.
• Battery gas is flammable and
explosive. Keep flame or sparks
away from the battery. Do not use a
booster battery or any other booster
source with an output greater than
12 Volts. Do not allow cable clamps
to touch each other.
• Battery posts, terminals, and related
accessories contain lead and lead
compounds. Wash hands after
handling the battery.
• The battery in this vehicle has a vent
hose that should not be
disconnected and should only be
replaced with a component of the same type (vented).
NOTE:
Remote
battery terminals for starting
are located in the engine
compartment for jump-starting to be
used with an auxiliary battery or a
battery from another vehicle (see
“Auxiliary Jump-Start Procedure”
chapter in section “In an Emergency”).
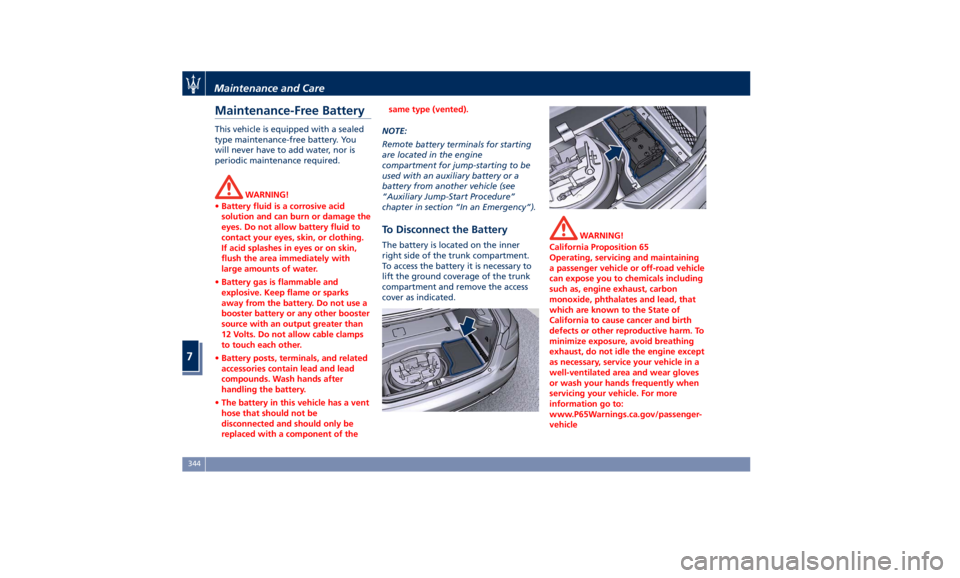
To Disconnect the Battery The battery is located on the inner
right side of the trunk compartment.
To access the battery it is necessary to
lift the ground coverage of the trunk
compartment and remove the access
cover as indicated. WARNING!
California Proposition 65
Operating, servicing and maintaining
a passenger vehicle or off-road vehicle
can expose you to chemicals including
such as, engine exhaust, carbon
monoxide, phthalates and lead, that
which are known to the State of
California to cause cancer and birth
defects or other reproductive harm. To
minimize exposure, avoid breathing
exhaust, do not idle the engine except
as necessary, service your vehicle in a
well-ventilated area and wear gloves
or wash your hands frequently when
servicing your vehicle. For more
information go to:
www.P65Warnings.ca.gov/passenger-
vehicleMaintenance and Care
7
344
Page 349 of 396
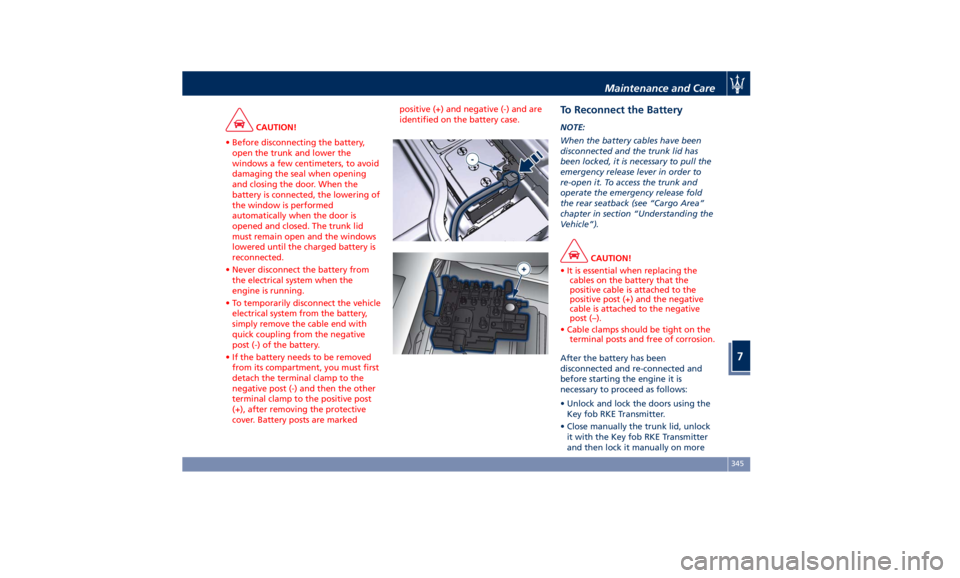
CAUTION!
• Before disconnecting the battery,
open the trunk and lower the
windows a few centimeters, to avoid
damaging the seal when opening
and closing the door. When the
battery is connected, the lowering of
the window is performed
automatically when the door is
opened and closed. The trunk lid
must remain open and the windows
lowered until the charged battery is
reconnected.
• Never disconnect the battery from
the electrical system when the
engine is running.
• To temporarily disconnect the vehicle
electrical system from the battery,
simply remove the cable end with
quick coupling from the negative
post (-) of the battery.
• If the battery needs to be removed
from its compartment, you must first
detach the terminal clamp to the
negative post (-) and then the other
terminal clamp to the positive post
(+), after removing the protective
cover. Battery posts are marked positive (+) and negative (-) and are
identified on the battery case.
To Reconnect the Battery NOTE:
When the battery cables have been
disconnected and the trunk lid has
been locked, it is necessary to pull the
emergency release lever in order to
re-open it. To access the trunk and
operate the emergency release fold
the rear seatback (see “Cargo Area”
chapter in section “Understanding the
Vehicle”).
CAUTION!
• It is essential when replacing the
cables on the battery that the
positive cable is attached to the
positive post (+) and the negative
cable is attached to the negative
post (–).
• Cable clamps should be tight on the
terminal posts and free of corrosion.
After the battery has been
disconnected
and re-connected and
before starting the engine it is
necessary to proceed as follows:
• Unlock and lock the doors using the
Key fob RKE Transmitter.
• Close manually the trunk lid, unlock
it with the Key fob RKE Transmitter
and then lock it manually on moreMaintenance and Care
7
345
Page 350 of 396
time. Then move the lid
automatically, using the buttons on
the lid itself, performing a complete
cycle of opening and closing.
• Initialize the climate control system
by activating the system and pressing
the “AUTO” control as described in
chapter “Air Conditioning Controls”
in section “Dashboard Instruments
and Controls”.
• Turn on the MTC+ and set the date
and time (see “MTC+ Settings” in
section “Dashboard Instruments and
Controls”).
• Lift, release and lift again the lever
on the central console to initialize
the electric parking brake. Following
this operation the
warning light
on the instrument cluster will turn
off.
• For correct activation of the
approach lights on the external
mirrors, press at least once the tilt
button on the driver's door panel so
that the door mode recognizes the
mirrors position.
• If the car is equipped with power
sunshades on rear door windows,
carry out the self learning cycle
described on chapter “Power
Sunshades on Rear Door Windows”
in section “Before Starting”. CAUTION!
• Every time the battery is
reconnected, wait at least 30 seconds
with the ignition switch turned to
RUN before starting the engine, in
order to allow the electronic system
that manages the motor-driven
throttles to run a self-learning cycle.
At the same time, you can run the
date and time set up procedure for
the MTC+.
• Every time the battery is reconnected
the warning light
flash for about
10 seconds and then go off.
WARNING!
California Proposition 65
Operating, servicing and maintaining
a passenger vehicle or off-road vehicle
can expose you to chemicals including
such as, engine exhaust, carbon
monoxide, phthalates and lead, that
which are known to the State of
California to cause cancer and birth
defects or other reproductive harm. To
minimize exposure, avoid breathing
exhaust, do not idle the engine except
as necessary, service your vehicle in a
well-ventilated area and wear gloves or wash your hands frequently when
servicing your vehicle. For more
information go to:
www.P65Warnings.ca.gov/passenger-
vehicle
Useful Advice to Extend
Battery Life When parking the vehicle, make sure
that the doors, front, rear lids and
flaps are properly closed. All interior
lights should be off.
When the engine is turned off, do not
keep the connected devices switched
on for a long time (such as radio,
hazard warning flashers, fan, etc.).
CAUTION!
If the battery charge remains below
50% for a long period of time, it will
be damaged due to sulfation; its
performance and starting power will
be reduced and it will be more subject
to freezing.
We recommend you to have the
battery
charge condition
checked,
preferably at the beginning of the cold
season, to prevent the electrolyte from
freezing.
This check should be carried out more
frequently if the vehicle is used mainlyMaintenance and Care
7
346