MASERATI QUATTROPORTE 2019 Owners Manual
Manufacturer: MASERATI, Model Year: 2019, Model line: QUATTROPORTE, Model: MASERATI QUATTROPORTE 2019Pages: 396, PDF Size: 13.9 MB
Page 351 of 396
for short trips or if it is equipped with
power-absorbing devices that remain
permanently on even when the
ignition switch is off. This applies
above all if these devices have been
retrofitted ("Aftermarket" services).
If the vehicle is not used for long
periods of time, please see “Vehicle
Stored for Long Periods” in this
section.
Battery Recharge WARNING!
The process of charging or recharging
the battery produces hydrogen, a
flammable gas that can explode and
cause serious injuries. When charging
or recharging the battery, follow the
recommended precautions at all
times.
• Before using a charger device
always check that this tool is
suitable for the installed battery,
with constant voltage (lower than
14.0 V) and low amperage
(maximum limit 15 A).
• Recharge the battery in a
well-ventilated environment.
• Never charge or recharge a frozen
battery. • Ensure that any sparks or open
flames are kept well away from the
battery while it is charging.
• Before using a charger to charge or
maintain the battery charge status,
carefully follow the instructions
provided to ensure the charger is
connected to the battery safely and
correctly.
It is possible to recharge the battery
without
disconnecting the
cables of
the vehicle electrical system.
• To access the battery lift the ground
coverage of the trunk compartment
and remove the access cover as
previously shown (see paragraph “To
Disconnect the Battery" in this
chapter).
• Remove the protection cover and
connect the terminal clamp of the
charger positive cable (typically in
red) to the positive post (+) of the
battery.
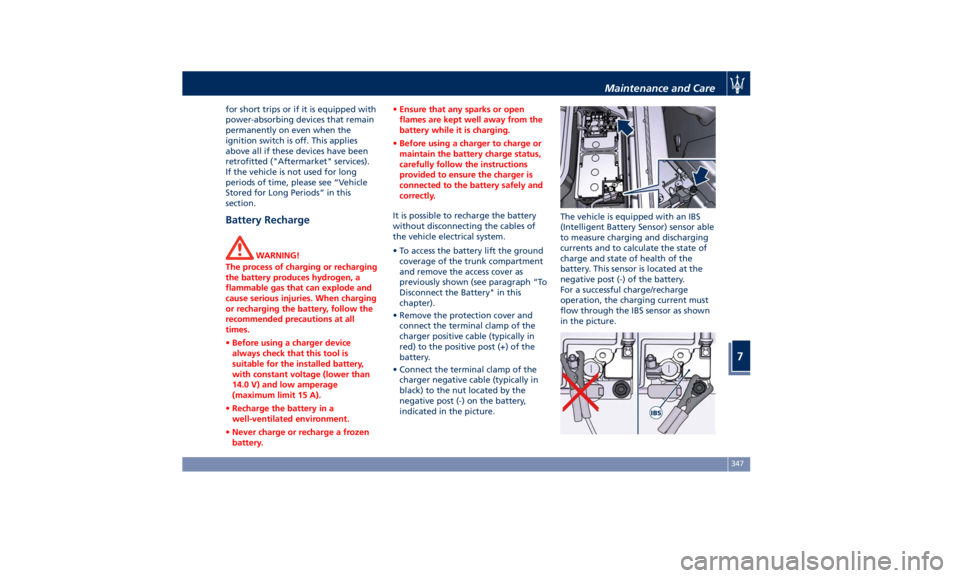
• Connect the terminal clamp of the
charger negative cable (typically in
black) to the nut located by the
negative post (-) on the battery,
indicated in the picture. The vehicle is equipped with an IBS
(Intelligent Battery Sensor) sensor able
to measure charging and discharging
currents and to calculate the state of
charge and state of health of the
battery. This sensor is located at the
negative post (-) of the battery.
For a successful charge/recharge
operation, the charging current must
flow through the IBS sensor as shown
in the picture.Maintenance and Care
7
347
Page 352 of 396
• Turn the charger on and follow the
instructions on its user manual to
completely recharge the battery.
• When the battery is recharged, turn
off the battery charger before
disconnecting it from the battery.
• Disconnect first the terminal clamp
of the charger black cable from the
battery and then the terminal clamp
of the red cable.
• Reassemble the protection cover on
the battery positive post and the
other parts removed for this
operation.
WARNING!
California Proposition 65
Operating, servicing and maintaining
a passenger vehicle or off-road vehicle
can expose you to chemicals including
such as, engine exhaust, carbon
monoxide, phthalates and lead, that
which are known to the State of
California to cause cancer and birth
defects or other reproductive harm. To
minimize exposure, avoid breathing
exhaust, do not idle the engine except
as necessary, service your vehicle in a
well-ventilated area and wear gloves
or wash your hands frequently when
servicing your vehicle. For more information go to:
www.P65Warnings.ca.gov/passenger-
vehicle
Fuse Replacement Used Fuses Characteristics When an electrical device is not
functioning, check that the
corresponding fuse is in proper
working order (intact).
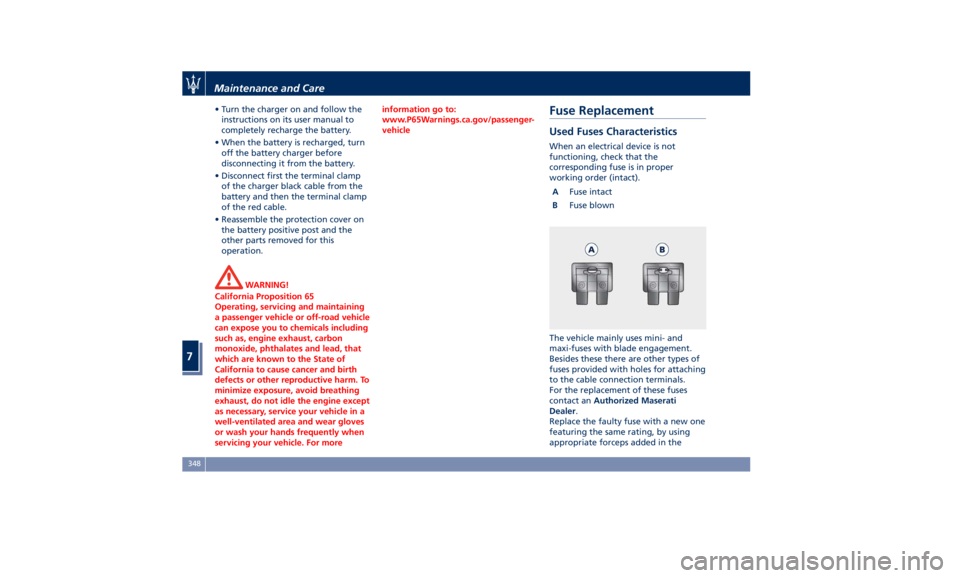
A Fuse intact
B Fuse blown
The vehicle mainly uses mini- and
maxi-fuses with blade engagement.
Besides these there are other types of
fuses provided with holes for attaching
to the cable connection terminals.
For the replacement of these fuses
contact an Authorized Maserati
Dealer .
Replace the faulty fuse with a new one
featuring the same rating, by using
appropriate forceps added in theMaintenance and Care
7
348
Page 353 of 396
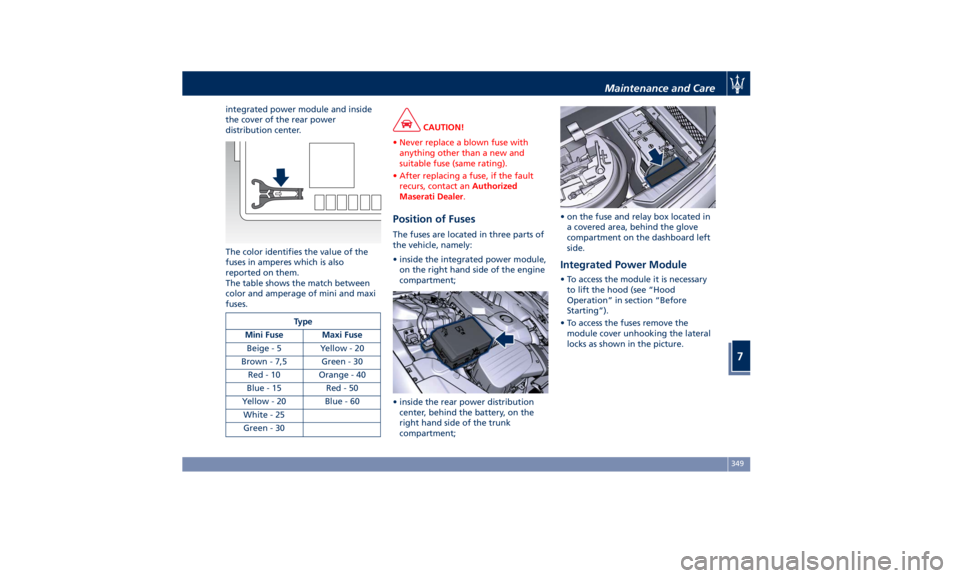
integrated power module and inside
the cover of the rear power
distribution center.
The color identifies the value of the
fuses in amperes which is also
reported on them.
The table shows the match between
color and amperage of mini and maxi
fuses.
Type
Mini Fuse Maxi Fuse
Beige - 5 Yellow - 20
Brown - 7,5 Green - 30
Red - 10 Orange - 40
Blue-15 Red-50
Yellow - 20 Blue - 60
White - 25
Green - 30 CAUTION!
• Never replace a blown fuse with
anything other than a new and
suitable fuse (same rating).
• After replacing a fuse, if the fault
recurs, contact an Authorized
Maserati Dealer .
Position of Fuses The fuses are located in three parts of
the vehicle, namely:
• inside the integrated power module,
on the right hand side of the engine
compartment;
• inside the rear power distribution
center, behind the battery, on the
right hand side of the trunk
compartment; • on the fuse and relay box located in
a covered area, behind the glove
compartment on the dashboard left
side.
Integrated Power Module • To access the module it is necessary
to lift the hood (see “Hood
Operation” in section “Before
Starting”).
• To access the fuses remove the
module cover unhooking the lateral
locks as shown in the picture.Maintenance and Care
7
349
Page 354 of 396
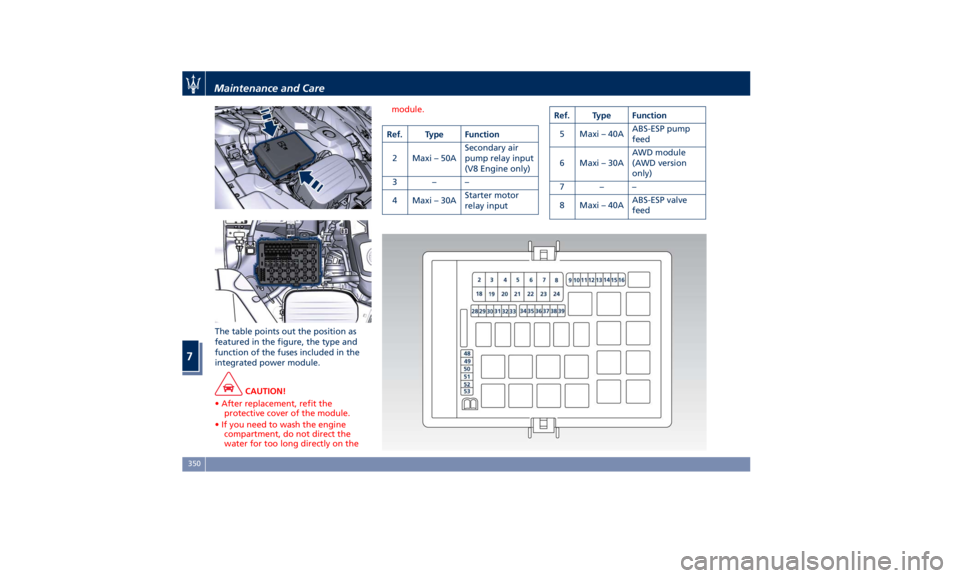
The table points out the position as
featured in the figure, the type and
function of the fuses included in the
integrated power module.
CAUTION!
• After replacement, refit the
protective cover of the module.
• If you need to wash the engine
compartment, do not direct the
water for too long directly on the module.
Ref. Type Function
2 Maxi – 50A Secondary air
pump relay input
(V8 Engine only)
3––
4 Maxi – 30A Starter motor
relay input Ref. Type Function
5 Maxi – 40A ABS-ESP pump
feed
6 Maxi – 30A AWD module
(AWD version
only)
7––
8 Maxi – 40A ABS-ESP valve
feedMaintenance and Care
7
350
Page 355 of 396
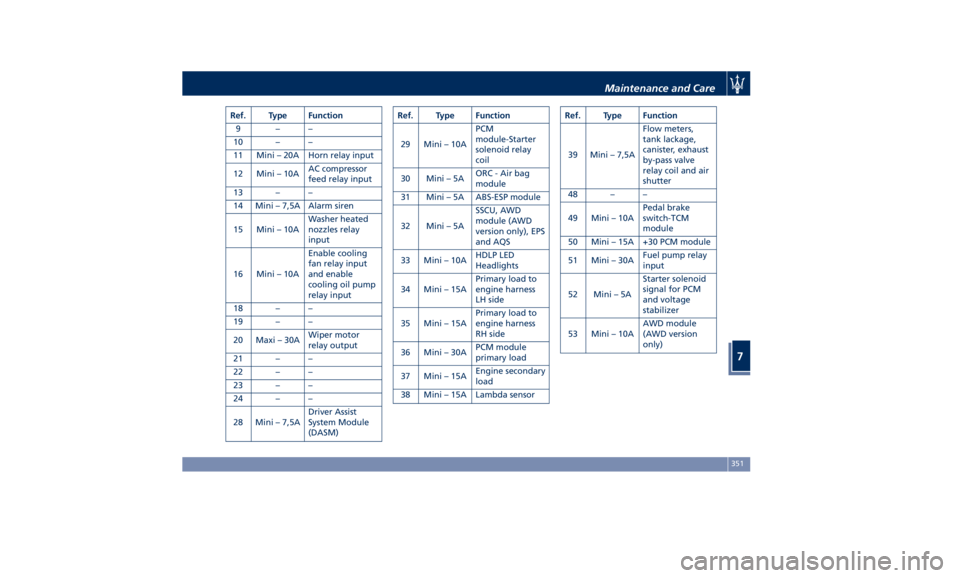
Ref. Type Function
9––
10 – –
11 Mini – 20A Horn relay input
12 Mini – 10A AC compressor
feed relay input
13 – –
14 Mini – 7,5A Alarm siren
15 Mini – 10A Washer heated
nozzles relay
input
16 Mini – 10A Enable cooling
fan relay input
and enable
cooling oil pump
relay input
18 – –
19 – –
20 Maxi – 30A Wiper motor
relay output
21 – –
22 – –
23 – –
24 – –
28 Mini – 7,5A Driver Assist
System Module
(DASM) Ref. Type Function
29 Mini – 10A PCM
module-Starter
solenoid relay
coil
30 Mini – 5A ORC - Air bag
module
31 Mini – 5A ABS-ESP module
32 Mini – 5A SSCU, AWD
module (AWD
version only), EPS
and AQS
33 Mini – 10A HDLP LED
Headlights
34 Mini – 15A Primary load to
engine harness
LH side
35 Mini – 15A Primary load to
engine harness
RH side
36 Mini – 30A PCM module
primary load
37 Mini – 15A Engine secondary
load
38 Mini – 15A Lambda sensor Ref. Type Function
39 Mini – 7,5A Flow meters,
tank lackage,
canister, exhaust
by-pass valve
relay coil and air
shutter
48 – –
49 Mini – 10A Pedal brake
switch-TCM
module
50 Mini – 15A +30 PCM module
51 Mini – 30A Fuel pump relay
input
52 Mini – 5A Starter solenoid
signal for PCM
and voltage
stabilizer
53 Mini – 10A AWD module
(AWD version
only)Maintenance and Care
7
351
Page 356 of 396
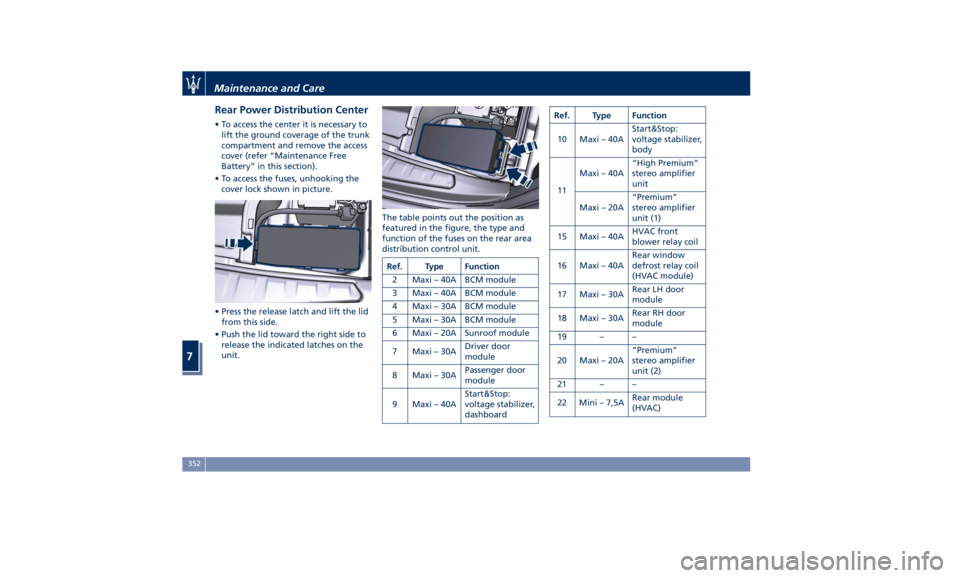
Rear Power Distribution Center • To access the center it is necessary to
lift the ground coverage of the trunk
compartment and remove the access
cover (refer “Maintenance Free
Battery” in this section).
• To access the fuses, unhooking the
cover lock shown in picture.
• Press the release latch and lift the lid
from this side.
• Push the lid toward the right side to
release the indicated latches on the
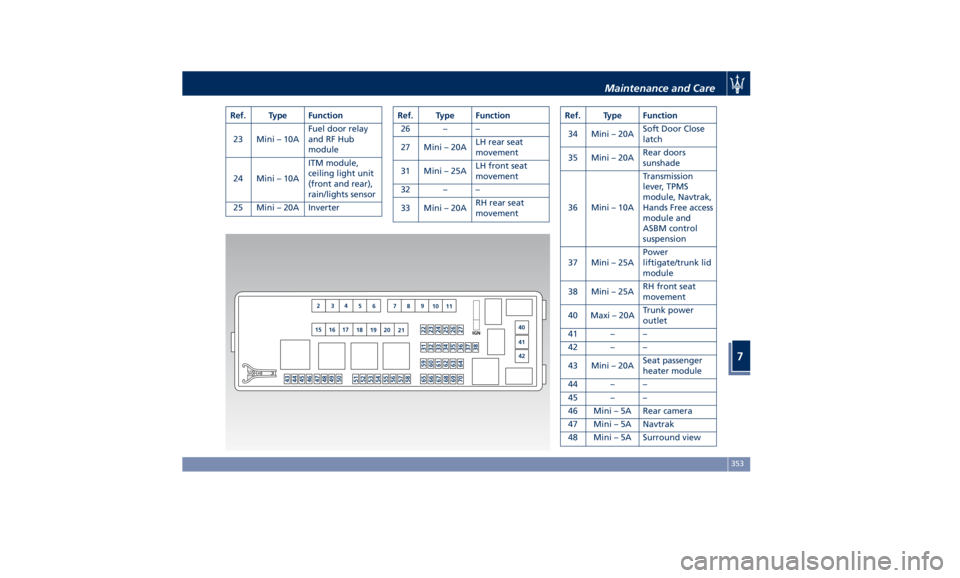
unit. The table points out the position as
featured in the figure, the type and
function of the fuses on the rear area
distribution control unit.
Ref. Type Function
2 Maxi – 40A BCM module
3 Maxi – 40A BCM module
4 Maxi – 30A BCM module
5 Maxi – 30A BCM module
6 Maxi – 20A Sunroof module
7 Maxi – 30A Driver door
module
8 Maxi – 30A Passenger door
module
9 Maxi – 40A Start&Stop:
voltage stabilizer,
dashboard Ref. Type Function
10 Maxi – 40A Start&Stop:
voltage stabilizer,
body
11 Maxi – 40A “High Premium”
stereo amplifier
unit
Maxi – 20A “Premium”
stereo amplifier
unit (1)
15 Maxi – 40A HVAC front
blower relay coil
16 Maxi – 40A Rear window
defrost relay coil
(HVAC module)
17 Maxi – 30A Rear LH door
module
18 Maxi – 30A Rear RH door
module
19 – –
20 Maxi – 20A “Premium”
stereo amplifier
unit (2)
21 – –
22 Mini – 7,5A Rear module
(HVAC)Maintenance and Care
7
352
Page 357 of 396
Ref. Type Function
23 Mini – 10A Fuel door relay
and RF Hub
module
24 Mini – 10A ITM module,
ceiling light unit
(front and rear),
rain/lights sensor
25 Mini – 20A Inverter Ref. Type Function
26 – –
27 Mini – 20A LH rear seat
movement
31 Mini – 25A LH front seat
movement
32 – –
33 Mini – 20A RH rear seat
movement Ref. Type Function
34 Mini – 20A Soft Door Close
latch
35 Mini – 20A Rear doors
sunshade
36 Mini – 10A Transmission
lever, TPMS
module, Navtrak,
Hands Free access
module and
ASBM control
suspension
37 Mini – 25A Power
liftigate/trunk lid
module
38 Mini – 25A RH front seat
movement
40 Maxi – 20A Trunk power
outlet
41 – –
42 – –
43 Mini – 20A Seat passenger
heater module
44 – –
45 – –
46 Mini – 5A Rear camera
47 Mini – 5A Navtrak
48 Mini – 5A Surround viewMaintenance and Care
7
353
Page 358 of 396
Ref. Type Function
49 Mini – 10A Internal
temperature
sensor, internal
mirror and HALF
50 – –
51 Mini – 25A Rear seat and
steering wheel
heater module
52 – –
53 Mini – 25A Rear seat vented
module
54 Mini – 7,5A Blind Spot
module
55 – –
56 Mini – 7,5A Blower front
HVAC coil relay
57 Mini – 7,5A Blower rear
HVAC coil relay
58 – –
59 Mini – 10A SDC module,
transmission
lever, ASBM, rear
tunnel stack
switch
60 Mini – 10A SDC module Ref. Type Function
61 Mini – 25A Front console
power outlet and
cigar lighter
62 Mini – 7,5A Front HVAC
module
63 Mini – 20A Blower rear
HVAC
64 Mini – 10A Wi-fi, rear HVAC
module
65 Mini – 10A Intelligent
battery sensor
66 Mini – 10A Wi-fi, RSE
67 Mini – 7,5A USB charge
outlet, sunroof
68 Mini – 20A Rear sunshade
module
69 Mini – 25A Rear console
power outlet and
cigar lighter
70 Mini – 10A Front HVAC
module and
Parking Aid
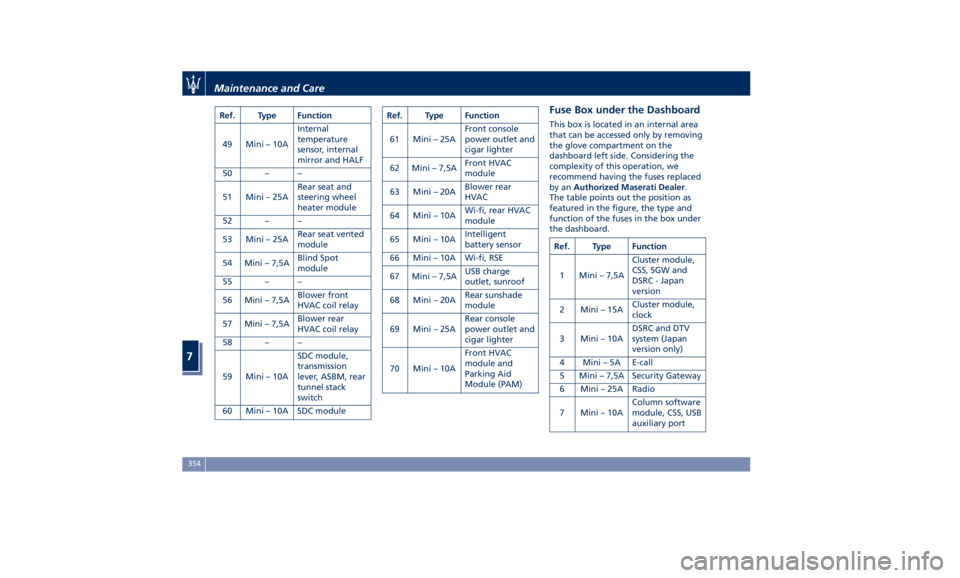
Module (PAM)Fuse Box under the Dashboard This box is located in an internal area
that can be accessed only by removing
the glove compartment on the
dashboard left side. Considering the
complexity of this operation, we
recommend having the fuses replaced
by an Authorized Maserati Dealer .
The table points out the position as
featured in the figure, the type and
function of the fuses in the box under
the dashboard.
Ref. Type Function
1 Mini – 7,5A Cluster module,
CSS, SGW and
DSRC - Japan
version
2 Mini – 15A Cluster module,
clock
3 Mini – 10A DSRC and DTV
system (Japan
version only)
4 Mini – 5A E-call
5 Mini – 7,5A Security Gateway
6 Mini – 25A Radio
7 Mini – 10A Column software
module, CSS, USB
auxiliary portMaintenance and Care
7
354
Page 359 of 396
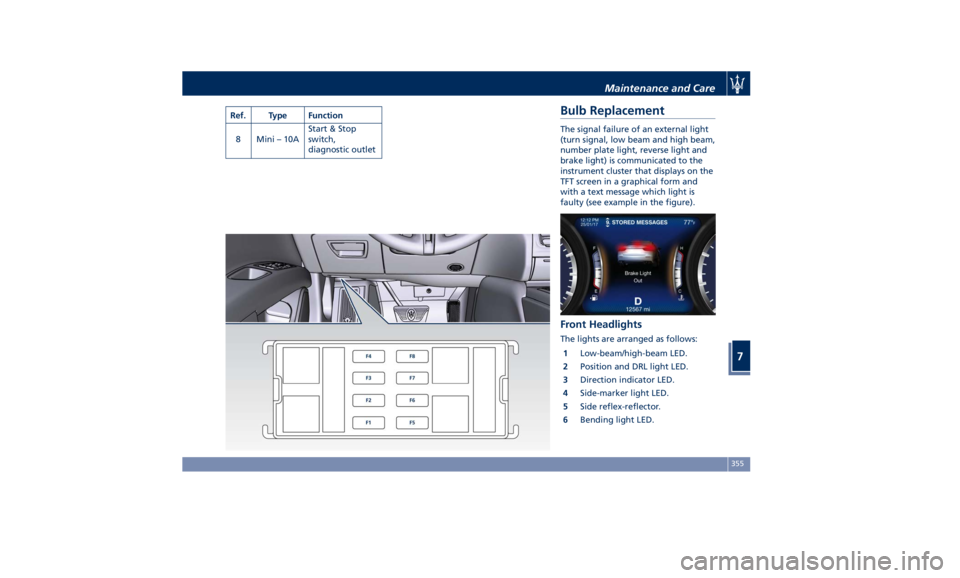
Ref. Type Function
8 Mini – 10A Start & Stop
switch,
diagnostic outlet
Bulb Replacement The signal failure of an external light
(turn signal, low beam and high beam,
number plate light, reverse light and
brake light) is communicated to the
instrument cluster that displays on the
TFT screen in a graphical form and
with a text message which light is
faulty (see example in the figure).
Front Headlights The lights are arranged as follows:
1 Low-beam/high-beam LED.
2 Position and DRL light LED.
3 Direction indicator LED.
4 Side-marker light LED.
5 Side reflex-reflector.
6 Bending light LED.Maintenance and Care
7
355
Page 360 of 396
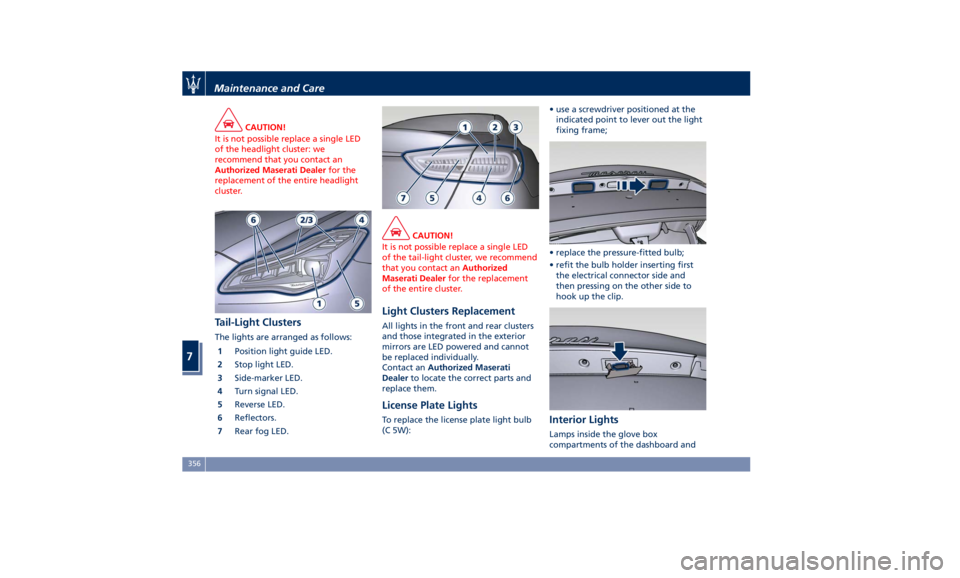
CAUTION!
It is not possible replace a single LED
of the headlight cluster: we
recommend that you contact an
Authorized Maserati Dealer for the
replacement of the entire headlight
cluster.
Tail-Light Clusters The lights are arranged as follows:
1 Position light guide LED.
2 Stop light LED.
3 Side-marker LED.
4 Turn signal LED.
5 Reverse LED.
6 Reflectors.
7 Rear fog LED. CAUTION!
It is not possible replace a single LED
of the tail-light cluster, we recommend
that you contact an Authorized
Maserati Dealer for the replacement
of the entire cluster.
Light Clusters Replacement All lights in the front and rear clusters
and those integrated in the exterior
mirrors are LED powered and cannot
be replaced individually.
Contact an Authorized Maserati
Dealer to locate the correct parts and
replace them.
License Plate Lights To replace the license plate light bulb
(C 5W): • use a screwdriver positioned at the
indicated point to lever out the light
fixing frame;
• replace the pressure-fitted bulb;
• refit the bulb holder inserting first
the electrical connector side and
then pressing on the other side to
hook up the clip.
Interior Lights Lamps inside the glove box
compartments of the dashboard andMaintenance and Care
7
356