warning MAZDA 232 1990 Workshop Manual Suplement
[x] Cancel search | Manufacturer: MAZDA, Model Year: 1990, Model line: 232, Model: MAZDA 232 1990Pages: 677, PDF Size: 61.19 MB
Page 4 of 677
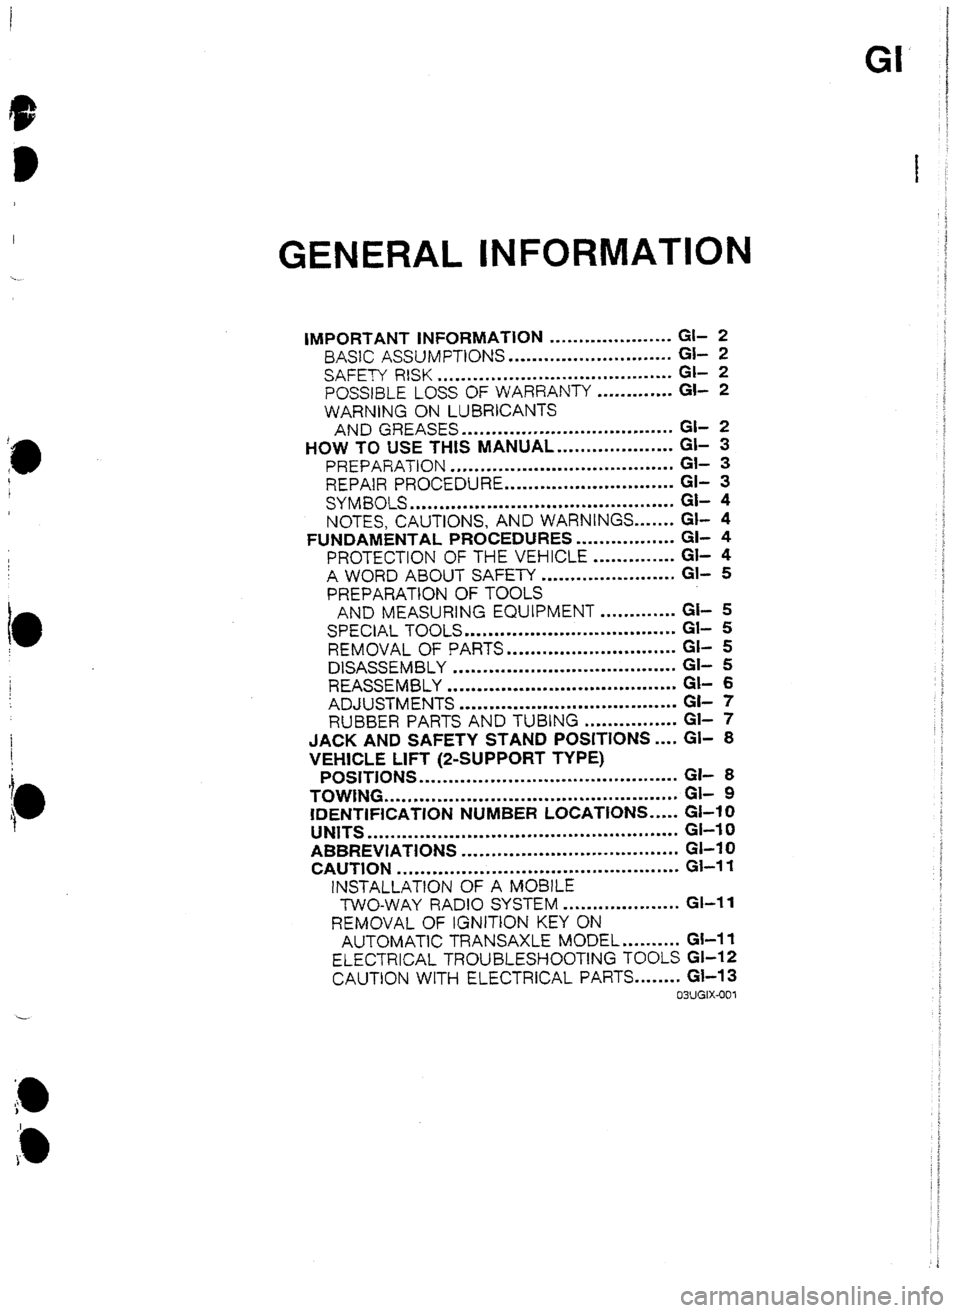
GENERAL INFORMATION
IMPORTANT INFORMATION ..................... GI- 2
BASIC ASSUMPTtONS ............................ a- 2
SAFETY RlSK
........................................ GI- 2
POSSBLE LOSS OF WARRANTY ............. GI- 2
WARNiNF ON LUBRICANTS
AND GREASES .................................... GI- 2
HOW TO USE THIS MANUAL.. .................. Gl- 3
PREPARATION ...................................... Gl- 3
REPAIR PROCEDURE ............................. Gl- 3
SYMBOLS
............................................. a- 4
NOTES, CAUTIONS, AND WARNINGS ....... Gl- 4
FUNDAMENTAL PROCEDURES ................. Gl- 4
PROTECTION OF THE VEHICLE .............. Gi- 4
A WORD ABOUT SAFETY ....................... Gl- 5
PREPARATION OF TOOLS
AND MEASURING EQUIPMENT ............. GI- 5
SPECIAL TOOLS
.................................... Gt- 5
REMOVAL OF PARTS
............................. GI- 5
DISASSEMBLY ...................................... Gi- 5
REASSEMBLY ....................................... Gl- 6
ADJUSTMENTS
..................................... GC- 7
RUBBER PARTS AND TUBING ................ Gl- 7
JACK AN5 SAFETY STAN5 POSITDNS .... Gl- 8
VEHICLE LIFT (Z-SUPPORT TYPE)
POSITIONS ............................................ GI- 8
TOWING .................................................. GL 9
IDENTIFICATION NUMBER LOCATIONS ..... GI-10
UNITS
..................................................... GI-I 0
ABBREVIATIONS ..................................... Gl-I 0
CAUTION ................................................ Gl-I 1
1NSTALLATtON OF A MOBlLE
TWO-WAY RADIO SYSTEM .................... GI-II
REMOVAL OF tGNIT1ON KEY ON
AUTOMATIC TRANSAXLE MODEL .......... Gl-11
ELECTRICAL TROUBLESHOOTlNG TOOLS GI-12
CAUTION WITH ELECTRICAL PARTS ........ Gl-13
03UGIX-001
Page 5 of 677
GI IMPORTANT tNFORMATlUN
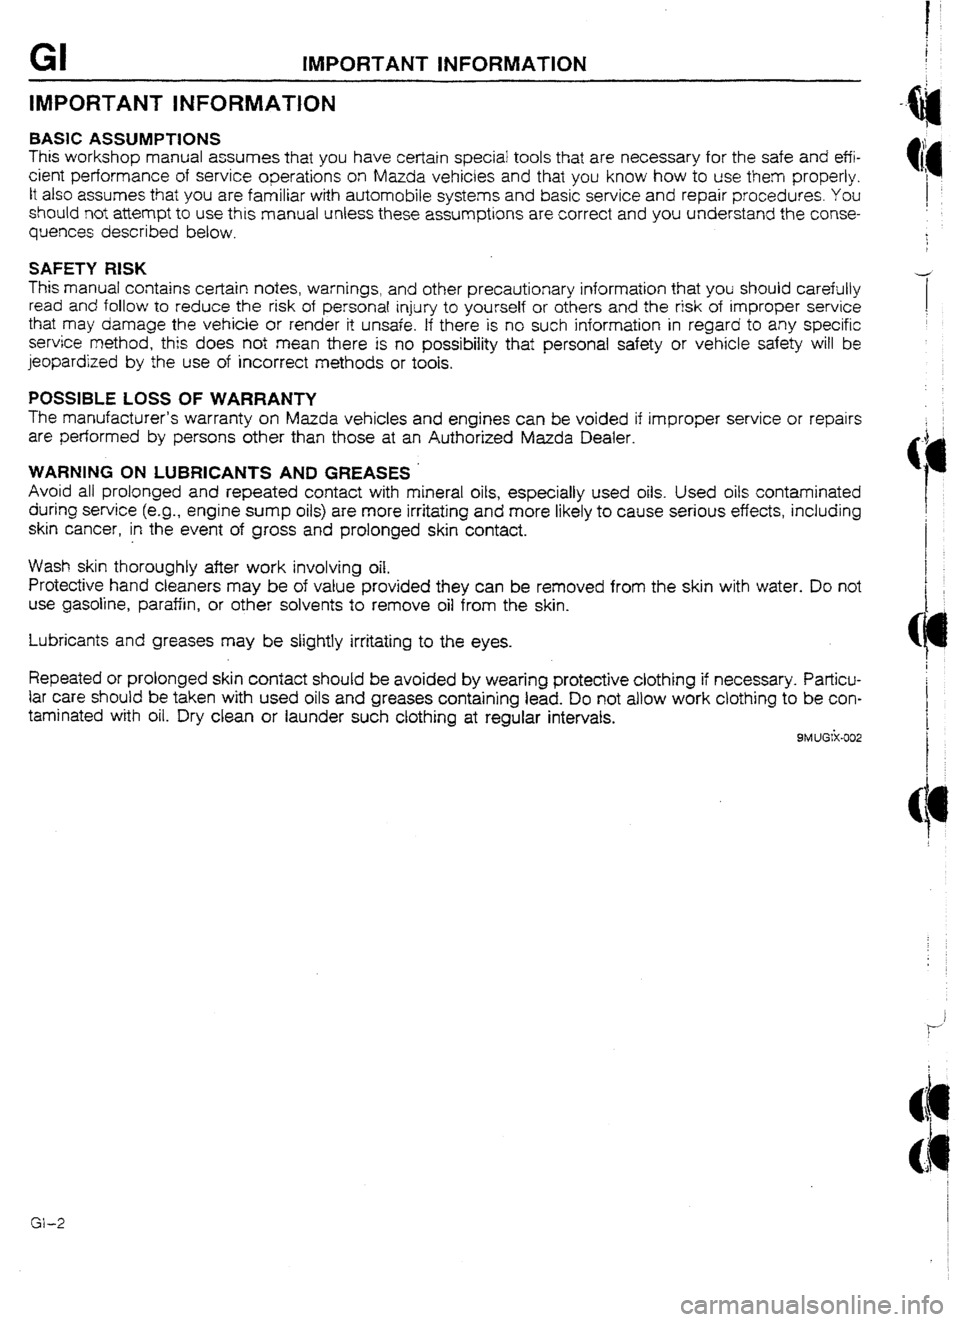
IMPORTANT INFORMATION
1
.ftl
1
BASIC ASSUMPTIONS
This workshop manual assumes that you have certain special tools that are necessary for the safe and effi-
cient performance of service operations on Mazda vehicles and that you know how to use
them properly.
It also assumes that you are familiar with automobile
systems and basic service and repair procedures. You
should
not attempt to use this manual unless these assumptions are correct and you understand the conse-
quences described below.
SAFETY RlSK
This manual contains certain notes, warnings, and other precautionary information that you should carefully
read and follow to reduce the risk of personal injury to yourself or others and the risk of improper service
that may damage the vehicle
or render it unsafe. If there is no such information in regard to any specific
service method, this does not mean there is no possibility that personal safety or vehicle safety will be
jeopardized by the use of incorrect methods or toots.
POSSIBLE LOSS OF WARRANTY
The manufacturer’s warranty on Mazda vehicles and engines can be voided if improper service or repairs
are performed by persons other than those at an Authorized Mazda Dealer.
WARNING ON LUBRICANTS AND GREASES ’
Avoid all prolonged and repeated contact with mineral oils, especially used oils. Used 08s contaminated
during service (e.g., engine sump oils) are more irritating and more likely to cause serious effects, including
skin cancer, in the event of gross and prolonged skin contact.
Wash skin thoroughly after work involving oil.
Protective hand cleaners may be of value provided they can be removed from the skin with water. Do not
use gasoline, paraffin, or other solvents to remove oil from the skin.
Lubricants and greases may be slightly irritating to the eyes.
Repeated or prolonged skin contact should be avoided by wearing protective clothing if necessary. Particu-
lar care should be taken with used oils and greases containing lead. Do not allow work clothing to be con-
taminated with oil. Dry clean or launder such clothing at regular intervafs.
9MUGiX-502
Page 7 of 677
GI HOW TO USE -MS lVlANUAL/FUNDAMENTAL PROCEDURES
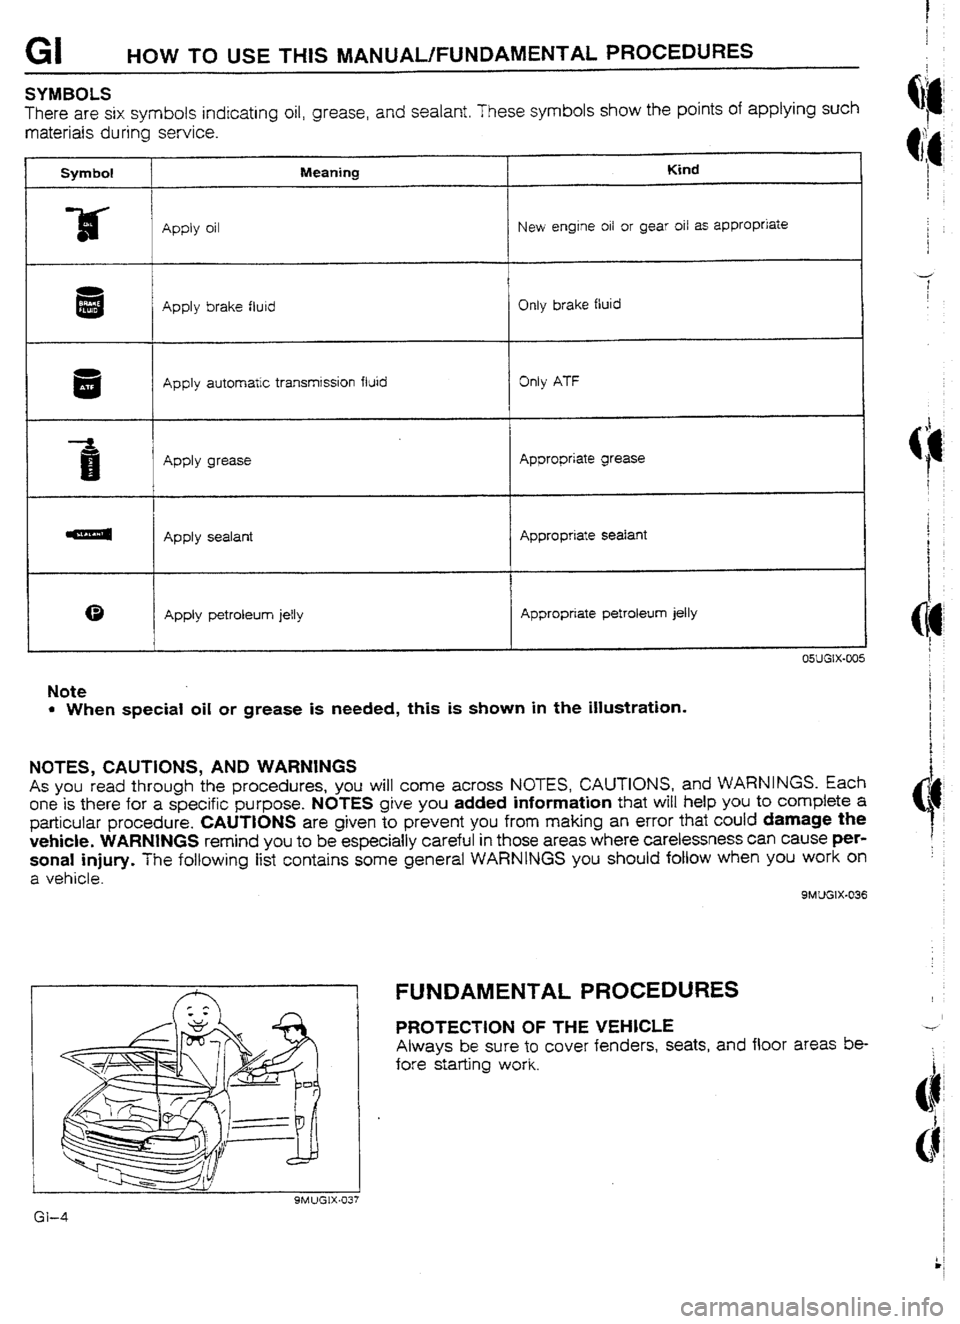
SYMBOLS
There are six symbols indicating oil, grease, and sealant.
These symbols show the points of applying such
materials during service.
Symbol
It Meaning Kind
I
Apply oil New engine
oil or gear oil as appropriate
Apply brake fluid Only brake fluid
Apply automatic
transmission fluid
Apply grease Only ATF
Appropriate grease
Appty sealant Appropriate sealant
m
0 Apply petroleum jelty Appropriate petroleum jelly
Note
l When special oil or grease is needed, this is shown in the illustration.
NOTES, CAUTIONS, AND WARNINGS
As you read through the procedures, you will come across NOTES, CAUTIONS, and WARNINGS. Each
one is there for a specific purpose. NOTES give you added information that will help you to complete a
particular procedure. CAUTlUNS are given to prevent you from making an error that could damage the
vehicle. WARNINGS remind you to be especially careful in those areas where carelessness can cause per-
sona! injury. The foliowing list contains some general WARNINGS you should follow when you work on
a vehicle.
9MUGlX-036
FUNDAMENTAL PROCEDURES
PROTECTON OF THE VEHICLE
Always be sure to cover fenders, seats, and floor areas be-
fore starting work.
Page 21 of 677
A PRE-DELIVERY INSPECTION
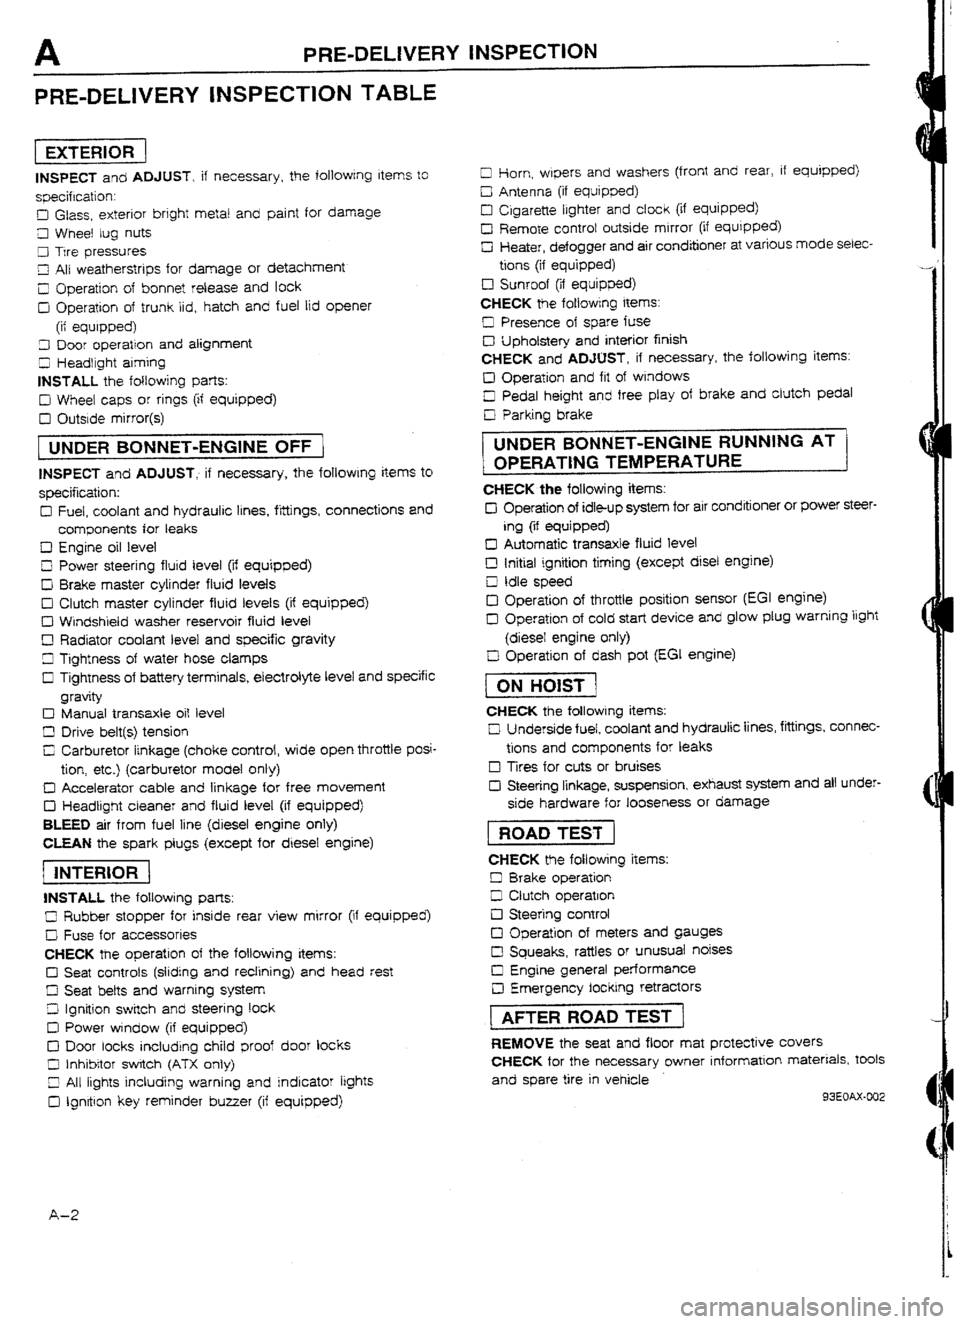
PRE-DELIVERY INSPECTION TABLE
pieziG-
INSPECT and ADJUST, if necessary, the following Items to
specification:
D Glass, exterior bright metal and paint for damage
Cl Wheel tug nuts
9 Trre pressures
LII All weatherstrips for damage or detachment
Z Operation of bonnet release and lock
D Operation of trunk lid, hatch and fuel lid opener
(it equipped)
3 Door operation and alignment
5 Headlight aiming
INSTALL the following parts:
D Wheel caps or rings (if equipped)
D Outside mirror(s)
[ UNDER BONNET-ENGINE OFF )
INSPECT and ADJUST, if necessary, the foIlowIng items to
specification:
Cl Fuel, coolant and hydraulrc lines, fittings, connections and
components for leaks
Cl Engine oil level
0 Power steering fluid level (if equipped)
D Brake master cylinder fluid levels
0 Clutch master cylinder fluid levels (if equipped) q
Windshield washer reservoir fluid level
D Radiator coolant level and specific gravity
Ll Tightness of water hose clamps
I3 Tightness of battery terminals, electrolyte level and specific
gravity
c) Manual transaxle oit level
D Drive belt(s) tension
C; Carburetor linkage (choke control, wide open throttle posi-
tion, etc.) (carburetor model only)
D Accelerator cable and linkage for free movement
D Headlight cleaner and fluid level (if equipped)
BLEED air from fuel line (diesel engine only)
CLEAN the spark plugs (except for diesef engine)
piicis-1
INSTALL the foflowing parts:
C Rubber stopper for inside rear view mirror (if equipped)
c! Fuse for accessories
CHECK the operation of the following items:
Cl Seat controls (sliding and redining) and head rest
ci Seat belts and warnrng system
Z! Ignition swrtch and steering lock
III Power window {if equipped)
0 Door locks including child proof door locks
0 Inhibitor switch
(ATX only)
Z All lights including warning and indicator lights
0 Ignrtron key reminder buyer (if equipped) Cl Horn, wipers and washers (front and rear, if equipped)
D Antenna (if equipped} q
Cigarette lighter and clock (if equipped)
I2 Remote controt outside mirror
(if equipped) q
Heater, defogger and air conditioner at various mode selec-
tions (if equipped)
c3 Sunroof (if equipped)
CHECK
the fotiowing items: q
Presence of spare fuse
c3 Upholstery and interior finish
CHECK and ADJUST, if necessary, the following items:
Cl Operation and fit of windows
D Pedal height and free ptay of brake and clutch pedal
Cl Parking brake
i UNDER BONNET-ENGtNE RUNNING AT ]
1 OPERATtNG TEMPERATURE
CHECK the following items:
Cl Operation of idle-up system for air conditioner or power steer-
ing (if equipped)
13 Automatic transaxle fluid level
D Initial ignition timing
(except disel engine) q
Idle speed
El Operation of throttle position sensor (EGI engine)
13 Operation of cold start device and glow plug warning light
(diesel engine only)
D Operation of dash pot [EGI engine)
t
ON HOtST 1
CHECK the following items:
U Underside fuel, coolant and hydraulic lines, fittings, connec-
tions and components for leaks q
Tires for cuts or bruises
Cl Steering linkage, suspension, exhaust system and all under-
side hardware for
looseness or damage
1 ROAD TEST 1
CHECK the foliowing items:
II Brake operation
D Clutch operation
0 Steering control
c3 Operation of meters and gauges
0 Squeaks, rattles or unusual noises q
Engine general performance
c3 Emergency Iocking retractors
rAFTER ROAD TEST 1
REMOVE the seat and floor mat protective covers
CHECK for the necessary
owner information materials, tools
and spare tire in vehicle
93EOAX-002
A-2
Page 35 of 677
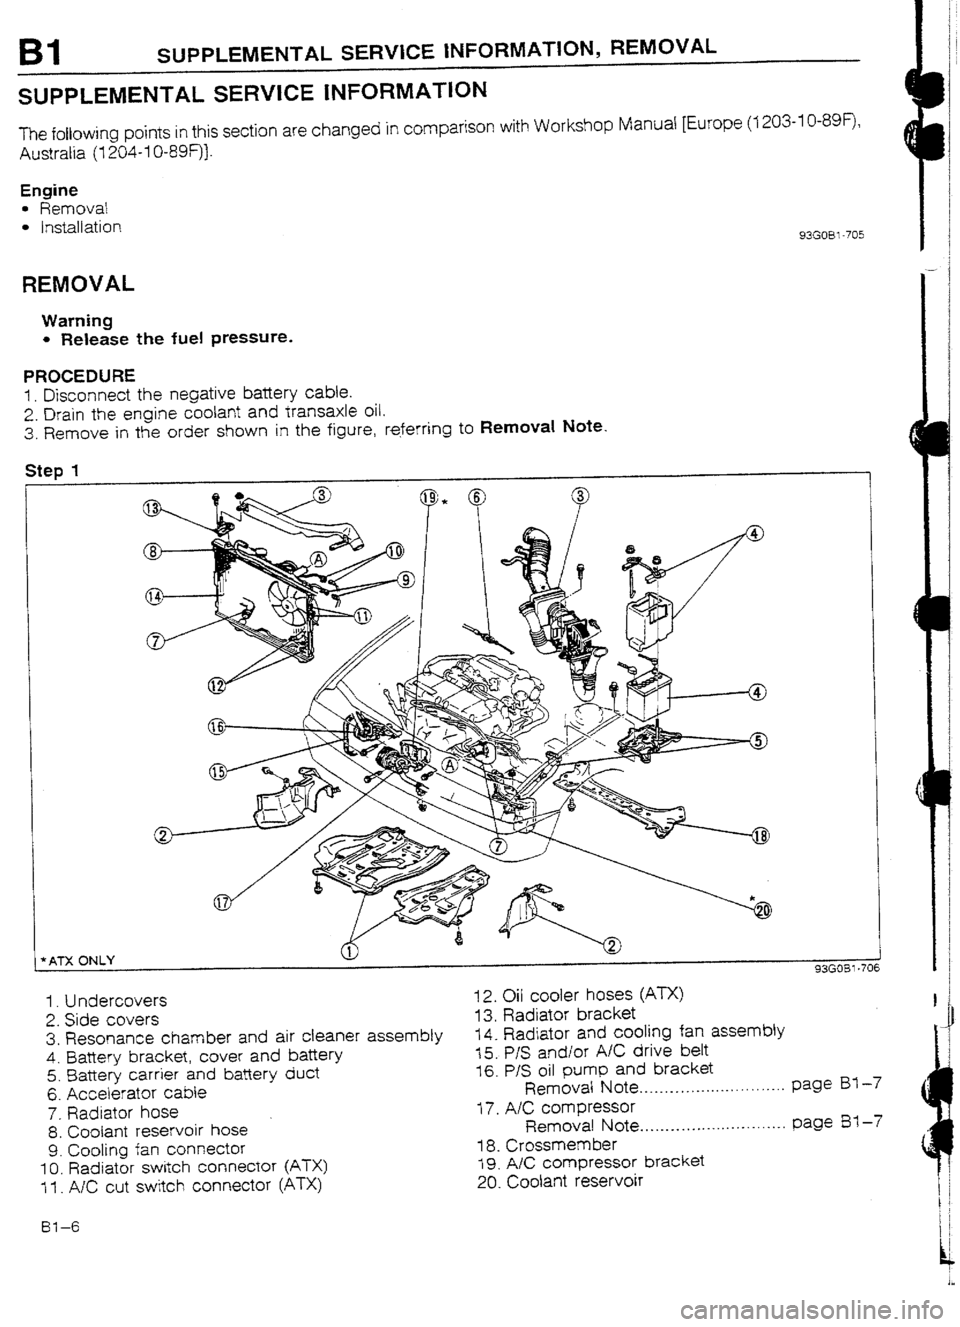
Bl SUPPLEMENTAL SERVICE tNFORMAT1ON, REMOVAL
SUPPLEMENTAL SERVICE INFORMATION
The following points in this section are changed in comparison with Workshop Manual [Europe (I 203-I U-89F),
Australia (1204- 1 O-89!=)].
Engine
l Removal
l Installation 93GOF31-705
REMOVAL
Warning
w Release the fuel pressure.
PROCEDURE
1. Disconnect the negative battery cable.
2. Drain the engine coolant and transaxle oil.
3. Remove in the order shown in the figure, referring to Removal Note.
Step 1
t
I
*ATX ONLY 1
93GOBl-706
1. Undercovers
2. Side covers
3. Resonance chamber and air cleaner assembly
4. Battery bracket, cover and bafiery
5. Battery carrier and battery duct
6. Accelerator cable
7. Radiator hose
8. Coolant reservoir hose
9. Cooling fan connector
IO. Radiator switch connector (ATX)
1 f . A/C cut switch connector (ATX) 12. Oil cooler hoses (ATX)
13. Radiator bracket
14. Radiator and cooling fan assembly
15. P/S and/or A/C drive belt
16. P/S oil pump and bracket
Removal Note .._...._...__......... . . . . . . . page BY -7
17. A/C compressor
Removal Note.. . . . . . . . . . . . . . .._. . . . . . . . ._. page Es1 -7
i 8. Crossmem ber
19. A/C compressor bracket
20. Coolant reservoir
61-6
Page 37 of 677
Bl REMOVAL
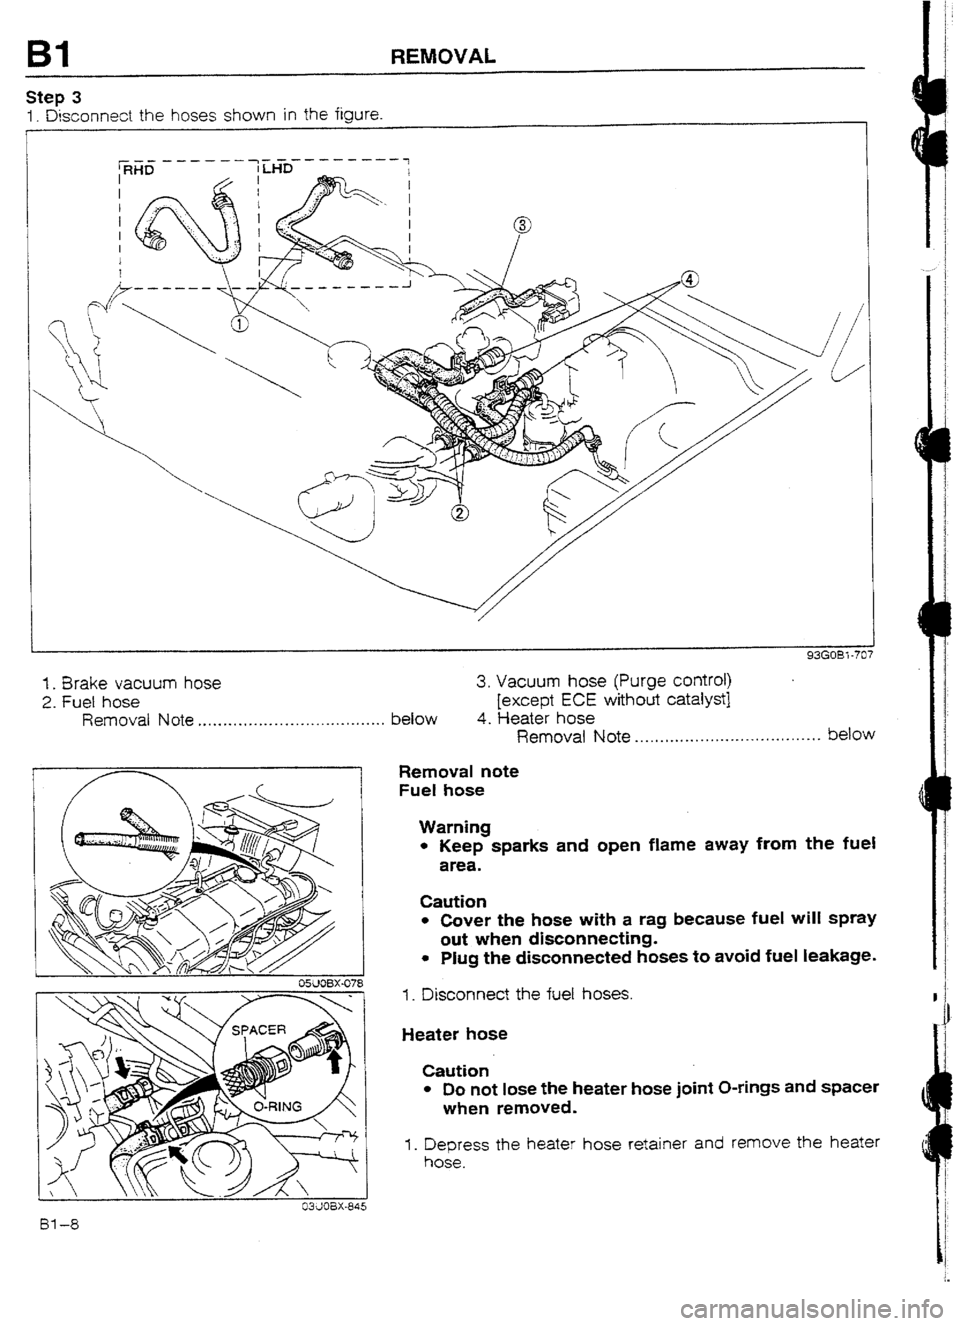
Step 3
1. Disconnect the hoses shown in the figure.
I
-----a _--w---
/
/I /
ti
93GOB7 -707
1. Brake vacuum hose 3. Vacuum hose (Purge control)
2. Fuel hose [except ECE without catalyst]
Removal Note . . . . . . . . . .*a . . . . . . . . *.* . . . . . . . . . . a-.. below 4. Heater hose
OWOBX-078
Removal Note *...,.....*............-.I..*.*.*.-*- below
Removal note
Fuel hose
Warning
l Keep sparks and open flame away from the fuel
area.
Caution
l Cover the hose with a rag because fuel will spray
out when disconnecting.
l Plug the disconnected hoses to avoid fuel leakage.
1. Disconnect the
fuel hoses.
Heater hose
Caution
l Do not lose the heater hose joint O-rings and spacer
when removed.
1. Depress the heater hose retainer and remove the heater
hose.
Page 44 of 677
INSTALLATlON ES1
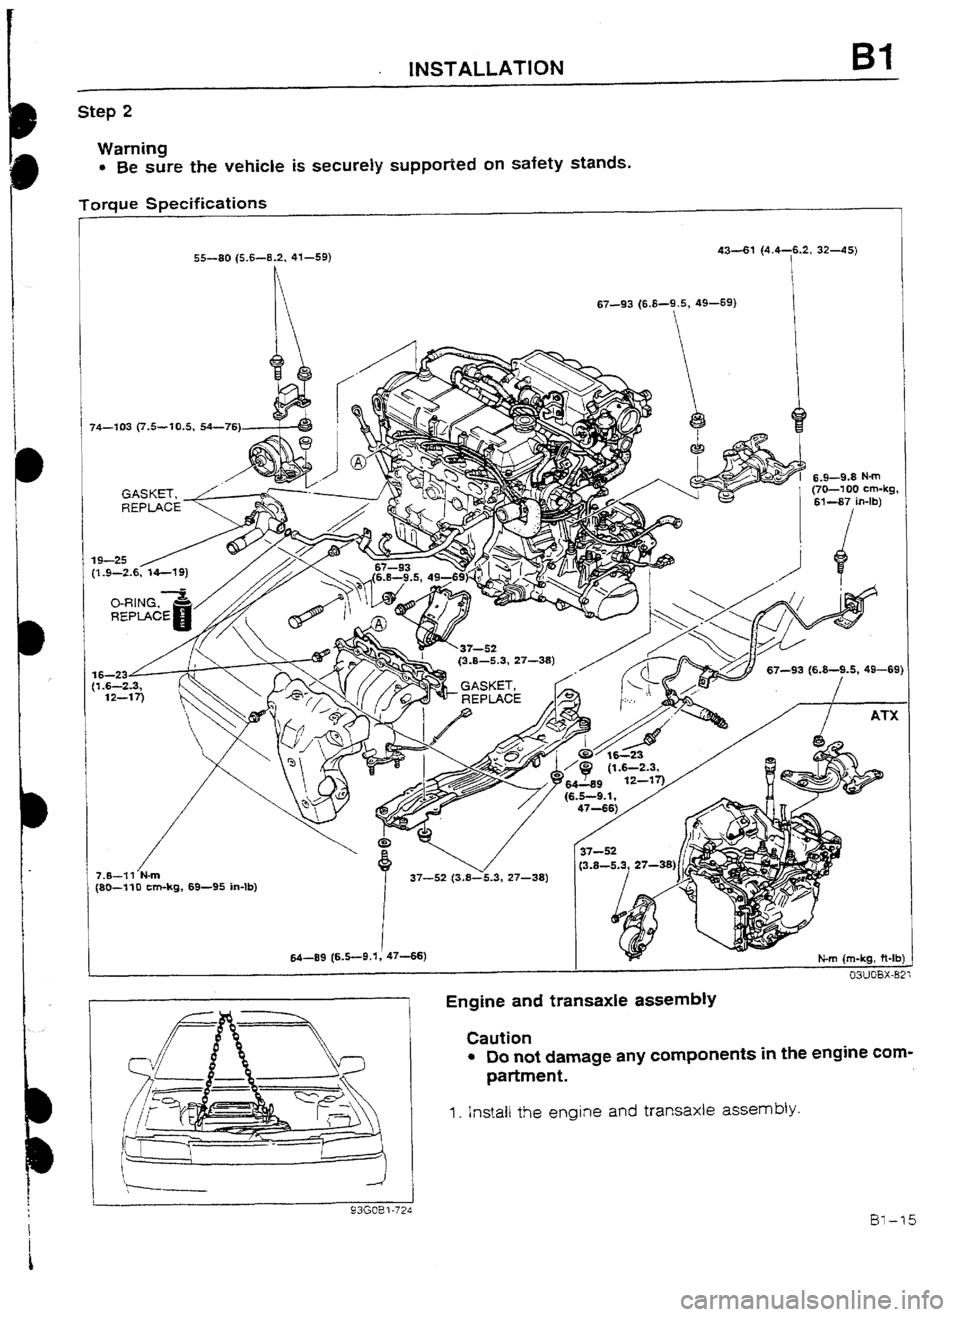
Step 2
Warning
l Be sure the vehicle is securely suppofied on safety stands.
Torque Specifications
I
I i 74-103 (7.5--10.5, 54-76)
/ 7.8-?I N-m
(80--flO cm-kg, 69-95 in-lb) 55-80 (5.fG-8.2, 41-59) 43-61 (4.4-6.2, 32-45)
I
1
I 64-89 (6.5-9.1, 4746) 67-93 (6.8-9.5, 49-69)
7 37-5x 27-38)
Engine and transaxle assembly
Caution
l Do not damage any components in the engine com-
partment.
1. Install the engine and transaxle assembly.
Page 65 of 677
B2 REMOVAL
REMOVAL
Warning
l Release the fuel pressure. (Refer to Section FZ.)
PROCEDURE
i. Disconnect the negative battery cable.
2. Drain the engine coolant and transaxle oil.
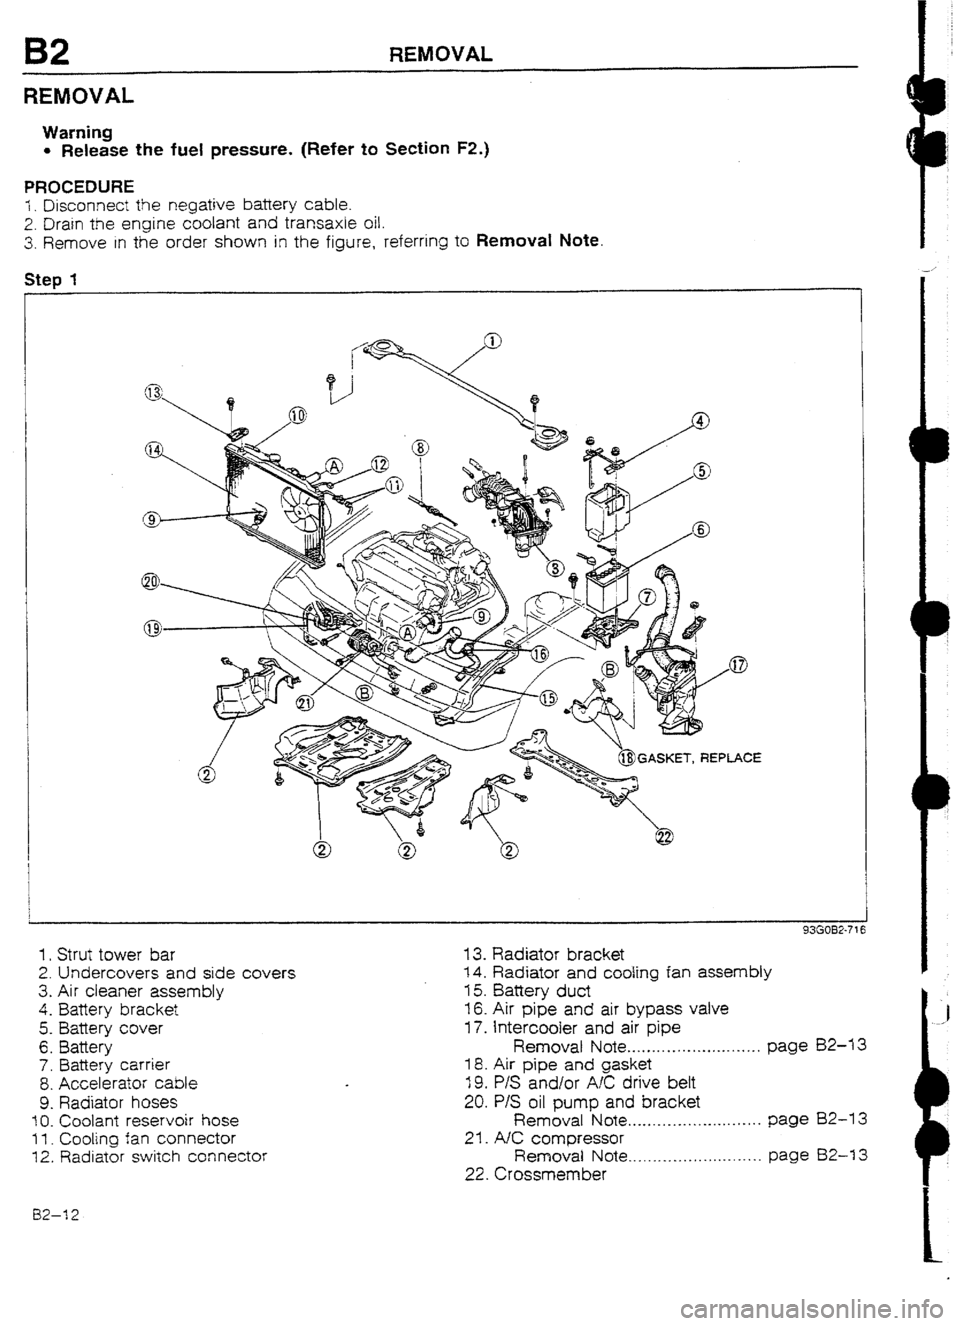
3. Remove in the order shown in the figure, referring to Removaf Note
Step 1
1. Strut tower bar
2. Undercovers and side covers
3. Air cleaner assembly
4.
Battery bracket
5. Battery cover
6. Battery
7. Battery carrier
8. Accelerator cable
9. Radiator hoses
10. Coolant reservoir hose
f I. Cooling fan connector
12. Radiator switch connector
13. Radiator bracket
14. Radiator and coofing fan assembly
15. Battery duct
16. Air pipe and air bypass valve
17. Intercooler and air pipe
Removat Note . . . . . . . . . . . . .._.. m _._._..., page 82-U
18. Air pipe and gasket
19. P/S and/or AK drive bett
20. P/S oil pump and bracket
Removal Note . . . . .._.__.....~..~........ page BZ-13
21. A/C compressor
Removal Note . . . . . .._................... page 82-I 3
22. Crossmember
02-12
Page 68 of 677

REMOVAL B2
_. OWOBX-07I
03UOBX-845
SteD 4 Removal note
Fuel hose
Warning
l Keep sparks and open flame away from the fue!
area.
Caution
l Cover the hose with a rag because fuel will spray
out when disconnecting.
l Plug the disconnected hoses to avoid fuel leakage-
1. Disconnect the fuel hoses.
Heater hose
Caution
l Do not lose the heater hose joint O-rings and spacer
when removed.
1. Depress the heater hose retainer and remove the heater
hose.
GASKET, REP
OTTER PIN, REPU\CE
91Gr-P7-771 J
-.,-1w- IL .
1. Speedometer cable 6. Driveshafts
2. Select and shift cables Removal Note ._.....*., * . . ..- *...- I..... page BZ-16
3. Front exhaust pipe 7. Propeiler shaft
4. Stabilizer Removal Note . . . . . . . _ . , . . . _. . . . . . . . . _. . . . . page L- 5
5. Tie-rod end
Removal Note . . . . . . . . . . . . . . . . . . . . . . . .._. page BZ-16
B2-15
Page 77 of 677
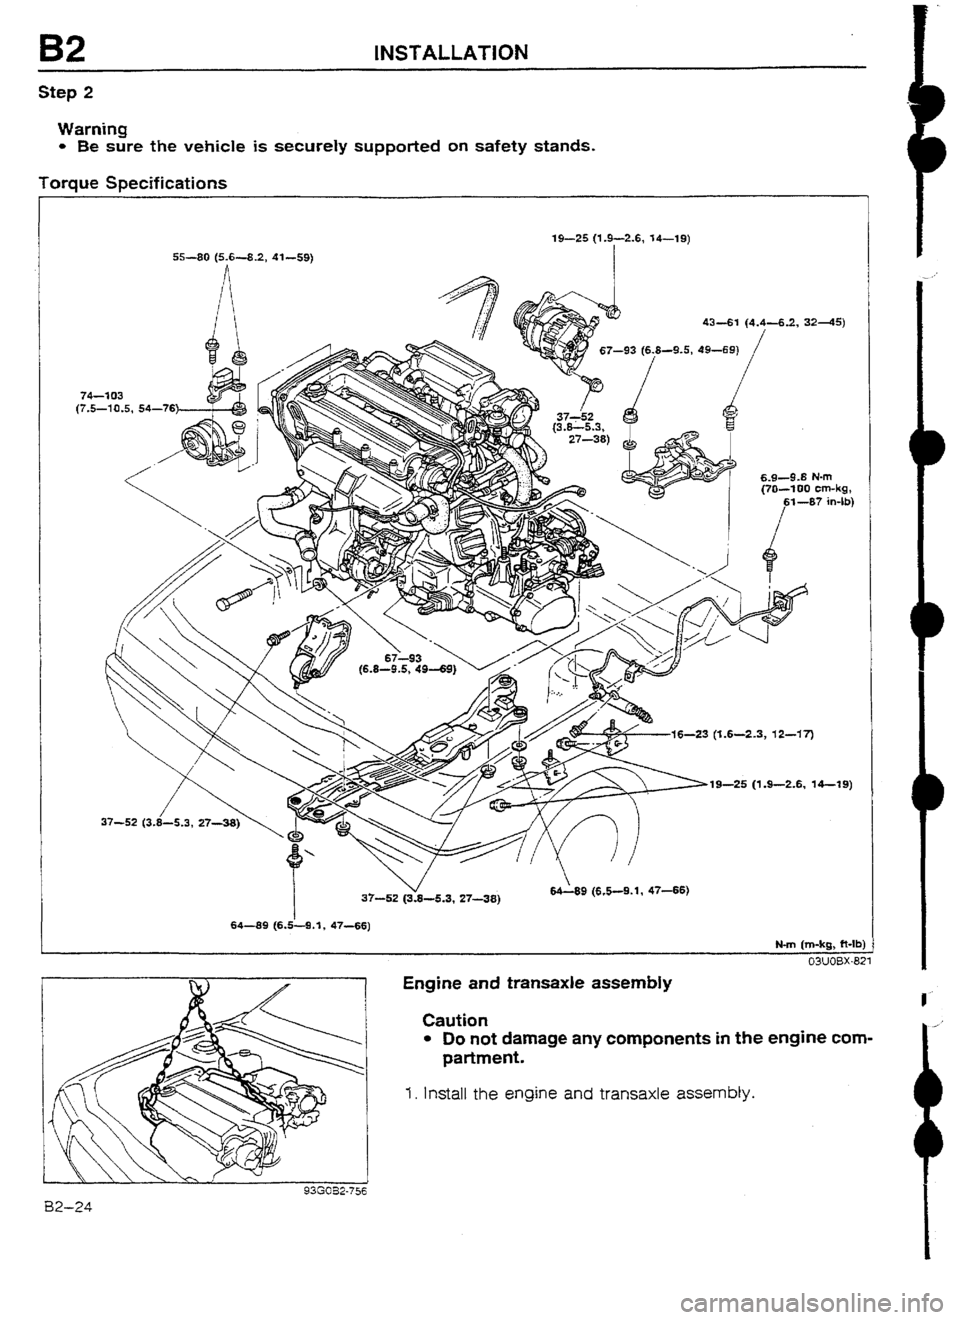
B2 INSTALLATION
Step 2
Warning
l Be sure the vehicle is securely supported on safety stands.
Torque Specifications
19-S (1.9-2.6, 14-l 9)
55-99 (5.6-8.2, 41-59)
I
74-2 03
(7,5-10.5, 54-76
6.9-9.8 N-m
16-23 (T.6-2.3, 12-17)
19-26 (1.9-2.6, 14-l 9)
9 (6.5-9.1, 4766)
64-89 (6.&9.*, 47-56)
Engine and transaxle assembly
Caution
l Do not damage any camponents in the engine com-
partment.
I. Install the engine and transaxle assembly.
93G052-756 B2-24