torque MAZDA 6 2002 Workshop Manual Suplement
[x] Cancel search | Manufacturer: MAZDA, Model Year: 2002, Model line: 6, Model: MAZDA 6 2002Pages: 909, PDF Size: 17.16 MB
Page 770 of 909

R–8
WHEEL ALIGNMENT
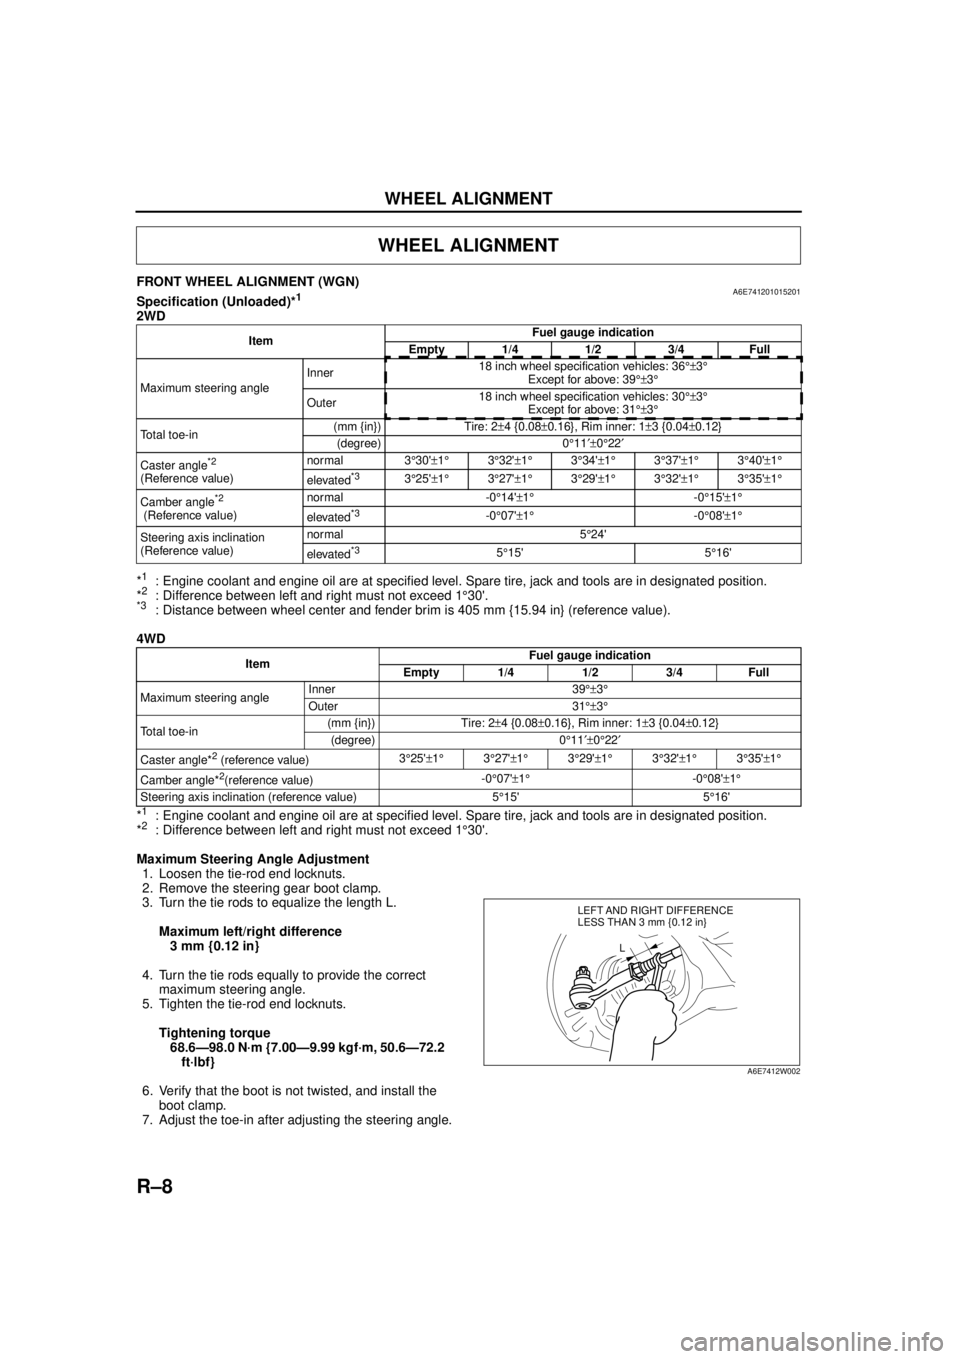
FRONT WHEEL ALIGNMENT (WGN)A6E741201015201Specification (Unloaded)*1
2WD
*
1: Engine coolant and engine oil are at specified level. Spare tire, jack and tools are in designated position.
*2: Difference between left and right must not exceed 1 °30'.*3: Distance between wheel center and fender brim is 405 mm {15.94 in} (reference value).
4WD
*
1: Engine coolant and engine oil are at specified level. Spare tire, jack and tools are in designated position.
*2: Difference between left and right must not exceed 1 °30'.
Maximum Steering Angle Adjustment 1. Loosen the tie-rod end locknuts.
2. Remove the steering gear boot clamp.
3. Turn the tie rods to equalize the length L.
Maximum left/right difference3 mm {0.12 in}
4. Turn the tie rods equally to provide the correct maximum steering angle.
5. Tighten the tie-rod end locknuts.
Tightening torque68.6—98.0 N·m {7.00—9.99 kgf·m, 50.6—72.2 ft·lbf}
6. Verify that the boot is not twisted, and install the boot clamp.
7. Adjust the toe-in after adjusting the steering angle.
WHEEL ALIGNMENT
Item Fuel gauge indication
Empty 1/4 1/2 3/4 Full
Maximum steering angle Inner
18 inch wheel specification vehicles: 36
°±3°
Except for above: 39 °±3°
Outer 18 inch wheel specification vehicles: 30
°±3°
Except for above: 31 °±3°
Total toe-in (mm {in}) Tire: 2
±4 {0.08 ±0.16}, Rim inner: 1 ±3 {0.04 ±0.12}
(degree) 0 °11 ′±0°22 ′
Caster angle
*2
(Reference value) normal 3
°30' ±1 ° 3°32' ±1 ° 3°34' ±1° 3°37' ±1° 3°40' ±1 °
elevated*33 °25' ±1 ° 3°27' ±1 ° 3°29' ±1° 3°32' ±1° 3°35' ±1 °
Camber angle
*2
(Reference value) normal -0
°14' ±1 ° -0°15' ±1°
elevated*3-0 °07' ±1 ° -0°08' ±1°
Steering axis inclination
(Reference value) normal 5
°24'
elevated
*35 °15' 5 °16'
Item Fuel gauge indication
Empty 1/4 1/2 3/4 Full
Maximum steering angle Inner 39
°±3°
Outer 31 °±3°
Total toe-in (mm {in}) Tire: 2
±4 {0.08 ±0.16}, Rim inner: 1 ±3 {0.04 ±0.12}
(degree) 0 °11 ′±0°22 ′
Caster angle*
2 (reference value) 3
°25' ±1 ° 3°27' ±1 ° 3°29' ±1 ° 3°32' ±1 ° 3°35' ±1 °
Camber angle*
2(reference value) -0
°07' ±1 ° -0°08' ±1°
Steering axis inclination (reference value) 5 °15' 5 °16'
LEFT AND RIGHT DIFFERENCE
L
LESS THAN 3 mm {0.12 in}
A6E7412W002
Page 771 of 909

WHEEL ALIGNMENT
R–9
R
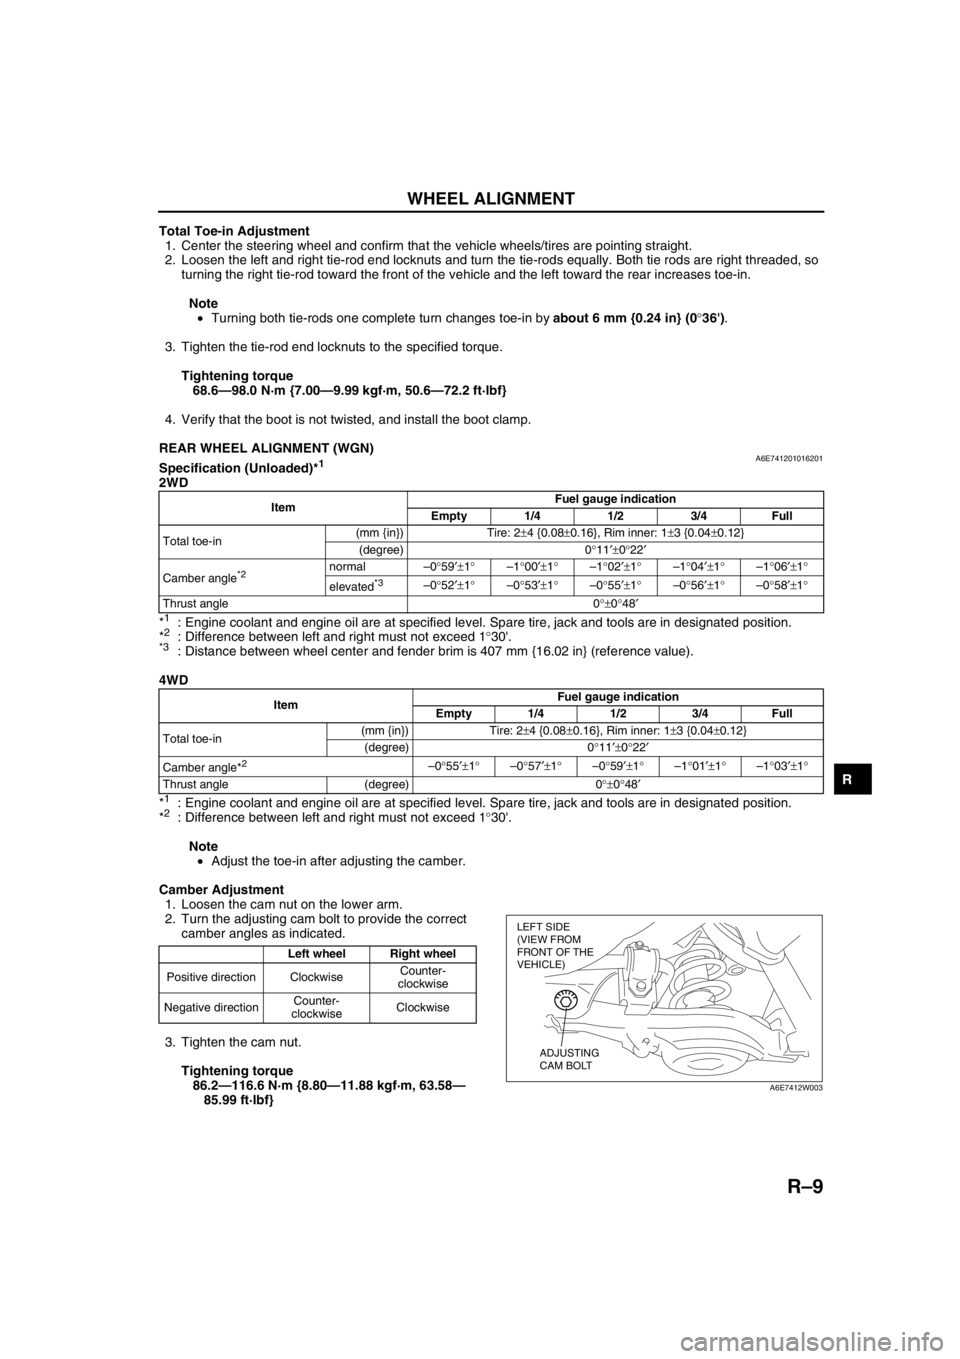
Total Toe-in Adjustment
1. Center the steering wheel and confirm that the vehicle wheels/tires are pointing straight.
2. Loosen the left and right tie-rod end locknuts and turn the tie-rods equally. Both tie rods are right threaded, so
turning the right tie-rod toward the front of the vehicle and the left toward the rear increases toe-in.
Note
•Turning both tie-rods one complete turn changes toe-in by about 6 mm {0.24 in} (0°36').
3. Tighten the tie-rod end locknuts to the specified torque.
Tightening torque
68.6—98.0 N·m {7.00—9.99 kgf·m, 50.6—72.2 ft·lbf}
4. Verify that the boot is not twisted, and install the boot clamp.
End Of Sie
REAR WHEEL ALIGNMENT (WGN)A6E741201016201Specification (Unloaded)*1
2WD
*
1: Engine coolant and engine oil are at specified level. Spare tire, jack and tools are in designated position.
*2: Difference between left and right must not exceed 1°30'.*3: Distance between wheel center and fender brim is 407 mm {16.02 in} (reference value).
4WD
*
1: Engine coolant and engine oil are at specified level. Spare tire, jack and tools are in designated position.
*2: Difference between left and right must not exceed 1°30'.
Note
•Adjust the toe-in after adjusting the camber.
Camber Adjustment
1. Loosen the cam nut on the lower arm.
2. Turn the adjusting cam bolt to provide the correct
camber angles as indicated.
3. Tighten the cam nut.
Tightening torque
86.2—116.6 N·m {8.80—11.88 kgf·m, 63.58—
85.99 ft·lbf}
ItemFuel gauge indication
Empty 1/4 1/2 3/4 Full
Total toe-in(mm {in}) Tire: 2±4 {0.08±0.16}, Rim inner: 1±3 {0.04±0.12}
(degree) 0°11′±0°22′
Camber angle
*2 normal–0°59′±1°–1°00′±1°–1°02′±1°–1°04′±1°–1°06′±1°
elevated
*3–0°52′±1°–0°53′±1°–0°55′±1°–0°56′±1°–0°58′±1°
Thrust angle 0°±0°48′
ItemFuel gauge indication
Empty 1/4 1/2 3/4 Full
Total toe-in(mm {in}) Tire: 2±4 {0.08±0.16}, Rim inner: 1±3 {0.04±0.12}
(degree) 0°11′±0°22′
Camber angle*
2 –0°55′±1°–0°57′±1°–0°59′±1°–1°01′±1°–1°03′±1°
Thrust angle (degree) 0°±0°48′
Left wheel Right wheel
Positive direction ClockwiseCounter-
clockwise
Negative directionCounter-
clockwiseClockwise
LEFT SIDE
(VIEW FROM
FRONT OF THE
VEHICLE)
ADJUSTING
CAM BOLT
A6E7412W003
Page 772 of 909

R–10
WHEEL ALIGNMENT
Total Toe-in Adjustment
1. Loosen the locknut of the lateral link.
2. Adjust the toe-in turning the adjusting link.
Specification
Total Toe-in: 2±4 mm {0.08±0.16 in}
Note
•Toe change amount: 0°43′ / one rotation
3. Tighten the locknut.
Tightening torque
68.6—98.1 N·m {7.0—10.0 kgf·m, 50.6—72.3
ft·lbf}
End Of Sie
A6E7412W004
A6E7412W005
A6E7412W004
Page 778 of 909

R–16
REAR SUSPENSION
Bolt (Trailing Link Front Side) Removal Note
1. Support the trailing link with a jack.
Caution
•Removing the trailing link is dangerous.
The trailing link could fall and cause
serious injury or death. Verify that the
jack securely supports the trailing link.
2. Remove the bolts (trailing link front side).
Bolt (Lateral Link Outer Side) Removal Note
1. Loosen the bolt (lateral link inner side).
2. Remove the bolt (lateral link outer side).
Bolt (Lateral Link Outer Side) Installation Note
1. Tighten the bolt (lateral link outer side).
2. Tighten the bolt (lateral link inner side).
Tightening torque
86.2—116.6 N·m {8.80—11.88 kgf·m, 63.58—85.99 ft·lbf}
Bolt (Trailing Link Front Side) Installation Note
1. Support the trailing link with a jack.
2. Tighten the bolts (trailing link front side).
End Of SieREAR CROSSMEMBER REMOVAL/INSTALLATION (4WD)A6E741628400201
Caution
•Performing the following procedures without first removing the ABS wheel-speed sensor may
possibly cause an open circuit in the harness if it is pulled by mistake. Before performing the
following procedures, remove the ABS wheel-speed sensor (axle side) and fix it to an appropriate
place where the sensor will not be pulled by mistake while servicing the vehicle.
1. Remove the rear auto leveling sensor and harness.
(See T–20 REAR AUTO LEVELING SENSOR REMOVAL/INSTALLATION.)
2. Remove the middle pipe.
(See F1–30 EXHAUST SYSTEM REMOVAL/INSTALLATION.)
3. Remove in the order indicated in the table.
4. Install in the reverse order of removal.
5. Adjust the headlight zeroset.
6. Inspect the rear wheel alignment.
(See R–9 REAR WHEEL ALIGNMENT (WGN).)
JACK
A6E74162010
JACK
A6E74162010
Page 815 of 909

T–4
MULTIPLEX COMMUNICATION SYSTEM
SYSTEM WIRING DIAGRAMA6E811155430203
.
End Of SieCAN SIGNAL-CHARTA6E811155430204
OUT: Output (sends signal)
IN: Input (receives signal)
1
2
67
3
8
4
5
ROAF AG
HG
2M2J2W
2X
9
10
CAN_L
CAN_H
A6E81111102
1PCM
2 DSC HU/CM (with DSC)
3 ABS (ABS/TCS) HU/CM (with ABS (ABS/TCS))
4 Data link connector-2
5 Instrument cluster
6 TCM (JA5AX-EL)7 4WD control module (4WD)
8Twist pair
9 2R (except MZR-CD (RF Turbo))
39 (MZR-CD (RF Turbo))
10 2U (except MZR-CD (RF Turbo))
13 (MZR-CD (RF Turbo))
SignalMultiplex module
PCM TCMABS (ABS/TCS)
HU/CM or
DSC HU/CM4WD control
moduleInstrument
cluster
Accelerator pedal position
(MZR-CD (RF Turbo))OUT IN IN–IN
Air induction type OUT–IN––
ATF temperature IN OUT–––
AT warning light conditions
(JA5AX-EL)IN OUT––IN
Battery reconnection
(except MZR-CD (RF
Turbo))OUT IN–––
Brake system configuration
(EBD/ABS/TCS/DSC)IN–OUT–IN
Brake system
statusABS IN–OUT––
EBD/ABS/
TCS/DSC––OUT IN IN
Brake system warning light
conditions (brake fluid level
sensor)––IN–OUT
Country OUT–IN––
Coupling torque (with
DSC)––IN OUT–
Coupling torque request
(with DSC)––OUT IN–
Page 816 of 909

MULTIPLEX COMMUNICATION SYSTEM
T–5
T
End Of Sie
Cruise main indicator light
conditions (MZR-CD (RF
Turbo))OUT–––IN
Cruise set indicator light
conditions (MZR-CD (RF
Turbo))OUT–––IN
Desired gear/
selector lever
positionFN4A-EL OUT–IN–IN
JA5AX-EL IN OUT IN IN IN
ECT OUT IN–IN
Engine control condition OUT–IN––
Engine displacement OUT–IN––
Engine loss torque (except
MZR-CD (RF Turbo))OUT IN–––
Engine speed OUT IN IN IN IN
Engine torque (except
MZR-CD (RF Turbo))OUT IN–––
Fuel injection information OUT–IN––
Fuel type and delivery OUT–IN––
Gear position IN OUT IN IN IN
Generator warning light
conditions (except MZR-
CD (RF Turbo))OUT–––IN
Glow indicator light
condition (MZR-CD (RF
Turbo))OUT–––IN
HOLD indicator light
conditions (FN4A-EL)OUT–––IN
Idle speed up request IN OUT–––
MIL condition (except
MZR-CD (RF Turbo))OUT–––IN
MIL indicate request IN OUT–––
Number of cylinders OUT–IN––
Racing select
determinationIN OUT–––
TCC condition IN OUT–––
Tire circumference (front/
rear)OUT–IN––
Torque reduction inhibit OUT IN IN––
TP OUTINININ–
Transmission/axle type OUT–IN––
Travelled distanceIN–OUT––
IN OUT––IN
OUT–––IN
Torque
reduction
requestJA5AX-EL IN OUT–––
except
JA5AX-ELIN–OUT––
Turbine speed IN OUT–––
Upper torque limit IN OUT–––
Vehicle speedOUT–––IN
IN OUT–––
Wheel speed (front left/
front right/rear left/rear
right)IN IN OUT IN–
OUT–––IN
4WD system operating
condition (warning light
information)–––OUT IN SignalMultiplex module
PCM TCMABS (ABS/TCS)
HU/CM or
DSC HU/CM4WD control
moduleInstrument
cluster
Page 839 of 909

T–28
WARNING AND INDICATOR SYSTEM
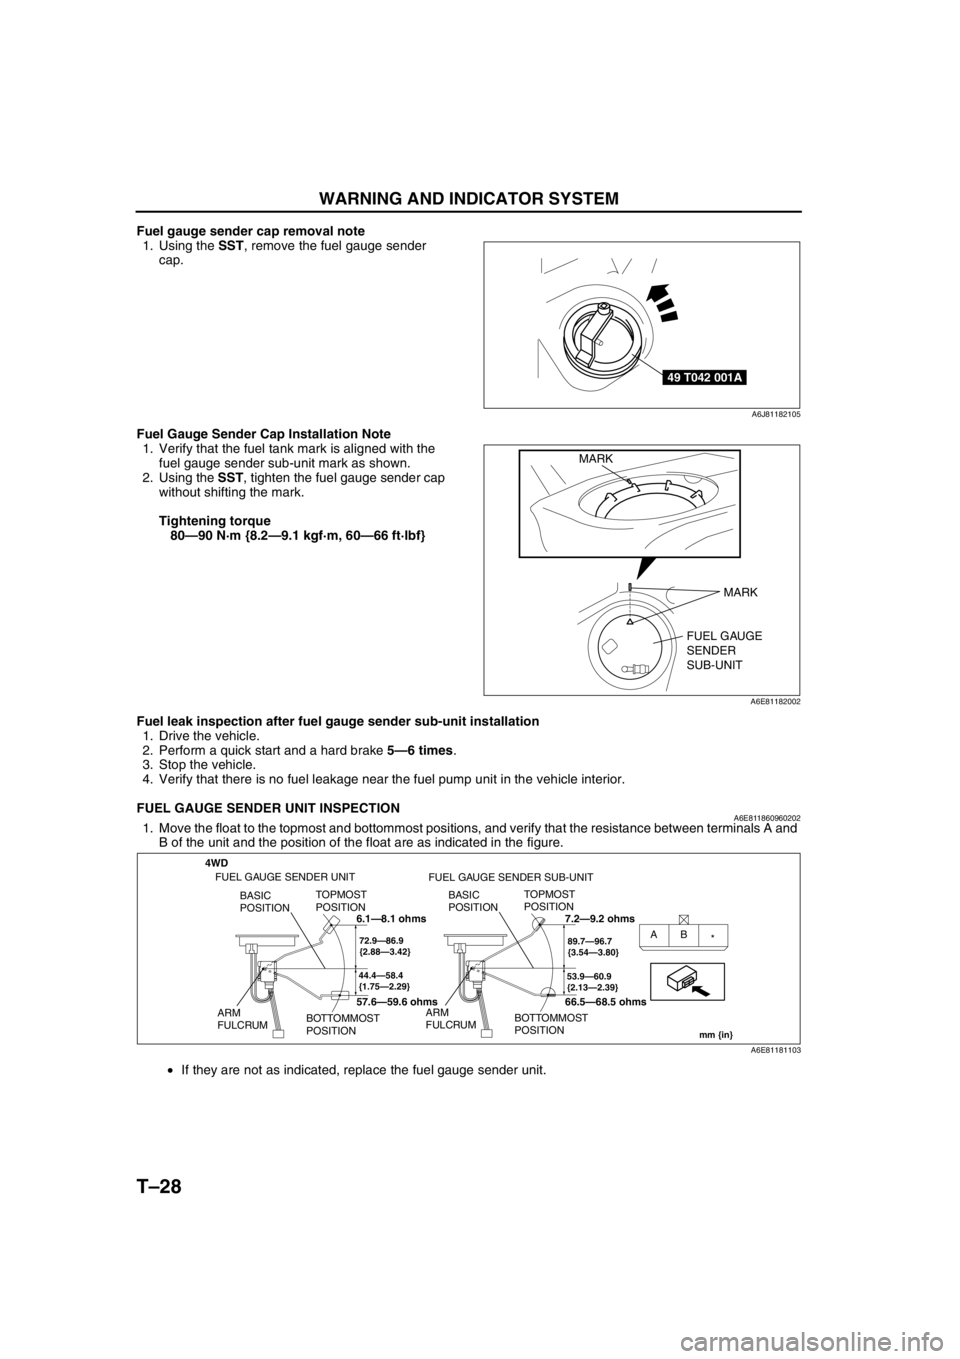
Fuel gauge sender cap removal note
1. Using the SST, remove the fuel gauge sender
cap.
Fuel Gauge Sender Cap Installation Note
1. Verify that the fuel tank mark is aligned with the
fuel gauge sender sub-unit mark as shown.
2. Using the SST, tighten the fuel gauge sender cap
without shifting the mark.
Tightening torque
80—90 N·m {8.2—9.1 kgf·m, 60—66 ft·lbf}
Fuel leak inspection after fuel gauge sender sub-unit installation
1. Drive the vehicle.
2. Perform a quick start and a hard brake 5—6 times.
3. Stop the vehicle.
4. Verify that there is no fuel leakage near the fuel pump unit in the vehicle interior.
End Of Sie
FUEL GAUGE SENDER UNIT INSPECTIONA6E8118609602021. Move the float to the topmost and bottommost positions, and verify that the resistance between terminals A and
B of the unit and the position of the float are as indicated in the figure.
•If they are not as indicated, replace the fuel gauge sender unit.
End Of Sie
49 T042 001A
A6J81182105
FUEL GAUGE
SENDER
SUB-UNIT MARK
MARK
A6E81182002
4WD
44.4—58.4
{1.75—2.29}
TOPMOST
POSITION
BOTTOMMOST
POSITION BASIC
POSITION
ARM
FULCRUM
72.9—86.9
{2.88—3.42}AB
*
53.9—60.9
{2.13—2.39}
TOPMOST
POSITION
BOTTOMMOST
POSITION BASIC
POSITION
ARM
FULCRUM
89.7—96.7
{3.54—3.80}
mm {in}
FUEL GAUGE SENDER UNIT
FUEL GAUGE SENDER SUB-UNIT
6.1—8.1 ohms
57.6—59.6 ohms7.2—9.2 ohms
66.5—68.5 ohms
A6E81181103
Page 897 of 909

TECHNICAL DATA
TD–5
TD
End Of SieAUTOMATIC TRANSAXLEA6E931001024203
End Of Sie
PROPELLER SHAFTA6E931001024204
End Of Sie
Item Specification
Transaxle typeJA5AX-EL
Line pressure
(kPa {kgf/cm
2, psi})D range, M range (2GR)Idle 290—490 {3.0—5.0, 42—71}
Stall 1,550—1,750 {15.8—17.8, 225—254}
M range (1GR), R positionIdle 550—750 {5.6—7.6, 80—109}
Stall 1,550—1,750 {15.8—17.8, 225—254}
Engine stall speed
D, M (1GR, 2GR), R 2,200—2,600
(rpm)
Time lag (second)N-D Approx. 0.5—1.0
N-R Approx. 0.6—1.0
Transaxle fluid
temperature (TFT)
sensor-20 °C {−4 °F} 15.87—17.54
0 °C {32 °F} 5.73—6.33
20 °C {68 °F} 2.38—2.63
40 °C {104 °F} 1.10—1.22
60 °C {140 °F} 0.56—0.62
80 °C {176 °F} 0.31—0.34
(kilohm) 100 °C {212 °F} 0.18—0.20
120 °C {248 °F} 0.11—0.12
130 °C {266 °F} 0.09—0.10
Input/turbine
speed sensor(ohm) ATF temperature: 20 °C {68 °F} 513—627
Intermediate
sensor(ohm) ATF temperature: 20 °C {68 °F} 513—627
Vehicle
speedometer
sensor(ohm) ATF temperature: 20 °C {68 °F} 513—627
Solenoid valves (ohm)Shift solenoid A 14—18
Shift solenoid B 14—18
Shift solenoid C 14—18
Neutral shift solenoid valve 14—18
Reduction timing solenoid valve 14—18
TCC solenoid valve 12.0—13.2
2-4 brake solenoid valve 2.6—3.2
High clutch solenoid valve 2.6—3.2
Pressure control solenoid 2.6—3.2
Automatic transaxle fluid
(ATF)Type
M-
III or equivalent (e.g. Dexron ® III )
Capacity (Approximate quantity) (L {US qt, Imp qt}) 8.3 {8.8, 7.3}
Transfer oilGrade API service GL-5
Viscosity SAE 80W-90
Capacity (Approximate quantity) (L {US qt, Imp qt}) 0.62 {0.65, 0.54}
Item Specification
Runout limit mm {in} 0.3 {0.01}
Starting torqueN·m
{kgf·cm}0.29—0.78 {3.0—7.9}