stop start MAZDA 6 2002 Suplement Owner's Manual
[x] Cancel search | Manufacturer: MAZDA, Model Year: 2002, Model line: 6, Model: MAZDA 6 2002Pages: 909, PDF Size: 17.16 MB
Page 750 of 909

PARKING BRAKE SYSTEM, DYNAMIC STABILITY CONTROL
P–17
P
PARKING BRAKE (LEVER TYPE) ADJUSTMENTA6E6914440002011. Start the engine and depress the brake pedal several times.
2. Stop the engine.
3. For the 2WD model, remove the rear ashtray case behind the center console
4. For the 4WD model, remove the 4 screws (back side) and pull up the rear of the center console, then remove
the rear ashtray case.
5. Turn the adjusting nut as shown in the figure.
6. After adjustment, inspect the following points:
(1) Turn the ignition switch to ON, pull the parking
brake lever one notch, and verify that the
parking brake warning light illuminates.
(2) Verify that the rear brakes do not drag.
End Of Sie
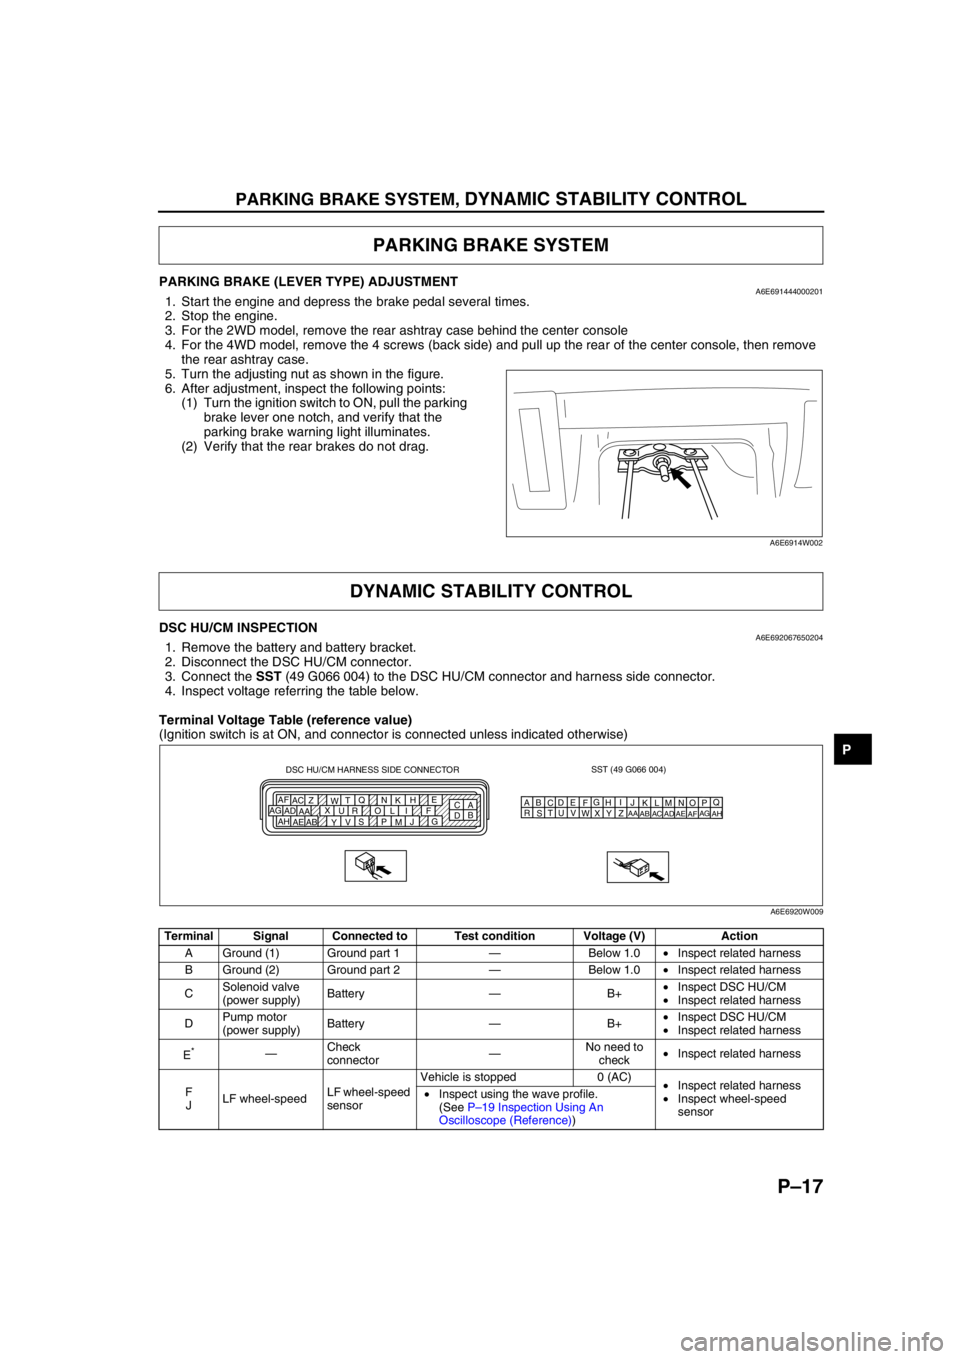
DSC HU/CM INSPECTIONA6E6920676502041. Remove the battery and battery bracket.
2. Disconnect the DSC HU/CM connector.
3. Connect the SST (49 G066 004) to the DSC HU/CM connector and harness side connector.
4. Inspect voltage referring the table below.
Terminal Voltage Table (reference value)
(Ignition switch is at ON, and connector is connected unless indicated otherwise)
PARKING BRAKE SYSTEM
A6E6914W002
DYNAMIC STABILITY CONTROL
Terminal Signal Connected to Test condition Voltage (V) Action
A Ground (1) Ground part 1—Below 1.0•Inspect related harness
B Ground (2) Ground part 2—Below 1.0•Inspect related harness
CSolenoid valve
(power supply)Battery—B+•Inspect DSC HU/CM
•Inspect related harness
DPump motor
(power supply)Battery—B+•Inspect DSC HU/CM
•Inspect related harness
E
*—Check
connector—No need to
check•Inspect related harness
F
JLF wheel-speedLF wheel-speed
sensorVehicle is stopped 0 (AC)
•Inspect related harness
•Inspect wheel-speed
sensor •Inspect using the wave profile.
(See P–19 Inspection Using An
Oscilloscope (Reference))
SST (49 G066 004)
AQ
B
CDE
FG
HI
J DSC HU/CM HARNESS SIDE CONNECTOR
A
C E
H
K N Q
T
W Z AC AF
F I L O R U X
AA AD AG
G
J
M P S
V
Y AB AE AHB
DKN
T
WZ
AC
AFLO
RU
XAA
ADAGMP
SV
YAB
AEAH
A6E6920W009
Page 839 of 909

T–28
WARNING AND INDICATOR SYSTEM
Fuel gauge sender cap removal note
1. Using the SST, remove the fuel gauge sender
cap.
Fuel Gauge Sender Cap Installation Note
1. Verify that the fuel tank mark is aligned with the
fuel gauge sender sub-unit mark as shown.
2. Using the SST, tighten the fuel gauge sender cap
without shifting the mark.
Tightening torque
80—90 N·m {8.2—9.1 kgf·m, 60—66 ft·lbf}
Fuel leak inspection after fuel gauge sender sub-unit installation
1. Drive the vehicle.
2. Perform a quick start and a hard brake 5—6 times.
3. Stop the vehicle.
4. Verify that there is no fuel leakage near the fuel pump unit in the vehicle interior.
End Of Sie
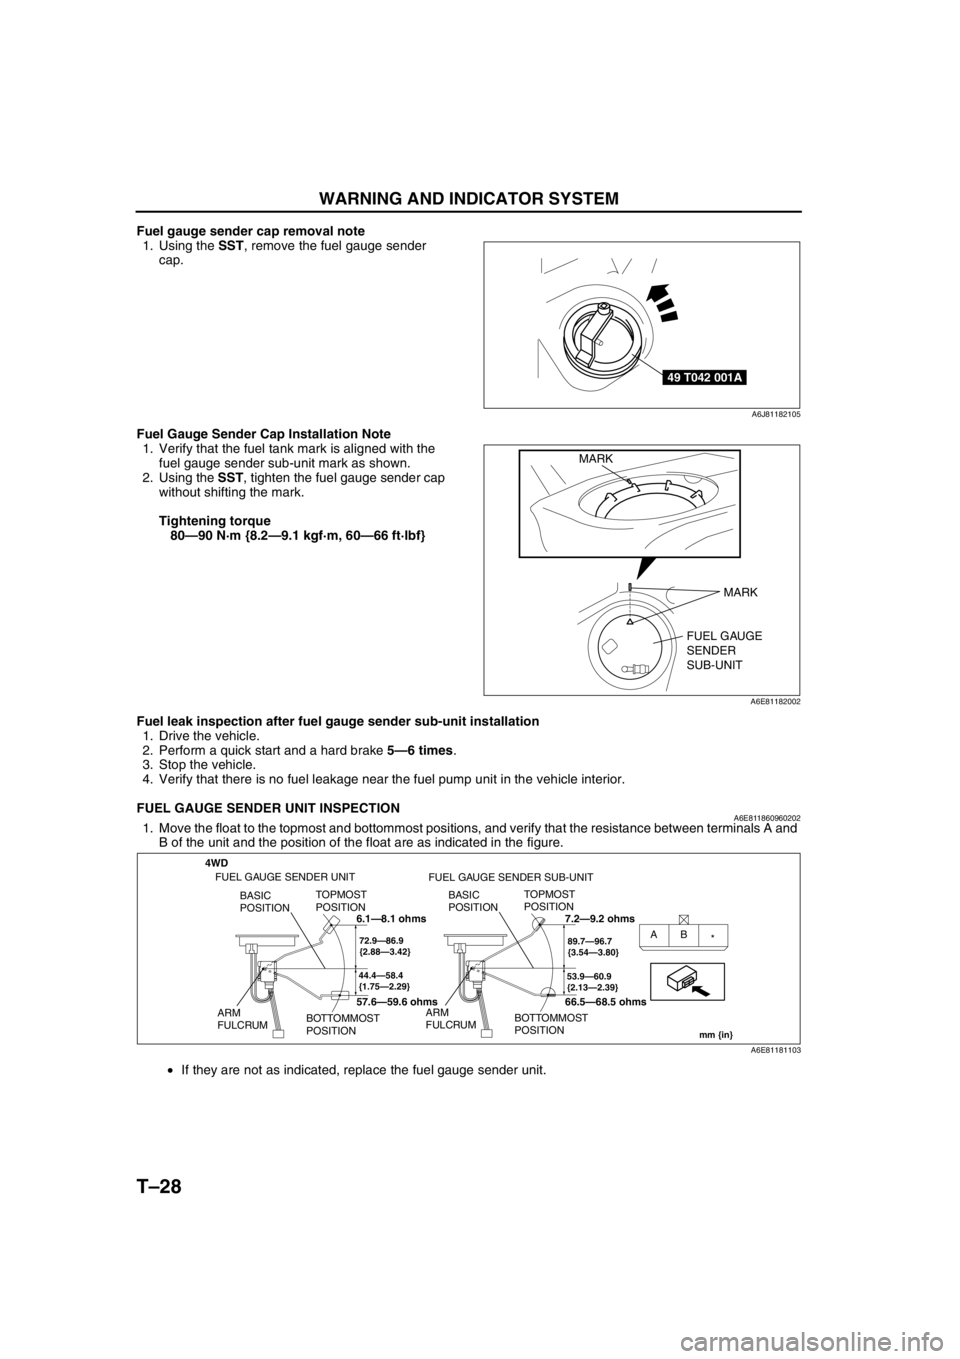
FUEL GAUGE SENDER UNIT INSPECTIONA6E8118609602021. Move the float to the topmost and bottommost positions, and verify that the resistance between terminals A and
B of the unit and the position of the float are as indicated in the figure.
•If they are not as indicated, replace the fuel gauge sender unit.
End Of Sie
49 T042 001A
A6J81182105
FUEL GAUGE
SENDER
SUB-UNIT MARK
MARK
A6E81182002
4WD
44.4—58.4
{1.75—2.29}
TOPMOST
POSITION
BOTTOMMOST
POSITION BASIC
POSITION
ARM
FULCRUM
72.9—86.9
{2.88—3.42}AB
*
53.9—60.9
{2.13—2.39}
TOPMOST
POSITION
BOTTOMMOST
POSITION BASIC
POSITION
ARM
FULCRUM
89.7—96.7
{3.54—3.80}
mm {in}
FUEL GAUGE SENDER UNIT
FUEL GAUGE SENDER SUB-UNIT
6.1—8.1 ohms
57.6—59.6 ohms7.2—9.2 ohms
66.5—68.5 ohms
A6E81181103