air MAZDA MIATA 1991 Factory Workshop Manual
[x] Cancel search | Manufacturer: MAZDA, Model Year: 1991, Model line: MIATA, Model: MAZDA MIATA 1991Pages: 392, PDF Size: 29.45 MB
Page 166 of 392
WHEEL SPEED SENSOR ROTORS
Inspection
Perform a comprehensive visual inspection of sensor rotor. If any damage is noted, replace sensor rotor. Sensor
rotors are attached to wheel hubs.
REMOVAL & INSTALLATION
HYDRAULIC UNIT
Removal
Remove hydraulic lines from unit. Disconnect hydraulic unit connectors. Remove nuts securing unit. Remove
hydraulic unit.
Bleeding Hydraulic Unit
Before bleeding hydraulic unit, bleed brake system in appropriate sequence. See BRAKE LINE BLEEDING
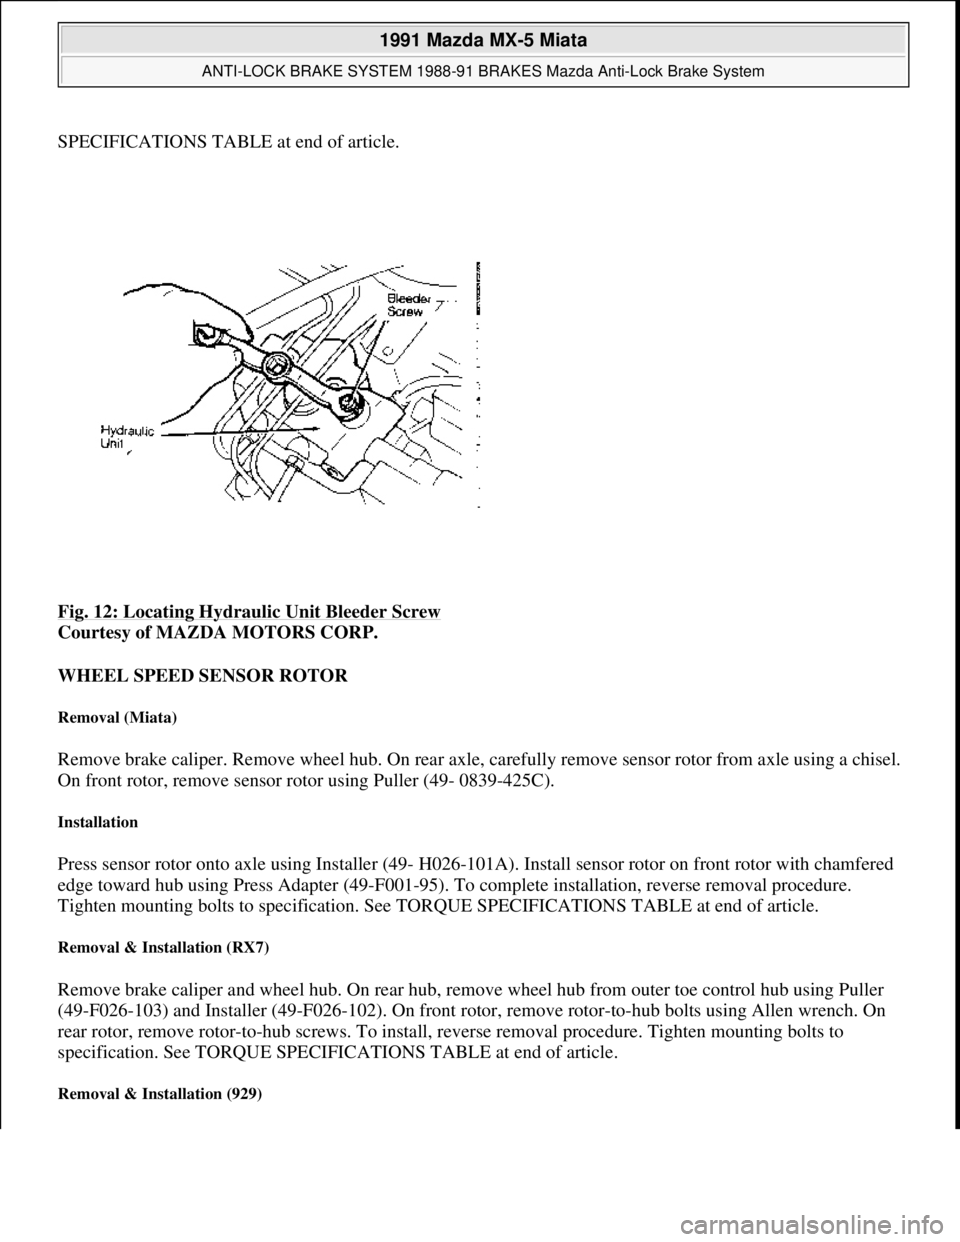
SEQUENCE TABLE under BLEEDING BRAKE SYSTEM. Bleed hydraulic unit by opening bleeder screw on
unit. See Fig. 12
.
Installation
To install, reverse removal procedure. Tighten mounting bolts to specification. See TORQUE
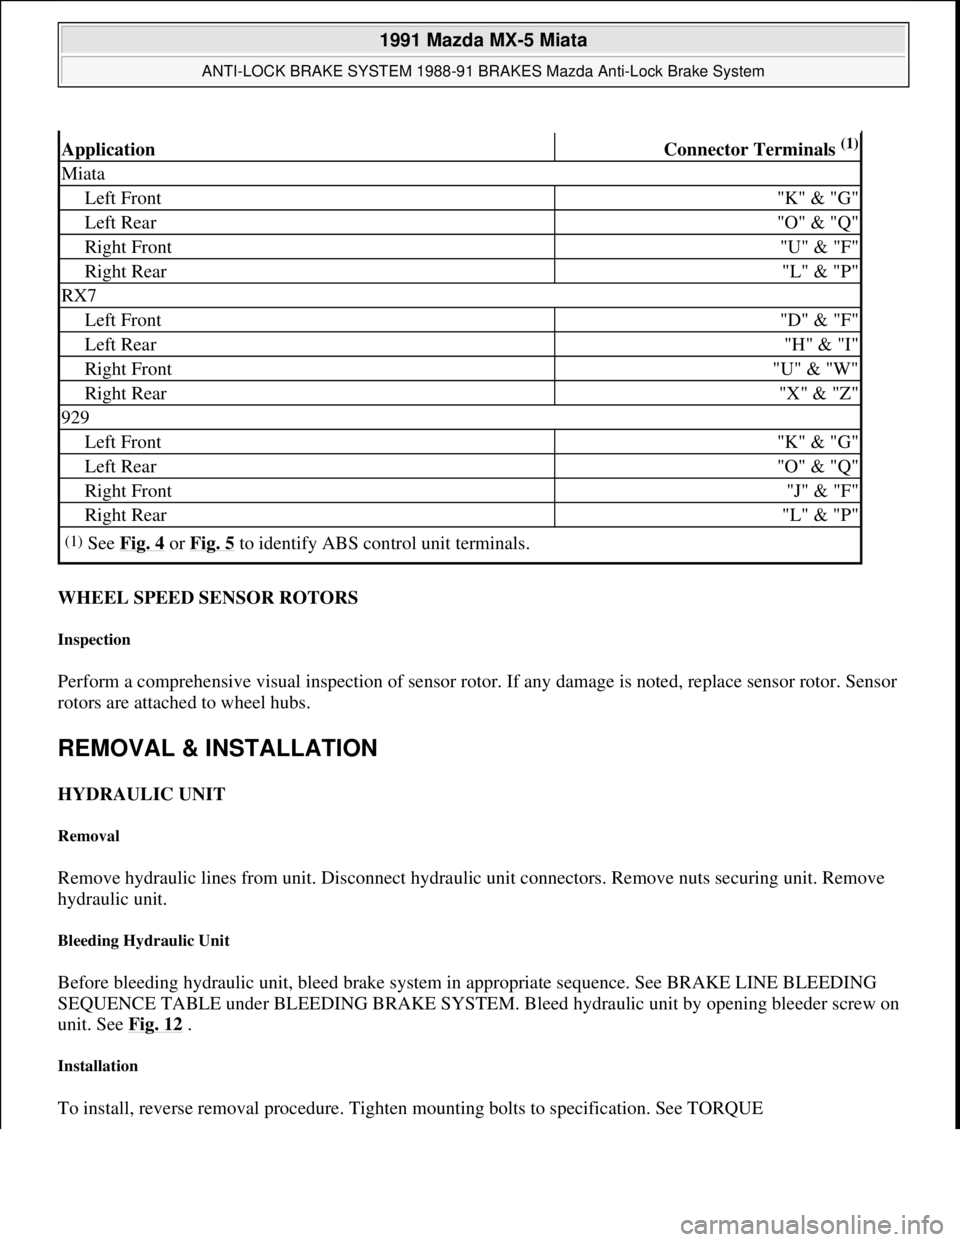
ApplicationConnector Terminals (1)
Miata
Left Front"K" & "G"
Left Rear"O" & "Q"
Right Front"U" & "F"
Right Rear"L" & "P"
RX7
Left Front"D" & "F"
Left Rear"H" & "I"
Right Front"U" & "W"
Right Rear"X" & "Z"
929
Left Front"K" & "G"
Left Rear"O" & "Q"
Right Front"J" & "F"
Right Rear"L" & "P"
(1)See Fig. 4 or Fig. 5 to identify ABS control unit terminals.
1991 Mazda MX-5 Miata
ANTI-LOCK BRAKE SYSTEM 1988-91 BRAKES Mazda Anti-Lock Brake System
Microsoft
Sunday, July 05, 2009 2:17:32 PMPage 14 © 2005 Mitchell Repair Information Company, LLC.
Page 167 of 392
SPECIFICATIONS TABLE at end of article.
Fig. 12: Locating Hydraulic Unit Bleeder Screw
Courtesy of MAZDA MOTORS CORP.
WHEEL SPEED SENSOR ROTOR
Removal (Miata)
Remove brake caliper. Remove wheel hub. On rear axle, carefully remove sensor rotor from axle using a chisel.
On front rotor, remove sensor rotor using Puller (49- 0839-425C).
Installation
Press sensor rotor onto axle using Installer (49- H026-101A). Install sensor rotor on front rotor with chamfered
edge toward hub using Press Adapter (49-F001-95). To complete installation, reverse removal procedure.
Tighten mounting bolts to specification. See TORQUE SPECIFICATIONS TABLE at end of article.
Removal & Installation (RX7)
Remove brake caliper and wheel hub. On rear hub, remove wheel hub from outer toe control hub using Puller
(49-F026-103) and Installer (49-F026-102). On front rotor, remove rotor-to-hub bolts using Allen wrench. On
rear rotor, remove rotor-to-hub screws. To install, reverse removal procedure. Tighten mounting bolts to
specification. See TORQUE SPECIFICATIONS TABLE at end of article.
Removal & Installation (929)
1991 Mazda MX-5 Miata
ANTI-LOCK BRAKE SYSTEM 1988-91 BRAKES Mazda Anti-Lock Brake System
Microsoft
Sunday, July 05, 2009 2:17:32 PMPage 15 © 2005 Mitchell Repair Information Company, LLC.
Page 168 of 392
Remove brake caliper and wheel hub. On rear axle, carefully remove sensor rotor from axle using chisel. On
front rotor, remove sensor rotor using Puller (49-0839-425C). To install, press sensor rotors onto axle and front
rotor using Installer (49-H026-101A). On front rotor, install sensor rotor with chamfered edge toward hub. To
complete installation, reverse removal procedure. Tighten mounting bolts to specification. See TORQUE
SPECIFICATIONS TABLE at end of article.
WHEEL SPEED SENSOR
Removal & Installation
Unplug wheel sensor connector. Remove sensor bolt. Remove wheel sensor from vehicle. To install, reverse
removal procedure. On RX7, adjust wheel sensor so clearance between sensor and rotor is .016-.039" (.40-1.0
mm). Tighten mounting bolts to specification. See TORQUE SPECIFICATIONS TABLE at end of article.
DIAGNOSING ABS SYSTEM
ABS TESTER OPERATION
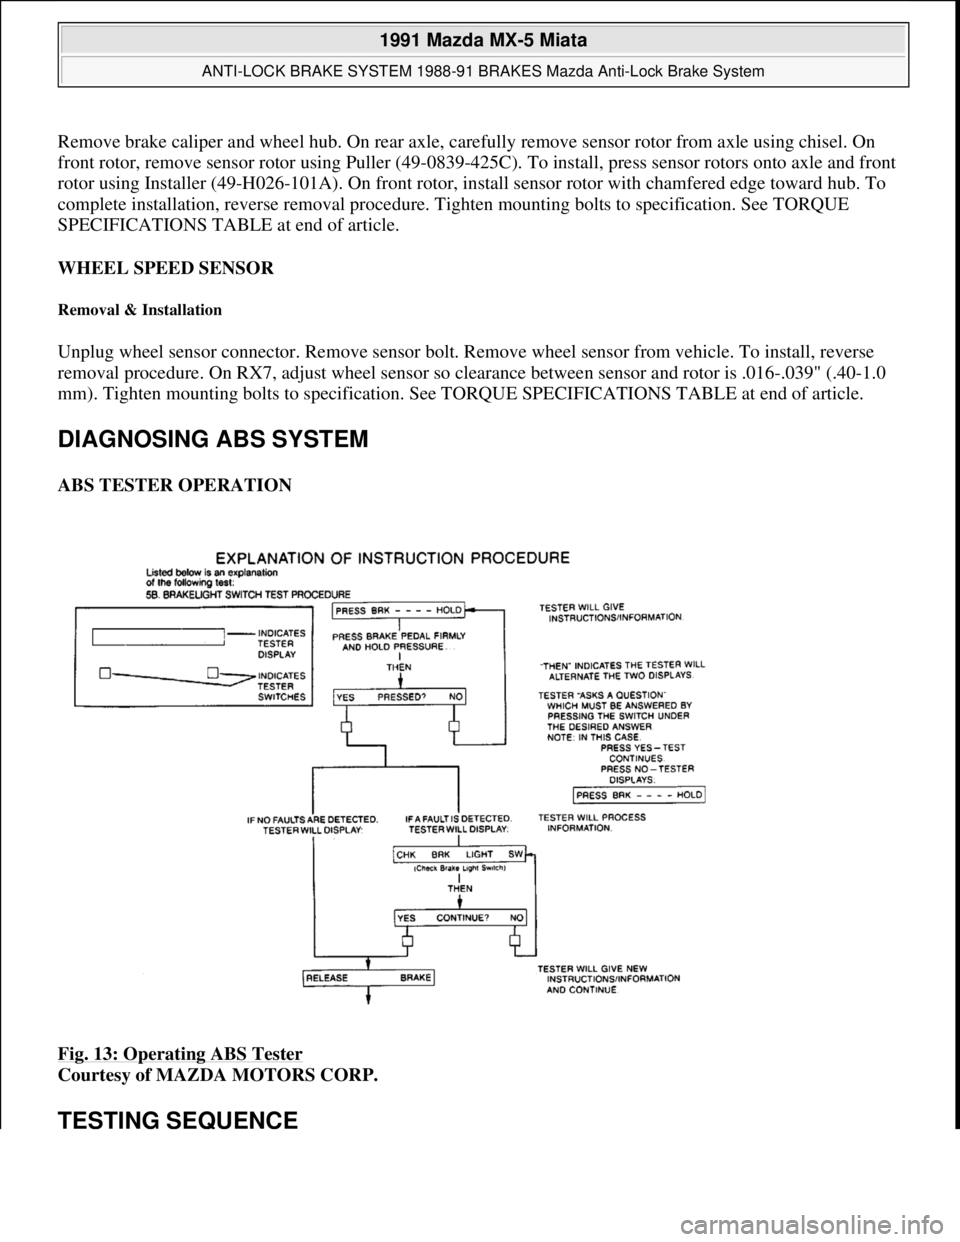
Fig. 13: Operating ABS Tester
Courtesy of MAZDA MOTORS CORP.
TESTING SEQUENCE
1991 Mazda MX-5 Miata
ANTI-LOCK BRAKE SYSTEM 1988-91 BRAKES Mazda Anti-Lock Brake System
Microsoft
Sunday, July 05, 2009 2:17:32 PMPage 16 © 2005 Mitchell Repair Information Company, LLC.
Page 169 of 392

TEST 1. CONNECTION POWER UP
CONNECTION/POWER-UP
1. Locate ABS Control Unit.
2. Disconnect Control Unit Harness from Control Unit.
3. Connect ABS Tester Harness to Control Unit Harness Connector.
4. Turn Ignition Key to "ON" position.
TEST 2 ALTERNATOR TEST
ALTERNATOR TEST START ENGINE (ALTERNATOR TESTED BY RUNNING ENGINE)
Tester will rapidly display several messages during an Initial Segment Check.
Fig. 14: Test 2 Alternator Test
Courtesy of MAZDA MOTORS CORP.
TEST 3 ABS SYSTEM TEST
1991 Mazda MX-5 Miata
ANTI-LOCK BRAKE SYSTEM 1988-91 BRAKES Mazda Anti-Lock Brake System
Microsoft
Sunday, July 05, 2009 2:17:32 PMPage 17 © 2005 Mitchell Repair Information Company, LLC.
Page 170 of 392

ABS SYSTEM TEST TURN IGNITION KEY ON (DO NOT RUN ENGINE
Tester will rapidly display several messages during an Initial Segment Check.
Fig. 15: Test 3 ABS System Test
Courtesy of MAZDA MOTORS CORP.
TEST 4 SYSTEM VOLTAGE TEST
1991 Mazda MX-5 Miata
ANTI-LOCK BRAKE SYSTEM 1988-91 BRAKES Mazda Anti-Lock Brake System
Microsoft
Sunday, July 05, 2009 2:17:32 PMPage 18 © 2005 Mitchell Repair Information Company, LLC.
Page 171 of 392

1991 Mazda MX-5 Miata
ANTI-LOCK BRAKE SYSTEM 1988-91 BRAKES Mazda Anti-Lock Brake System
Microsoft
Sunday, July 05, 2009 2:17:32 PMPage 19 © 2005 Mitchell Repair Information Company, LLC.
Page 172 of 392

Fig. 16: Test 4 System Voltage Test
Courtesy of MAZDA MOTORS CORP.
TEST 5A. ANTI-LOCK LIGHT TEST
Fig. 17: Test 5A. Anti
-Lock Light Test
Courtesy of MAZDA MOTORS CORP.
TEST 5B. BRAKE LIGHT SWITCH TEST
1991 Mazda MX-5 Miata
ANTI-LOCK BRAKE SYSTEM 1988-91 BRAKES Mazda Anti-Lock Brake System
Microsoft
Sunday, July 05, 2009 2:17:32 PMPage 20 © 2005 Mitchell Repair Information Company, LLC.
Page 173 of 392

Fig. 18: Test 5B. Brake Light Switch Test
Courtesy of MAZDA MOTORS CORP.
TEST 5C. PUMP TEST
1991 Mazda MX-5 Miata
ANTI-LOCK BRAKE SYSTEM 1988-91 BRAKES Mazda Anti-Lock Brake System
Microsoft
Sunday, July 05, 2009 2:17:32 PMPage 21 © 2005 Mitchell Repair Information Company, LLC.
Page 174 of 392

Fig. 19: Test 5C. Pump Test
1991 Mazda MX-5 Miata
ANTI-LOCK BRAKE SYSTEM 1988-91 BRAKES Mazda Anti-Lock Brake System
Microsoft
Sunday, July 05, 2009 2:17:32 PMPage 22 © 2005 Mitchell Repair Information Company, LLC.
Page 175 of 392

Courtesy of MAZDA MOTORS CORP.
6A. DYNAMIC WHEEL SELECTION TEST OR EXIT
WHEEL SELECTION TEST
These three messages will alternate on the dispaly screen at 3 1/2 second intervals. Now, select one of the four
wheels to begin the dynamic test sequence.
EXIT
Press either switch under "PUSH TO EXIT" Display to return to "STAT TEST DYNAM" Selection.
NOTE: When entering the dynamic test sequence, you will select one of four wheels to
begin. When you have finished with that wheel test, you should return to 6A.
WHEEL SELECTION TEST to select another wheel, and repeat these test
procedures for all four wheels
1991 Mazda MX-5 Miata
ANTI-LOCK BRAKE SYSTEM 1988-91 BRAKES Mazda Anti-Lock Brake System
Microsoft
Sunday, July 05, 2009 2:17:32 PMPage 23 © 2005 Mitchell Repair Information Company, LLC.