4WD MAZDA MIATA 1991 Factory Service Manual
[x] Cancel search | Manufacturer: MAZDA, Model Year: 1991, Model line: MIATA, Model: MAZDA MIATA 1991Pages: 392, PDF Size: 29.45 MB
Page 206 of 392
1. Raise and support rear of vehicle. Ensure parking brake is released. Remove plugs from rear of backing
plate (one below wheel cylinder, other near outer diameter of backing plate). Insert a screwdriver through
hole below wheel cylinder. Rotate star wheel adjuster in direction of arrow stamped on backing plate until
wheel locks.
2. Insert a drift through other hole in backing plate. Push pawl back from adjuster and back off adjuster 6-7
notches. Ensure wheel rotates freely. Perform same procedure on both sides. Adjust parking brake.
B2600i 4WD & MPV
1. Raise and support rear of vehicle. Ensure parking brake is released. Remove plugs from rear of backing
plate. Insert a screwdriver through hole for star wheel. Rotate adjuster in direction of arrow stamped on
backing plate until wheel locks.
2. Insert a drift through other hole in backing plate. Push pawl back from adjuster and back off adjuster 8-10
notches (13-15 notches on MPV). Ensure wheel rotates freely. Perform same procedure on both sides.
Adjust parking brake.
MX-6, Protege, 323 & 626
1. Raise and support rear of vehicle. Remove wheel. Release parking brake. Remove lock nut from axle
shaft. Remove brake drum. Insert screwdriver between adjusting plate and quadrant. Twist screwdriver to
disen
gage teeth. See Fig. 2 or Fig. 3 .
1991 Mazda MX-5 Miata
BRAKE SYSTEM 1991 BRAKES Mazda Brake System
Microsoft
Sunday, July 05, 2009 2:18:08 PMPage 3 © 2005 Mitchell Repair Information Company, LLC.
Page 222 of 392
Removal & Installation (B2200 & B2600i 2WD)
1. With caliper assembly removed, remove wheel hub grease cap, cotter pin, lock plate and ring adjusting
lock nut. Remove thrust washer and outer bearing from hub. Slide hub and rotor assembly from spindle.
2. Mark rotor-to-hub position. Separate rotor from hub. Machine rotor if lateral runout exceeds
specification. Replace rotor if measured thickness is less than specified minimum thickness. See DISC
BRAKE SPECIFICATIONS at end of article.
3. To install, reverse removal procedure and evenly tighten rotor-to-hub bolts. Adjust wheel bearings.
Removal & Installation (B2600i 4WD) 1) Remove front caliper. Set hub to FREE position. Remove hub
bolts. Remove hub as an assembly. Install 2 bolts and nuts to retain hub assembly together. Remove snap
ring and spacer.
4. Remove set bolt and plate. Remove nut. Remove rotor and hub assembly. Mark rotor-to-hub position.
Remove rotor from hub. Machine rotor if lateral runout exceeds specification. Replace rotor if measured
thickness is less than specified minimum thickness. See DISC BRAKE SPECIFICATIONS
at end of
article. To install, reverse removal procedure.
Removal & Installation (Miata, MPV, MX-6, Protege, RX7, 323 & 626)
1. Raise and support front of vehicle. Remove wheel. Remove caliper with brake hose connected. Support
caliper using rope. Remove 2 rotor-to-hub screws. Remove rotor.
2. Machine rotor if lateral runout exceeds specification. Replace rotor if measured thickness is less than
specified minimum thickness. See DISC BRAKE SPECIFICATIONS
at end of article. To install,
reverse removal procedure.
Removal & Installation (Navajo 2WD)
1. Raise vehicle, and support using safety stands. Remove wheel and caliper assemblies. Remove dust cap,
cotter pin, nut, washer and outer bearing. Carefully remove hub and rotor assembly. Remove inner
bearing and seal.
2. To install, reverse removal procedure. Adjust front wheel bearings. While rotating rotor, tighten adjusting
nut to 17-25 ft. lbs. (23-34 N.m). Back off adjusting nut 120-180 degrees. Install bearing retainer and new
cotter pin.
Removal (Navajo 4WD With Automatic Locking Hubs)
1. Raise vehicle, and support using safety stands. Remove wheel assembly and caliper. See FRONT DISC
BRAKE PADS under REMOVAL & INSTALLATION. Remove retainer washers from lug nut studs.
Remove automatic locking hub housing from spindle.
2. Remove snap ring from end of spindle shaft. Remove axle spacer. See Fig. 13
. Carefully pull plastic
moving cam off wheel bearing adjusting nut. Remove 2 plastic thrust spacers from adjusting nut. Using a
magnet, remove locking key.
CAUTION: DO NOT pry on plastic cam or spacers during removal as damage
may result. To prevent damaging spindle threads, remove locking
key before removing adjusting nut.
1991 Mazda MX-5 Miata
BRAKE SYSTEM 1991 BRAKES Mazda Brake System
Microsoft
Sunday, July 05, 2009 2:18:08 PMPage 19 © 2005 Mitchell Repair Information Company, LLC.
Page 224 of 392
(T70T-4252-B), remove wheel bearing adjusting nut. Remove outer wheel bearing, and then remove
rotor.
Installation
When installing rotor, outer bearing and adjusting nut, tighten adjusting nut to 35 ft. lbs (47 N.m) to seat
bearings. Spin rotor, and back off adjusting nut 1/4 turn. Tighten adjusting nut to 16 INCH lbs. (1.8 N.m). To
install remaining components, reverse removal procedure. See Fig. 13
. After assembly is complete, wheel to
spindle end play should be .001-.003" (.02-.08 mm).
Removal (Navajo 4WD With Manual Locking Hubs)
1. Raise and support vehicle. Remove wheel assembly and caliper. See FRONT DISC BRAKE PADS
under REMOVAL & INSTALLATION. Remove retainer washers from lug nut studs. Remove manual
locking hub housing from spindle.
2. Remove snap ring from end of spindle shaft. Remove axle spacer. See Fig. 14
. Using Lock Nut Wrench
(T86T-1197-A), remove outer wheel bearing lock-nut. Remove lock washer. Using Lock Nut Wrench
(T86T-1197-A), remove inner wheel bearing lock nut, outer wheel bearing and rotor. CAUTION: Extreme caution must be used when aligning adjusting nut lug with
spindle locking key slot to prevent damage to locking key. Extreme
caution must be used when aligning fixed cam key with spindle key slot to
prevent damage to fixed cam.
1991 Mazda MX-5 Miata
BRAKE SYSTEM 1991 BRAKES Mazda Brake System
Microsoft
Sunday, July 05, 2009 2:18:08 PMPage 21 © 2005 Mitchell Repair Information Company, LLC.
Page 230 of 392
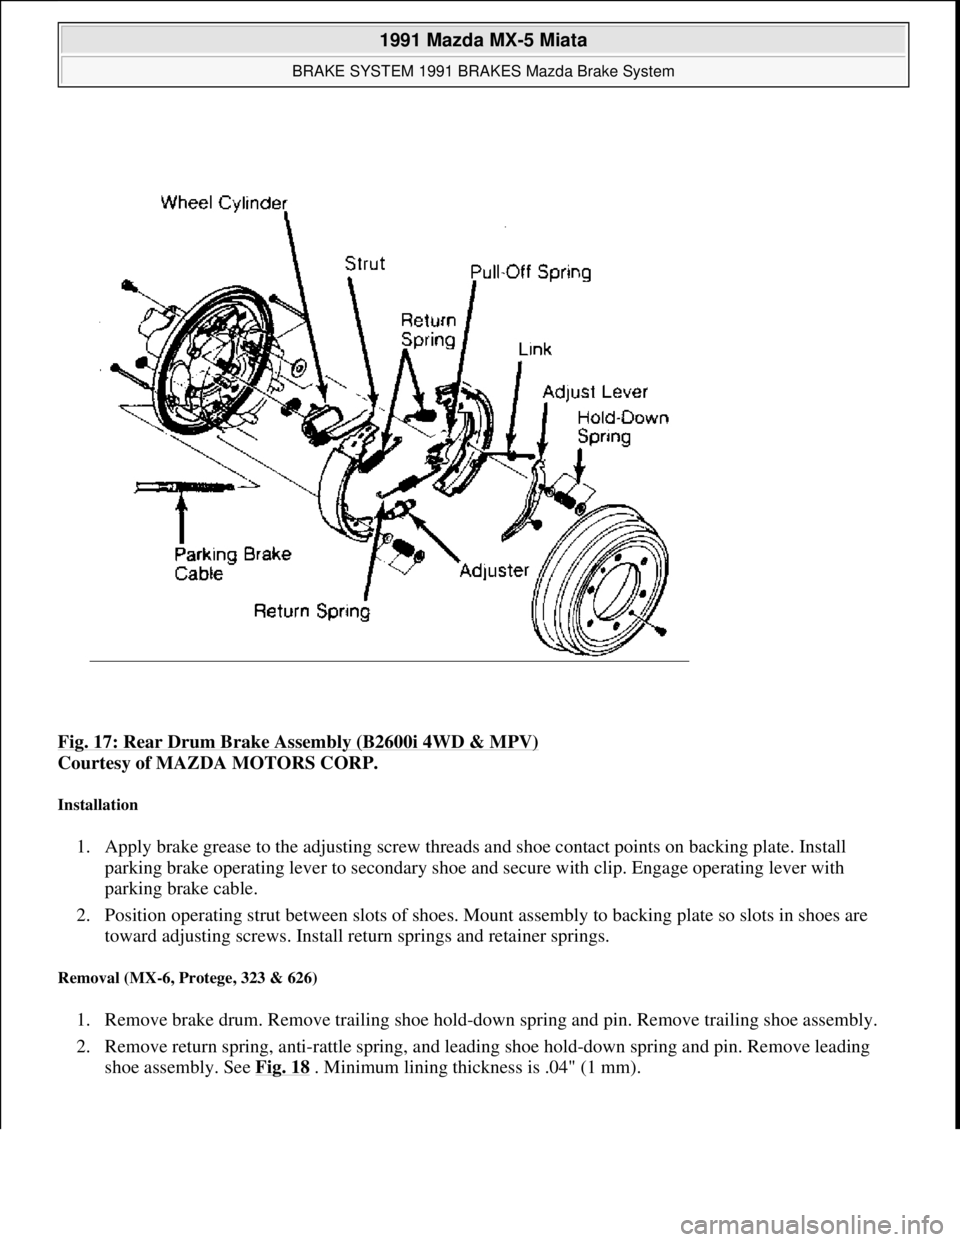
Fig. 17: Rear Drum Brake Assembly (B2600i 4WD & MPV)
Courtesy of MAZDA MOTORS CORP.
Installation
1. Apply brake grease to the adjusting screw threads and shoe contact points on backing plate. Install
parking brake operating lever to secondary shoe and secure with clip. Engage operating lever with
parking brake cable.
2. Position operating strut between slots of shoes. Mount assembly to backing plate so slots in shoes are
toward adjusting screws. Install return springs and retainer springs.
Removal (MX-6, Protege, 323 & 626)
1. Remove brake drum. Remove trailing shoe hold-down spring and pin. Remove trailing shoe assembly.
2. Remove return spring, anti-rattle spring, and leading shoe hold-down spring and pin. Remove leading
shoe assembly. See Fig. 18
. Minimum lining thickness is .04" (1 mm).
1991 Mazda MX-5 Miata
BRAKE SYSTEM 1991 BRAKES Mazda Brake System
Microsoft
Sunday, July 05, 2009 2:18:08 PMPage 27 © 2005 Mitchell Repair Information Company, LLC.
Page 240 of 392
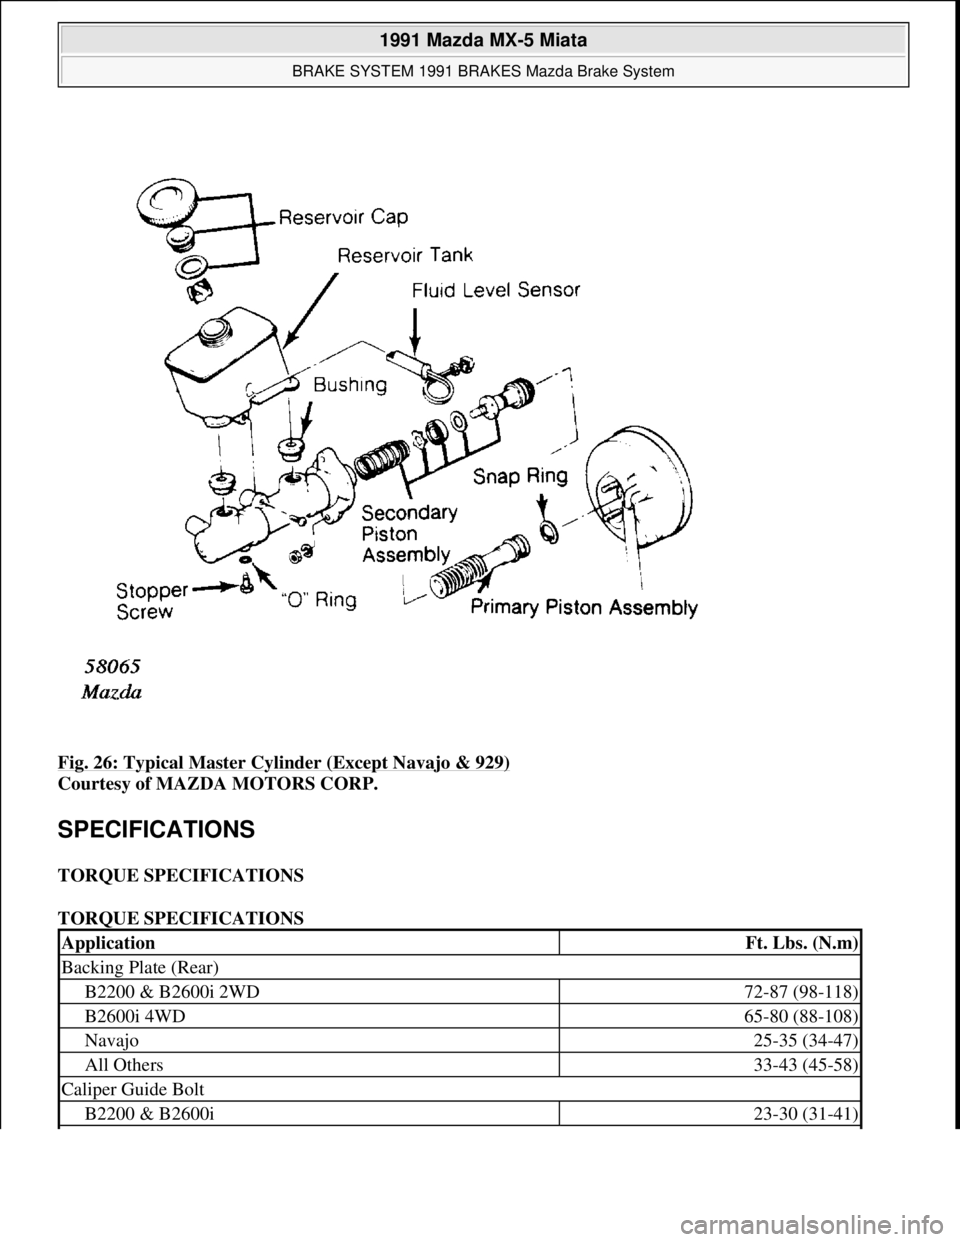
Fig. 26: Typical Master Cylinder (Except Navajo & 929)
Courtesy of MAZDA MOTORS CORP.
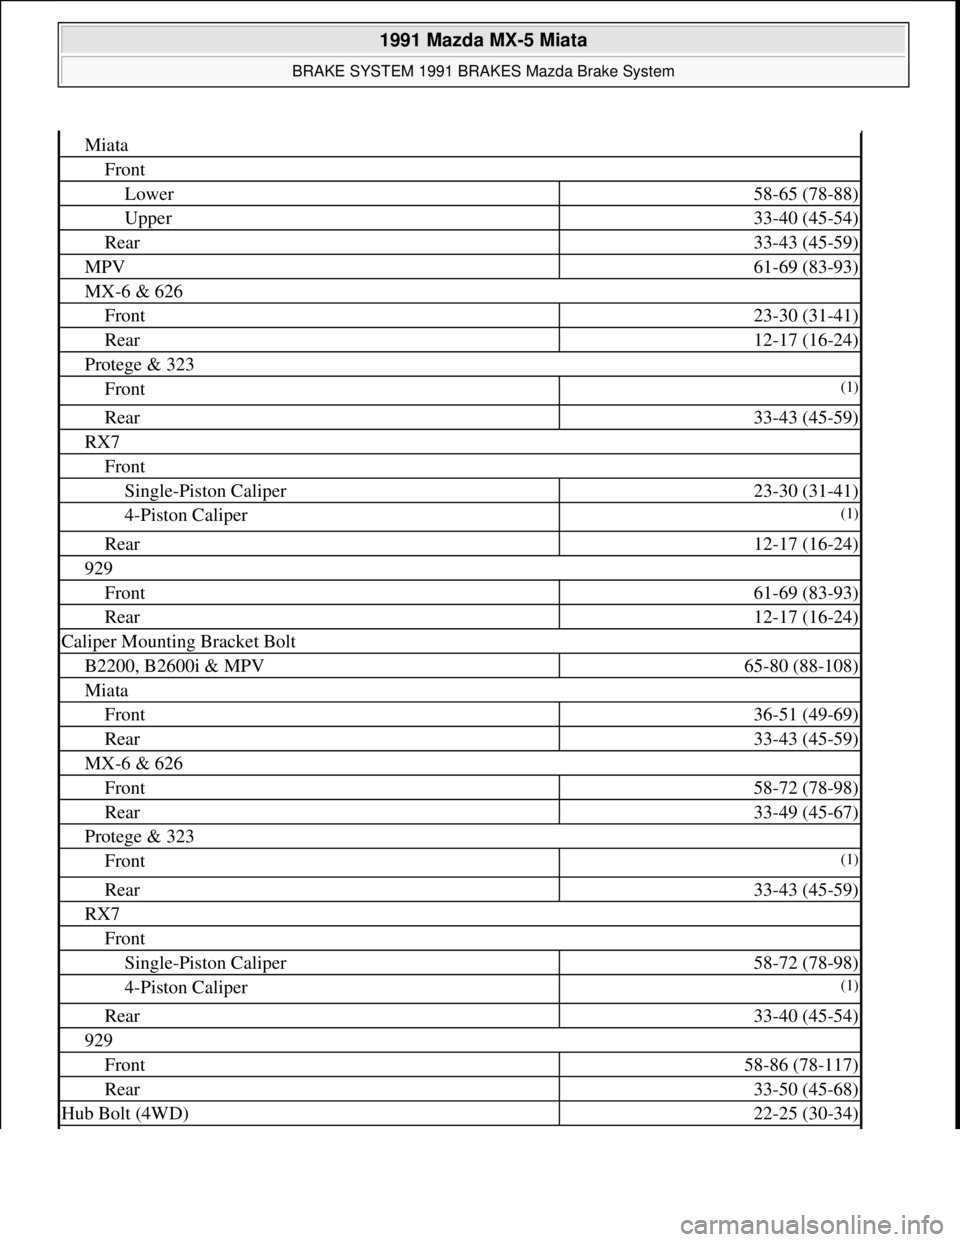
SPECIFICATIONS
TORQUE SPECIFICATIONS
TORQUE SPECIFICATIONS
ApplicationFt. Lbs. (N.m)
Backing Plate (Rear)
B2200 & B2600i 2WD72-87 (98-118)
B2600i 4WD65-80 (88-108)
Navajo25-35 (34-47)
All Others33-43 (45-58)
Caliper Guide Bolt
B2200 & B2600i23-30 (31-41)
1991 Mazda MX-5 Miata
BRAKE SYSTEM 1991 BRAKES Mazda Brake System
Microsoft
Sunday, July 05, 2009 2:18:09 PMPage 37 © 2005 Mitchell Repair Information Company, LLC.
Page 241 of 392
Miata
Front
Lower58-65 (78-88)
Upper33-40 (45-54)
Rear33-43 (45-59)
MPV61-69 (83-93)
MX-6 & 626
Front23-30 (31-41)
Rear12-17 (16-24)
Protege & 323
Front(1)
Rear33-43 (45-59)
RX7
Front
Single-Piston Caliper23-30 (31-41)
4-Piston Caliper(1)
Rear12-17 (16-24)
929
Front61-69 (83-93)
Rear12-17 (16-24)
Caliper Mounting Bracket Bolt
B2200, B2600i & MPV65-80 (88-108)
Miata
Front36-51 (49-69)
Rear33-43 (45-59)
MX-6 & 626
Front58-72 (78-98)
Rear33-49 (45-67)
Protege & 323
Front(1)
Rear33-43 (45-59)
RX7
Front
Single-Piston Caliper58-72 (78-98)
4-Piston Caliper(1)
Rear33-40 (45-54)
929
Front58-86 (78-117)
Rear33-50 (45-68)
Hub Bolt (4WD)22-25 (30-34)
1991 Mazda MX-5 Miata
BRAKE SYSTEM 1991 BRAKES Mazda Brake System
Microsoft
Sunday, July 05, 2009 2:18:09 PMPage 38 © 2005 Mitchell Repair Information Company, LLC.
Page 242 of 392
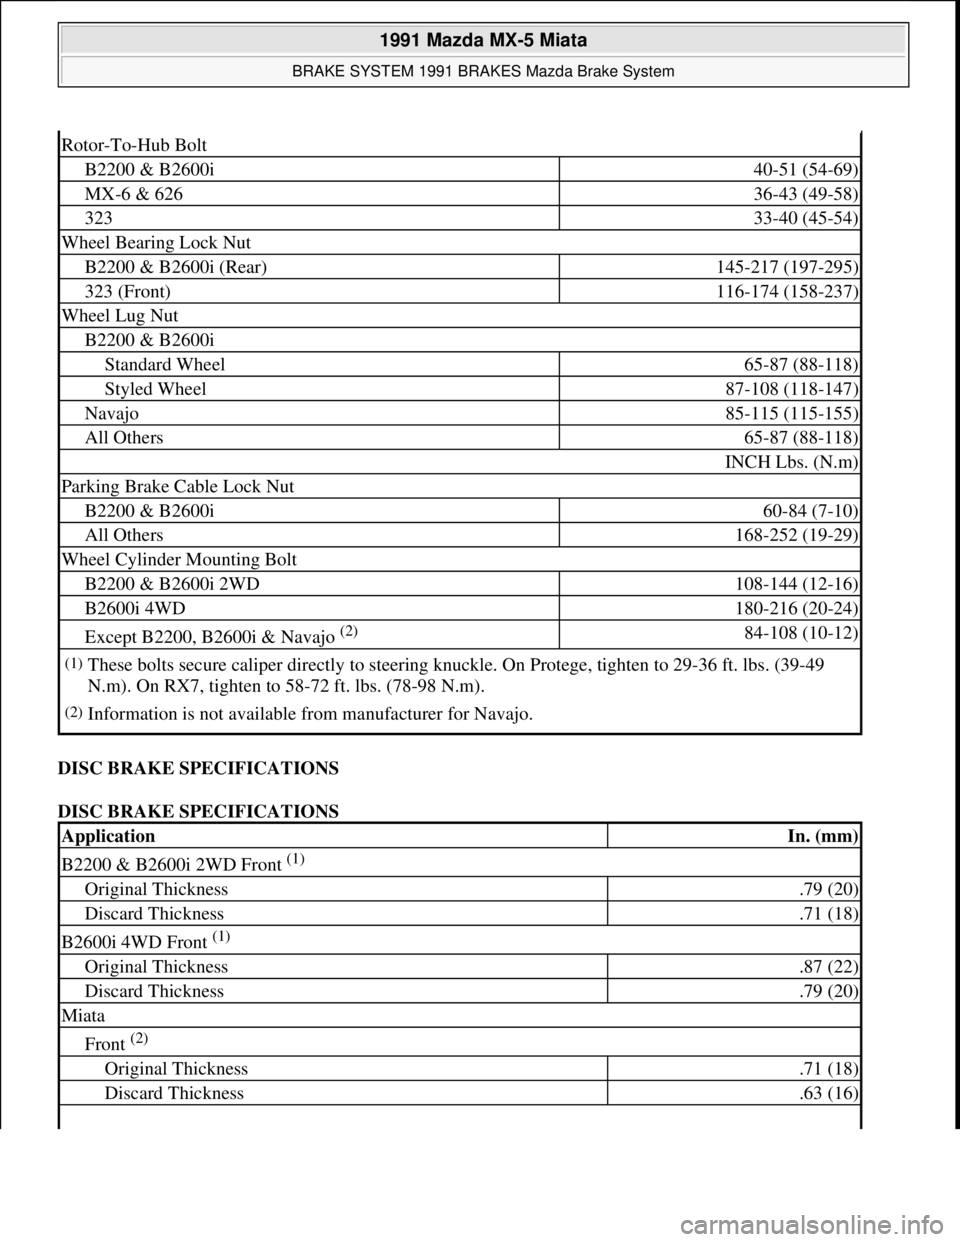
DISC BRAKE SPECIFICATIONS
DISC BRAKE SPECIFICATIONS
Rotor-To-Hub Bolt
B2200 & B2600i40-51 (54-69)
MX-6 & 62636-43 (49-58)
32333-40 (45-54)
Wheel Bearing Lock Nut
B2200 & B2600i (Rear)145-217 (197-295)
323 (Front)116-174 (158-237)
Wheel Lug Nut
B2200 & B2600i
Standard Wheel65-87 (88-118)
Styled Wheel87-108 (118-147)
Navajo85-115 (115-155)
All Others65-87 (88-118)
INCH Lbs. (N.m)
Parking Brake Cable Lock Nut
B2200 & B2600i60-84 (7-10)
All Others168-252 (19-29)
Wheel Cylinder Mounting Bolt
B2200 & B2600i 2WD108-144 (12-16)
B2600i 4WD180-216 (20-24)
Except B2200, B2600i & Navajo (2) 84-108 (10-12)
(1)These bolts secure caliper directly to steering knuckle. On Protege, tighten to 29-36 ft. lbs. (39-49
N.m). On RX7, tighten to 58-72 ft. lbs. (78-98 N.m).
(2)Information is not available from manufacturer for Navajo.
ApplicationIn. (mm)
B2200 & B2600i 2WD Front (1)
Original Thickness.79 (20)
Discard Thickness.71 (18)
B2600i 4WD Front (1)
Original Thickness.87 (22)
Discard Thickness.79 (20)
Miata
Front (2)
Original Thickness.71 (18)
Discard Thickness.63 (16)
1991 Mazda MX-5 Miata
BRAKE SYSTEM 1991 BRAKES Mazda Brake System
Microsoft
Sunday, July 05, 2009 2:18:09 PMPage 39 © 2005 Mitchell Repair Information Company, LLC.
Page 244 of 392
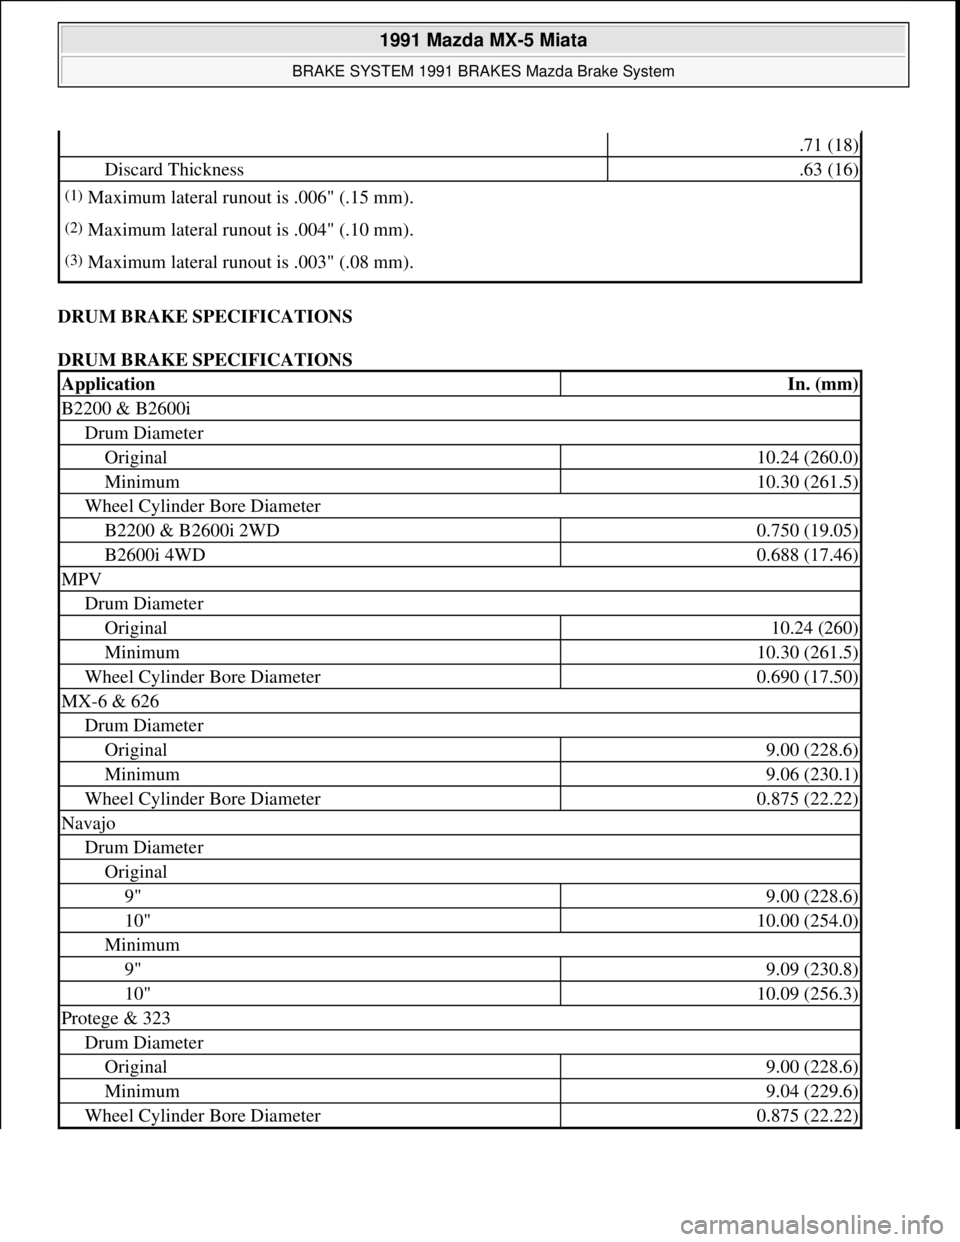
DRUM BRAKE SPECIFICATIONS
DRUM BRAKE SPECIFICATIONS
.71 (18)
Discard Thickness.63 (16)
(1)Maximum lateral runout is .006" (.15 mm).
(2)Maximum lateral runout is .004" (.10 mm).
(3)Maximum lateral runout is .003" (.08 mm).
ApplicationIn. (mm)
B2200 & B2600i
Drum Diameter
Original10.24 (260.0)
Minimum10.30 (261.5)
Wheel Cylinder Bore Diameter
B2200 & B2600i 2WD0.750 (19.05)
B2600i 4WD0.688 (17.46)
MPV
Drum Diameter
Original10.24 (260)
Minimum10.30 (261.5)
Wheel Cylinder Bore Diameter0.690 (17.50)
MX-6 & 626
Drum Diameter
Original9.00 (228.6)
Minimum9.06 (230.1)
Wheel Cylinder Bore Diameter0.875 (22.22)
Navajo
Drum Diameter
Original
9"9.00 (228.6)
10"10.00 (254.0)
Minimum
9"9.09 (230.8)
10"10.09 (256.3)
Protege & 323
Drum Diameter
Original9.00 (228.6)
Minimum9.04 (229.6)
Wheel Cylinder Bore Diameter0.875 (22.22)
1991 Mazda MX-5 Miata
BRAKE SYSTEM 1991 BRAKES Mazda Brake System
Microsoft
Sunday, July 05, 2009 2:18:09 PMPage 41 © 2005 Mitchell Repair Information Company, LLC.
Page 259 of 392
1990-91 DRIVE AXLES
Differentials & Drive Axles - 929, B2200, B2600i, MX-5 Miata, MPV, Protege & RX-7
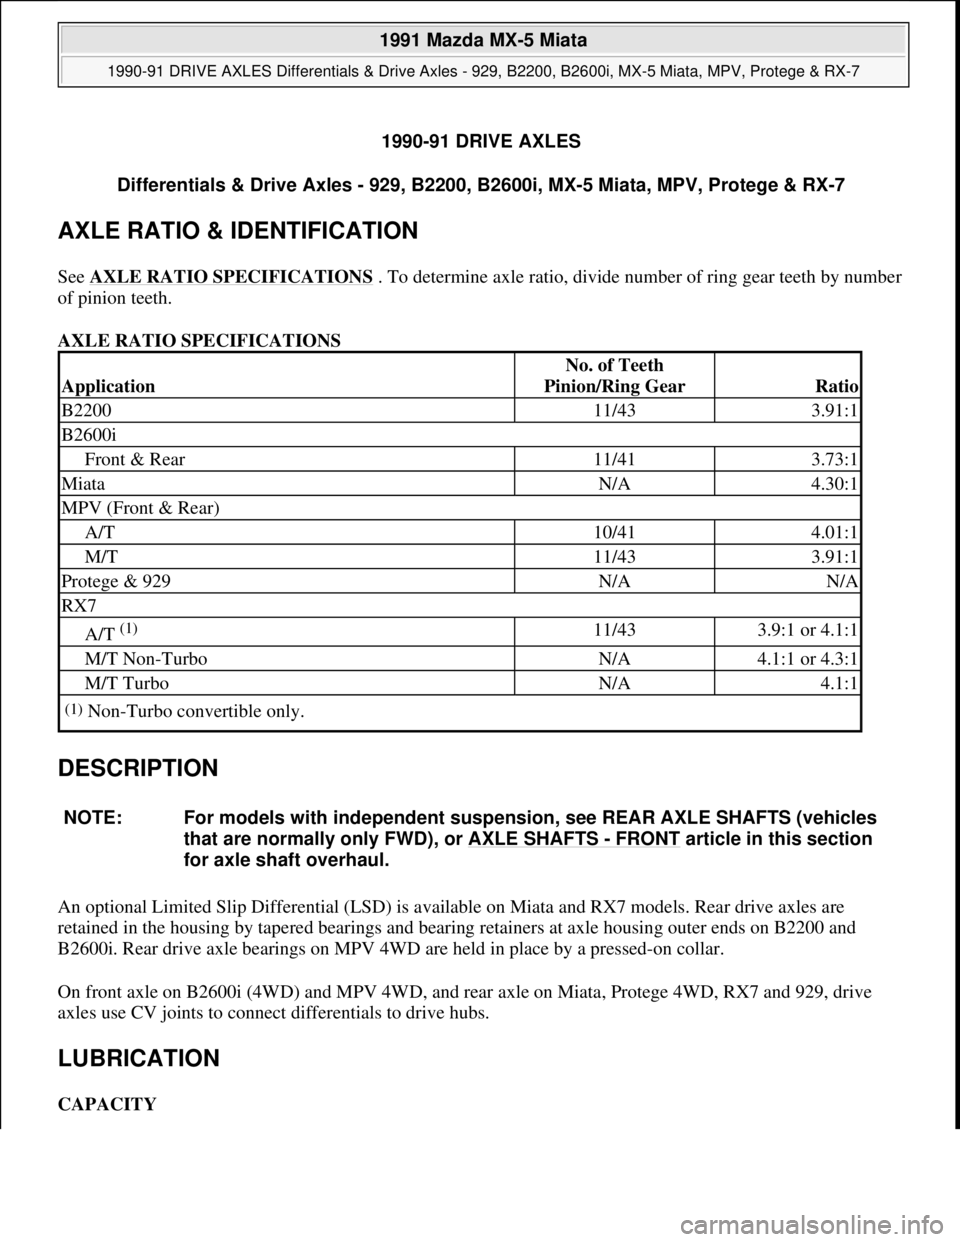
AXLE RATIO & IDENTIFICATION
See AXLE RATIO SPECIFICATIONS . To determine axle ratio, divide number of ring gear teeth by number
of pinion teeth.
AXLE RATIO SPECIFICATIONS
DESCRIPTION
An optional Limited Slip Differential (LSD) is available on Miata and RX7 models. Rear drive axles are
retained in the housing by tapered bearings and bearing retainers at axle housing outer ends on B2200 and
B2600i. Rear drive axle bearings on MPV 4WD are held in place by a pressed-on collar.
On front axle on B2600i (4WD) and MPV 4WD, and rear axle on Miata, Protege 4WD, RX7 and 929, drive
axles use CV joints to connect differentials to drive hubs.
LUBRICATION
CAPACITY
Application
No. of Teeth
Pinion/Ring Gear
Ratio
B220011/433.91:1
B2600i
Front & Rear11/413.73:1
MiataN/A4.30:1
MPV (Front & Rear)
A/T10/414.01:1
M/T11/433.91:1
Protege & 929N/AN/A
RX7
A/T (1) 11/433.9:1 or 4.1:1
M/T Non-TurboN/A4.1:1 or 4.3:1
M/T TurboN/A4.1:1
(1)Non-Turbo convertible only.
NOTE: For models with independent suspension, see REAR AXLE SHAFTS (vehicles
that are normally only FWD), or AXLE SHAFTS
- FRONT article in this section
for axle shaft overhaul.
1991 Mazda MX-5 Miata
1990-91 DRIVE AXLES Differentials & Drive Axles - 929, B2200, B2600i, MX-5 Miata, MPV, Protege & RX-7
1991 Mazda MX-5 Miata
1990-91 DRIVE AXLES Differentials & Drive Axles - 929, B2200, B2600i, MX-5 Miata, MPV, Protege & RX-7
Microsoft
Sunday, July 05, 2009 2:17:01 PMPage 1 © 2005 Mitchell Repair Information Company, LLC.
Microsoft
Sunday, July 05, 2009 2:17:05 PMPage 1 © 2005 Mitchell Repair Information Company, LLC.
Page 260 of 392
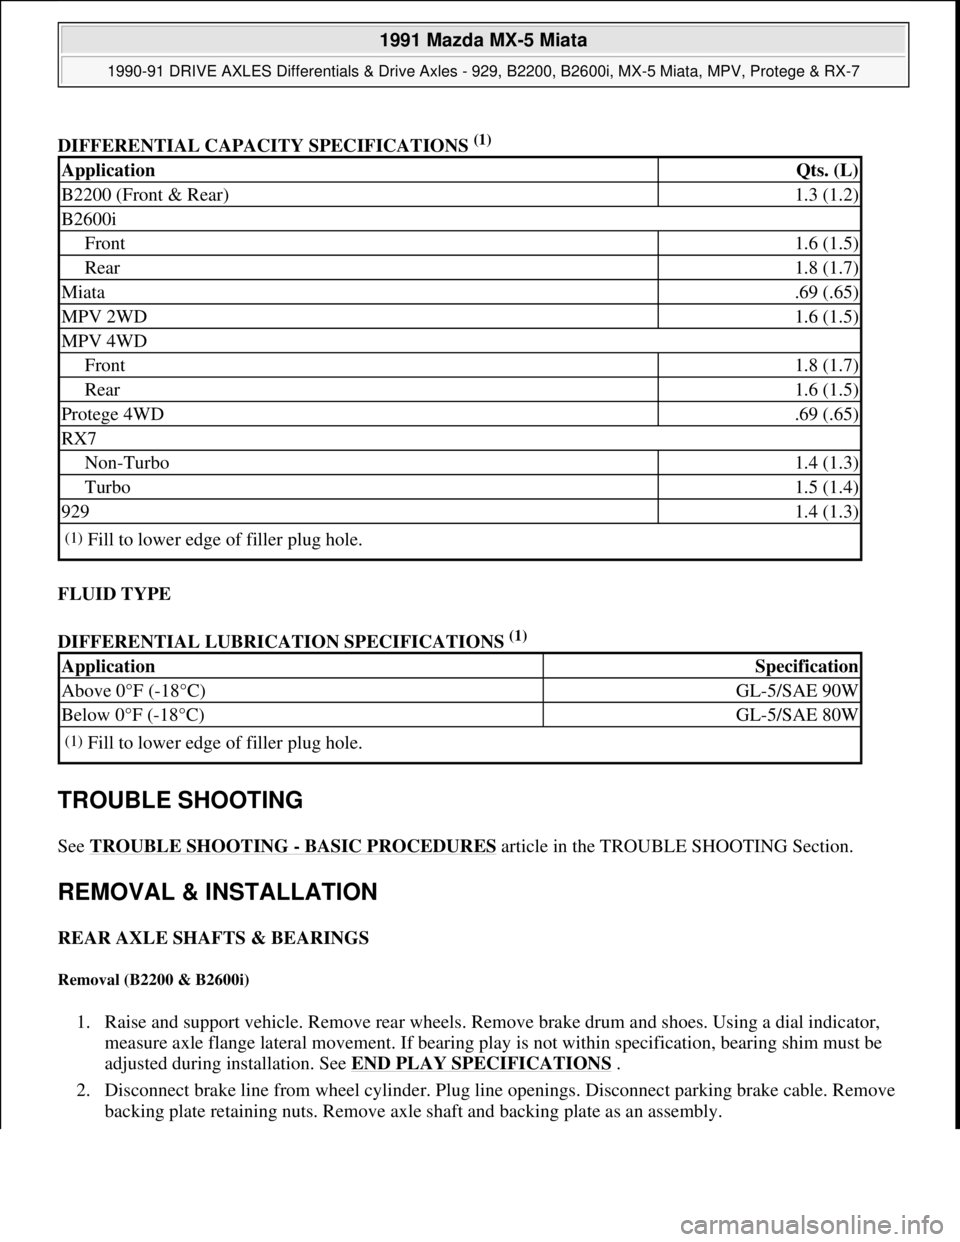
DIFFERENTIAL CAPACITY SPECIFICATIONS (1)
FLUID TYPE
DIFFERENTIAL LUBRICATION SPECIFICATIONS
(1)
TROUBLE SHOOTING
See TROUBLE SHOOTING - BASIC PROCEDURES article in the TROUBLE SHOOTING Section.
REMOVAL & INSTALLATION
REAR AXLE SHAFTS & BEARINGS
Removal (B2200 & B2600i)
1. Raise and support vehicle. Remove rear wheels. Remove brake drum and shoes. Using a dial indicator,
measure axle flange lateral movement. If bearing play is not within specification, bearing shim must be
adjusted during installation. See END PLAY SPECIFICATIONS
.
2. Disconnect brake line from wheel cylinder. Plug line openings. Disconnect parking brake cable. Remove
backing plate retaining nuts. Remove axle shaft and backing plate as an assembly.
ApplicationQts. (L)
B2200 (Front & Rear)1.3 (1.2)
B2600i
Front1.6 (1.5)
Rear1.8 (1.7)
Miata.69 (.65)
MPV 2WD1.6 (1.5)
MPV 4WD
Front1.8 (1.7)
Rear1.6 (1.5)
Protege 4WD.69 (.65)
RX7
Non-Turbo1.4 (1.3)
Turbo1.5 (1.4)
9291.4 (1.3)
(1)Fill to lower edge of filler plug hole.
ApplicationSpecification
Above 0°F (-18°C)GL-5/SAE 90W
Below 0°F (-18°C)GL-5/SAE 80W
(1)Fill to lower edge of filler plug hole.
1991 Mazda MX-5 Miata
1990-91 DRIVE AXLES Differentials & Drive Axles - 929, B2200, B2600i, MX-5 Miata, MPV, Protege & RX-7
Microsoft
Sunday, July 05, 2009 2:17:01 PMPage 2 © 2005 Mitchell Repair Information Company, LLC.