air filter MAZDA MIATA 1991 Factory Service Manual
[x] Cancel search | Manufacturer: MAZDA, Model Year: 1991, Model line: MIATA, Model: MAZDA MIATA 1991Pages: 392, PDF Size: 29.45 MB
Page 294 of 392

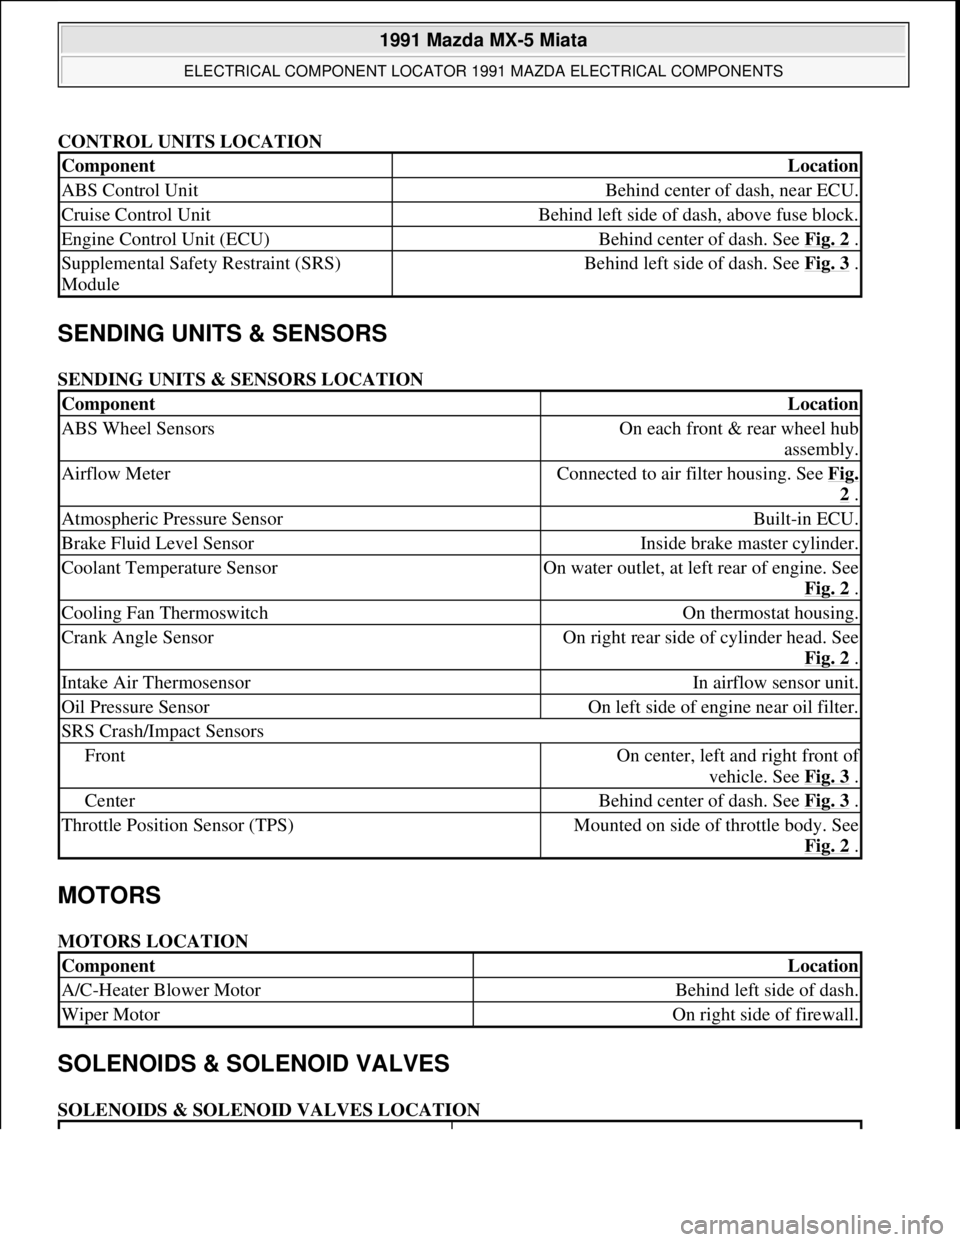
CONTROL UNITS LOCATION
SENDING UNITS & SENSORS
SENDING UNITS & SENSORS LOCATION
MOTORS
MOTORS LOCATION
SOLENOIDS & SOLENOID VALVES
SOLENOIDS & SOLENOID VALVES LOCATION
ComponentLocation
ABS Control UnitBehind center of dash, near ECU.
Cruise Control UnitBehind left side of dash, above fuse block.
Engine Control Unit (ECU)Behind center of dash. See Fig. 2 .
Supplemental Safety Restraint (SRS)
ModuleBehind left side of dash. See Fig. 3 .
ComponentLocation
ABS Wheel SensorsOn each front & rear wheel hub
assembly.
Airflow MeterConnected to air filter housing. See Fig.
2 .
Atmospheric Pressure SensorBuilt-in ECU.
Brake Fluid Level SensorInside brake master cylinder.
Coolant Temperature SensorOn water outlet, at left rear of engine. See
Fig. 2
.
Cooling Fan ThermoswitchOn thermostat housing.
Crank Angle SensorOn right rear side of cylinder head. See
Fig. 2
.
Intake Air ThermosensorIn airflow sensor unit.
Oil Pressure SensorOn left side of engine near oil filter.
SRS Crash/Impact Sensors
FrontOn center, left and right front of
vehicle. See Fig. 3
.
CenterBehind center of dash. See Fig. 3 .
Throttle Position Sensor (TPS)Mounted on side of throttle body. See
Fig. 2
.
ComponentLocation
A/C-Heater Blower MotorBehind left side of dash.
Wiper MotorOn right side of firewall.
1991 Mazda MX-5 Miata
ELECTRICAL COMPONENT LOCATOR 1991 MAZDA ELECTRICAL COMPONENTS
Microsoft
Sunday, July 05, 2009 2:15:23 PMPage 2 © 2005 Mitchell Repair Information Company, LLC.
Page 387 of 392

Fig. 5: Aligning Camshaft Timing Marks (DOHC 1.8L Engines)
Courtesy of MAZDA MOTORS CORP.
Removal (MX-5 Miata - DOHC)
1. Disconnect negative battery cable. Drain cooling system. Remove radiator hose and by-pass hoses from
thermostat housing. Remove air cleaner intake duct assembly from throttle body to air cleaner filter
housing. Remove splash shield.
2. Remove drive belt(s) and water pump pulley. See Fig. 6
. Align crankshaft pulley timing mark with
cylinder No. 1 at TDC of compression stroke. Hold crankshaft pulley stationary. Remove crankshaft
pulley bolts. Remove pulley. Remove crankshaft pulley hub bolt and hub.
3. Remove cylinder head cover. Remove upper, center and lower timing belt cover. If timing belt is to be
reused, mark timing belt rotation direction. Ensure timing marks on camshaft sprockets are aligned. See
Fig. 7
. Loosen timing belt tensioner lock bolt, and move tensioner away from belt with spring fully
expanded. Remove timin
g belt.
1991 Mazda MX-5 Miata
MAZDA 1.6L & 1.8L 4-Cylinder - 1986-95
Microsoft
Sunday, July 05, 2009 2:12:44 PMPage 6 © 2005 Mitchell Repair Information Company, LLC.