lock MAZDA MODEL 3 4-DOOR 2005 Manual PDF
[x] Cancel search | Manufacturer: MAZDA, Model Year: 2005, Model line: MODEL 3 4-DOOR, Model: MAZDA MODEL 3 4-DOOR 2005Pages: 378, PDF Size: 5.32 MB
Page 212 of 378

Black plate (212,1)
qClock
When the ignition switch is in the ACC or
ON position, the time is displayed.
Time setting
1. Press the CLOCK button until a beep
sounds, and “12Hr ”and “24Hr ”will be
displayed.
2. Press the SET button to switch between “12Hr ”and “24Hr ”displays. The
selected display will flash.
To select the desired clock setting,
press the CLOCK button again while
the preferred setting is flashing.
3. “Hr. ADJUST ”will be displayed next,
and the hour portion of the display will
flash. Press the SET button to set the
hour, then press the CLOCK button.
4. “Min. ADJUST ”will be displayed
next, and the minutes portion of the
display will flash. Press the SET button
to set the minutes, then press the
CLOCK button.
Time resetting
While the clock is displayed, press the
SET button 1.5 seconds or more. When
the button is released, a beep will sound
and the clock will be reset as follows:
(Example) 12:01
―12:29 →12:00
12:30 ―12:59 →1:00
NOTE
When the SET button is released, the
seconds are reset to “00 ”.
q Audio Display
The audio system status is displayed. To
operate the audio system, refer to
“Audio System ”(page 6-10).
6-42
Interior Comfort
Interior Equipment
Mazda3_8T96-EA-04J_Edition3 Page212
Wednesday, May 11 2005 3:38 PM
Form No.8T96-EA-04J
Page 215 of 378

Black plate (215,1)
Bottle Holder
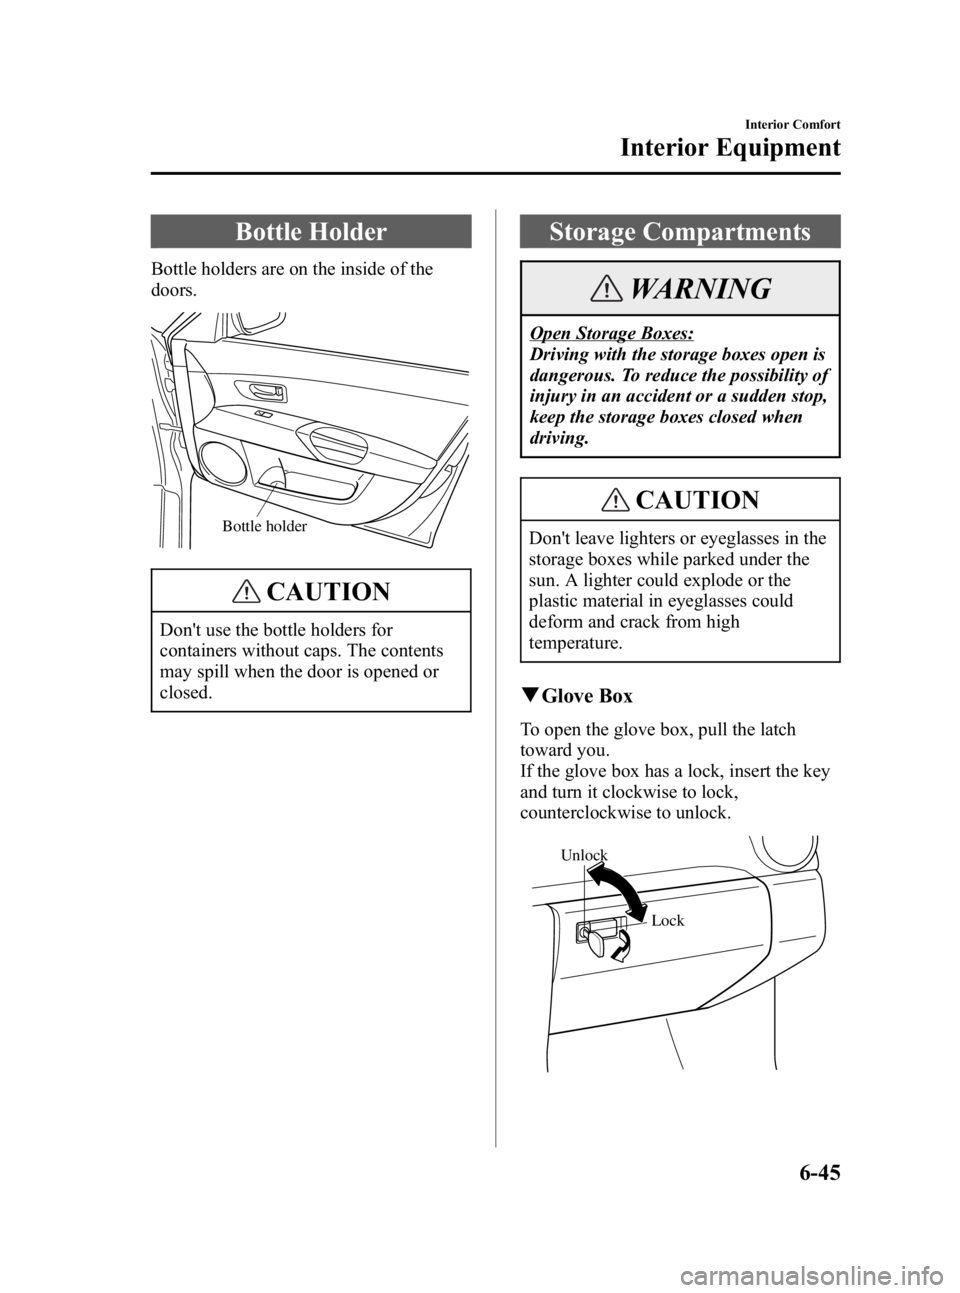
Bottle holders are on the inside of the
doors.
Bottle holder
CAUTION
Don't use the bottle holders for
containers without caps. The contents
may spill when the door is opened or
closed.
Storage Compartments
WARNING
Open Storage Boxes:
Driving with the storage boxes open is
dangerous. To reduce the possibility of
injury in an accident or a sudden stop,
keep the storage boxes closed when
driving.
CAUTION
Don't leave lighters or eyeglasses in the
storage boxes while parked under the
sun. A lighter could explode or the
plastic material in eyeglasses could
deform and crack from high
temperature.
qGlove Box
To open the glove box, pull the latch
toward you.
If the glove box has a lock, insert the key
and turn it clockwise to lock,
counterclockwise to unlock.
Unlock
Lock
Interior Comfort
Interior Equipment
6-45
Mazda3_8T96-EA-04J_Edition3 Page215
Wednesday, May 11 2005 3:38 PM
Form No.8T96-EA-04J
Page 218 of 378

Black plate (218,1)
2. Insert the trunk board loops into thetrunk board slits.
Front
Trunk
board
NOTE
To facilitate insertion of the trunk board
loops into the trunk board slits, first
insert the bottom of the rear trunk board
into the groove of the luggage sub-
compartment.
GrooveCargo sub-
compartment
3. Rock the trunk board to make sure theboard is installed securely.
To separate horizontally
Use the front trunk board to separate the
luggage compartment horizontally.
CAUTION
lDo not place heavy objects on the
trunk board or apply excessive force
as they could damage the trunk
board. The permissible weight is
about 5 kg (11 lb).
lDo not use the rear trunk board to
separate the luggage compartment
horizontally. The rear trunk board
cannot be locked to the trunk board
loops and it could move and cause
injury while the vehicle is moving.
1. Pull the trunk board loops out.
Compartment
divider loop
2. Insert the trunk board loop into slit A.
Slit A
6-48
Interior Comfort
Interior Equipment
Mazda3_8T96-EA-04J_Edition3 Page218
Wednesday, May 11 2005 3:38 PM
Form No.8T96-EA-04J
Page 224 of 378

Black plate (224,1)
qJack
To remove the jack
1. Turn the knob and remove the cover.
2. Turn the wing bolt counterclockwise.
To secure the jack
Perform the removal procedure in reverse.
qSpare Tire
Your Mazda has a temporary spare tire.
The temporary spare tire is lighter and
smaller than a conventional tire, and is
designed only for emergency use and
should be used only for VERY short
periods. Temporary spares should
NEVER be used for long drives or
extended periods.
WARNING
Driving with a Temporary Spare Tire
on Ice or Snow:
Driving with a spare tire on the front
(driving) wheels on ice or snow is
dangerous. Handling will be affected.
You could lose control of the vehicle
and have an accident. Put the spare
tire on the rear axle and move a
regular tire to the front.
CAUTION
lWhen using the temporary spare tire,
driving stability may decrease
compared to when using only the
conventional tire.
Drive carefully.
lTo avoid damage to the temporary
spare or to the vehicle, observe the
following precautions:
lDon't exceed 80 km/h (50 mph).lAvoid driving over obstacles.
Also, don't drive through an
automatic car wash. This tire's
diameter is smaller than a
conventional tire's, so the ground
clearance is reduced about 25 mm
(1 in).
lDon't use a tire chain on this tire
because it won't fit properly.
lDon't use your temporary spare
on any other vehicle; it has been
designed only for your Mazda.
lUse only one temporary spare tire
on your vehicle at the same time.
7-4
In Case of an Emergency
Flat Tire
Mazda3_8T96-EA-04J_Edition3 Page224
Wednesday, May 11 2005 3:38 PM
Form No.8T96-EA-04J
Page 225 of 378

Black plate (225,1)
NOTE
(With Tire Pressure Monitoring
System)
A tire pressure sensor is not installed to
the temporary spare tire. The warning
light will flash continuously while the
temporary spare tire is being used (page
5-23).
To remove the spare tire
(4 Door)
1. Remove the trunk mat and trunk board.
2. Turn the tire hold-down boltcounterclockwise with the lug wrench.
(5 Door)
1. Remove the trunk mat, trunk board andcargo sub-compartment.
2. Turn the tire hold-down boltcounterclockwise with the lug wrench.
In Case of an Emergency
Flat Tire
7-5
Mazda3_8T96-EA-04J_Edition3 Page225
Wednesday, May 11 2005 3:38 PM
Form No.8T96-EA-04J
Page 227 of 378

Black plate (227,1)
6. Block the wheel diagonally oppositethe flat tire. When blocking a wheel,
place a tire block both in front and
behind the tire.
NOTE
When blocking a tire, use rocks or
wood blocks of sufficient size to hold
the tire in place.
qRemoving a Flat Tire
1. If your vehicle is equipped with a
wheel cover, pry off the wheel cover
with the beveled end of the lug wrench.
NOTE
Force the end of the lug wrench firmly
between wheel and cover, or removal
will be difficult.
CAUTION
There is a valve-stem mark inside the
wheel cap. When installing the wheel
cap, align this mark with the tire's valve
stem.
Damage could occur during installation
if the wheel cover is not properly
aligned.
2. Loosen the lug nuts by turning them counterclockwise one turn each, but
don't remove any lug nuts until the tire
has been raised off the ground.
In Case of an Emergency
Flat Tire
7-7
Mazda3_8T96-EA-04J_Edition3 Page227
Wednesday, May 11 2005 3:38 PM
Form No.8T96-EA-04J
Page 228 of 378

Black plate (228,1)
3. Place the jack under the jackingposition closest to the tire being
changed.
Jacking position
WARNING
Incorrect Jacking Position:
Attempting to jack the vehicle in
positions other than those
recommended in this manual is
dangerous. The vehicle could slip off
the jack and seriously injure or even
kill someone. Use only the front and
rear jacking positions recommended
in this manual.
Improper Jack:
Using a jack that isn't designed for
your Mazda is dangerous. The vehicle
could slip off the jack and seriously
injure someone. Use only the jack
provided with your Mazda.
Placing Objects Under the Jack:
Jacking the vehicle with an object
under the jack is dangerous. The jack
could slip and someone could be
seriously injured by the jack or the
falling vehicle. Never place objects
under the jack. 4. Insert the jack handle into the jack.
5. Turn the jack handle clockwise and
raise the vehicle high enough so that
the spare tire can be installed. Before
removing the lug nuts, make sure your
Mazda is firmly in position and that it
cannot slip or move.
6. Remove the lug nuts by turning them
counterclockwise; then remove the
wheel and center cap.
7-8
In Case of an Emergency
Flat Tire
Mazda3_8T96-EA-04J_Edition3 Page228
Wednesday, May 11 2005 3:38 PM
Form No.8T96-EA-04J
Page 229 of 378

Black plate (229,1)
qLocking Lug Nutsí
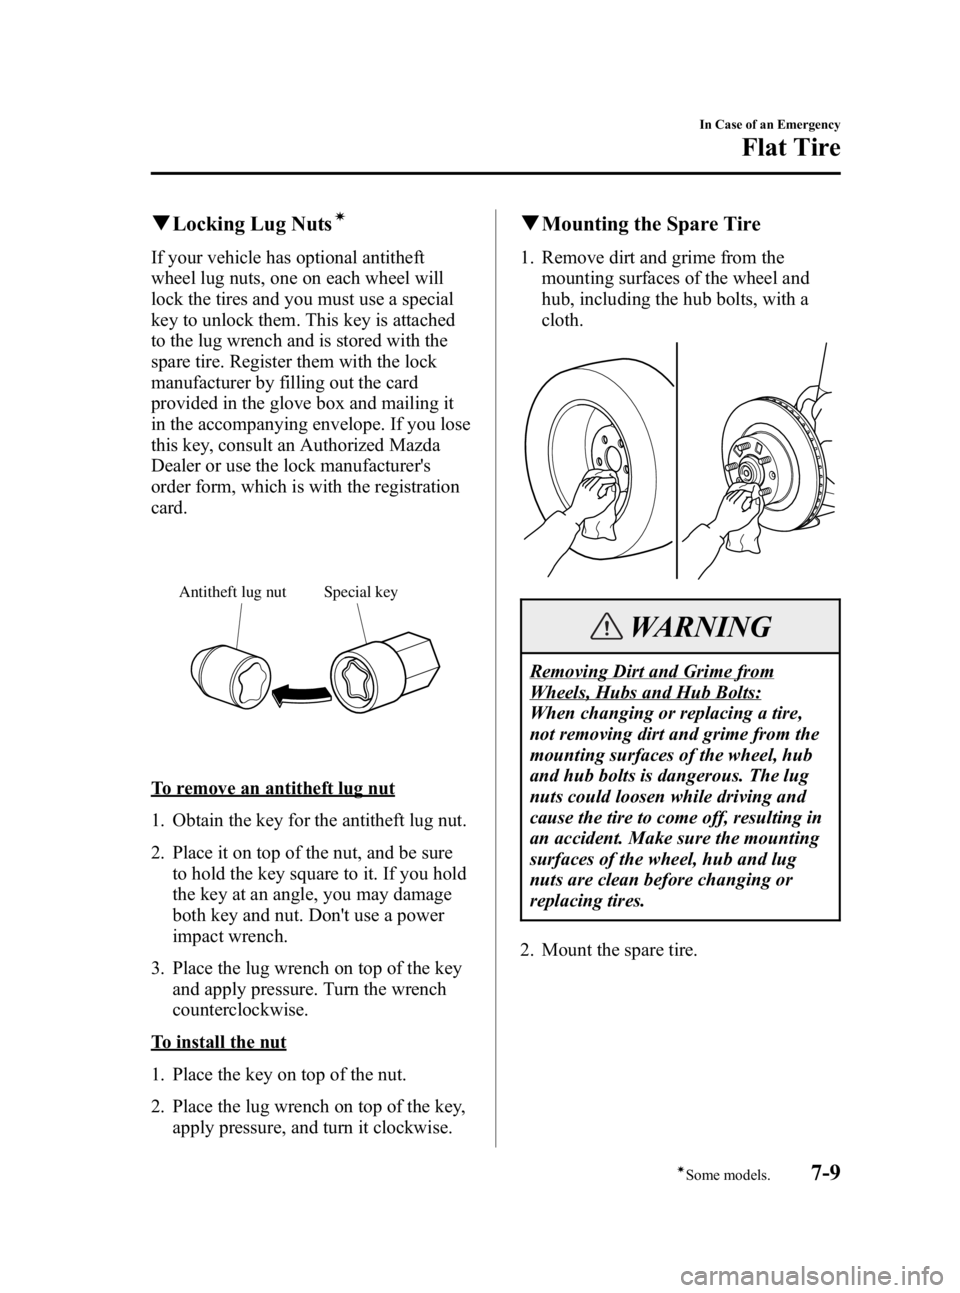
If your vehicle has optional antitheft
wheel lug nuts, one on each wheel will
lock the tires and you must use a special
key to unlock them. This key is attached
to the lug wrench and is stored with the
spare tire. Register them with the lock
manufacturer by filling out the card
provided in the glove box and mailing it
in the accompanying envelope. If you lose
this key, consult an Authorized Mazda
Dealer or use the lock manufacturer's
order form, which is with the registration
card.
Special key
Antitheft lug nut
To remove an antitheft lug nut
1. Obtain the key for the antitheft lug nut.
2. Place it on top of the nut, and be sure
to hold the key square to it. If you hold
the key at an angle, you may damage
both key and nut. Don't use a power
impact wrench.
3. Place the lug wrench on top of the key and apply pressure. Turn the wrench
counterclockwise.
To install the nut
1. Place the key on top of the nut.
2. Place the lug wrench on top of the key,apply pressure, and turn it clockwise.
qMounting the Spare Tire
1. Remove dirt and grime from the
mounting surfaces of the wheel and
hub, including the hub bolts, with a
cloth.
WARNING
Removing Dirt and Grime from
Wheels, Hubs and Hub Bolts:
When changing or replacing a tire,
not removing dirt and grime from the
mounting surfaces of the wheel, hub
and hub bolts is dangerous. The lug
nuts could loosen while driving and
cause the tire to come off, resulting in
an accident. Make sure the mounting
surfaces of the wheel, hub and lug
nuts are clean before changing or
replacing tires.
2. Mount the spare tire.
In Case of an Emergency
Flat Tire
7-9íSome models.
Mazda3_8T96-EA-04J_Edition3 Page229
Wednesday, May 11 2005 3:38 PM
Form No.8T96-EA-04J
Page 230 of 378

Black plate (230,1)
3. Install the lug nuts with the bevelededge inward; tighten them by hand.
WARNING
Don't Apply Oil or Grease to Lug
Nuts, Bolts:
Applying oil or grease to lug nuts and
bolts is dangerous. The lug nuts could
loosen while driving and cause the tire
to come off, resulting in an accident.
In addition, lug nuts and bolts could
be damaged if tightened more than
necessary. Do not apply oil or grease
to lug nuts and bolts and do not
tighten the lug nuts beyond the
recommended tightening torque. 4. Turn the jack handle counterclockwise
and lower the vehicle. Use the lug
wrench to tighten the nuts in the order
shown.
If you're unsure of how tight the nuts
should be, have them inspected at an
Authorized Mazda Dealer.
Nut tightening torque
N·m (kgf·m, ft·lbf) 88 ―117 (9 ―11, 65 ―93)
7-10
In Case of an Emergency
Flat Tire
Mazda3_8T96-EA-04J_Edition3 Page230
Wednesday, May 11 2005 3:38 PM
Form No.8T96-EA-04J
Page 246 of 378

Black plate (246,1)
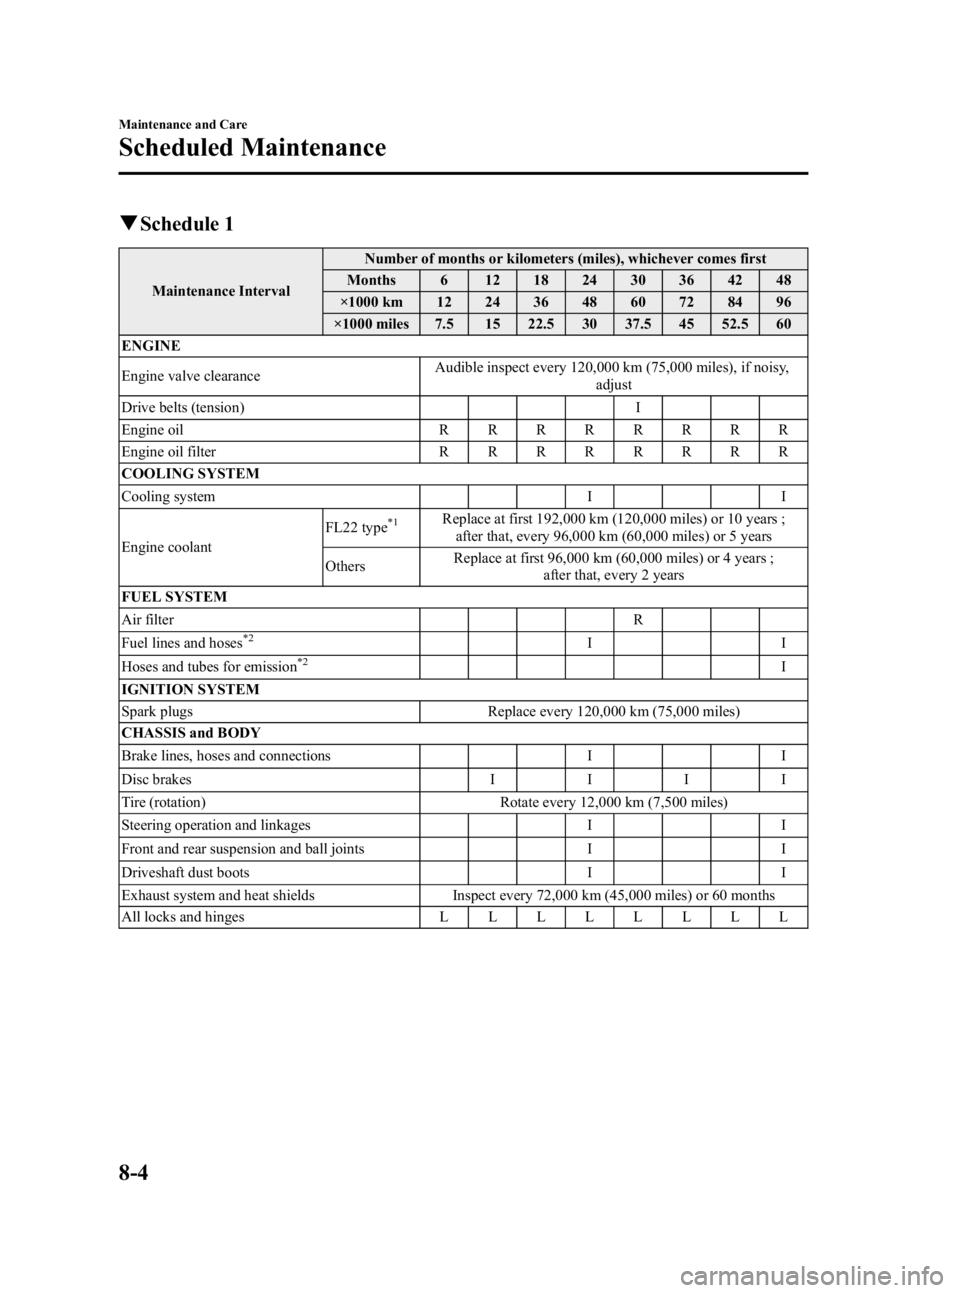
qSchedule 1
Maintenance Interval Number of months or kilometers (miles), whichever comes first
Months 6 12 18 24 30 36 42 48
×1000 km 12 24 36 48 60 72 84 96
×1000 miles 7.5 15 22.5 30 37.5 45 52.5 60
ENGINE
Engine valve clearance Audible inspect every 120,000 km (75,000 miles), if noisy,
adjust
Drive belts (tension) I
Engine oil RRRRRRRR
Engine oil filter RRRRRRRR
COOLING SYSTEM
Cooling system II
Engine coolant FL22 type
*1Replace at first 192,000 km (120,000 miles) or 10 years ;
after that, every 96,000 km (60,000 miles) or 5 years
Others Replace at first 96,000 km (60,000 miles) or 4 years ;
after that, every 2 years
FUEL SYSTEM
Air filter R
Fuel lines and hoses
*2II
Hoses and tubes for emission*2I
IGNITION SYSTEM
Spark plugs Replace every 120,000 km (75,000 miles)
CHASSIS and BODY
Brake lines, hoses and connections I I
Disc brakes IIII
Tire (rotation) Rotate every 12,000 km (7,500 miles)
Steering operation and linkages I I
Front and rear suspension and ball joints I I
Driveshaft dust boots I I
Exhaust system and heat shields Inspect every 72,000 km (45,000 miles) or 60 months
All locks and hinges LLLLLLLL
8-4
Maintenance and Care
Scheduled Maintenance
Mazda3_8T96-EA-04J_Edition3 Page246
Wednesday, May 11 2005 3:39 PM
Form No.8T96-EA-04J