clock MAZDA MODEL 3 4-DOOR 2017 Owner's Manual
[x] Cancel search | Manufacturer: MAZDA, Model Year: 2017, Model line: MODEL 3 4-DOOR, Model: MAZDA MODEL 3 4-DOOR 2017Pages: 612
Page 468 of 612
6–56
Maintenance and Care
Owner Maintenance
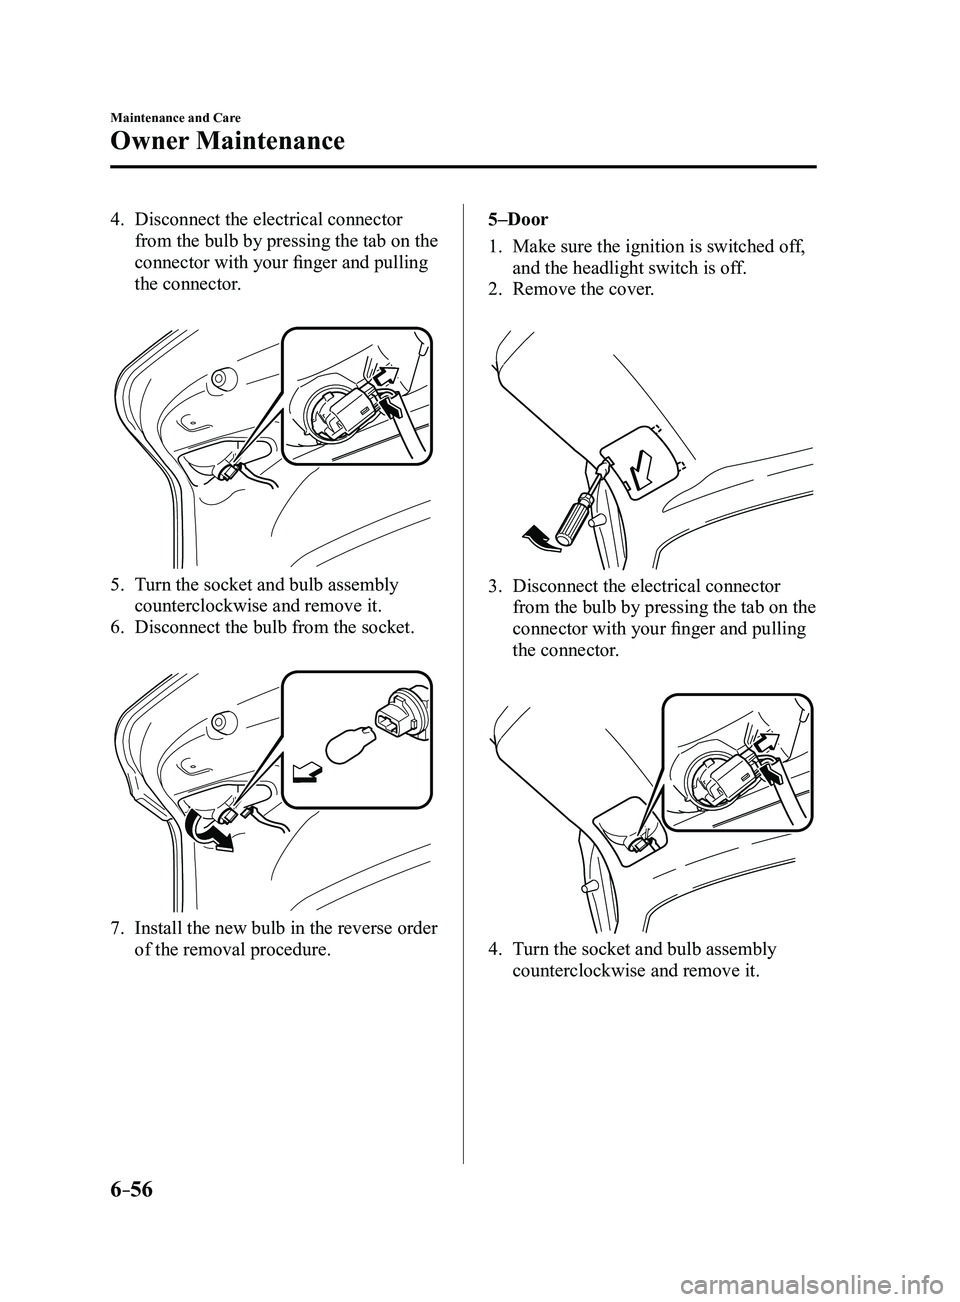
4. Disconnect the electrical connector
from the bulb by pressing the tab on the
connector with your finger and pulling
the connector.
5. Turn the socket and bulb assembly
counterclockwise and remove it.
6. Disconnect the bulb from the socket.
7. Install the new bulb in the reverse order
of the removal procedure.5–Door
1. Make sure the ignition is switched of
f,
and the headlight switch is off.
2. Remove the cover.
3. Disconnect the electrical connector
from the bulb by pressing the tab on the
connector with your finger and pulling
the connector.
4. Turn the socket and bulb assembly
counterclockwise and remove it.
Mazda3_8FL6-EA-16F_Edition2.indb 562016/08/10 17:38:57
Page 469 of 612
6–57
Maintenance and Care
Owner Maintenance
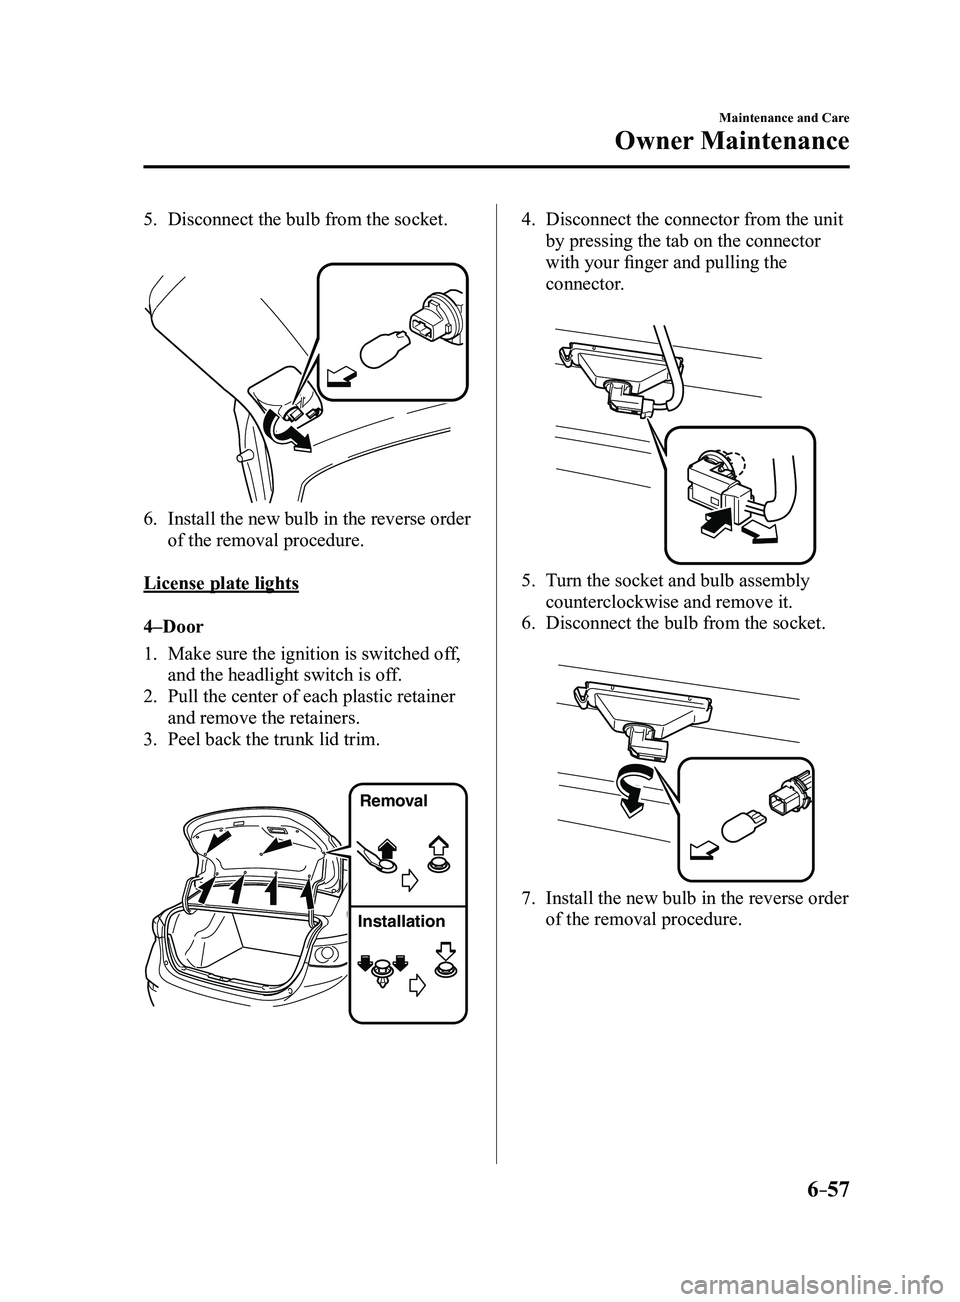
5. Disconnect the bulb from the socket.
6. Install the new bulb in the reverse order
of the removal procedure.
License plate lights
4–Door
1. Make sure the ignition is switched of f,
and the headlight switch is off.
2. Pull the center of each plastic retainer
and remove the retainers.
3. Peel back the trunk lid trim.
Removal
Installation
4. Disconnect the connector from the unit
by pressing the tab on the connector
with your finger and pulling the
connector.
5. Turn the socket and bulb assembly
counterclockwise and remove it.
6. Disconnect the bulb from the socket.
7. Install the new bulb in the reverse order
of the removal procedure.
Mazda3_8FL6-EA-16F_Edition2.indb 572016/08/10 17:38:58
Page 492 of 612
7–4
If Trouble Arises
Flat Tire
Jack
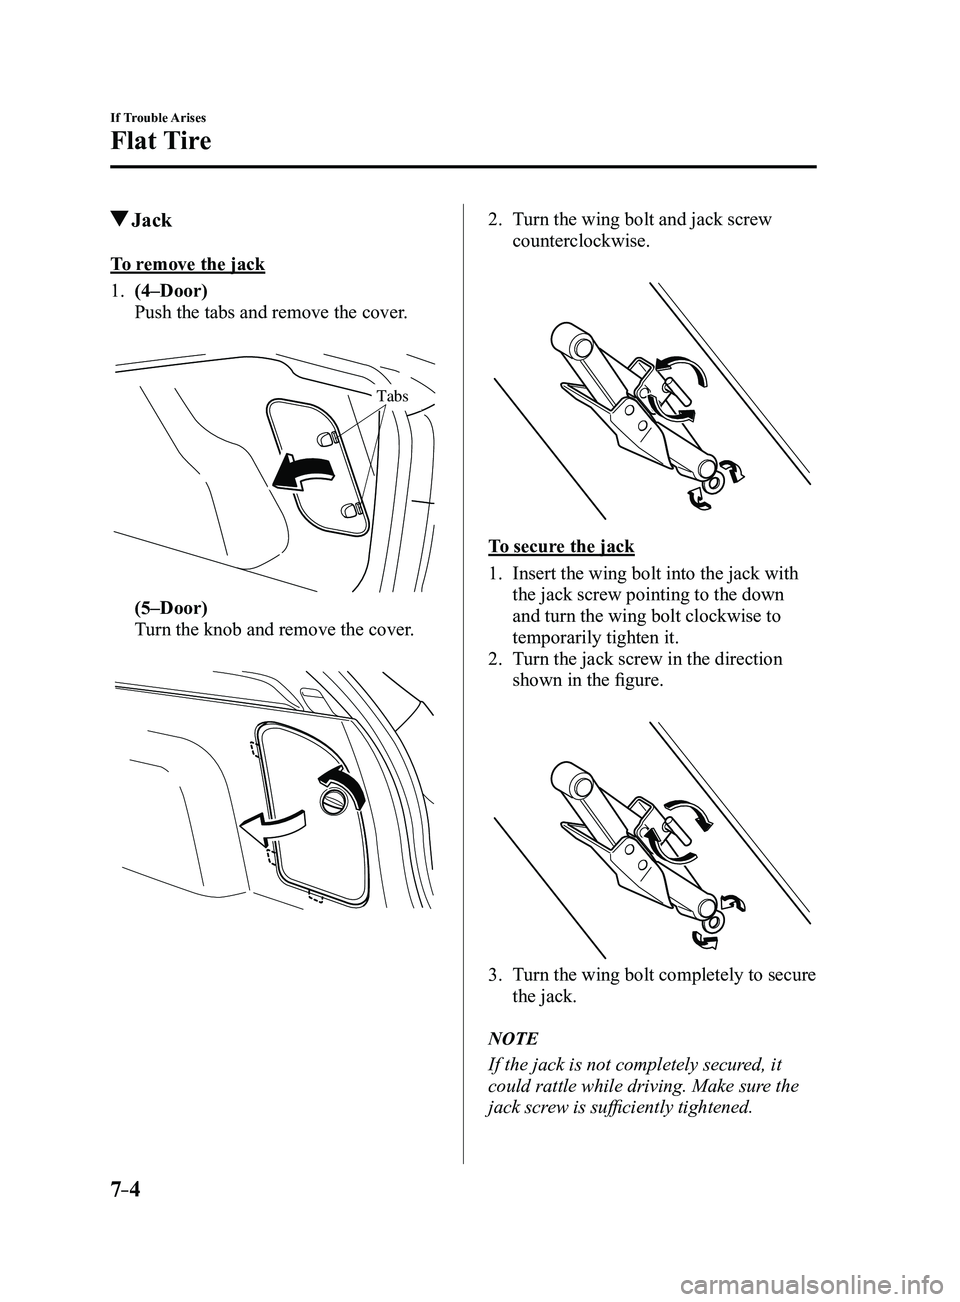
To remove the jack
1. (4–Door)
Push the tabs and remove the cover.
Tabs
(5–Door)
Turn the knob and remove the cover.
2. Turn the wing bolt and jack screw
counterclockwise.
To secure the jack
1. Insert the wing bolt into the jack with
the jack screw pointing to the down
and turn the wing bolt clockwise to
temporarily tighten it.
2. Turn the jack screw in the direction
shown in the figure.
3. Turn the wing bolt completely to secure
the jack.
NOTE
If the jack is not completely secured, it
could rattle while driving. Make sure the
jack screw is sufficiently tightened.
Mazda3_8FL6-EA-16F_Edition2.indb 42016/08/10 17:39:09
Page 494 of 612
7–6
If Trouble Arises
Flat Tire
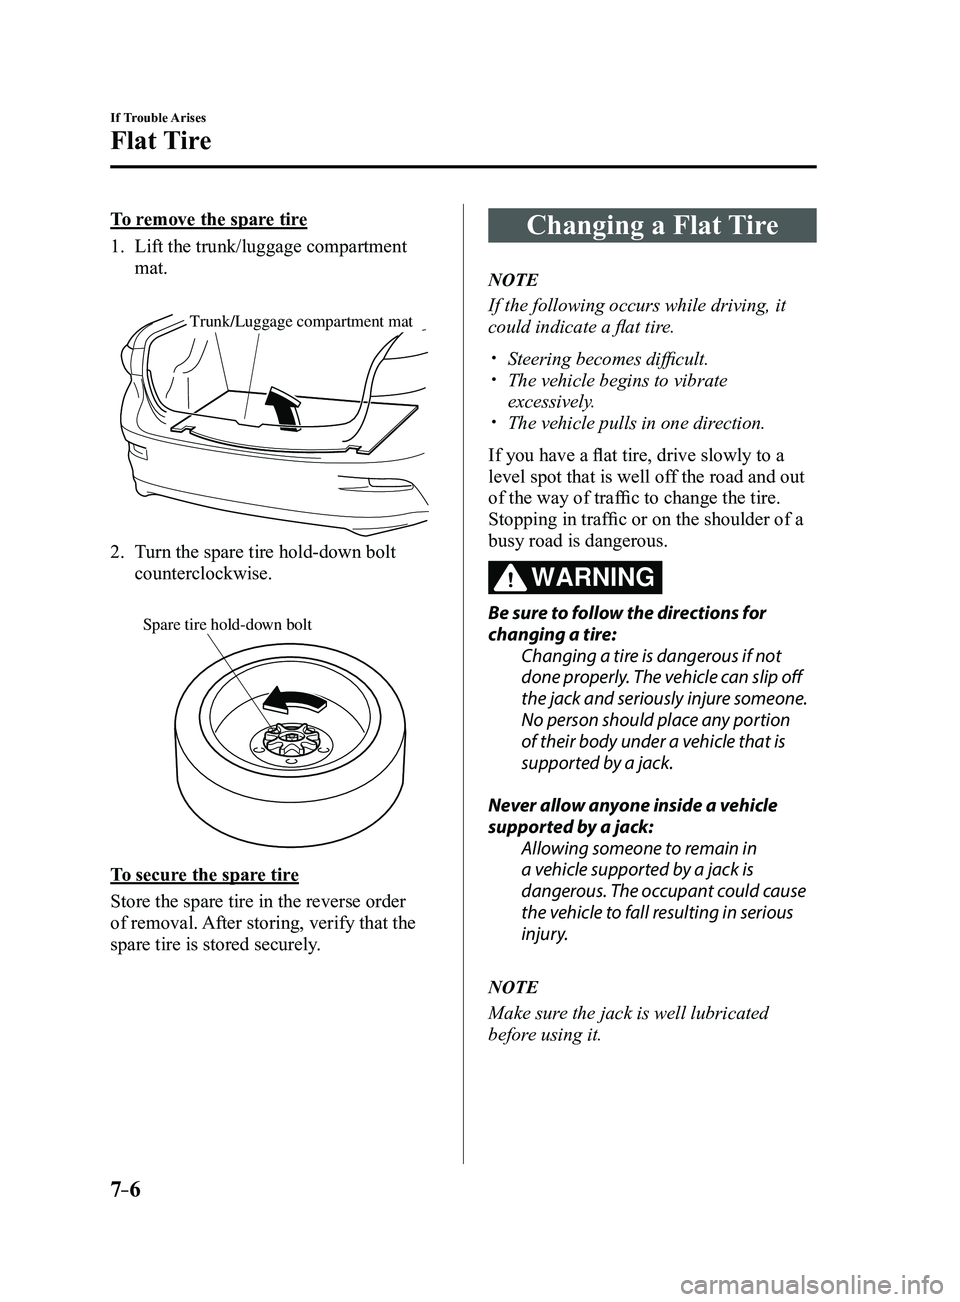
To remove the spare tire
1. Lift the trunk/luggage compartment
mat.
Trunk/Luggage compartment mat
2. Turn the spare tire hold-down bolt
counterclockwise.
Spare tire hold-down bolt
To secure the spare tire
Store the spare tire in the reverse order
of removal. After storing, verify that the
spare tire is stored securely.
Changing a Flat Tire
NOTE
If the following occurs while driving, it
could indicate a flat tire.
Steering becomes difficult. The vehicle begins to vibrate
excessively. The vehicle pulls in one direction.
If you have a flat tire, drive slowly to a
level spot that is well off the road and out
of the way of traffic to change the tire.
Stopping in traffic or on the shoulder of a
busy road is dangerous.
WARNING
Be sure to follow the directions for
changing a tire:
Changing a tire is dangerous if not
done properly. The vehicle can slip off
the jack and seriously injure someone.
No person should place any portion
of their body under a vehicle that is
supported by a jack.
Never allow anyone inside a vehicle
supported by a jack: Allowing someone to remain in
a vehicle supported by a jack is
dangerous. The occupant could cause
the vehicle to fall resulting in serious
injury.
NOTE
Make sure the jack is well lubricated
before using it.
Mazda3_8FL6-EA-16F_Edition2.indb 62016/08/10 17:39:10
Page 496 of 612
7–8
If Trouble Arises
Flat Tire
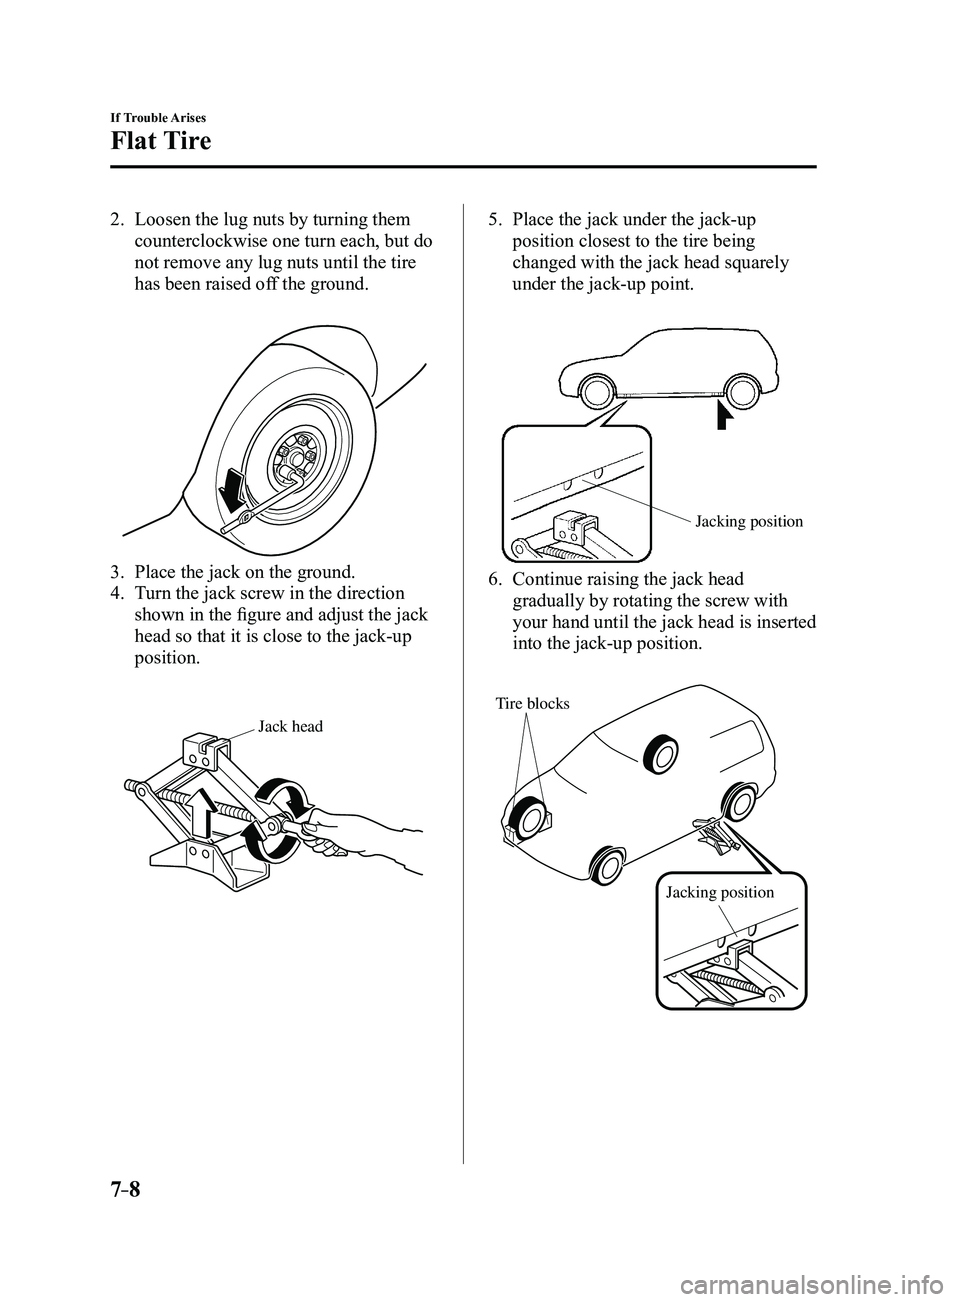
2. Loosen the lug nuts by turning them
counterclockwise one turn each, but do
not remove any lug nuts until the tire
has been raised off the ground.
3. Place the jack on the ground.
4. Turn the jack screw in the direction
shown in the figure and adjust the jack
head so that it is close to the jack-up
position.
Jack head
5. Place the jack under the jack-up
position closest to the tire being
changed with the jack head squarely
under the jack-up point.
Jacking position
6. Continue raising the jack head
gradually by rotating the screw with
your hand until the jack head is inserted
into the jack-up position.
Tire blocksJacking position
Mazda3_8FL6-EA-16F_Edition2.indb 82016/08/10 17:39:12
Page 497 of 612
7–9
If Trouble Arises
Flat Tire
WARNING
Use only the front and rear jacking
positions recommended in this manual:Attempting to jack the vehicle
in positions other than those
recommended in this manual is
dangerous. The vehicle could slip off
the jack and seriously injure or even kill
someone. Use only the front and rear
jacking positions recommended in this
manual.
Do not jack up the vehicle in a position
other than the designated jack-up
position or place any objects on or
under the jack: Jacking up the vehicle in a position
other than the designated jack-up
position or placing objects on or
under the jack is dangerous as it could
deform the vehicle body or the vehicle
could fall off the jack resulting in an
accident.
Use only the jack provided with your
Mazda: Using a jack that is not designed for
your Mazda is dangerous. The vehicle
could slip off the jack and seriously
injure someone.
Never place objects under the jack: Jacking the vehicle with an object
under the jack is dangerous. The jack
could slip and someone could be
seriously injured by the jack or the
falling vehicle.
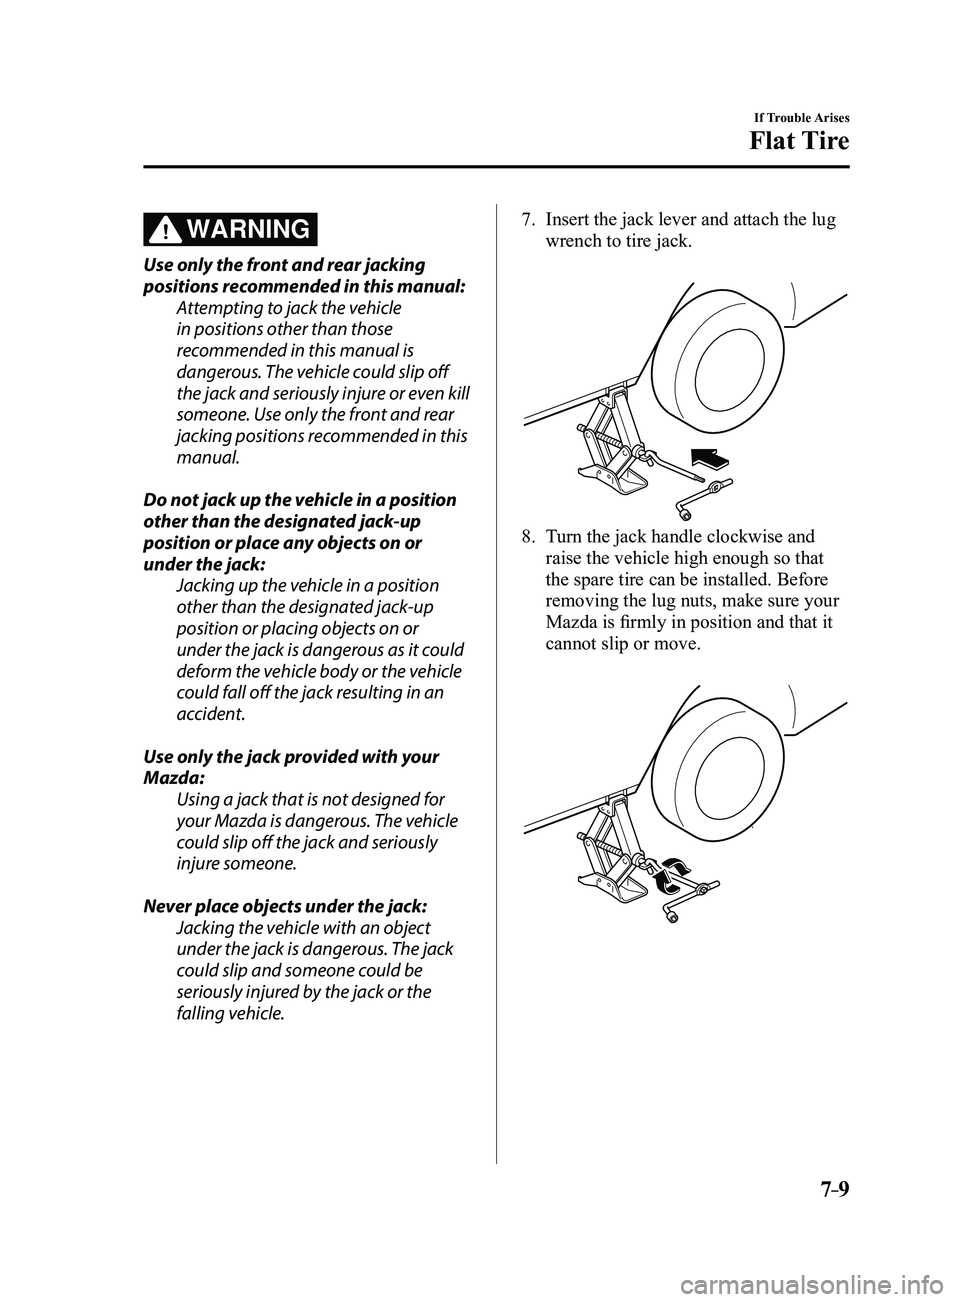
7. Insert the jack lever and attach the lug
wrench to tire jack.
8. Turn the jack handle clockwise and
raise the vehicle high enough so that
the spare tire can be installed. Before
removing the lug nuts, make sure your
Mazda is firmly in position and that it
cannot slip or move.
Mazda3_8FL6-EA-16F_Edition2.indb 92016/08/10 17:39:12
Page 498 of 612
7–10
If Trouble Arises
Flat Tire
*Some models.
WARNING
Do not jack up the vehicle higher than is
necessary:Jacking up the vehicle higher than
is necessary is dangerous as it could
destabilize the vehicle resulting in an
accident.
Do not start the engine or shake the
vehicle while it is jacked up: Starting the engine or shaking
the vehicle while it is jacked up is
dangerous as it could cause the vehicle
to fall off the jack resulting in an
accident.
Never go under the vehicle while it is
jacked up: Going under the vehicle while it is
jacked up is dangerous as it could
result in death or serious injury if the
vehicle were to fall off the jack.
9. Remove the lug nuts by turning them
counterclockwise; then remove the
wheel and center cap.
Locking Lug Nuts*
If your vehicle has Mazda optional
antitheft wheel lug nuts, one on each
wheel will lock the tires and you must
use a special key to unlock them. This
key will attach to the lug wrench.
Register them with the lock manufacturer
by filling out the card provided in the
glove compartment and mailing it in the
accompanying envelope. If you lose this
key, consult an Authorized Mazda Dealer
or use the lock manufacturer's order form,
which is with the registration card.
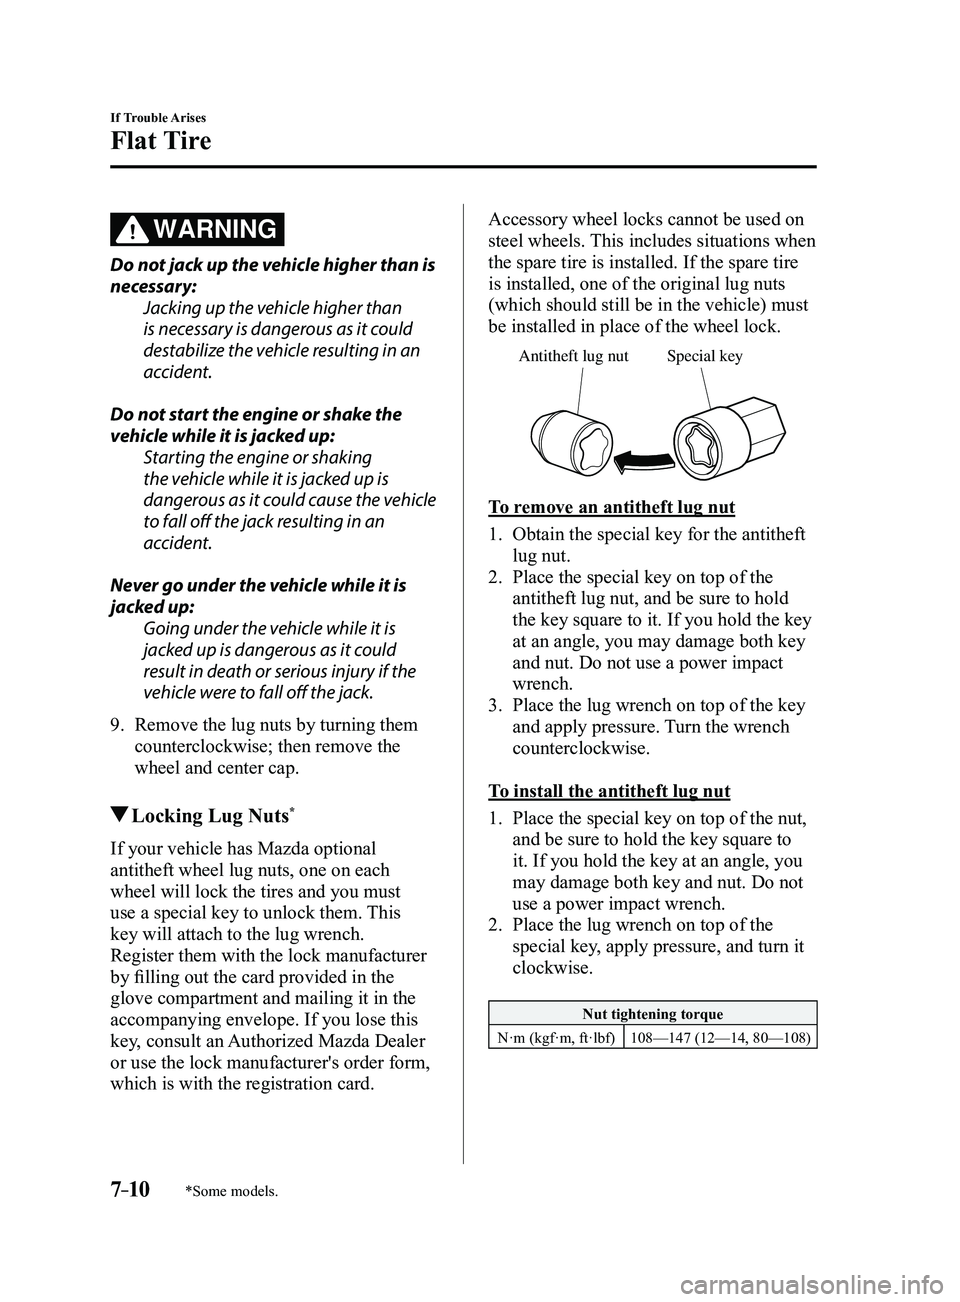
Accessory wheel locks cannot be used on
steel wheels. This includes situations when
the spare tire is installed. If the spare tire
is installed, one of the original lug nuts
(which should still be in the vehicle) must
be installed in place of the wheel lock.
Special ke y
Antitheft lug nut
To remove an antitheft lug nut
1. Obtain the special key for the antitheft
lug nut.
2. Place the special key on top of the
antitheft lug nut, and be sure to hold
the key square to it. If you hold the key
at an angle, you may damage both key
and nut. Do not use a power impact
wrench.
3. Place the lug wrench on top of the key
and apply pressure. Turn the wrench
counterclockwise.
To install the antitheft lug nut
1. Place the special key on top of the nut,
and be sure to hold the key square to
it. If you hold the key at an angle, you
may damage both key and nut. Do not
use a power impact wrench.
2. Place the lug wrench on top of the
special key, apply pressure, and turn it
clockwise.
Nut tightening torque
N·m (kgf·m, ft·lbf) 108—147 (12—14, 80—108)
Mazda3_8FL6-EA-16F_Edition2.indb 102016/08/10 17:39:13
Page 500 of 612
7–12
If Trouble Arises
Flat Tire
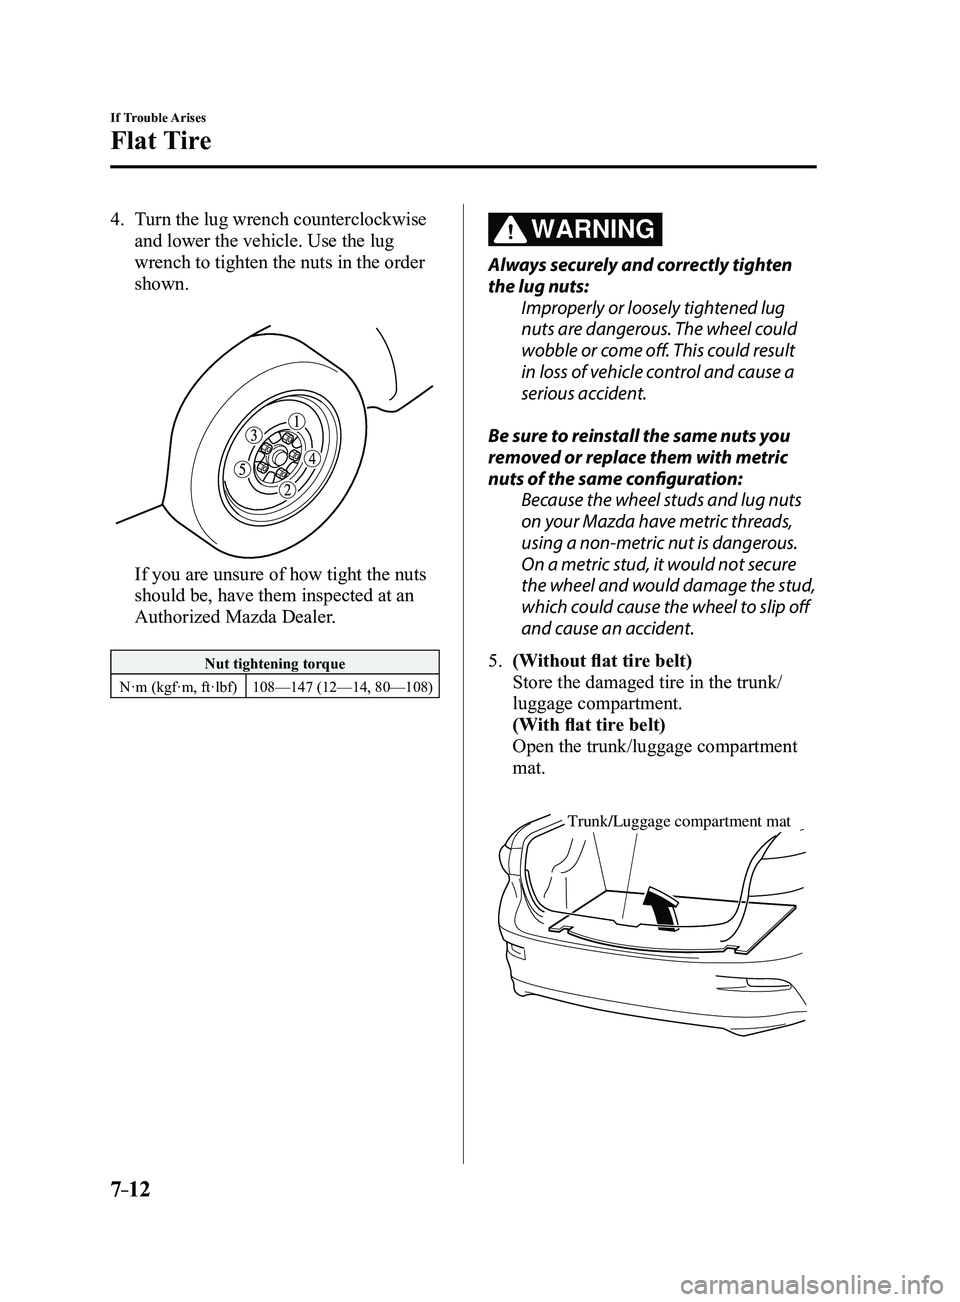
4. Turn the lug wrench counterclockwise
and lower the vehicle. Use the lug
wrench to tighten the nuts in the order
shown.
If you are unsure of how tight the nuts
should be, have them inspected at an
Authorized Mazda Dealer.
Nut tightening torque
N·m (kgf·m, ft·lbf) 108—147 (12—14, 80—108)
WARNING
Always securely and correctly tighten
the lug nuts:
Improperly or loosely tightened lug
nuts are dangerous. The wheel could
wobble or come off. This could result
in loss of vehicle control and cause a
serious accident.
Be sure to reinstall the same nuts you
removed or replace them with metric
nuts of the same configuration: Because the wheel studs and lug nuts
on your Mazda have metric threads,
using a non-metric nut is dangerous.
On a metric stud, it would not secure
the wheel and would damage the stud,
which could cause the wheel to slip off
and cause an accident.
5. (Without flat tire belt)
Store the damaged tire in the trunk/
luggage compartment.
(With flat tire belt)
Open the trunk/luggage compartment
mat.
Trunk/Luggage compartment mat
Mazda3_8FL6-EA-16F_Edition2.indb 122016/08/10 17:39:14
Page 532 of 612
7–44
If Trouble Arises
When Liftgate/Trunk Lid Cannot be Opened
When Liftgate/Trunk Lid
Cannot be Opened
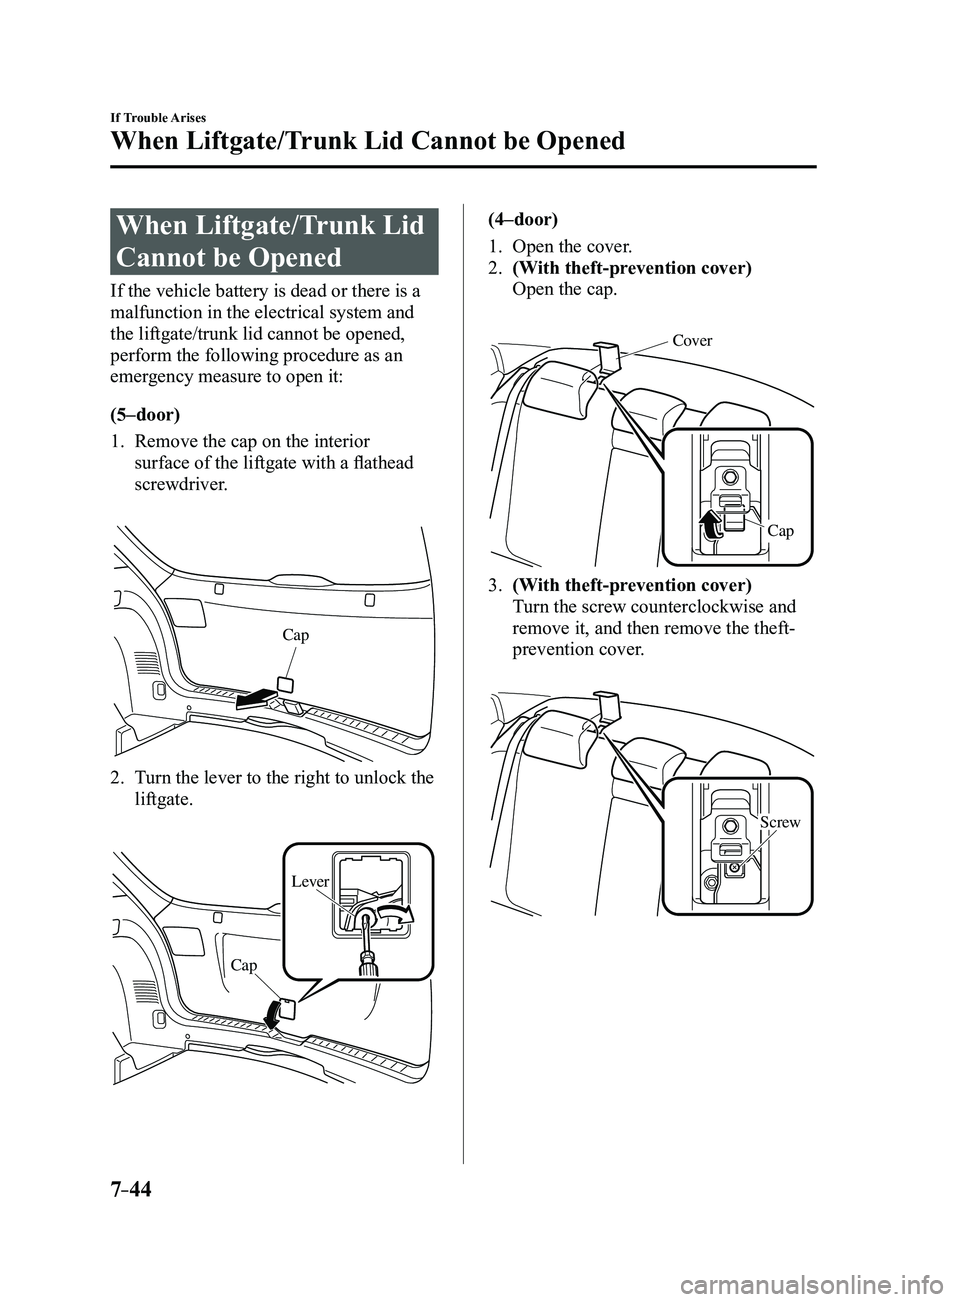
If the vehicle battery is dead or there is a
malfunction in the electrical system and
the liftgate/trunk lid cannot be opened,
perform the following procedure as an
emergency measure to open it:
(5–door)
1. Remove the cap on the interior
surface of the liftgate with a flathead
screwdriver.
Cap
2. Turn the lever to the right to unlock the
liftgate.
Lever
Cap
(4–door)
1. Open the cover .
2. (With theft-prevention cover)
Open the cap.
Cover
Cap
3. (With theft-prevention cover)
Turn the screw counterclockwise and
remove it, and then remove the theft-
prevention cover.
Screw
Mazda3_8FL6-EA-16F_Edition2.indb 442016/08/10 17:39:35
Page 605 of 612
10–3
Index
Climate Control System ........................5-2
Automatic Climate Control
.............5-9
Dual-Zone Automatic Climate
Control ........................................... 5-12
Gas specifications
............................9-8
Manual Climate Control
..................5-5
Operating Tips
.................................5-2
Vent Operation
................................5-3
Clock
...................................................5-30
Collision warning
................................7-42
Coming Home Light
...........................4-47
Control Status Display
........................4-77
Cruise Control
...................................4-146
Cruise Control Switch
.................4-146
Cruise Control Set Vehicle Speed
Display
................................................4-19
Cup Holder
........................................5-115
Customer Assistance
.............................8-2
D
Dashboard Illumination ......................4-18
Daytime Running Lights
.....................4-48
Defogger Mirror
............................................4-55
Rear window
.................................4-54
Dimensions
...........................................9-6
Distance Recognition Support System
(DRSS)
..............................................4-101
Indication on display
...................4-102
Door Locks
..........................................3-12
Drive selection
....................................4-78
Driving In Flooded Area
.....................3-51
Driving Tips Automatic transaxle
......................4-42
Break-in period .............................. 3-46
Driving in flooded area ..................3-51
Driving on uneven road
.................3-52
Floor mat
.......................................3-47
Hazardous driving
.........................3-47
Overloading
...................................3-51
Rocking the vehicle
.......................3-48
Winter driving
...............................3-49 Driving on Uneven Road
....................3-52
Dynamic Stability Control (DSC)
.......4-70
DSC OFF Indicator Light ..............4-71
DSC OFF Switch ...........................4-71
TCS/DSC Indicator Light
.............4-70
E
Electric Parking Brake Warning
Beep
....................................................7-43
Electric parking brake
.........................4-63
Emergency Starting Push-Starting
.................................7-19
Starting a Flooded Engine
.............7-19
Emergency Towing Tiedown Hooks
.............................7-23
Towing Description
.......................7-22
Emission Control System
....................3-29
Ending Screen Display
........................4-77
Engine Coolant
..........................................6-28
Engine Compartment Overview
....6-24
Exhaust gas .................................... 3-30
Hood release
..................................6-22
Oil
..................................................6-25
Starting
............................................4-5
Essential information
............................6-2
Event Data Recorder
...........................8-21
Excessive Speed Warning
...................7-42
Exhaust Gas
........................................3-30
Exterior Care
.......................................6-66
Aluminum Wheel Maintenance
....6-71
Bright-Metal Maintenance
............6-70
Maintaining the Finish
..................6-68
Plastic Part Maintenance
...............6-72
Mazda3_8FL6-EA-16F_Edition2.indb 32016/08/10 17:39:57