engine MAZDA MODEL 3 5-DOOR 2017 Owners Manual
[x] Cancel search | Manufacturer: MAZDA, Model Year: 2017, Model line: MODEL 3 5-DOOR, Model: MAZDA MODEL 3 5-DOOR 2017Pages: 612
Page 451 of 612
6–39
Maintenance and Care
Owner Maintenance
The following conditions indicate that the
battery power is low:
The KEY indicator light (green) flashes
in the instrument cluster for about 30
seconds after the engine is turned off.
The system does not operate and
the operation indicator light on the
transmitter does not flash when the
buttons are pressed.
The system's operational range is
reduced.
Replacing the battery at an Authorized
Mazda Dealer is recommended to prevent
damage to the key. If replacing the battery
by yourself, follow the instruction.
Replacing the key battery
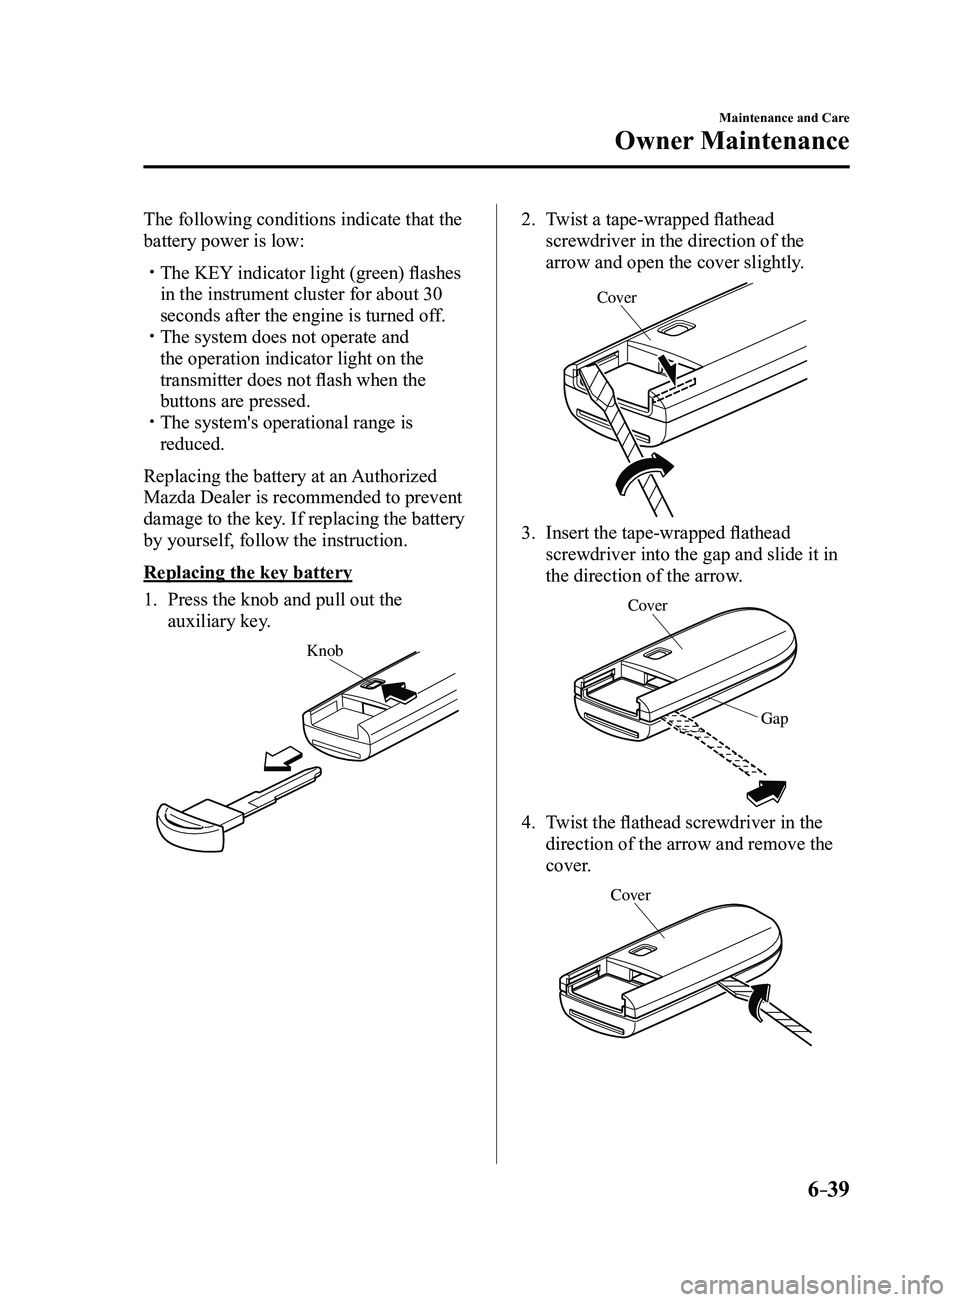
1. Press the knob and pull out the
auxiliary key.
Knob
2. Twist a tape-wrapped flathead
screwdriver in the direction of the
arrow and open the cover slightly.
Cove r
3. Insert the tape-wrapped flathead
screwdriver into the gap and slide it in
the direction of the arrow.
Cover
Gap
4. Twist the flathead screwdriver in the
direction of the arrow and remove the
cover.
Cover
Mazda3_8FL6-EA-16F_Edition2.indb 392016/08/10 17:38:46
Page 458 of 612
6–46
Maintenance and Care
Owner Maintenance
*Some models.
WARNING
Never touch the glass portion of a
halogen bulb with your bare hands
and always wear eye protection when
handling or working around the bulbs:When a halogen bulb breaks, it is
dangerous. These bulbs contain
pressurized gas. If one is broken, it will
explode and serious injuries could be
caused by the flying glass.
If the glass portion is touched with
bare hands, body oil could cause the
bulb to overheat and explode when lit.
Always keep halogen bulbs out of the
reach of children: Playing with a halogen bulb is
dangerous. Serious injuries could be
caused by dropping a halogen bulb or
breaking it some other way.
CAUTION
When removing the lens or lamp unit
using a flathead screwdriver, make
sure that the flathead screwdriver does
not contact the interior terminal. If
the flathead screwdriver contacts the
terminal, a short circuit may occur.
NOTE
To replace the bulb, contact an
Authorized Mazda Dealer. If the halogen bulb is accidentally
touched, it should be cleaned with
rubbing alcohol before being used.
Use the protective cover and carton for
the replacement bulb to dispose of the
old bulb promptly and out of the reach
of children.
Replacing Exterior Light Bulbs
Headlights (With LED headlights),
Daytime running lights/Parking lights
(With LED headlights), Fog lights
*
The LED bulb cannot be replaced as a
single unit because it is an integrated unit.
The LED bulb has to be replaced with the
unit. We recommend an Authorized Mazda
Dealer when the replacement is necessary.
Headlights (With halogen headlights)
Low-beam bulbs
1. If you are changing the right bulb, start
the engine, turn the steering wheel all
the way to the left, and turn off engine.
If you are changing the left bulb, turn
the steering wheel to the right, and turn
off engine.
2. Make sure the headlight switch is of f.
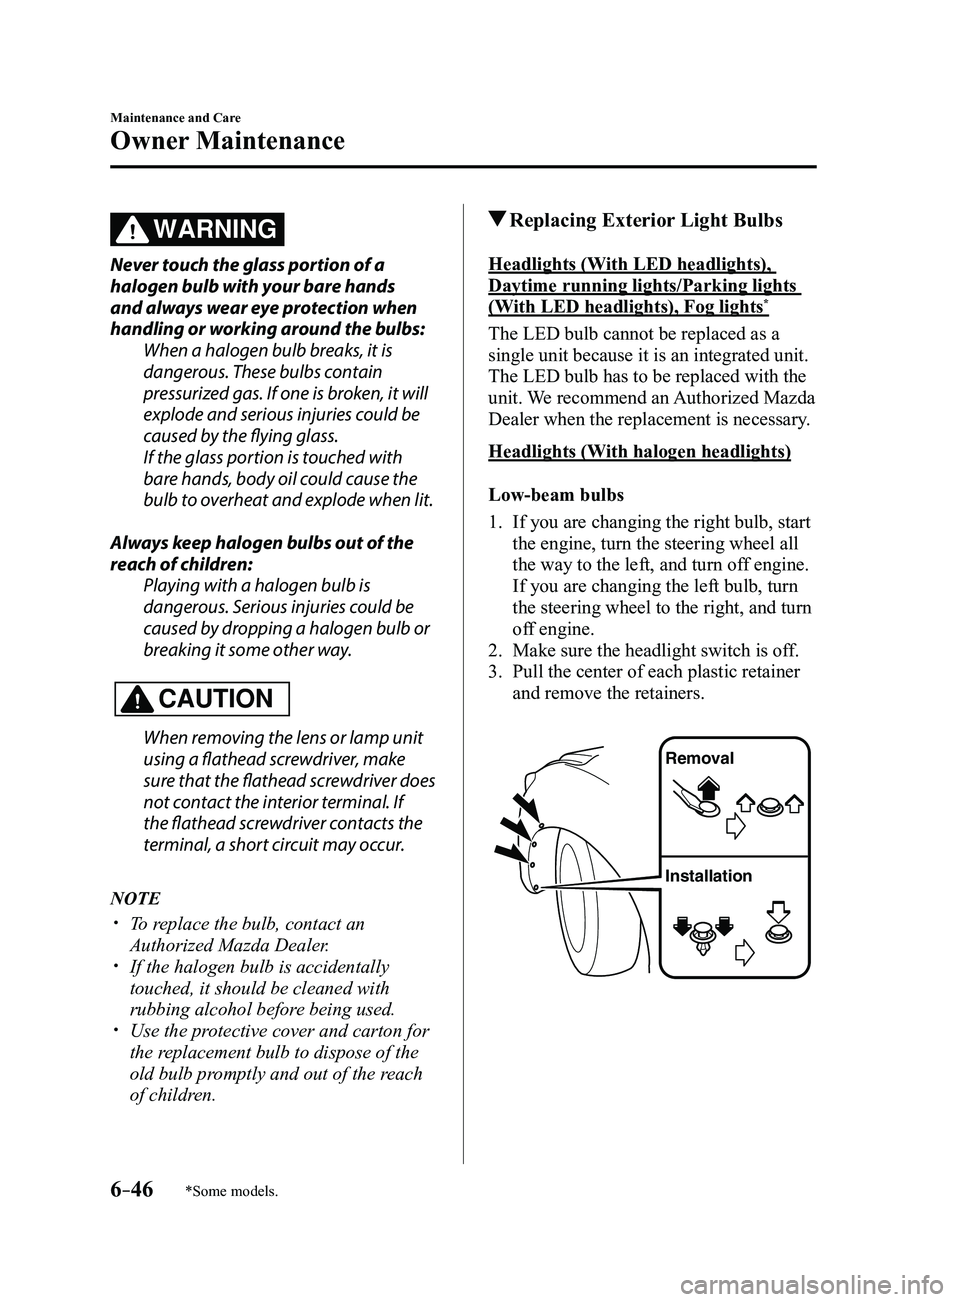
3. Pull the center of each plastic retainer
and remove the retainers.
Removal
Installation
Mazda3_8FL6-EA-16F_Edition2.indb 462016/08/10 17:38:50
Page 460 of 612
6–48
Maintenance and Care
Owner Maintenance
High-beam bulbs/Daytime running
lights
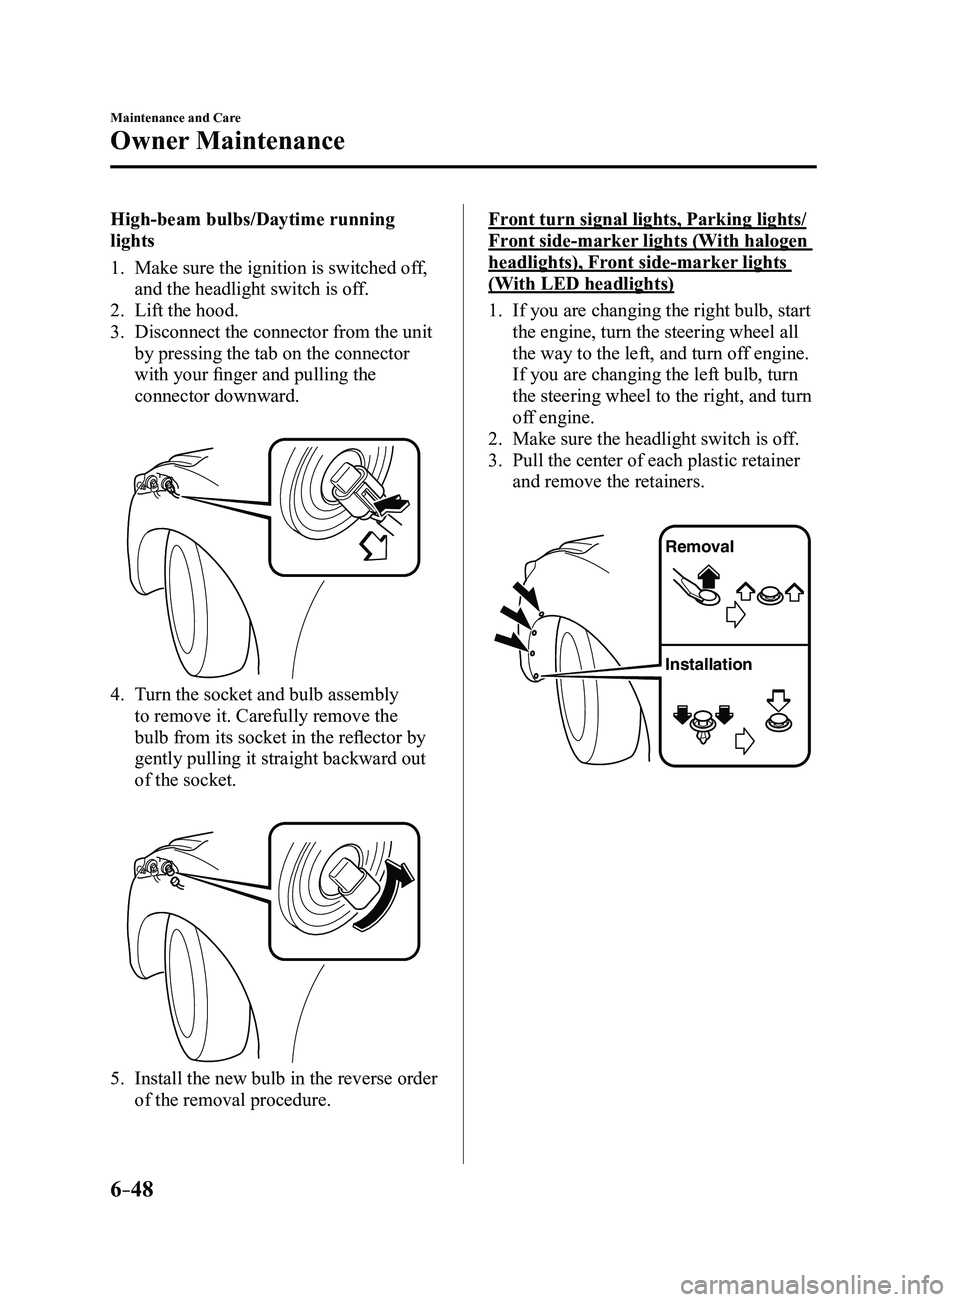
1. Make sure the ignition is switched off,
and the headlight switch is off.
2. Lift the hood.
3. Disconnect the connector from the unit
by pressing the tab on the connector
with your finger and pulling the
connector downward.
4. Turn the socket and bulb assembly
to remove it. Carefully remove the
bulb from its socket in the reflector by
gently pulling it straight backward out
of the socket.
5. Install the new bulb in the reverse order
of the removal procedure.
Front turn signal lights, Parking lights/
Front side-marker lights (With halogen
headlights), Front side-marker lights
(With LED headlights)
1. If you are changing the right bulb, start
the engine, turn the steering wheel all
the way to the left, and turn off engine.
If you are changing the left bulb, turn
the steering wheel to the right, and turn
off engine.
2. Make sure the headlight switch is off.
3. Pull the center of each plastic retainer
and remove the retainers.
Removal
Installation
Mazda3_8FL6-EA-16F_Edition2.indb 482016/08/10 17:38:51
Page 473 of 612
6–61
Maintenance and Care
Owner Maintenance
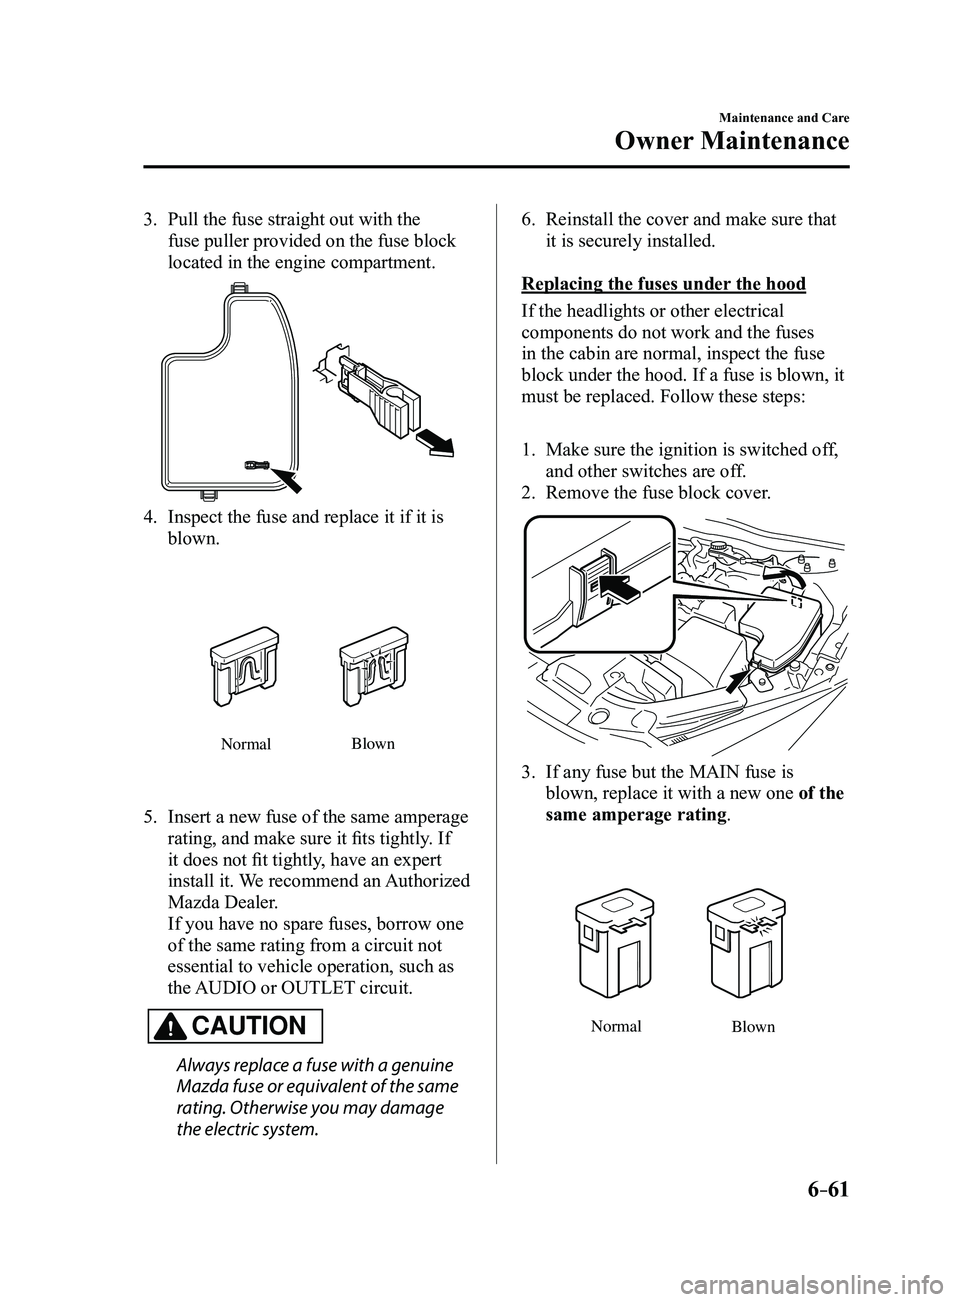
3. Pull the fuse straight out with the
fuse puller provided on the fuse block
located in the engine compartment.
4. Inspect the fuse and replace it if it is
blown.
NormalBlown
5. Insert a new fuse of the same amperage
rating, and make sure it fits tightly. If
it does not fit tightly, have an expert
install it. We recommend an Authorized
Mazda Dealer.
If you have no spare fuses, borrow one
of the same rating from a circuit not
essential to vehicle operation, such as
the AUDIO or OUTLET circuit.
CAUTION
Always replace a fuse with a genuine
Mazda fuse or equivalent of the same
rating. Otherwise you may damage
the electric system.
6. Reinstall the cover and make sure that
it is securely installed.
Replacing the fuses under the hood
If the headlights or other electrical
components do not work and the fuses
in the cabin are normal, inspect the fuse
block under the hood. If a fuse is blown, it
must be replaced. Follow these steps:
1. Make sure the ignition is switched of f,
and other switches are off.
2. Remove the fuse block cover.
3. If any fuse but the MAIN fuse is
blown, replace it with a new one of the
same amperage rating.
Normal Blown
Mazda3_8FL6-EA-16F_Edition2.indb 612016/08/10 17:39:01
Page 475 of 612
6–63
Maintenance and Care
Owner Maintenance
*Some models.
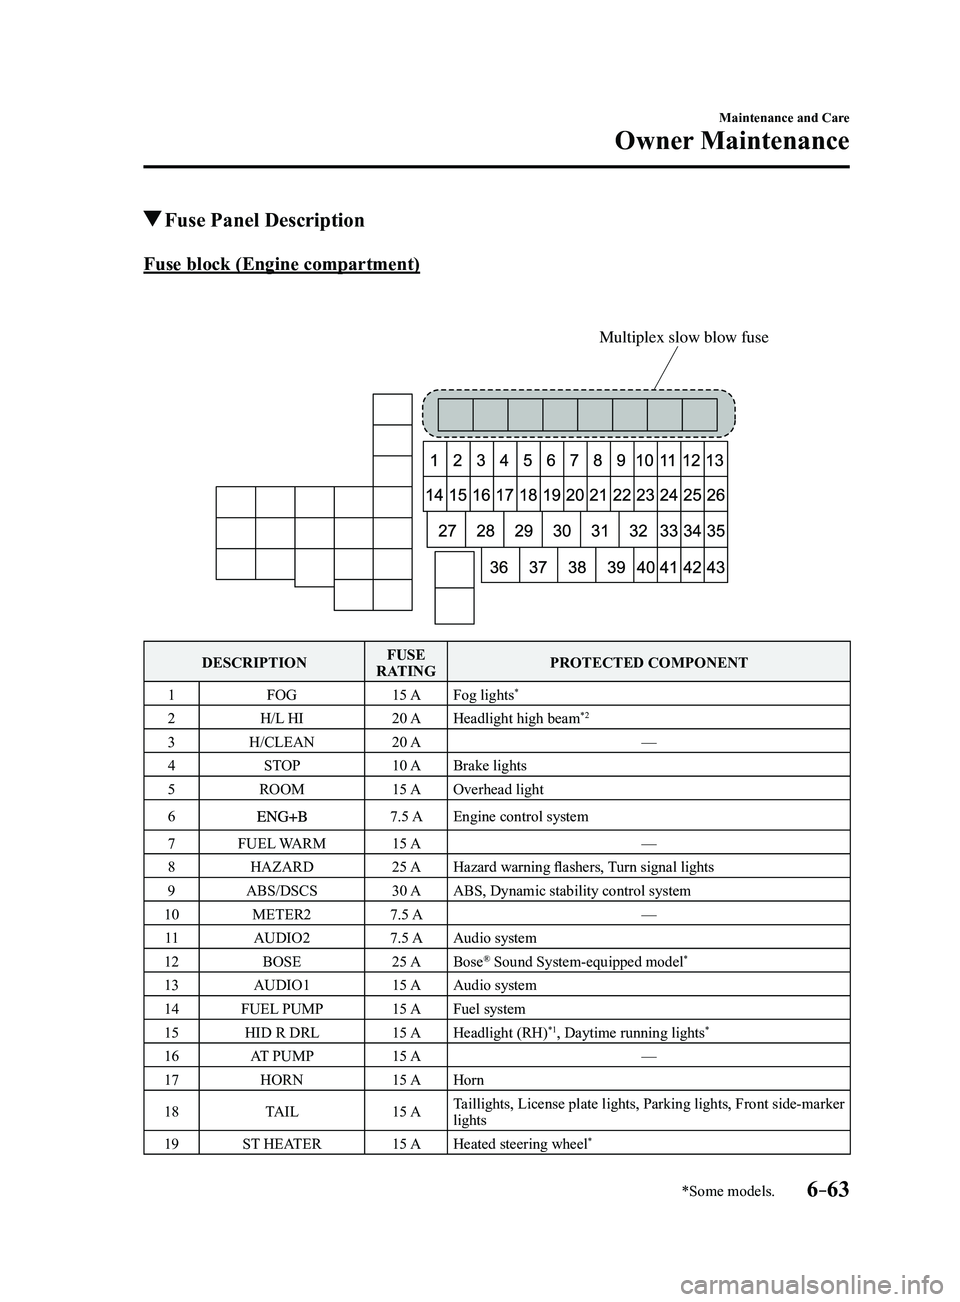
Fuse Panel Description
Fuse block (Engine compartment)
Multiplex slow blow fuse
DESCRIPTIONFUSE
RATING PROTECTED COMPONENT
1 FOG 15 AFog lights
*
2 H/L HI 20 AHeadlight high beam*2
3 H/CLEAN 20 A —
4 STOP 10 ABrake lights
5 ROOM 15 AOverhead light
6
7.5 AEngine control system
7 FUEL WARM 15 A —
8 HAZARD 25 AHazard warning flashers, Turn signal lights
9 ABS/DSCS 30 AABS, Dynamic stability control system
10 METER2 7.5 A —
11 AUDIO2 7.5 AAudio system
12 BOSE 25 ABose
® Sound System-equipped model*
13 AUDIO1 15 AAudio system
14 FUEL PUMP 15 AFuel system
15 HID R DRL 15 AHeadlight (RH)
*1, Daytime running lights*
16 AT PUMP 15 A —
17 HORN 15 AHorn
18 TAIL 15 ATaillights, License plate lights, Parking lights, Front side-marker
lights
19 ST HEATER 15 AHeated steering wheel
*
Mazda3_8FL6-EA-16F_Edition2.indb 632016/08/10 17:39:02
Page 476 of 612
6–64
Maintenance and Care
Owner Maintenance
*Some models.
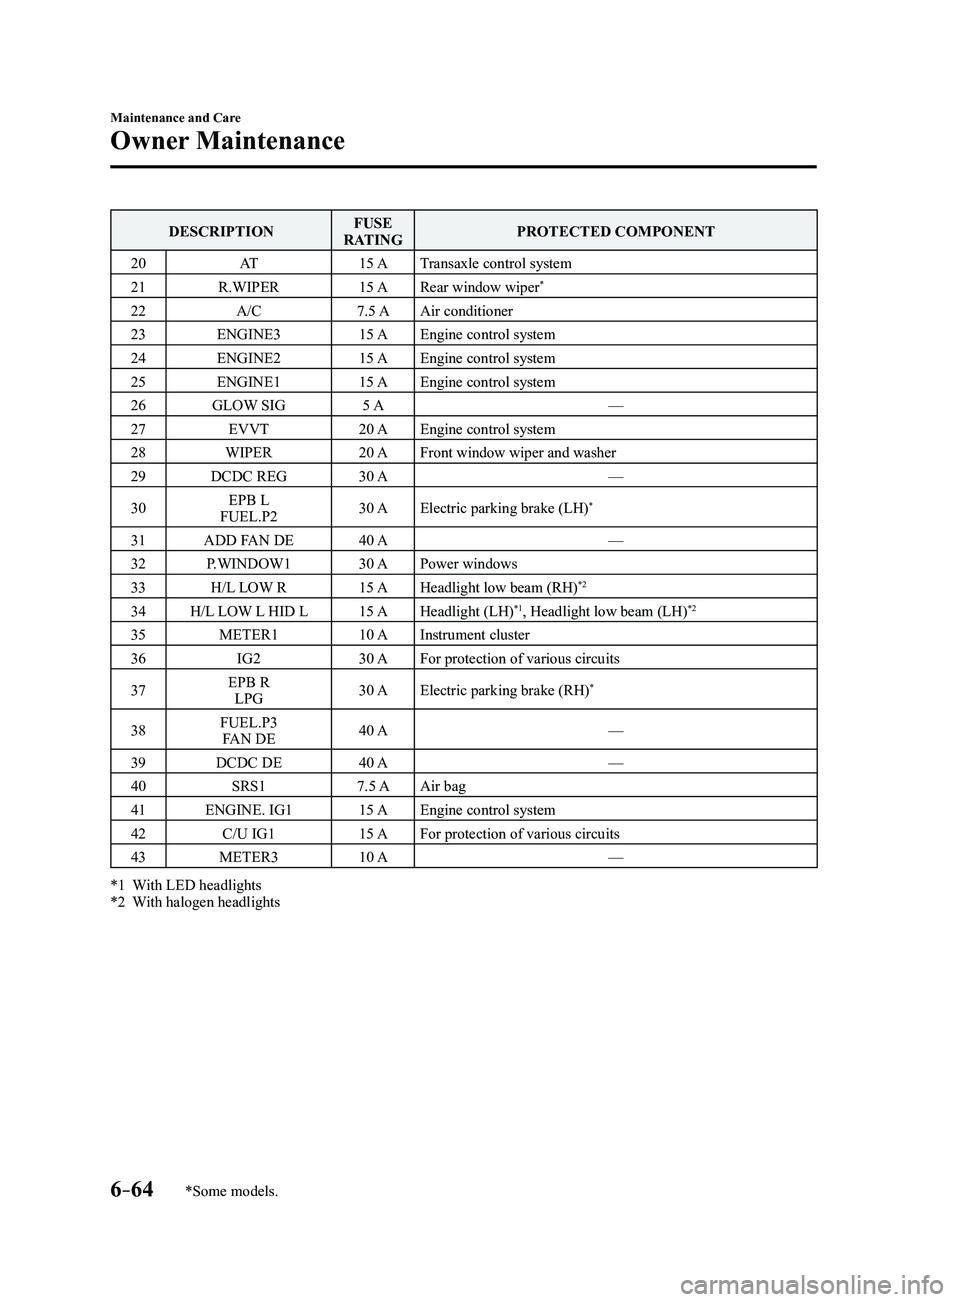
DESCRIPTIONFUSE
RATING PROTECTED COMPONENT
20 AT 15 ATransaxle control system
21 R.WIPER 15 ARear window wiper
*
22 A/C 7.5 AAir conditioner
23 ENGINE3 15 AEngine control system
24 ENGINE2 15 AEngine control system
25 ENGINE1 15 AEngine control system
26 GLOW SIG 5 A —
27 EVVT 20 AEngine control system
28 WIPER 20 AFront window wiper and washer
29 DCDC REG 30 A —
30 EPB L
FUEL.P2 30 A
Electric parking brake (LH)
*
31 ADD FAN DE 40 A —
32 P.WINDOW1 30 APower windows
33 H/L LOW R 15 AHeadlight low beam (RH)
*2
34H/L LOW L HID L 15 AHeadlight (LH)*1, Headlight low beam (LH)*2
35 METER1 10 AInstrument cluster
36 IG2 30 AFor protection of various circuits
37 EPB R
LPG 30 A
Electric parking brake (RH)
*
38 FUEL.P3
FAN DE 40 A
—
39 DCDC DE 40 A —
40 SRS1 7.5 AAir bag
41 ENGINE. IG1 15 AEngine control system
42 C/U IG1 15 AFor protection of various circuits
43 METER3 10 A —
*1 With LED headlights*2 With halogen headlights
Mazda3_8FL6-EA-16F_Edition2.indb 642016/08/10 17:39:03
Page 480 of 612
6–68
Maintenance and Care
Appearance Care
Maintaining the Finish
Washing
CAUTION
When the wiper lever is in the
position and the ignition is switched ON,
the wipers may move automatically in
the following cases:
If the windshield above the rain
sensor is touched or wiped with a
cloth.
If the windshield is struck with a hand
or other object from either outside or
inside the vehicle.
Keep hands and scrapers clear of the
windshield when the wiper lever is in the
position and the ignition is
switched ON as fingers could be pinched
or the wipers and wiper blades damaged
when the wipers activate automatically.
If you are going to clean the windshield,
be sure the wipers are turned off
completely (when it is most likely
that the engine is left running) this is
particularly important when clearing ice
and snow.
Do not spray water in the engine
compartment. Otherwise, it could result
in engine-starting problems or damage
to electrical parts.
When washing and waxing the vehicle,
be careful not to apply excessive force to
any single area of the vehicle roof or the
antenna. Otherwise, you could dent the
vehicle or damage the antenna.To help protect the finish from rust
and deterioration, wash your Mazda
thoroughly and frequently, at least once a
month, with lukewarm or cold water.
If the vehicle is washed improperly, the
paint surface could be scratched. Here are
some examples of how scratching could
occur.
Scratches occur on the paint surface when:
The vehicle is washed without first
rinsing off dirt and other foreign matter. The vehicle is washed with a rough, dry
,
or dirty cloth. The vehicle is washed at a car wash that
uses brushes that are dirty or too stiff. Cleansers or wax containing abrasives
are used.
NOTE
Mazda is not responsible for scratches
caused by automatic car washes or
improper washing.
Scratches are more noticeable on
vehicles with darker paint finishes.
To minimize scratches on the vehicle's
paint finish:
Rinse off any dirt or other foreign matter
using lukewarm or cold water before
washing.
Use plenty of lukewarm or cold water
and a soft cloth when washing the
vehicle. Do not use a nylon cloth.
Rub gently when washing or drying the
vehicle. Take your vehicle only to a car wash
that keeps its brushes well maintained. Do not use abrasive cleansers or wax
that contain abrasives.
Mazda3_8FL6-EA-16F_Edition2.indb 682016/08/10 17:39:04
Page 484 of 612
6–72
Maintenance and Care
Appearance Care
Plastic Part Maintenance
When cleaning the plastic lenses of the
lights, do not use gasoline, kerosene,
rectified spirit, paint, thinner, highly
acidic detergents, or strongly alkaline
detergents. Otherwise, these chemical
agents can discolor or damage the
surfaces resulting in a significant loss
in functionality. If plastic parts become
inadvertently exposed to any of these
chemical agents, flush with water
immediately.
If plastic parts such as the bumpers
become inadvertently exposed to
chemical agents or fluids such as
gasoline, oil, engine coolant, or battery
fluid, it could cause discoloration,
staining, or paint peeling. Wipe off any
such chemical agents or fluids using a
soft cloth immediately.
High water temperature and high water
pressure car washers are available
depending on the type of high pressure
car washer device. If the car washer
nozzle is put too close to the vehicle or
aimed at one area for an extended period
of time, it could deform plastic parts or
damage the paint.
Do not use wax containing compounds
(polish). Otherwise, it could result in
paint damage.
In addition, do not use an electrical or
air tool to apply wax. Otherwise, the
frictional heat generated could result
in deformation of plastic parts or paint
damage.
Interior Care
WARNING
Do not spray water into the vehicle
cabin:Spraying water into the vehicle cabin is
dangerous as electrical devices such as
the audio and switches could get wet
resulting in a malfunction or vehicle
fire.
NOTE
Do not wipe the interior using alcohol,
chlorine bleach, or organic solvents
such as thinner, benzene, and gasoline.
Otherwise, it may cause discoloration
or stains.
Rubbing har d with a stiff brush or cloth
may cause damage.
If the vehicle interior becomes soiled
by any of the following, wipe it off
immediately using a soft cloth.
Leaving it uncleaned could cause
discoloration, stains, cracks, or peeling
of the coating, and it will make it hard to
wipe off later.
Beverage or fragrance Grease or oil Soiling
Mazda3_8FL6-EA-16F_Edition2.indb 722016/08/10 17:39:05
Page 489 of 612
7–1
*Some models.
7If Trouble Arises
Helpful information on what to do if a problem arises with the vehicle.
Parking in an Emergency
..................................................................7-2
Parking in an Emergency ..............................................................7-2
Flat Tire........................................................................\
.......................7-3
Spare Tire and Tool Storage ..........................................................7-3
Changing a Flat Tire ......................................................................7-6
Battery Runs Out ........................................................................\
.....7-16
Jump-Starting ........................................................................\
......7-16
Emergency Starting ........................................................................\
.7-19
Starting a Flooded Engine ...........................................................7-19
Push-Starting ........................................................................\
.......7-19
Overheating ........................................................................\
..............7-20
Overheating ........................................................................\
.........7-20
Emergency Towing ........................................................................\
...7-22
Towing Description .....................................................................7-22
Tiedown Hooks* ........................................................................\
..7-23
Warning/Indicator Lights and Warning Sounds ...........................7-25
If a Warning Light Turns On or Flashes ......................................7-25
Message Indicated on Display* ...................................................7-37
Warning Sound is Activated ........................................................7-39
When Liftgate/Trunk Lid Cannot be Opened ...............................7-44
When Liftgate/Trunk Lid Cannot be Opened .............................7-44
Active Driving Display Does Not Operate* ....................................7-46
If the Active Driving Display Does Not Operate ........................7-46
Mazda3_8FL6-EA-16F_Edition2.indb 12016/08/10 17:39:07
Page 495 of 612
7–7
If Trouble Arises
Flat Tire
1. Park on a hard, level surface off the
right-of-way and firmly set the parking
brake.
2. Put a vehicle with an automatic
transaxle in Park (P), a manual
transaxle in Reverse (R) or 1, and turn
off the engine.
3. Turn on the hazard warning flasher.
4. Have everyone get out of the vehicle
and away from the vehicle and traffic.
5. Remove the jack, tool, and spare tire
(page 7-3).
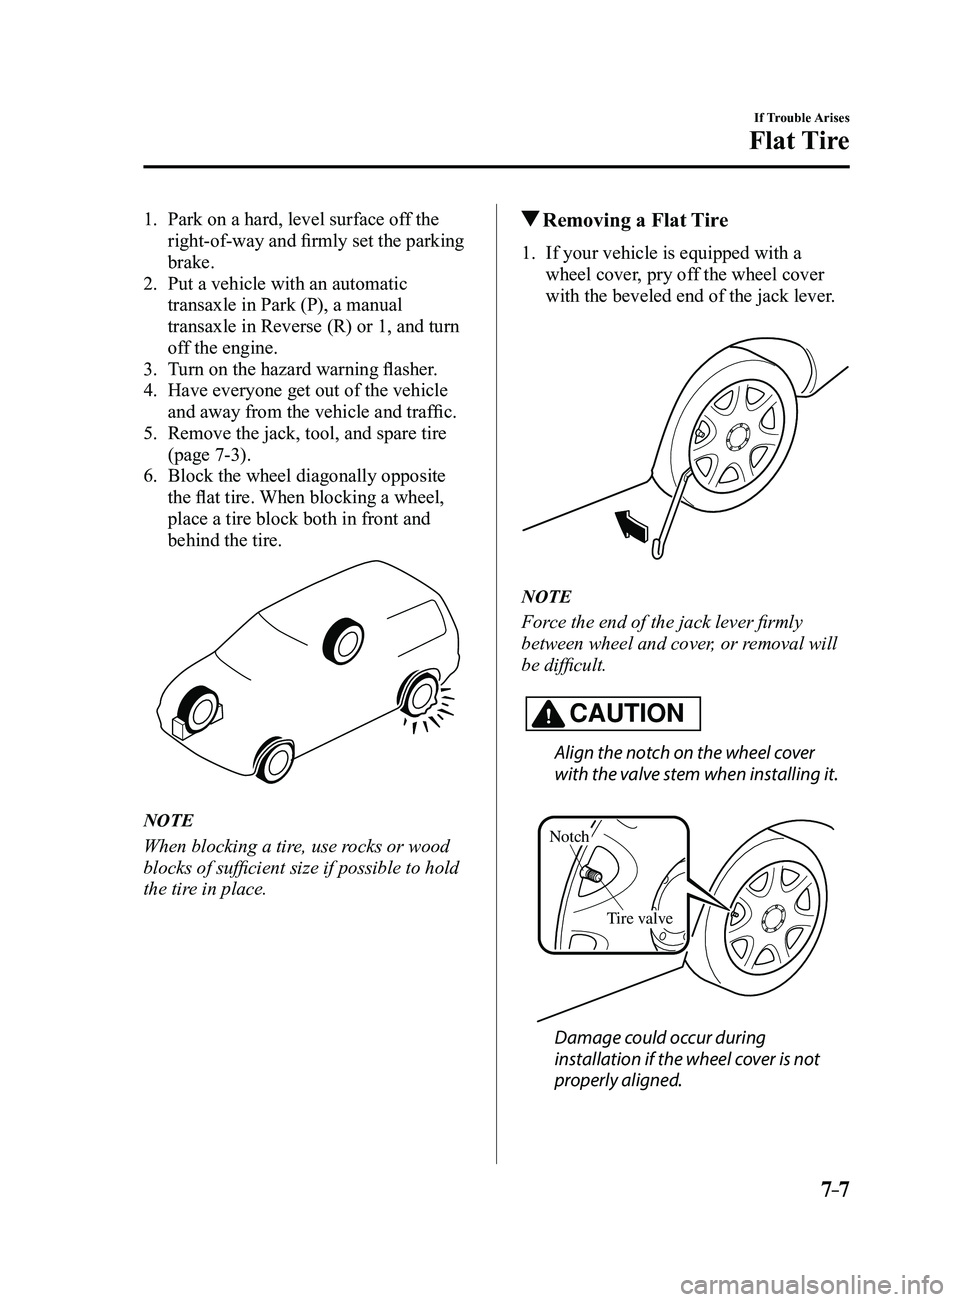
6. Block the wheel diagonally opposite
the flat tire. When blocking a wheel,
place a tire block both in front and
behind the tire.
NOTE
When blocking a tire, use rocks or wood
blocks of sufficient size if possible to hold
the tire in place.
Removing a Flat Tire
1. If your vehicle is equipped with a
wheel cover, pry off the wheel cover
with the beveled end of the jack lever.
NOTE
Force the end of the jack lever firmly
between wheel and cover, or removal will
be difficult.
CAUTION
Align the notch on the wheel cover
with the valve stem when installing it.
Tire valve
Notch
Damage could occur during
installation if the wheel cover is not
properly aligned.
Mazda3_8FL6-EA-16F_Edition2.indb 72016/08/10 17:39:11