type MAZDA MODEL 3 HATCHBACK 2007 Owner's Manual (in English)
[x] Cancel search | Manufacturer: MAZDA, Model Year: 2007, Model line: MODEL 3 HATCHBACK, Model: MAZDA MODEL 3 HATCHBACK 2007Pages: 402, PDF Size: 5.66 MB
Page 15 of 402
Black plate (15,1)
2Essential Safety Equipment
Use of safety equipment, including seats, seat belt system, child-restraint
systems and SRS air bags.
Seats ............................................................................................... 2-2
Front Seats ................................................................................ 2-2
Rear Seat ................................................................................... 2-5
Seat Belt Systems ........................................................................ 2-10
Seat Belt Precautions .............................................................. 2-10
Seat Belt (Except Center-Rear Position) ................................. 2-13
Front Seat Belt Pretensioner and Load Limiting Systems ....... 2-15
Center-Rear Position Seat Belt (3-Point Type) ....................... 2-18
Seat Belt Extender ................................................................... 2-21
Seat Belt Warning Light/Beep ................................................ 2-22
Child Restraint ............................................................................ 2-24
Child Restraint Precautions ..................................................... 2-24
Installing Child-Restraint Systems .......................................... 2-28
LATCH Child-Restraint Systems ............................................ 2-36
SRS Air Bags ............................................................................... 2-41
Supplemental Restraint Systems (SRS) Precautions ............... 2-41
Supplemental Restraint System Components ......................... 2-46
How the Air Bags Work .......................................................... 2-49
2-1
Mazda3_8V66-EA-06F_Edition3 Page15
Wednesday, August 23 2006 11:18 AM
Form No.8V66-EA-06F
Page 32 of 402
Black plate (32,1)
Center-Rear Position Seat
Belt (3-Point Type)
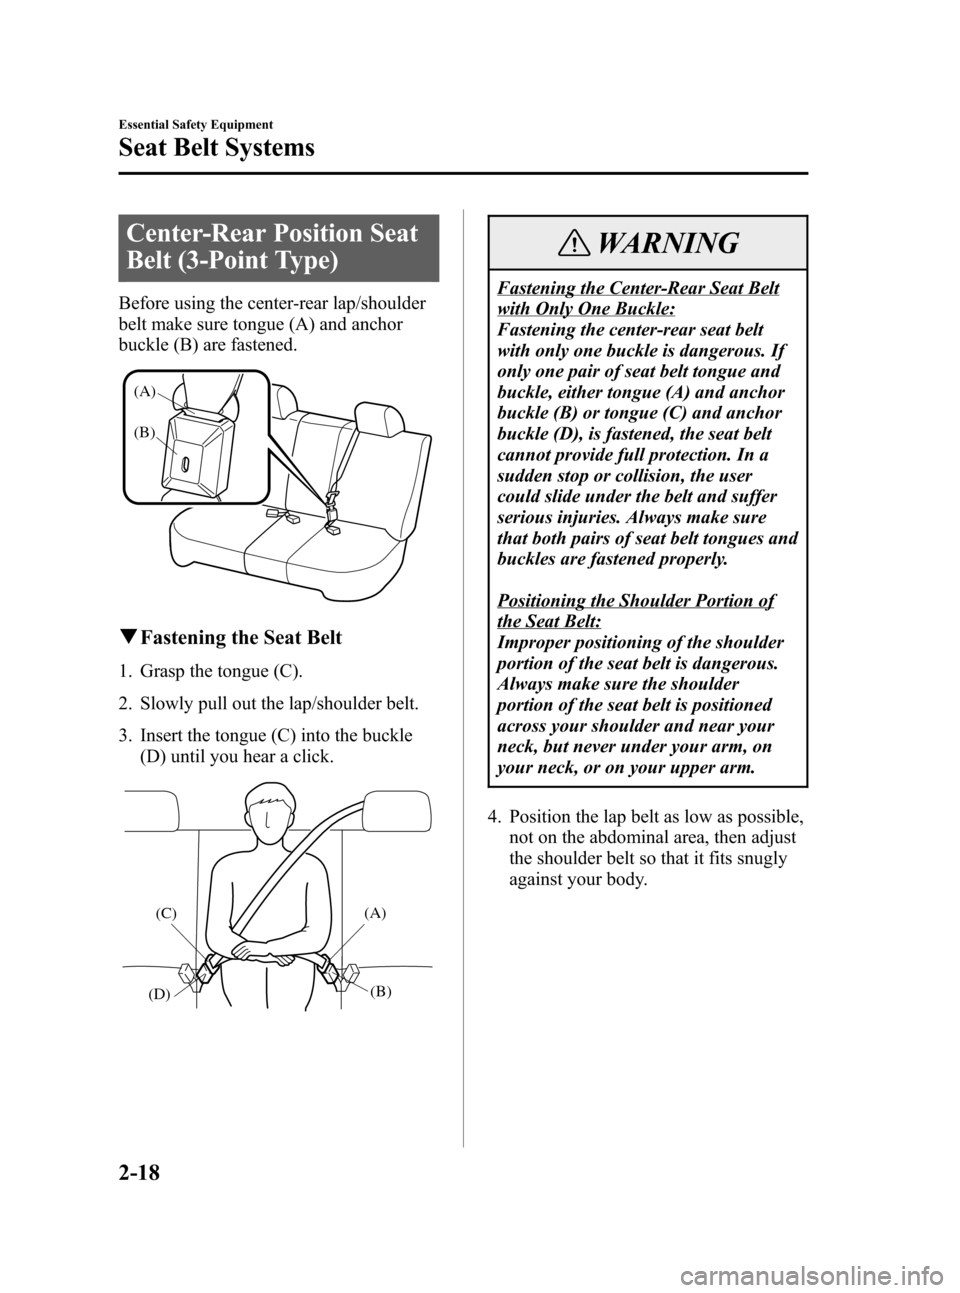
Before using the center-rear lap/shoulder
belt make sure tongue (A) and anchor
buckle (B) are fastened.
(A)
(B)
qFastening the Seat Belt
1. Grasp the tongue (C).
2. Slowly pull out the lap/shoulder belt.
3. Insert the tongue (C) into the buckle
(D) until you hear a click.
(C)
(D)(B) (A)
WARNING
Fastening the Center-Rear Seat Belt
with Only One Buckle:
Fastening the center-rear seat belt
with only one buckle is dangerous. If
only one pair of seat belt tongue and
buckle, either tongue (A) and anchor
buckle (B) or tongue (C) and anchor
buckle (D), is fastened, the seat belt
cannot provide full protection. In a
sudden stop or collision, the user
could slide under the belt and suffer
serious injuries. Always make sure
that both pairs of seat belt tongues and
buckles are fastened properly.
Positioning the Shoulder Portion of
the Seat Belt:
Improper positioning of the shoulder
portion of the seat belt is dangerous.
Always make sure the shoulder
portion of the seat belt is positioned
across your shoulder and near your
neck, but never under your arm, on
your neck, or on your upper arm.
4. Position the lap belt as low as possible,
not on the abdominal area, then adjust
the shoulder belt so that it fits snugly
against your body.
2-18
Essential Safety Equipment
Seat Belt Systems
Mazda3_8V66-EA-06F_Edition3 Page32
Wednesday, August 23 2006 11:18 AM
Form No.8V66-EA-06F
Page 42 of 402
Black plate (42,1)
Installing Child-Restraint
Systems
Accident statistics reveal that a child is
safer in the rear seat. The front passenger's
seat is clearly the worst choice for any
child under 12, and with rear-facing child-
restraint systems it is clearly unsafe due to
air bags.
Some child-restraint systems now come
with tethers and therefore must be
installed on the seats that take tethers to
be effective. In your Mazda, tethered
child-restraint systems can only be
accommodated in the three positions on
the rear seat.
Even if your vehicle is equipped with
front passenger seat weight sensors (page
2-49), which automatically deactivates the
front passenger air bag, a rear seat is the
safest place for a child of any age or size.
Some child-restraint systems also employ
specially designed LATCH attachments;
refer to“LATCH Child-Restraint
Systems”(page 2-36).
WARNING
Tethered Child-Restraint Systems
Work Only on Tether-Equipped Rear
Seats:
Installation of a tether equipped child-
restraint system in the front
passenger's seat defeats the safety
design of the system and will result in
an increased chance of serious injury
if the child-restraint system goes
forward without benefit of being
tethered.
Place tether equipped child-restraint
systems where there are tether
anchors.
qRear Seat Child-Restraint System
Installation
Follow these instructions when using a
child-restraint system, unless you are
attaching a LATCH-equipped child-
restraint system to the rear LATCH lower
anchors. Refer to“LATCH Child-
Restraint Systems”(page 2-36).
NOTE
Follow the child-restraint system
manufacturer's instructions carefully. If
you are not sure whether you have a
LATCH system or tether, check in the
child-restraint system manufacturer's
instructions and follow them
accordingly. Depending on the type of
child-restraint system, it may not
employ seat belts which are in
automatic locking mode.
2-28
Essential Safety Equipment
Child Restraint
Mazda3_8V66-EA-06F_Edition3 Page42
Wednesday, August 23 2006 11:18 AM
Form No.8V66-EA-06F
Page 48 of 402
Black plate (48,1)
NOTE
lInspect this function before each use
of the child-restraint system. You
should not be able to pull the
shoulder belt out of the retractor
while the system is in the automatic
locking mode. When you remove the
child-restraint system, be sure the
belt fully retracts to return the system
to emergency locking mode before
occupants use the seat belts.
lFollow the child-restraint system
manufacturer's instructions carefully.
Depending on the type of child-
restraint system, it may not employ
seat belts which are in automatic
locking mode.
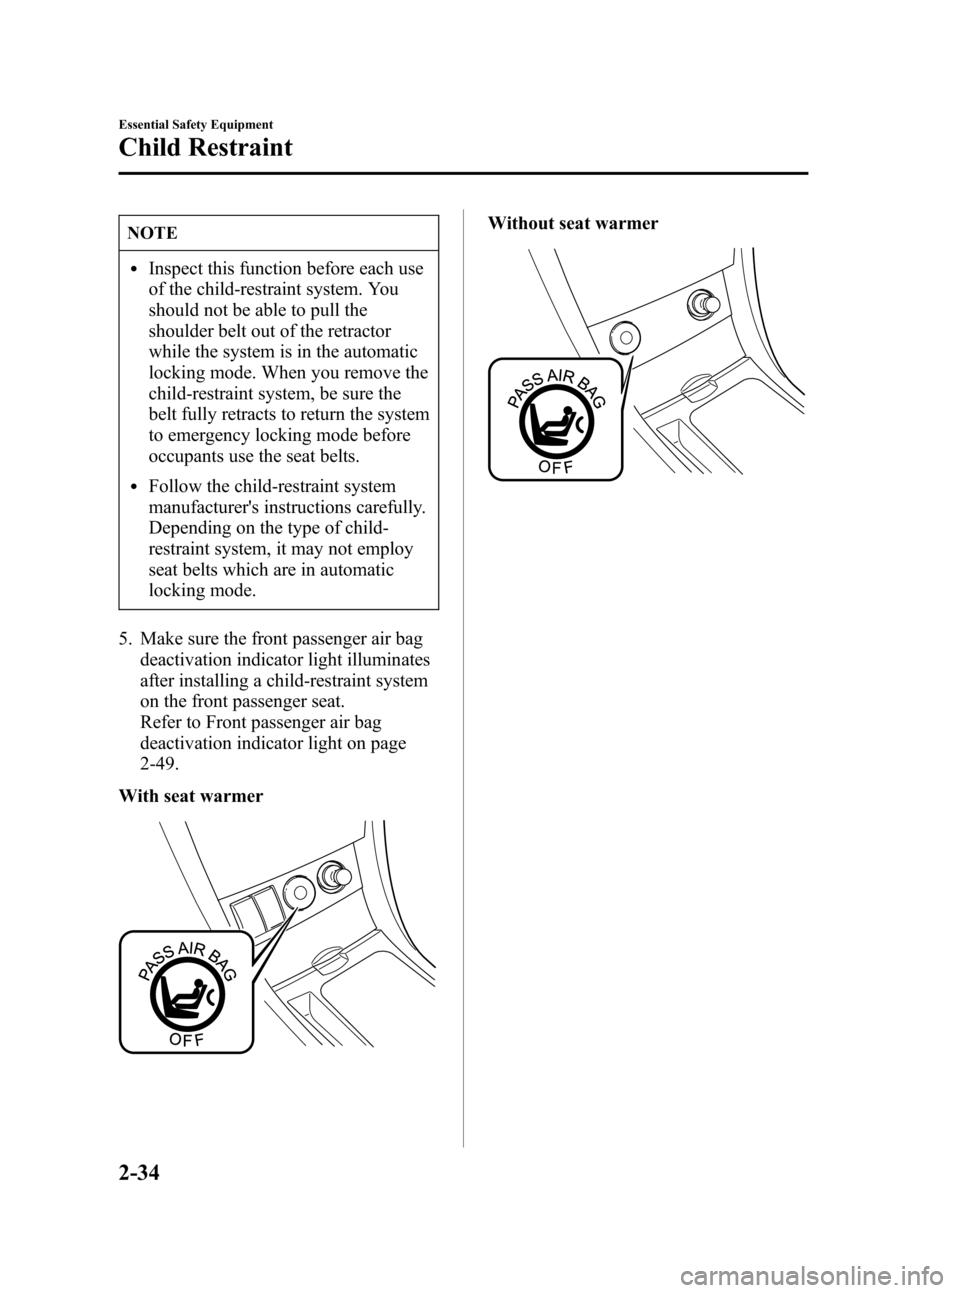
5. Make sure the front passenger air bag
deactivation indicator light illuminates
after installing a child-restraint system
on the front passenger seat.
Refer to Front passenger air bag
deactivation indicator light on page
2-49.
With seat warmer
Without seat warmer
2-34
Essential Safety Equipment
Child Restraint
Mazda3_8V66-EA-06F_Edition3 Page48
Wednesday, August 23 2006 11:18 AM
Form No.8V66-EA-06F
Page 55 of 402
Black plate (55,1)
Supplemental Restraint Systems (SRS) Precautions
The front and side supplemental restraint systems (SRS) include up to 6 air bags (verify
“SRS AIRBAG”location indicator marks).
They are located in:
lThe steering wheel hub (driver air bag)
lThe front passenger dashboard (front passenger air bag)
lThe outboard sides of the front seatbacks (side air bags)í
lThe front and rear window pillars, and the roof edge along both sides (curtain air bags)í
These systems operate independently depending on the type of accident encountered; if
you have side and curtain air bags, the side and curtain air bags are not likely to deploy on
both sides in the same accident because a vehicle is not often hit from both sides. The side
and curtain air bags and the frontal air bag system will not normally deploy during the
same type of accident unless a combination of frontal and side impacts occur.
The air bag supplemental restraint systems are designed to provide supplemental protection
only in the front seats in certain situations and the rear outside passenger positions only in
same-side collisions, so seat belts are always important in the following ways:
Without seat belt usage, the air bags cannot provide adequate protection during an accident.
Seat belt usage is necessary to:
lKeep the occupant from being thrown into an inflating air bag.
lReduce the possibility of injuries during an accident that is not designed for air bag
inflation, such as roll-over or rear impact.
lReduce the possibility of injuries in frontal or side collisions that are not severe enough
to activate the air bags.
lReduce the possibility of being thrown from your vehicle.
lReduce the possibility of injuries to lower body and legs during an accident because the
air bags provide no protection to these parts of the body.
lHold the driver in a position which allows better control of the vehicle.
Small children must be protected by a child-restraint system as stipulated by law in every
state and province. In certain states and provinces, larger children must use a child-restraint
system (page 2-24).
Carefully consider which child-restraint system is necessary for your child and follow the
installation directions in this Owner's Manual as well as the child-restraint system
manufacturer's instructions.
Essential Safety Equipment
SRS Air Bags
2-41íSome models. Mazda3_8V66-EA-06F_Edition3 Page55
Wednesday, August 23 2006 11:18 AM
Form No.8V66-EA-06F
Page 76 of 402
Black plate (76,1)
Keys
WARNING
Do not leave the keys in your vehicle
with children and keep them in a place
where your children will not find or
play with them:
Leaving children in a vehicle with the
key is dangerous. This could result in
someone being badly injured or even
killed. They could play with power
windows or other controls, or even
make the vehicle move.
NOTE
lRefer to Immobilizer System (page
3-26) for information regarding keys
and engine starting.
l(With theft-deterrent system)
Refer to Theft-Deterrent System
(page 3-29) for information
regarding keys and the prevention of
vehicle and vehicle contents theft.
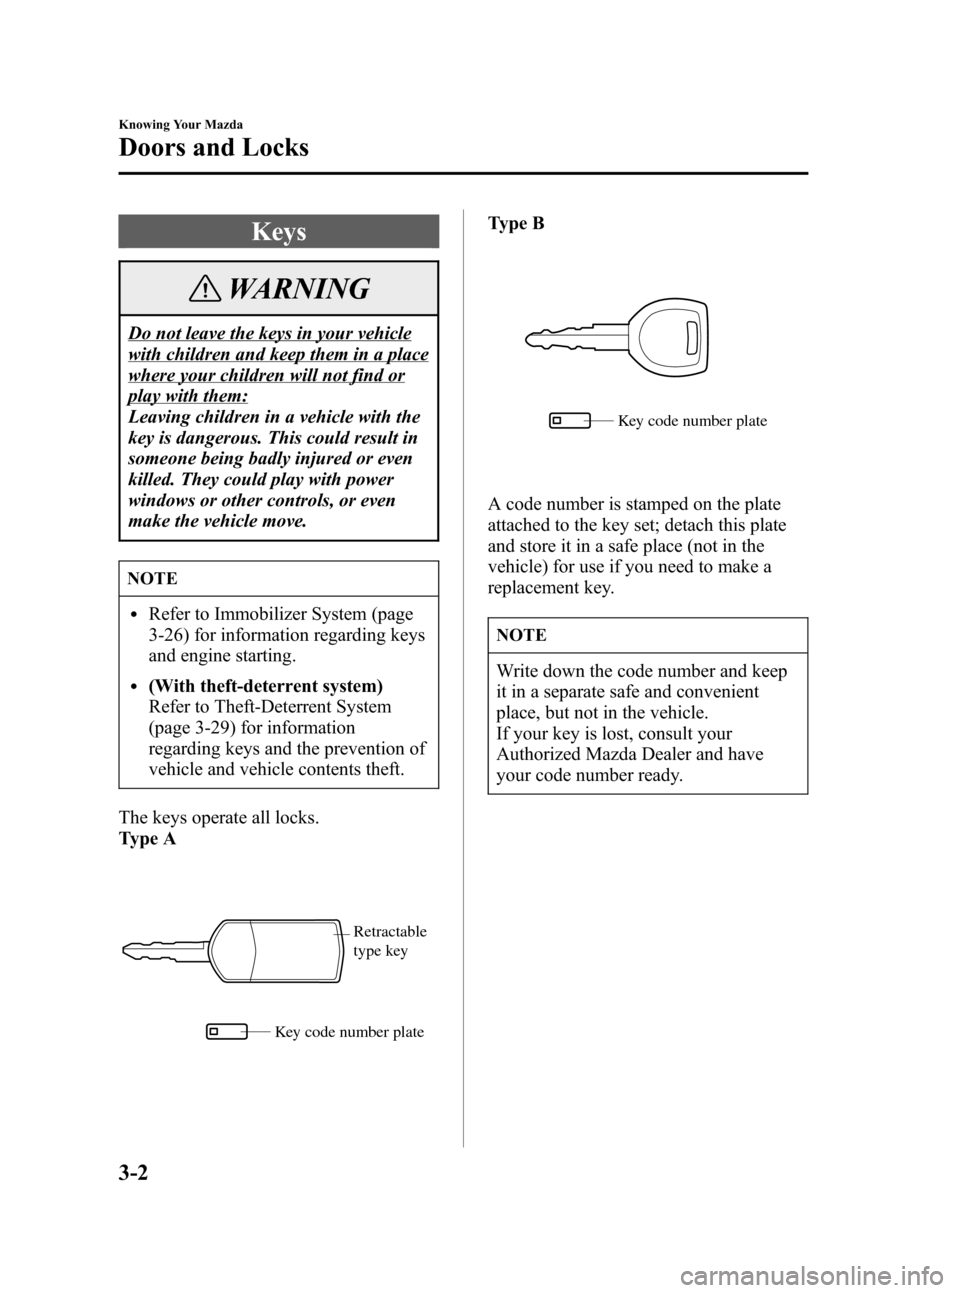
The keys operate all locks.
Type A
Key code number plate
Retractable
type key
Type B
Key code number plate
A code number is stamped on the plate
attached to the key set; detach this plate
and store it in a safe place (not in the
vehicle) for use if you need to make a
replacement key.
NOTE
Write down the code number and keep
it in a separate safe and convenient
place, but not in the vehicle.
If your key is lost, consult your
Authorized Mazda Dealer and have
your code number ready.
3-2
Knowing Your Mazda
Doors and Locks
Mazda3_8V66-EA-06F_Edition3 Page76
Wednesday, August 23 2006 11:18 AM
Form No.8V66-EA-06F
Page 77 of 402
Black plate (77,1)
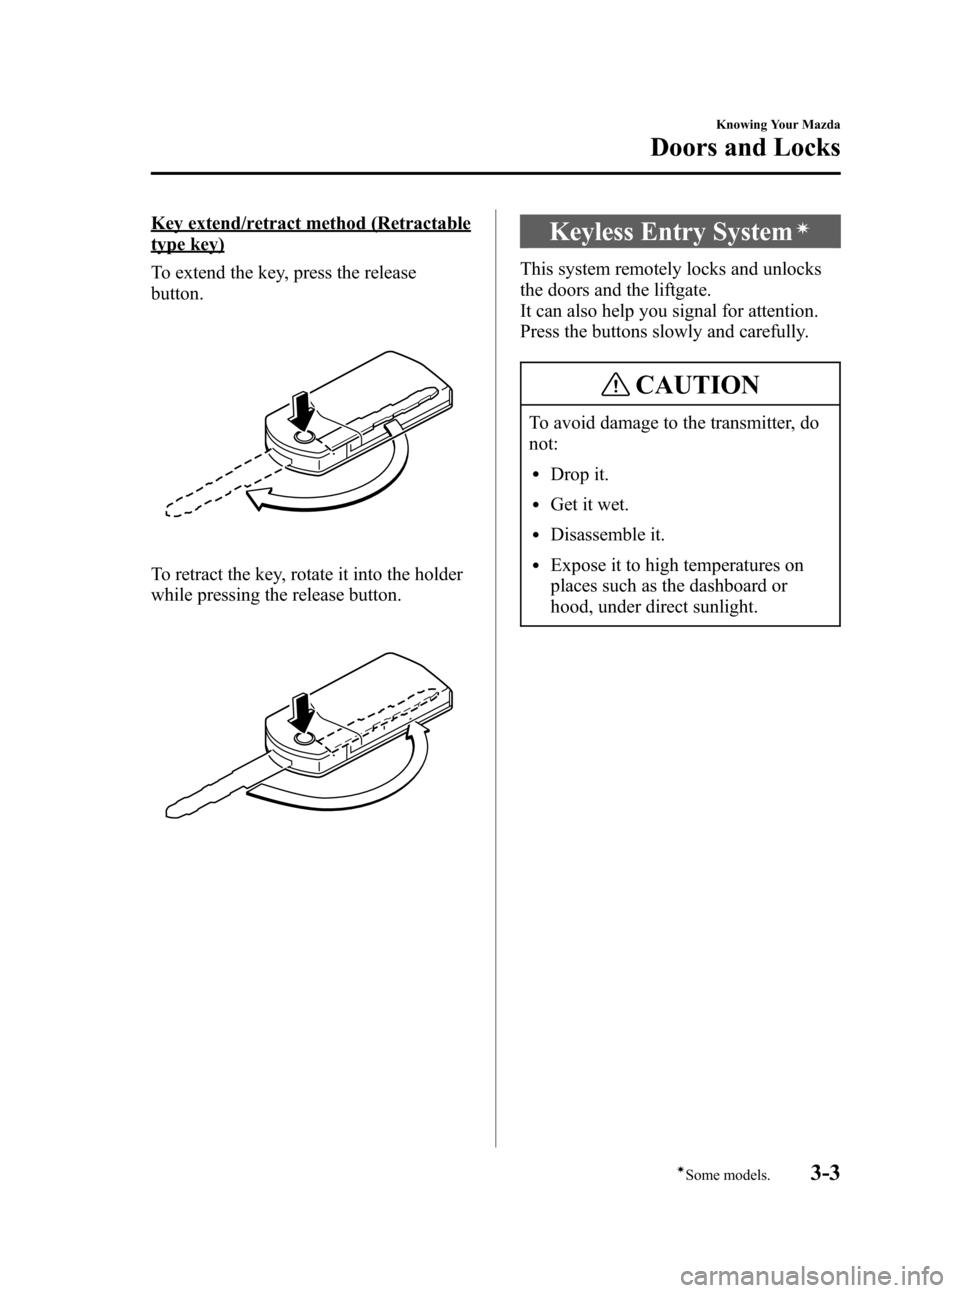
Key extend/retract method (Retractable
type key)
To extend the key, press the release
button.
To retract the key, rotate it into the holder
while pressing the release button.
Keyless Entry Systemí
This system remotely locks and unlocks
the doors and the liftgate.
It can also help you signal for attention.
Press the buttons slowly and carefully.
CAUTION
To avoid damage to the transmitter, do
not:
lDrop it.
lGet it wet.
lDisassemble it.
lExpose it to high temperatures on
places such as the dashboard or
hood, under direct sunlight.
Knowing Your Mazda
Doors and Locks
3-3íSome models. Mazda3_8V66-EA-06F_Edition3 Page77
Wednesday, August 23 2006 11:18 AM
Form No.8V66-EA-06F
Page 78 of 402
Black plate (78,1)
NOTE
lThe keyless entry system is designed
to operate up to about 2.5 m (8 ft)
from the center of the vehicle, but
this may vary due to local
conditions.
lThe system doesn't operate when the
key is in the ignition switch.
lDoors and the liftgate cannot be
locked by pressing the lock button
while any other door or the liftgate is
open. Also, the hazard warning lights
will not flash.
lIf the transmitter does not operate
when pressing a button or the
operation range becomes too small,
the battery may be dead. To install a
new battery, refer to Maintenance
(page 3-6).
lAdditional transmitters can be
obtained at an Authorized Mazda
Dealer. Up to 3 transmitters can be
used with the keyless entry system
per vehicle. Bring all transmitters to
an Authorized Mazda Dealer when
additional transmitters are required.
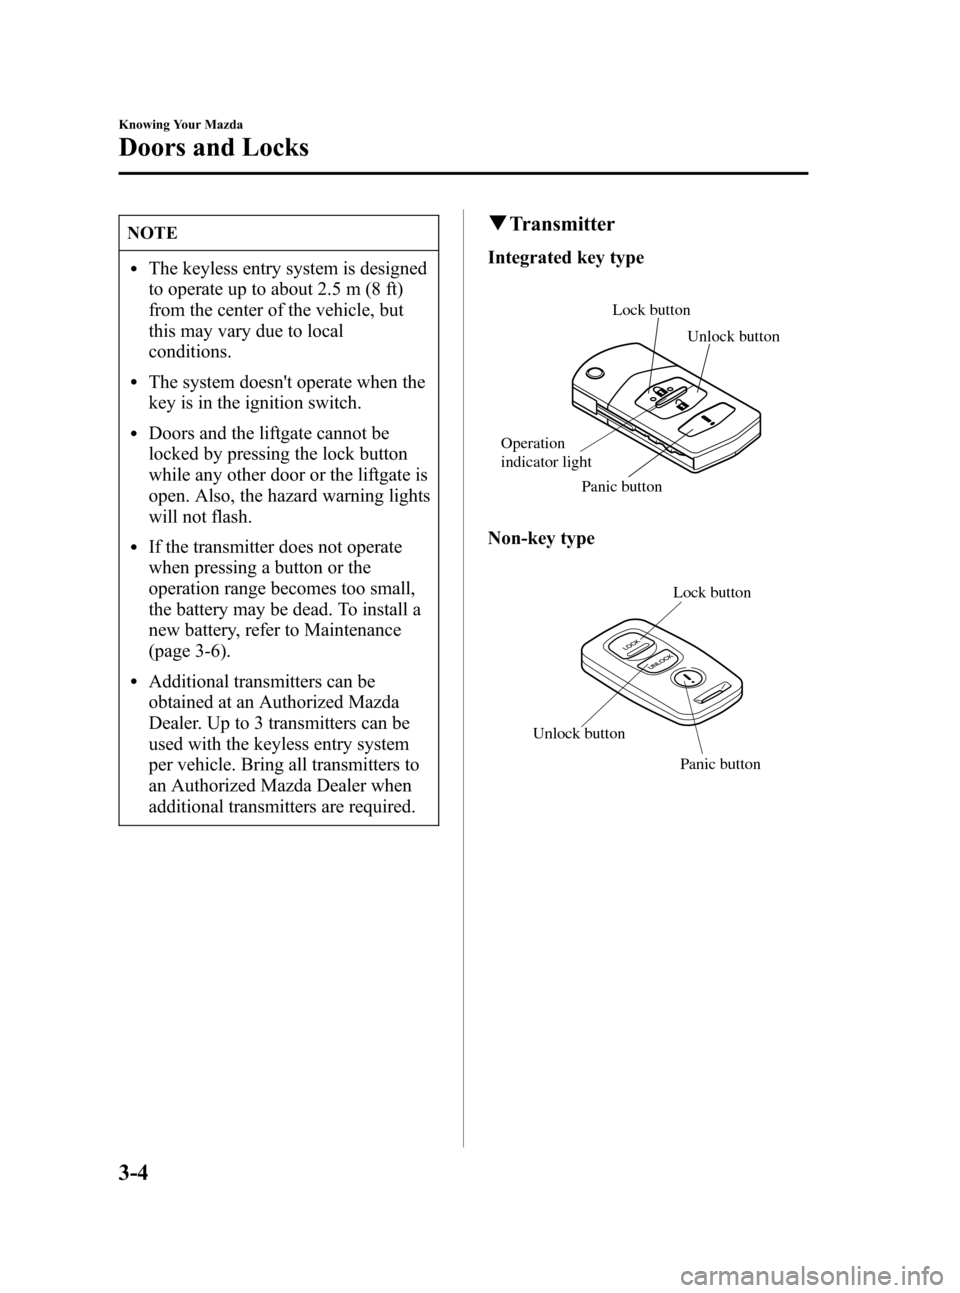
qTransmitter
Integrated key type
Lock button
Unlock button
Panic button
Operation
indicator light
Non-key type
Panic button Lock button
Unlock button
3-4
Knowing Your Mazda
Doors and Locks
Mazda3_8V66-EA-06F_Edition3 Page78
Wednesday, August 23 2006 11:18 AM
Form No.8V66-EA-06F
Page 80 of 402
Black plate (80,1)
NOTE
(Without theft-deterrent system)
The hazard warning lights will flash
twice to indicate that all doors and the
liftgate are unlocked.
(With theft-deterrent system)
lThe hazard warning lights will not
flash.
lThe hazard warning lights only flash
when the theft deterrent system is
armed or turned off, refer to the
theft-deterrent system (page 3-29).
NOTE
After unlocking with the transmitter, all
doors and the liftgate will automatically
lock if one of the doors or the liftgate is
not opened within about 30 seconds.
Panic button
If you witness from a distance someone
attempting to break into or damage your
vehicle, pressing the panic button will
activate the vehicle's alarm.
NOTE
The panic button will work whether
any door or the liftgate is open or
closed.
Turning on the alarm
Pressing the panic button for 1 second or
more will trigger the alarm for about 2
minutes and 30 seconds, and the
following will occur:
lThe horn sounds intermittently.
lThe hazard warning lights flash.Turning off the alarm
Press any button on the transmitter.
qTransmitter Maintenance
CAUTION
lMake sure the battery is installed
with the correct pole facing upward.
Battery leakage could occur if it is
not installed correctly.
lWhen replacing the battery, be
careful not to bend the electrical
terminals or get oil on them. Also be
careful not to get dirt in the
transmitter as it could be damaged.
lThere is the danger of explosion if
the battery is not correctly replaced.
lReplace only with the same type
battery.
lIntegrated key type: CR1620 or
equivalent
lNon-key type: CR2025 or
equivalent
lDispose of used batteries according
to the following instructions.
lInsulate the plus and minus
terminals of the battery using
cellophane or equivalent tape.
lNever disassemble.lNever throw the battery into fire
and/or water.
lNever deform or crush.
3-6
Knowing Your Mazda
Doors and Locks
Mazda3_8V66-EA-06F_Edition3 Page80
Wednesday, August 23 2006 11:18 AM
Form No.8V66-EA-06F
Page 81 of 402
Black plate (81,1)
Replacing the transmitter battery
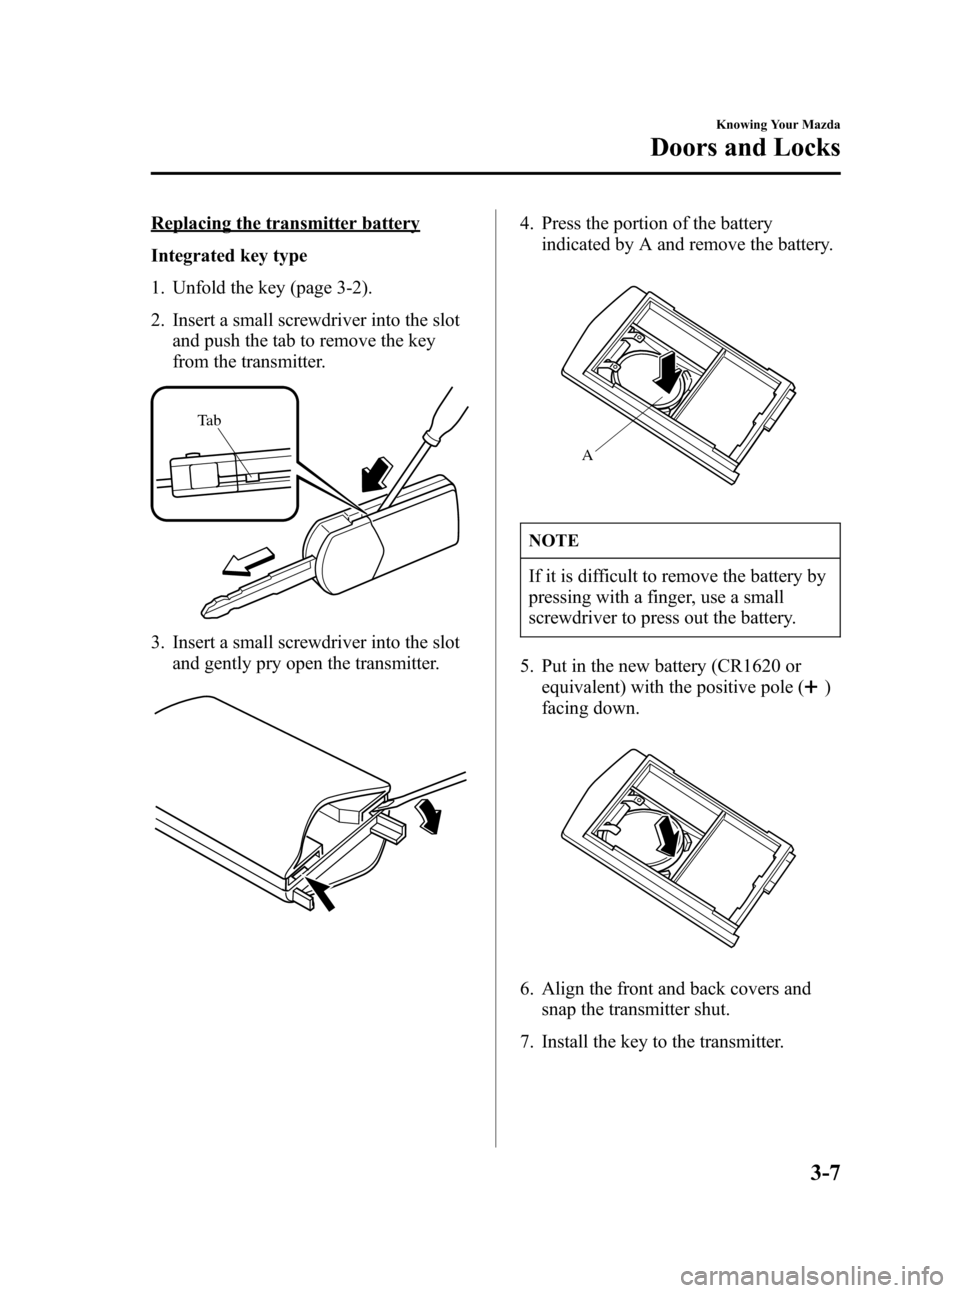
Integrated key type
1. Unfold the key (page 3-2).
2. Insert a small screwdriver into the slot
and push the tab to remove the key
from the transmitter.
Ta b
3. Insert a small screwdriver into the slot
and gently pry open the transmitter.
4. Press the portion of the battery
indicated by A and remove the battery.
A
NOTE
If it is difficult to remove the battery by
pressing with a finger, use a small
screwdriver to press out the battery.
5. Put in the new battery (CR1620 or
equivalent) with the positive pole (
)
facing down.
6. Align the front and back covers and
snap the transmitter shut.
7. Install the key to the transmitter.
Knowing Your Mazda
Doors and Locks
3-7
Mazda3_8V66-EA-06F_Edition3 Page81
Wednesday, August 23 2006 11:18 AM
Form No.8V66-EA-06F