change wheel MAZDA MODEL 3 HATCHBACK 2020 (in English) Owner's Manual
[x] Cancel search | Manufacturer: MAZDA, Model Year: 2020, Model line: MODEL 3 HATCHBACK, Model: MAZDA MODEL 3 HATCHBACK 2020Pages: 598, PDF Size: 89.37 MB
Page 324 of 598

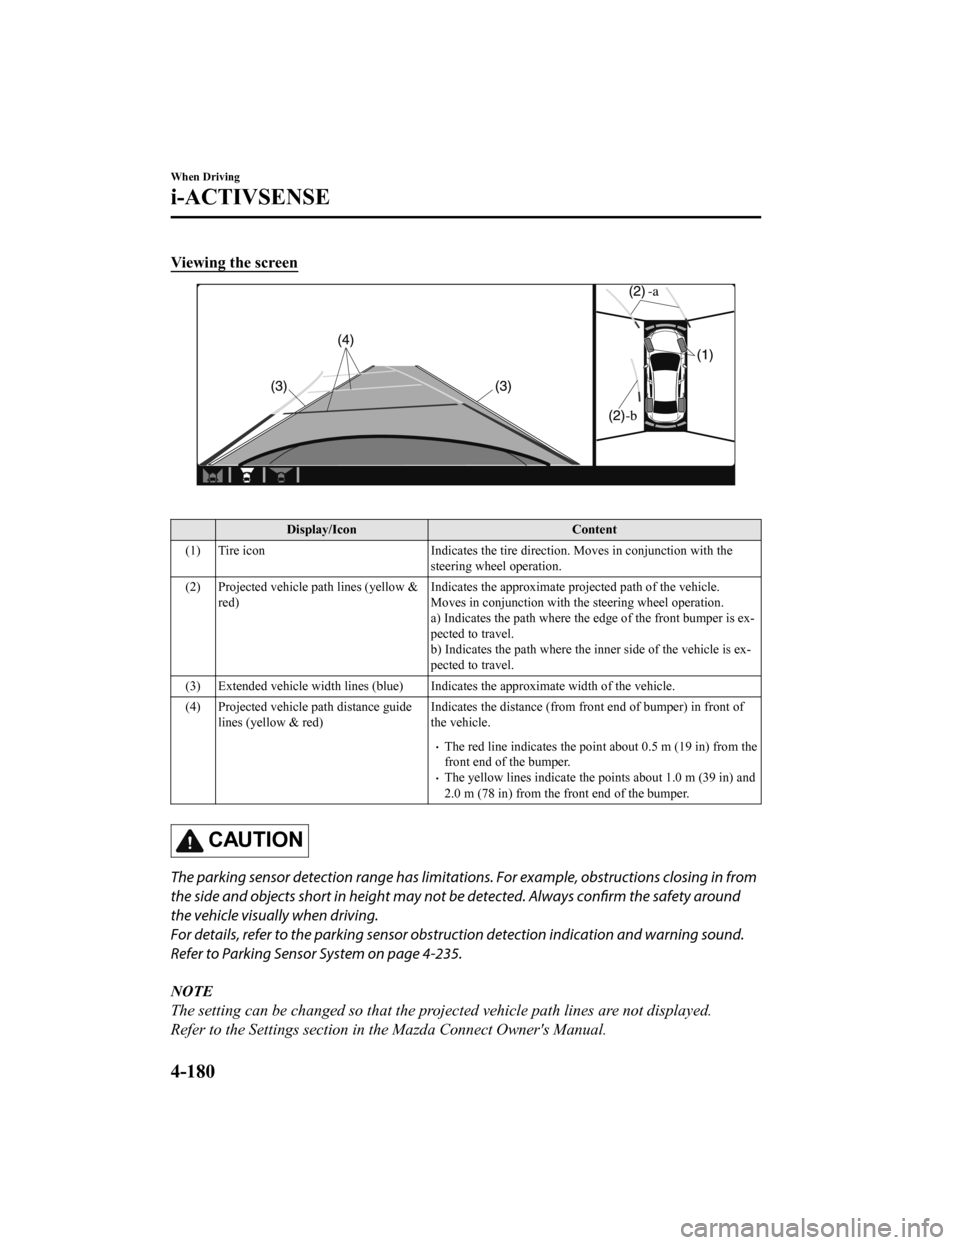
Viewing the screen
Display/IconContent
(1) Tire icon Indicates the tire direction. Moves in conjunction with the
steering wheel operation.
(2) Projected vehicle path lines (yellow & red) Indicates the approximate projected path of the vehicle.
Moves in conjunction with the steering wheel operation.
a) Indicates the path where the
edge of the front bumper is ex‐
pected to travel.
b) Indicates the path where the inner side of the vehicle is ex ‐
pected to travel.
(3) Extended vehicle width lines (blue) Indicates the approximate width of the vehicle.
(4) Projected vehicle path distance guide lines (yellow & red) Indicates the distance (from front end of bumper) in front of
the vehicle.
The red line indicates the point about 0.5 m (19 in) from the
front end of the bumper.
The yellow lines indicate the points about 1.0 m (39 in) and
2.0 m (78 in) from the front end of the bumper.
CAUTION
The parking sensor detection range has limitation
s. For example, obstructions closing in from
the side and objects short in height may not be detected. Always confirm the safety around
the vehicle visually when driving.
For details, refer to the parking sensor obstru ction detection indication and warning sound.
Refer to Parking Sensor System on page 4-235.
NOTE
The setting can be changed so that the projected vehicle path lines are not displayed.
Refer to the Settings section in the Mazda Connect Owner's Manual.
When Driving
i-ACTIVSENSE
4-180
Mazda3_8HZ1-EA-19G_Edition1_old 2019-5-17 13:49:03
Page 329 of 598

Viewing the screen
Display/IconContent
(1) Projected vehicle path lines (yellow) Indicates the approxima te projected path of the vehicle.
Moves in conjunction with the steering wheel operation.
The projected vehicle path lines (yellow) indicate the path the
inner side of the vehicle is expected to travel.
(2) Vehicle parallel guide lines (blue) Indicates the approximate vehicle width including the door
mirrors.
(3) Vehicle front end guide lines (blue) Indicates the point about 0.25 m (9.84 in) from the front edge of the vehicle (front edge of the bumper).
NOTE
The setting can be changed so that the projected vehicle path lines are not displayed.
Refer to the Settings section in the Mazda Connect Owner's Manual.
When Driving
i-ACTIVSENSE
4-185
Mazda3_8HZ1-EA-19G_Edition1_old 2019-5-17 13:49:03
Page 332 of 598

Obstructions displayed in the rear view may not display on the top view screen.
If the position or angle of each camera changes due to tilting of the vehicle, the image
may appear distorted.
Lines on the road may appear distorted at the seams where each of the camera images
merge.
The screen area for each camera may appear bright/dark depending on the illumination
level around any of the cameras.
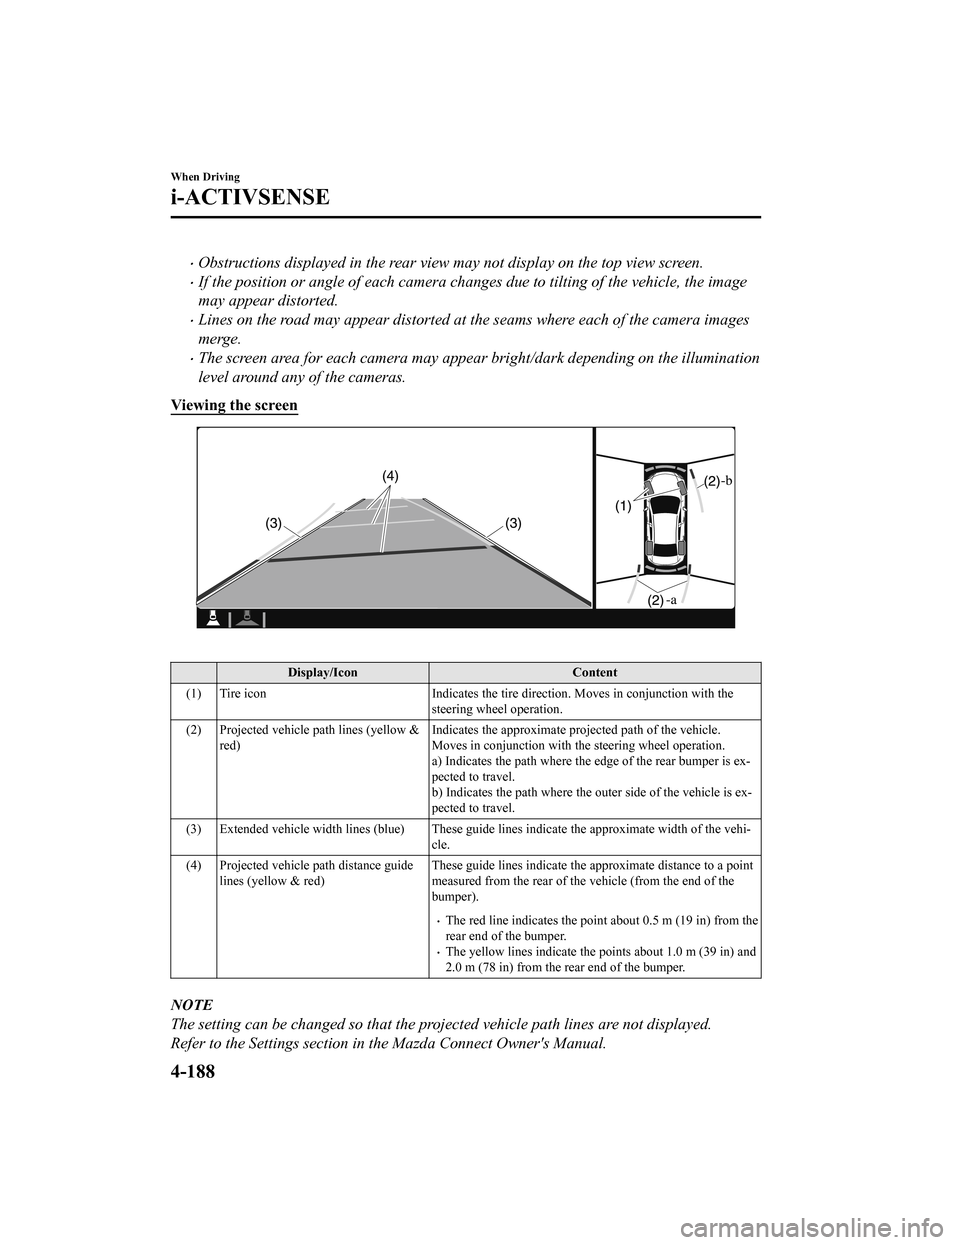
Viewing the screen
Display/Icon Content
(1) Tire icon Indicates the tire direction. Moves in conjunction with the
steering wheel operation.
(2) Projected vehicle path lines (yellow & red) Indicates the approximate projected path of the vehicle.
Moves in conjunction with t
he steering wheel operation.
a) Indicates the path where the edge of the rear bumper is ex‐
pected to travel.
b) Indicates the path where the outer side of the vehicle is ex ‐
pected to travel.
(3) Extended vehicle width lines ( blue) These guide lines indicate the approximate width of the vehi‐
cle.
(4) Projected vehicle path distance guide lines (yellow & red) These guide lines indicate the
approximate distance to a point
measured from the rear of the vehicle (from the end of the
bumper).
The red line indicates the point about 0.5 m (19 in) from the
rear end of the bumper.
The yellow lines indicate the points about 1.0 m (39 in) and
2.0 m (78 in) from the rear end of the bumper.
NOTE
The setting can be changed so that the projected vehicle path lines are not displayed.
Refer to the Settings section in the Mazda Connect Owner's Manual.
When Driving
i-ACTIVSENSE
4-188
Mazda3_8HZ1-EA-19G_Edition1_old 2019-5-17 13:49:03
Page 345 of 598

Be careful not to scratch the Forward
Sensing Camera (FSC) lens or allow it
to get dirty.
Do not remove the Forward Sensing
Camera (FSC) cover.
Do not place objects on the dashboard
which
reflect light.
Always keep the windshield glass
around the camera clean by removing
dirt or fogging. Use the windshield
defroster to remove fogging on the
windshield.
Consult an Authorized Mazda Dealer
regarding cleaning the interior side of
the windshield around the Forward
Sensing Camera (FSC).
Consult an Authorized Mazda Dealer
before performing repairs around the
Forward Sensing Camera (FSC).
The Forward Sensing Camera (FSC) is
installed to the windshield. Consult an
Authorized Mazda Dealer for
windshield repair and replacement.
When cleaning the windshield, do not
allow glass cleaners or similar cleaning
fluids to get on the Forward Sensing
Camera (FSC) lens. In addition, do not
touch the Forward Sensing Camera
(FSC) lens.
When performing repairs around the
rearview mirror, consult an Authorized
Mazda Dealer.
Consult an Authorized Mazda Dealer
regarding cleaning of the camera lens.Do not hit or apply strong force to the
Forward Sensing Camera (FSC) or the
area around it. If the Forward Sensing
Camera (FSC) is severely hit or if there
are cracks or damage caused by
flying
gravel or debris in the area around it,
stop using the following systems and
consult an Authorized Mazda Dealer.
High Beam Control System (HBC)
Lane Departure Warning System
(LDWS)
Traffic Sign Recognition System
(TSR)
Distance & Speed Alert (DSA)
Driver Attention Alert (DAA)
Driver Monitoring (DM)
Mazda Radar Cruise Control (MRCC)
Mazda Radar Cruise Control with
Stop & Go function (MRCC with Stop
& Go function)
Lane-keep Assist System (LAS)
Traffic Jam Assist (TJA)
Smart Brake Support (SBS)
The direction in which the Forward
Sensing Camera (FSC) is pointed has
been finely adjusted. Do not change
the installation position of the Forward
Sensing Camera (FSC) or remove it.
Otherwise, it could result in damage or
malfunction.
Always use tires for all wheels that are of
the specified size, and the same
manufacturer, brand, and tread pattern.
In addition, do not use tires with
significantly different wear patterns on
the same vehicle as the system may not
operate normally.
When Driving
i-ACTIVSENSE
4-201
Mazda3_8HZ1-EA-19G_Edition1_old 2019-5-17 13:49:03
Page 355 of 598

Driver MonitoringCamera
*
▼Driver Monitoring Camera
The driver monitoring camera detects
changes in the driver'
s facial features and
estimates the amount of accumulated
fatigue and sleepiness of the driver.
1. Driver monitoring camera
NOTE
Driver Monitoring (DM) and the earlier
collision warning may not operate
normally under the following conditions.
The driver monitoring camera is
covered with something.
You are driving the vehicle while
leaning on the steering wheel.
You are wearing glasses or
sunglasses.
A cap or hat you are wearing partially
blocks the driver monitoring camera's
view of your eyes, you have long
bangs partially covering your eyes, or
a part of your face is invisible due to a
face mask.
The lighting conditions change
significantly (such as backlight, light
from the side, or direct light from the
setting sun, and the headlights of
on-coming vehicles).
You are driving the vehicle with your
face largely pointed to the side.
You are moving around extensively.
Your face or your eyes frequently turn
in direction other than straight ahead
(direction of travel).
Your line of sight moves or directly
after it has moved.
There is a large difference between
your line of sight and the direction
your face is pointed.
You are driving the vehicle with your
head largely tilted to one side.
When Driving
i-ACTIVSENSE
*Some models.4-211
Mazda3_8HZ1-EA-19G_Edition1_old 2019-5-17 13:49:03
Page 367 of 598

It may be difficult to see the display under the following conditions, however, it does not
indicate a malfunction.
In darkened areas.
When the temperature around the lens is high/low.
When the camera is wet such as on a rainy day or during periods of high humidity.
When foreign material such as mud is stuck around the camera.
When the camera lens reflects sunlight or headlight beams.
The surroundings are illuminated by vehicle lights, fluorescent lights, or LED lights
(Display may flicker).
Extremely small dark or white dots appear on the screen (dots may flicker).
Image display may be delayed if the temperature around the camera is low.
▼Viewing the Display
Predicted vehicle path a
ssist lines display type
The projected path guidance mode displays the predicted path of the vehicle after you turn
the steering wheel.
Use this mode for parking your v ehicle in a parking space or garage.
a) Projected vehicle path (yellow)
These lines are displayed as a reference for the projected path of the vehicle.
The lines displaying the projected vehicle path change after yo u turn the steering wheel.
b) Extended vehicle w idth lines (blue)
These lines indicate the vehicle's extended width.
These lines are not displayed when the vehicle's wheels are in the straight-ahead position.
When Driving
Rear View Monitor
4-223
Mazda3_8HZ1-EA-19G_Edition1_old 2019-5-17 13:49:03
Page 368 of 598

c) Distance guide linesThese lines indicate the approximate distance to a point measur ed from the vehicle's rear
(from the end of the bumper).
The blue line indicates the poi nt about 50 cm (19 in) from the rear bumper.
The red and yellow lines, which change position after you turn the steering wheel,
indicate the points about 50 cm (19 in) for the red line and 10 0 cm (39.3 in) for the
yellow lines from the rear bumper (at the center point of each of the lines).
A degree of error occurs when the wheels are not in the straigh t-ahead position.
In the above illustration, the ri ght side of the vehicle is in a position closer to the actual
distance displayed by the distance guide lines (red: about 50 c m (19 in) point, yellow:
about 100 cm (39.3 in) point behind the rear bumper), whereas t he left side is in a
position farther away.
CAUTION
The indicated position of the guide lines on the display changes depending on the vehicle
conditions (such as the number of occupants/ca rgo load) and the road conditions (such as a
steep gradient to the rear of the vehicle).
Always check the area to the vehicle's rear and the surrounding area directly with your eyes
while backing up.
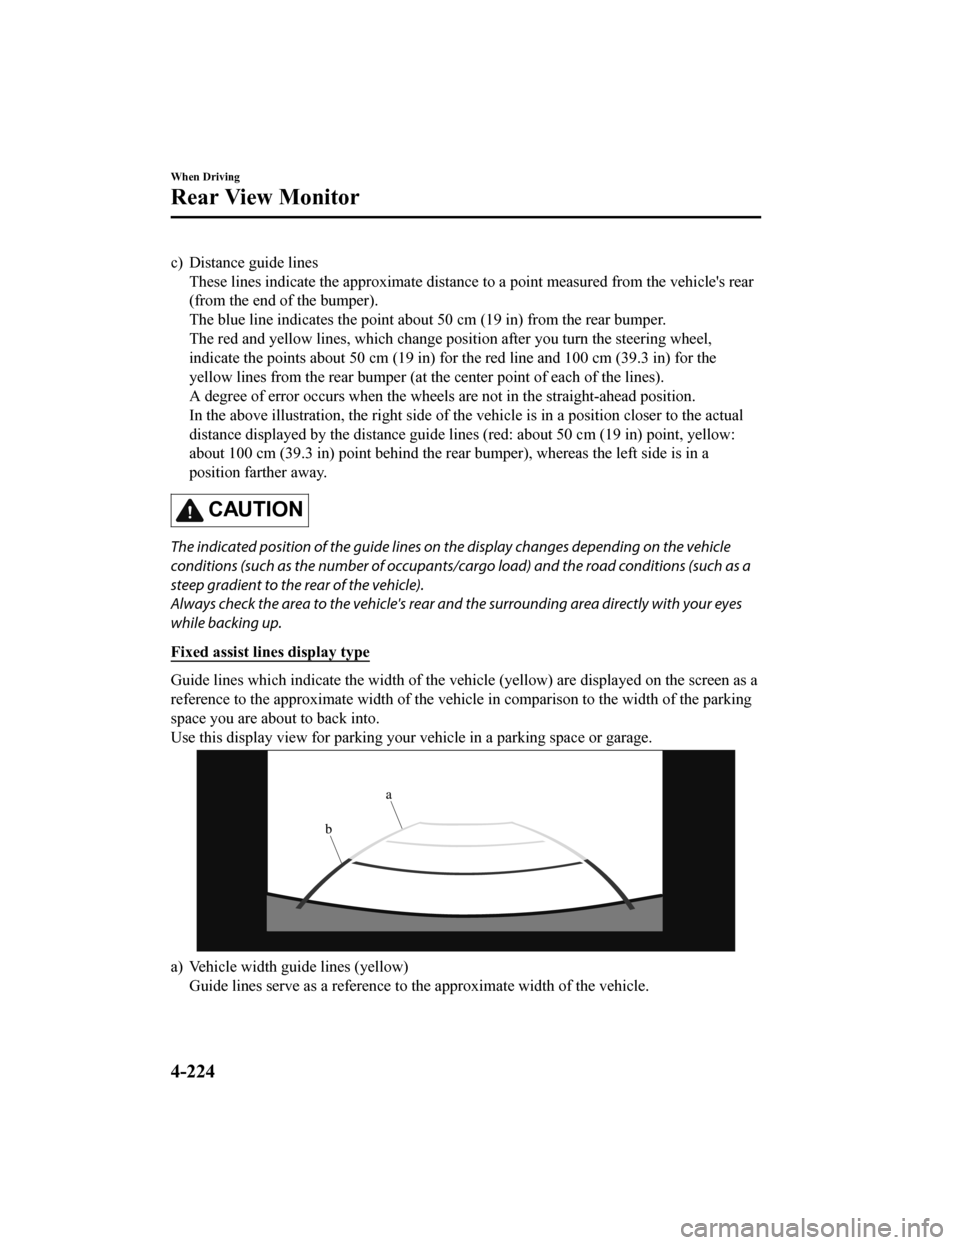
Fixed assist lines display type
Guide lines which indicate the width of the vehicle (yellow) ar e displayed on the screen as a
reference to the approximate width of the vehicle in comparison to the width of the parking
space you are about to back into.
Use this display view for parking your vehicle in a parking spa ce or garage.
a) Vehicle width guide lines (yellow)
Guide lines serve as a reference to the approximate width of th e vehicle.
When Driving
Rear View Monitor
4-224
Mazda3_8HZ1-EA-19G_Edition1_old 2019-5-17 13:49:03
Page 521 of 598

WA R N I N G
Do not drive the vehicle at high speeds if
the TPMS warning light turns on or flashes:
Driving the vehicle at high speeds while the
TPMS warning light is turned on or flashing
is dangerous because the brake
performance and the steering wheel
operability will be reduced. If the vehicle is
driven at high speeds or the brakes are
suddenly applied, it could lead to an
accident. Gradually apply the brakes to
lower the vehicle's speed.
Do not ignore the TPMS warning light
when it is turned on or flashing:
Continuing to drive the vehicle while
ignoring the illumination/flashing of the
TPMS warning light is dangerous because a
tire may burst which could lead to an
accident. Take appropriate measures as
soon as possible.
NOTE
While the TPMS is learning the tire
positions, such as immediately after a tire
position has been changed, the tire
pressure at the tire position prior to it
being changed is displayed until the
system completes the learning. For this
reason, the tire pressures displayed for the
tire positions may be different from the
actual tire pressures at the tire positions.
Action to be taken
Adjust the tire pressu res to the appropriate
pressures.
Refer to Tire Inflation Pressure on page
6-31.
CAUTION
Adjust the tire pressures while the tires
are cool. Because the air pressure in the
tires
fluctuates depending on the
temperature, before adjusting the tire
pressures, let the vehicle sit for an hour or
drive it only within a 1.6 km (1 mile)
distance. If the tire pressures are adjusted
while the tires are warm, the tire
pressures may decrease below the specified air pressure after cooling down
which could turn on the warning light. In
addition, because the air pressure in the
tires decreases when the ambient
temperature is low, if the ambient
temperature increases, an illuminated
TPMS warning light may turn off. Under
any circumstances, always adjust the tire
pressures while the tires are cool.
After adjusting the tire pressures, the
TPMS warning light turns off. If the TPMS
warning light does not turn off, drive the
vehicle at a speed of about 25 km (16
mph) or faster for 3 minutes or longer
and make sure the warning light turns
off.
If the TPMS warning light remains on
even after adjusting th e tire pressures, one
of the tires may have a puncture.
If Trouble Arises
Warning/Indicator Lights and Warning Sounds
7-37
Mazda3_8HZ1-EA-19G_Edition1_old 2019-5-17 13:49:03