warning light MAZDA MODEL 6 2008 (in English) Repair Manual
[x] Cancel search | Manufacturer: MAZDA, Model Year: 2008, Model line: MODEL 6, Model: MAZDA MODEL 6 2008Pages: 440, PDF Size: 6.49 MB
Page 182 of 440

Black plate (182,1)
HomeLink Wireless
Control Systemí
NOTEHomeLink and HomeLink house are registered
trademarks of Johnson Controls.
The HomeLink system replaces up to 3
hand-held transmitters with a single built-
in component in the auto-dimming mirror.
Pressing the HomeLink button on the
auto-dimming mirror activates garage
doors, gates and other devices
surrounding your home.
HomeLink button
Indicator light
WARNING
Do not use the HomeLink system with
any garage door opener that lacks the
safety stop and reverse feature:Using the HomeLink system with any
garage door opener that lacks the
safety stop and reverse feature as
required by federal safety standards
is dangerous. (This includes garage
doors manufactured before April 1,
1982.)
Using these garage door openers can
increase the risk of serious injury or
death. For further information,
contact HomeLink at 1-800-355-3515
or www.homelink.com or your
Authorized Mazda Dealer.
Always check the areas surrounding
garage doors and gates for people or
obstructions before programming or
during operation of the HomeLimk
system: Programming or operating the
HomeLink system without verifying
the safety of areas surrounding
garage doors and gates is dangerous
and could result in an unexpected
accident and serious injury if
someone were to be hit.
CAUTION
HomeLink has been tested and
complies with FCC and Industry
Canada rules. Changes or
modifications not expressly approved
by the party responsible for
compliance could void the user's
authority to operate the device.
5-54
Driving Your Mazda
íSome models.
Switches and Controls
Mazda6_8X47-EA-07G_Edition1 Page182
Tuesday, May 29 2007 3:43 PM
Form No.8X47-EA-07G
Page 193 of 440

Black plate (193,1)
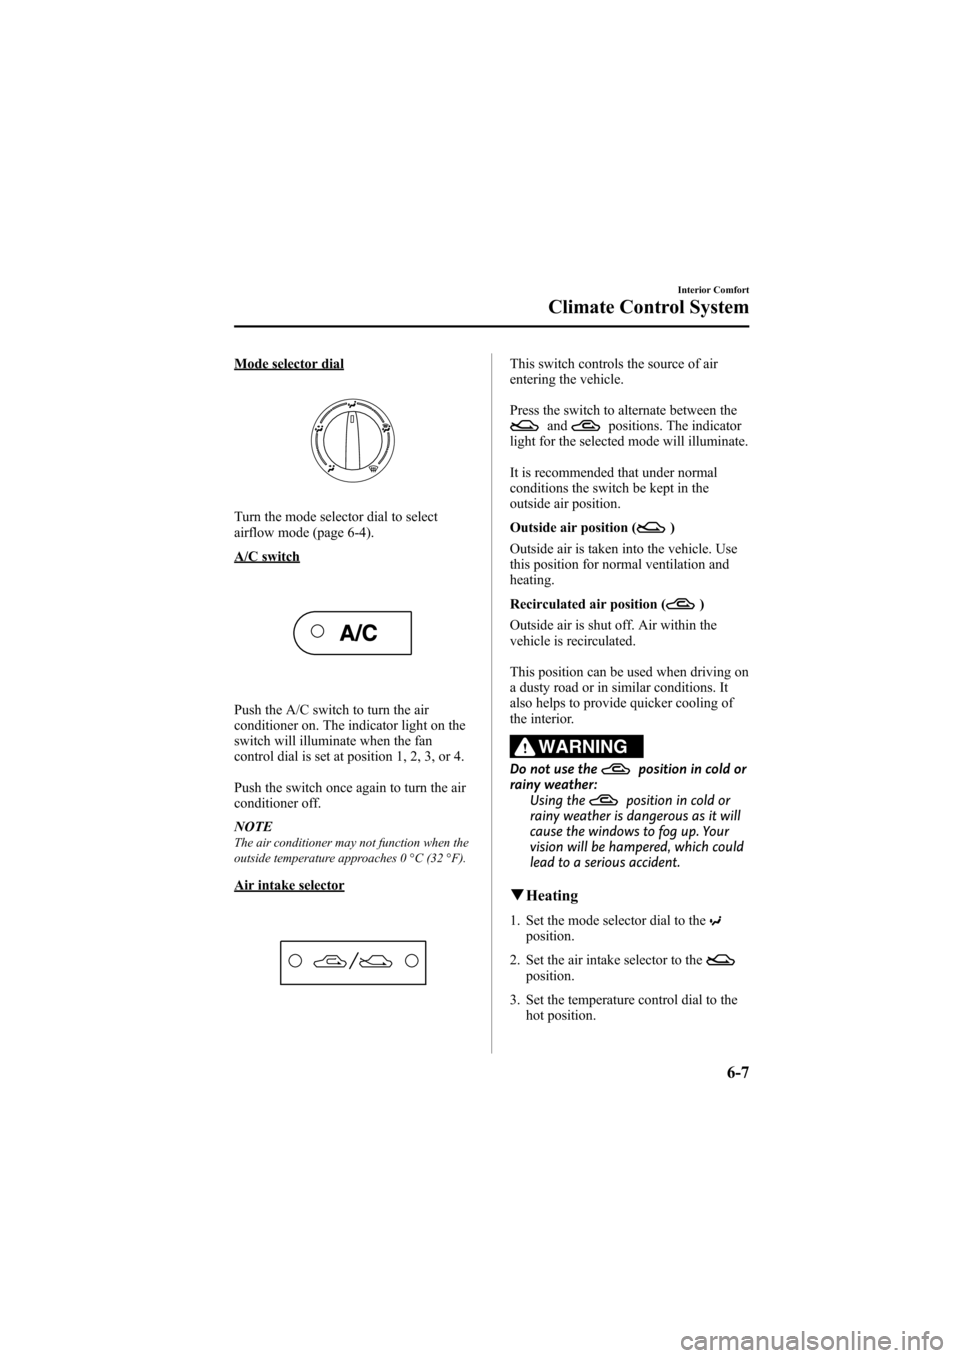
Mode selector dial
Turn the mode selector dial to select
airflow mode (page 6-4).
A/C switch
Push the A/C switch to turn the air
conditioner on. The indicator light on the
switch will illuminate when the fan
control dial is set at position 1, 2, 3, or 4.
Push the switch once again to turn the air
conditioner off.
NOTE
The air conditioner may not function when the
outside temperature approaches 0 °C (32 °F).
Air intake selector
This switch controls the source of air
entering the vehicle.
Press the switch to alternate between the
andpositions. The indicator
light for the selected mode will illuminate.
It is recommended that under normal
conditions the switch be kept in the
outside air position.
Outside air position (
)
Outside air is taken into the vehicle. Use
this position for normal ventilation and
heating.
Recirculated air position (
)
Outside air is shut off. Air within the
vehicle is recirculated.
This position can be used when driving on
a dusty road or in similar conditions. It
also helps to provide quicker cooling of
the interior.
WARNING
Do not use theposition in cold or
rainy weather: Using the
position in cold or
rainy weather is dangerous as it will
cause the windows to fog up. Your
vision will be hampered, which could
lead to a serious accident.
q Heating
1. Set the mode selector dial to theposition.
2. Set the air intake selector to the
position.
3. Set the temperature control dial to the hot position.
Interior Comfort
Climate Control System
6-7
Mazda6_8X47-EA-07G_Edition1 Page193
Tuesday, May 29 2007 3:43 PM
Form No.8X47-EA-07G
Page 195 of 440

Black plate (195,1)
WARNING
Do not defog the windshield using theposition with the temperature
control set to the cold position: Using the
position with the
temperature control set to the cold
position is dangerous as it will cause
the outside of the windshield to fog
up. Your vision will be hampered,
which could lead to a serious
accident. Set the temperature control
to the hot or warm position when
using the
position.
NOTE
lFor maximum defrosting, set the
temperature control dial to the extreme hot
position and the fan control dial to position
4.
lIf warm air is desired at the floor, set the
mode selector dial to theposition.lIn the,orposition, the air
conditioner is automatically turned on
(however, the indicator light does not
illuminate) and the
position is
automatically selected to defrost the
windshield.
In the
orposition, theposition cannot be changed to theposition.
q Dehumidifying (With Air
Conditioner)
Operate the air conditioner in cool or cold
weather to help defog the windshield and
side windows.
1. Set the mode selector dial to the
desired position.
2. Set the air intake selector to the
position. 3. Set the temperature control dial to the
desired position.
4. Set the fan control dial to the desired speed.
5. Turn on the air conditioner by pressing the A/C switch.
NOTE
One of the functions of the air conditioner is
dehumidifying the air and, to use this function,
the temperature does not have to be set to cold.
Therefore, set the temperature control dial to
the desired position (hot or cold) and turn on
the air conditioner when you want to
dehumidify the cabin air.
Interior Comfort
Climate Control System
6-9
Mazda6_8X47-EA-07G_Edition1 Page195
Tuesday, May 29 2007 3:44 PM
Form No.8X47-EA-07G
Page 199 of 440

Black plate (199,1)
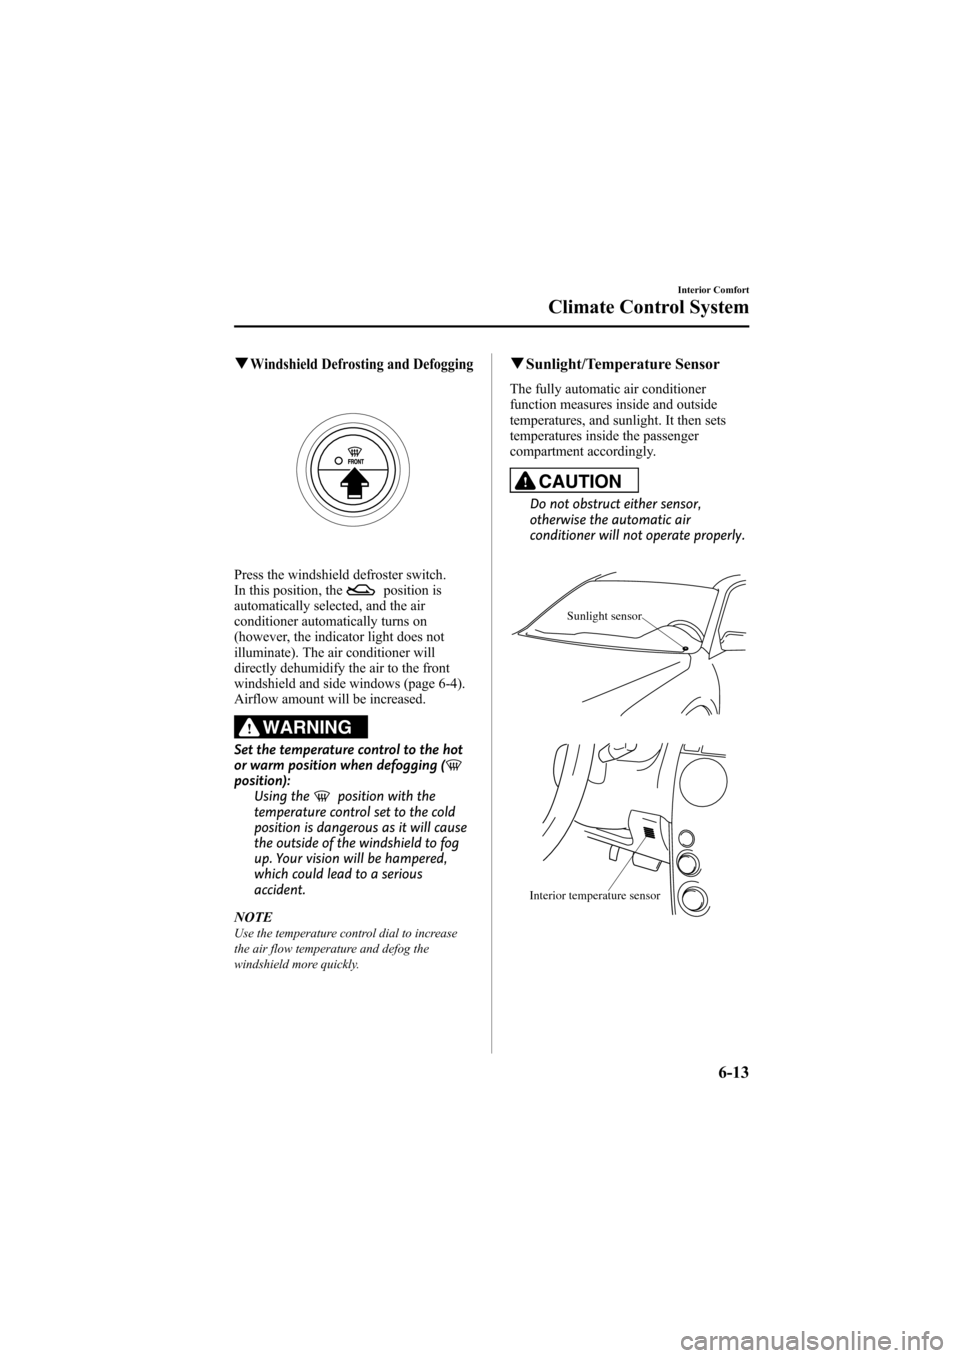
qWindshield Defrosting and Defogging
Press the windshield defroster switch.
In this position, theposition is
automatically selected, and the air
conditioner automatically turns on
(however, the indicator light does not
illuminate). The air conditioner will
directly dehumidify the air to the front
windshield and side windows (page 6-4).
Airflow amount will be increased.
WARNING
Set the temperature control to the hot
or warm position when defogging (
position): Using theposition with the
temperature control set to the cold
position is dangerous as it will cause
the outside of the windshield to fog
up. Your vision will be hampered,
which could lead to a serious
accident.
NOTE
Use the temperature control dial to increase
the air flow temperature and defog the
windshield more quickly.
q Sunlight/Temperature Sensor
The fully automatic air conditioner
function measures inside and outside
temperatures, and sunlight. It then sets
temperatures inside the passenger
compartment accordingly.
CAUTION
Do not obstruct either sensor,
otherwise the automatic air
conditioner will not operate properly.
Sunlight sensor
Interior temperature sensor
Interior Comfort
Climate Control System
6-13
Mazda6_8X47-EA-07G_Edition1 Page199
Tuesday, May 29 2007 3:44 PM
Form No.8X47-EA-07G
Page 239 of 440

Black plate (239,1)
Storage Compartments
WARNING
Keep storage boxes closed when
driving:Driving with the storage boxes open
is dangerous. To reduce the
possibility of injury in an accident or
a sudden stop, keep the storage
boxes closed when driving.
CAUTION
Do not leave lighters or eyeglasses in
the storage boxes while parked under
the sun. A lighter could explode or
the plastic material in eyeglasses
could deform and crack from high
temperature.
qOverhead Console
This console box is designed to store
eyeglasses or other accessories.
Push and release to open.
qStorage Pocket
To open, push the release catch down and
pull the lid downward.
qCenter Box with Lid (Without
Navigation System)
To use, pull the knob, and the lid opens
automatically.
Knob
Interior Comfort
Interior Equipment
6-53
Mazda6_8X47-EA-07G_Edition1 Page239
Tuesday, May 29 2007 3:44 PM
Form No.8X47-EA-07G
Page 244 of 440

Black plate (244,1)
Parking in an Emergency
The hazard warning lights should always
be used when you stop on or near a
roadway in an emergency.
The hazard warning lights warn other
drivers that your vehicle is a traffic hazard
and that they must take extreme caution
when near it.
Depress the hazard warning flasher and all
the turn signals will flash.
NOTE
lThe turn signals do not work when the
hazard warning lights are on.
lCheck local regulations about the use of
hazard warning lights while the vehicle is
being towed to verify that it is not in
violation of the law.
7-2
In Case of an Emergency
Parking in an Emergency
Mazda6_8X47-EA-07G_Edition1 Page244
Tuesday, May 29 2007 3:44 PM
Form No.8X47-EA-07G
Page 247 of 440

Black plate (247,1)
To secure the jack
1. Insert the wing bolt into the jack withthe jack screw pointing front and turn
the wing bolt clockwise to temporarily
tighten it.
2. Turn the jack screw in the direction shown in the figure.
Wing bolt
Jack screw
3. Turn the wing bolt completely to secure the jack.
NOTE
If the jack is not completely secured, it could
rattle while driving. Make sure the jack screw
is sufficiently tightened.
q Spare Tire
Your Mazda has a temporary spare tire.
The temporary spare tire is lighter and
smaller than a conventional tire, and is
designed only for emergency use and
should be used only for VERY short
periods. Temporary spare tires should
NEVER be used for long drives or
extended periods.
WARNING
Do not install the temporary spare tire
on the front wheels (driving wheels):
Driving with the temporary spare tire
on one of the front driving wheels is
dangerous. Handling will be affected.
You could lose control of the vehicle,
especially on ice or snow bound
roads, and have an accident. Move a
regular tire to the front wheel and
install the temporary spare tire to the
rear.
CAUTION
ØWhen using the temporary spare
tire, driving stability may decrease
compared to when using only the
conventional tire. Drive carefully.
Ø To avoid damage to the temporary
spare tire or to the vehicle, observe
the following precautions:
ØDo not exceed 80 km/h (50
mph).
ØAvoid driving over obstacles.
Also, do not drive through an
automatic car wash. This tire's
diameter is smaller than a
conventional tire, so the ground
clearance is reduced about
35 mm (1.4 in).
ØDo not use tire chains on any
type of tire, including the spare
tire.
ØDo not use your temporary
spare tire on any other vehicle,
it has been designed only for
your Mazda.
ØUse only one temporary spare
tire on your vehicle at the same
time.
In Case of an Emergency
Flat Tire
7-5
Mazda6_8X47-EA-07G_Edition1 Page247
Tuesday, May 29 2007 3:44 PM
Form No.8X47-EA-07G
Page 248 of 440

Black plate (248,1)
NOTE(With Tire Pressure Monitoring System)
A tire pressure sensor is not installed to the
temporary spare tire. The warning light will
flash continuously while the temporary spare
tire is being used (page 5-27).
To remove the spare tire
(Sedan)
1. Remove the trunk board.
2. Turn the tire wing bolt counterclockwise.
(5-Door)
1. For vehicles equipped with a sub-woofer, uncouple the connector.
Connector
NOTEExtra strength may be required to uncouple the
connector. Be sure to squeeze the tab firmly.
If uncoupling is very difficult, remove the
wiring from the groove in the trunk board.
Then, pull the driver's side of the trunk board
up to remove the spare tire.
2. Remove the trunk board.
7-6
In Case of an Emergency
Flat Tire
Mazda6_8X47-EA-07G_Edition1 Page248
Tuesday, May 29 2007 3:44 PM
Form No.8X47-EA-07G
Page 300 of 440

Black plate (300,1)
qTemporary Spare Tire
Inspect the temporary spare tire at least
monthly to make sure it's properly inflated
and stored.
NOTE
The temporary spare tire condition gradually
deteriorates even if it has not been used.
The temporary spare tire is easier to
handle because of its construction which
is lighter and smaller than a conventional
tire. This tire should be used only for an
emergency and only for a short distance.
Use the temporary spare tire only until the
conventional tire is repaired, which should
be as soon as possible.
Maintain its pressure at 420 kPa (4.2
kgf/cm
2or bar, 60 psi).
CAUTION
Ø Do not use your temporary spare
tire rim with a snow tire or a
conventional tire. Neither will
properly fit and could damage
both tire and rim.
Ø The temporary spare tire has a
tread life of less than 5,000 km
(3,000 miles). The tread life may
be shorter depending on driving
conditions.
Ø The temporary spare tire is for
limited use, however, if the tread
wear solid-band indicator
appears, replace the tire with the
same type of temporary spare
(page 8-35). NOTE
Tires degrade over time, even when they are
not being used on the road. It is recommended
that tires generally be replaced when they are
6 years or older. Heat caused by hot climates
or frequent high loading conditions can
accelerate the aging process. You should
replace the spare tire when you replace the
other road tires due to the aging of the spare
tire. Regarding the manufacturing week and
year is indicated with 4 digit.
Refer to The tire labeling on page 9-22.
q
Replacing a Wheel
WARNING
Always use wheels of the correct size
on your vehicle:
Using a wrong-sized wheel is
dangerous. Braking and handling
could be affected, leading to loss of
control and an accident.
8-36
Maintenance and Care
Owner Maintenance
Mazda6_8X47-EA-07G_Edition1 Page300
Tuesday, May 29 2007 3:45 PM
Form No.8X47-EA-07G
Page 303 of 440

Black plate (303,1)
WARNING
Do not replace the xenon fusion bulbs
yourself:Replacing the xenon fusion bulbs
yourself is dangerous. Because the
xenon fusion bulbs require high
voltage, you could receive an electric
shock if the bulbs are handled
incorrectly. Consult an Authorized
Mazda Dealer when the replacement
is necessary.
Never touch the glass portion of a
halogen bulb with your bare hands and
always wear eye protection when
handling or working around the bulbs: When a halogen bulb breaks, it is
dangerous. These bulbs contain
pressurized gas. If one is broken, it
will explode and serious injuries
could be caused by the flying glass.
If the glass portion is touched with
bare hands, body oil could cause the
bulb to overheat and explode when
lit.
Always keep halogen bulbs out of the
reach of children: Playing with a halogen bulb is
dangerous. Serious injuries could be
caused by dropping a halogen bulb
or breaking it some other way.
qReplacing Exterior Light Bulbs
Replacing the headlight, and parkinglight bulbs
Due to the complexity and difficulty of
the procedure, the bulbs should be
replaced by an Authorized Mazda Dealer.
Fog lights
1. If you are changing the left fog light
bulb, start the engine, turn the steering
wheel all the way to the right, and turn
off the engine. If you are changing the
right fog light bulb, turn the steering
wheel to the left.
2. Turn the screws counterclockwise and remove them.
3. Turn the center section of the plastic retainers counterclockwise and remove
them, and partially peel back the
mudguard.
Removal
Installation
4. Turn the socket and bulb assemblycounterclockwise, and carefully pull it
backward.
Maintenance and Care
Owner Maintenance
8-39
Mazda6_8X47-EA-07G_Edition1 Page303
Tuesday, May 29 2007 3:45 PM
Form No.8X47-EA-07G