light MAZDA MODEL 6 2009 Smart Start Guide (in English)
[x] Cancel search | Manufacturer: MAZDA, Model Year: 2009, Model line: MODEL 6, Model: MAZDA MODEL 6 2009Pages: 26, PDF Size: 4.83 MB
Page 3 of 26
2
Release
Button
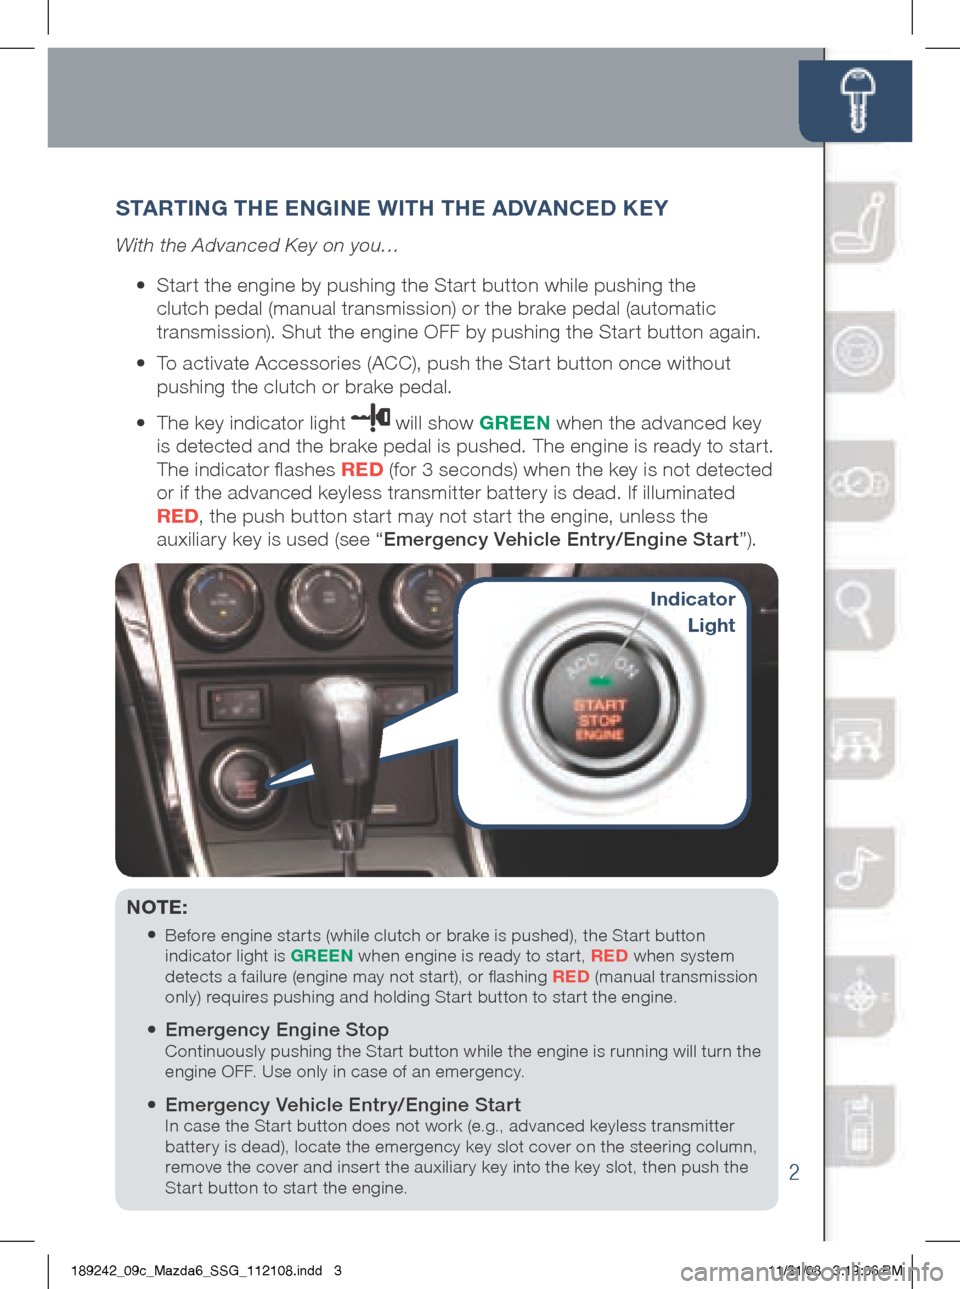
S TART iN g THE EN giNE wi TH THE A DVANCED K EY
With the Advanced Key on you…
• Start the engine by pushing the Start button while pushing the
clutch pedal (manual transmission) or the brake pedal (automatic
transmission). Shut the engine OFF by pushing the Start button again.
•
To activate Accessories (ACC), push the Start button once without
pushing the clutch or brake pedal.
•
The key indicator light
will show g REEN when the advanced key
is detected and the brake pedal is pushed. The engine is ready to start.
The indicator flashes RED (for 3 seconds) when the key is not detected
or if the advanced keyless transmitter battery is dead. If illuminated
RED , the push button start may not start the engine, unless the
auxiliary key is used (see “ Emergency Vehicle Entry/Engine Start ”).
NOTE:
•
Before engine star ts (while clutch or brake is pushed), the Star t button
indicator light is g REEN when engine is ready to start, RED when system
detects a failure (engine may not start), or flashing RED (manual transmission
only) requires pushing and holding Start button to start the engine.
• Emergency Engine Stop Continuously pushing the Start button while the engine is running will turn the
engine OFF. Use only in case of an emergency.
• Emergency Vehicle Entry/Engine Start In case the Start button does not work (e.g., advanced keyless transmitter
battery is dead), locate the emergency key slot cover on the steering column,
remove the cover and insert the auxiliary key into the key slot, then push the
Start button to start the engine.
indicator
Light
189242_09c_Mazda6_SSG_112108.indd 311/21/08 3:19:06 PM
Page 5 of 26
4
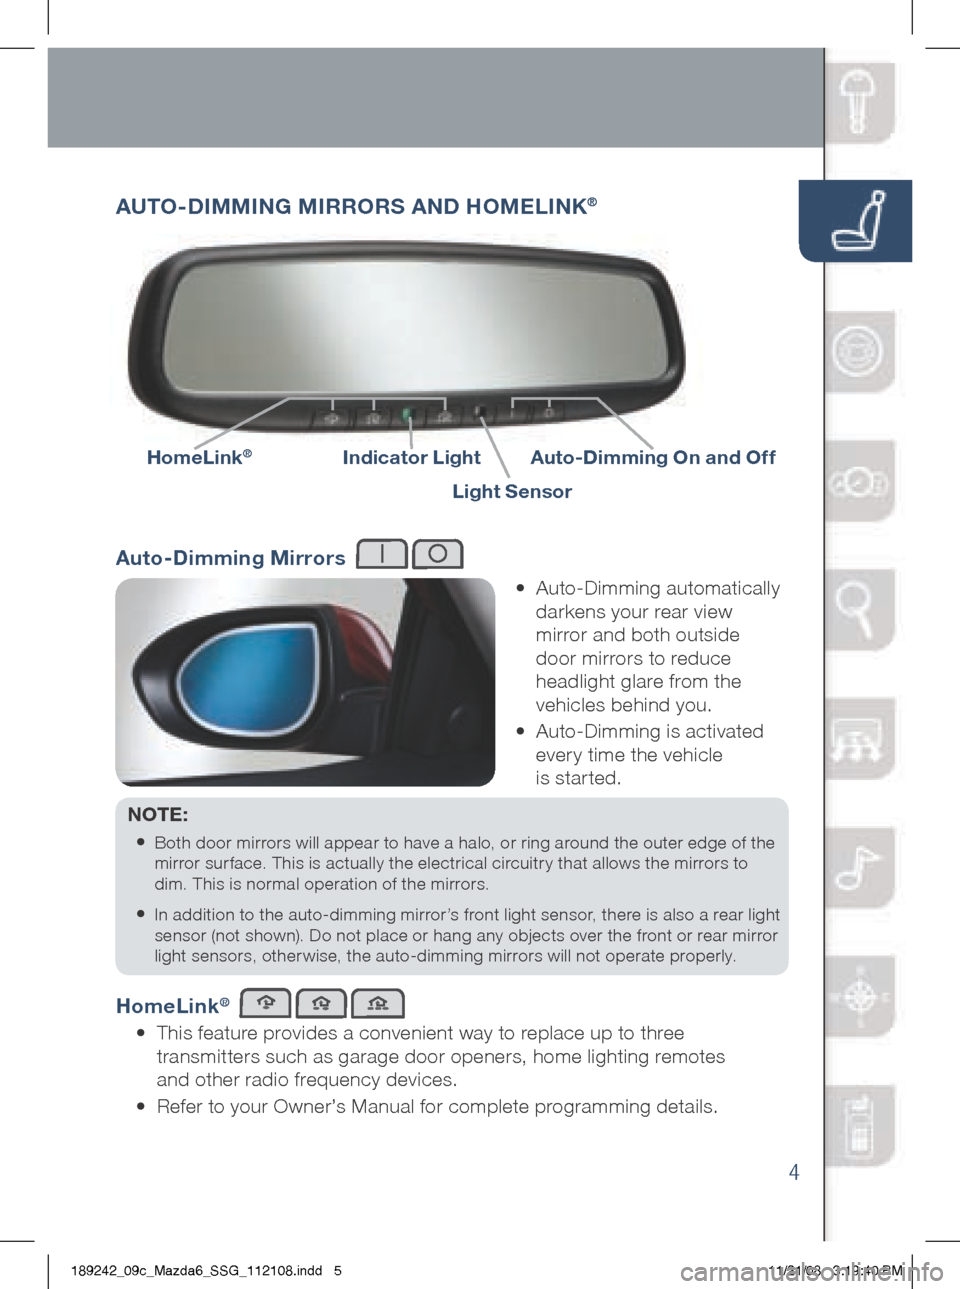
AUTO -DiMMi Ng Mi RROR S AND HOME LiNK®
•
Auto-Dimming automatically
darkens your rear view
mirror and both outside
door mirrors to reduce
headlight glare from the
vehicles behind you.
•
Auto-Dimming is activated
every time the vehicle
is started.
NOTE:
•
Both door mirrors will appear to have a halo, or ring around the outer edge of the
mirror surface. This is actually the electrical circuitry that allows the mirrors to
dim. This is normal operation of the mirrors.
• In addition to the auto-dimming mirror’s front light sensor, there is also a rear light
sensor (not shown). Do not place or hang any objects over the front or rear mirror
light sensors, otherwise, the auto-dimming mirrors will not operate properly.
HomeLink®
•
This feature provides a convenient way to replace up to three
transmitters such as garage door openers, home lighting remotes
and other radio frequency devices.
• Refer to your Owner’s Manual for complete programming details.
i ndicator LightAuto-Dimming On and Off
HomeLink®
Light Sensor
Auto-Dimming Mirrors
189242_09c_Mazda6_SSG_112108.indd 511/21/08 3:19:40 PM
Page 6 of 26
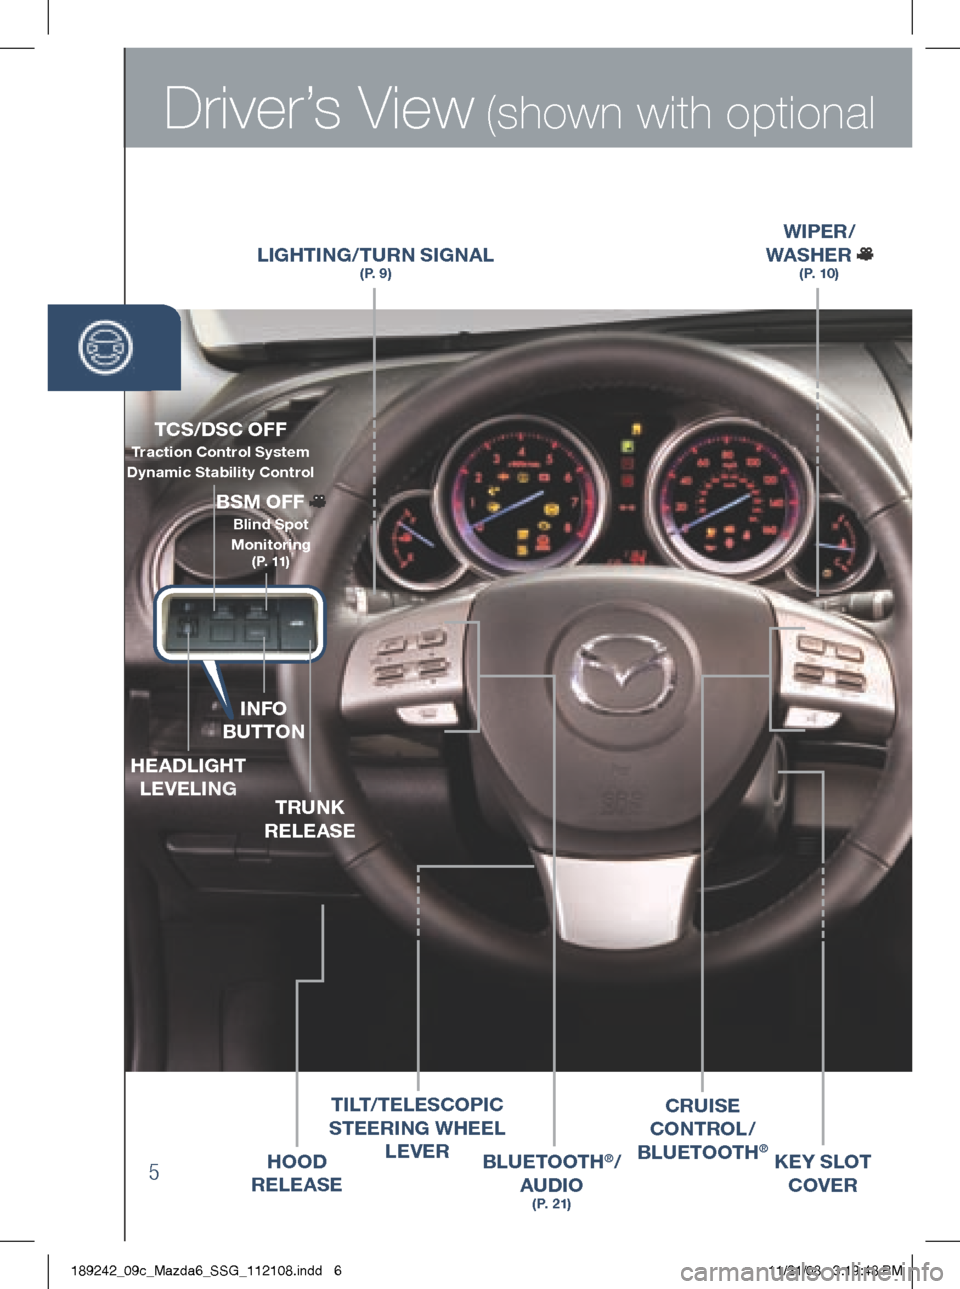
Driver’s View (shown with optional
5
LigHTiNg/T URN S ig NAL(P. 9)
wi PER /
wASHER
(P. 10)
BLUETOOTH®/
AUDi O
(P. 21)
CRU iSE
CONTROL /
B LUETOOTH
®HOOD
RELEASE
TCS/DSC OFF Traction Control System
Dynamic Stabilit y Control
i NFO
BUTTON
HEADLig HT
LEVELi Ng
TRUNK
RELEASE
BSM OFF
Blind Spot
Monitoring
(P. 11)
Ti LT /TELESCOP iC
STEER iN g w HEEL
LEVER
KEY SLOT
COVER
189242_09c_Mazda6_SSG_112108.indd 611/21/08 3:19:48 PM
Page 8 of 26
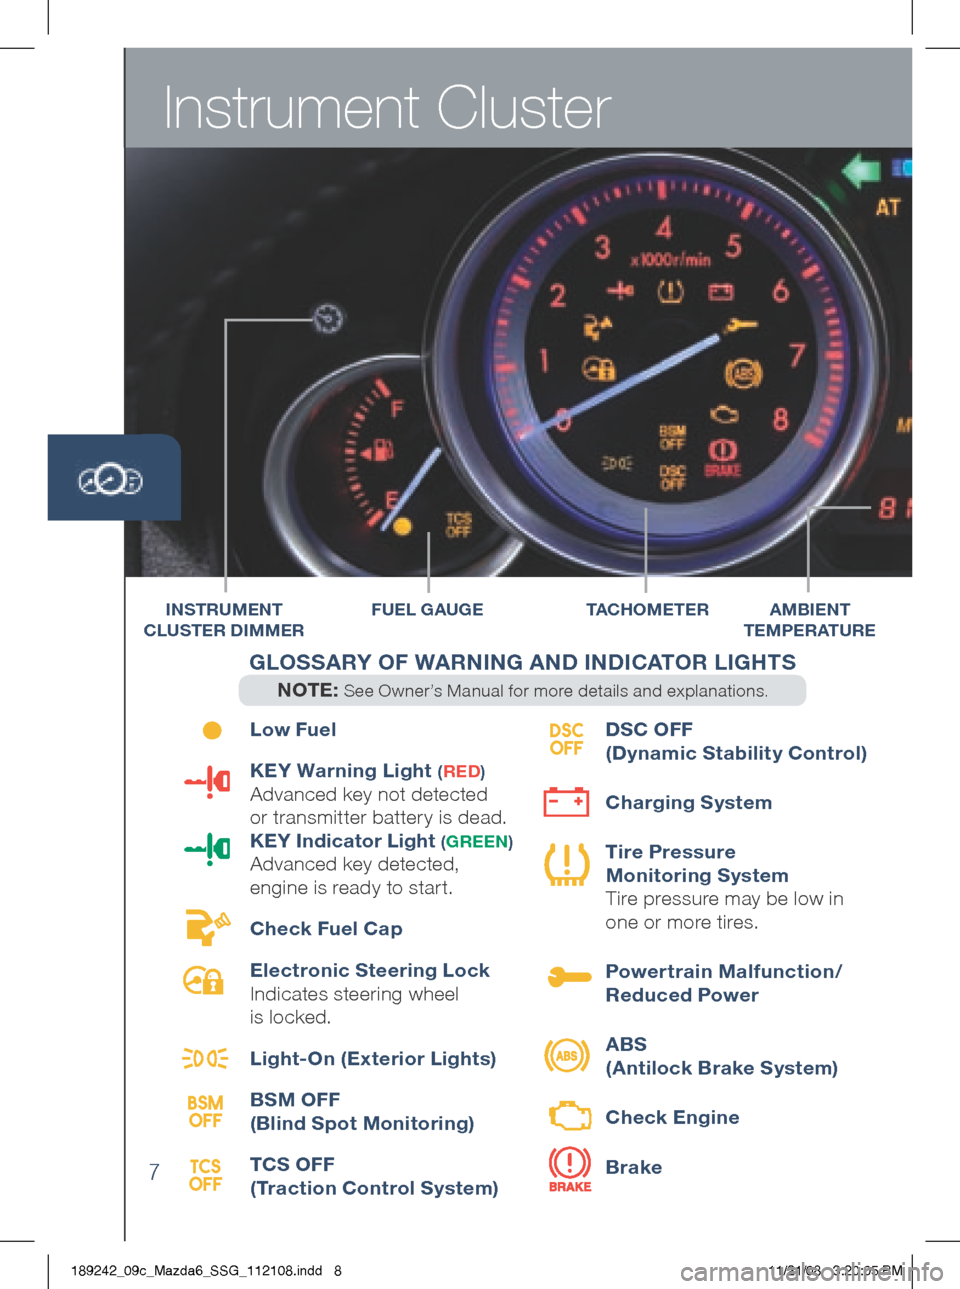
Instrument Cluster
7
Low Fuel
KEY warning Light
(RED )
Advanced key not detected
or transmitter battery is dead.
KEY i ndicator Light
(gREEN )
Advanced key detected,
engine is ready to start.
Check Fuel Cap
Electronic Steering Lock
Indicates steering wheel
is locked.
Light-On (Exterior Lights)
BSM OFF
(Blind Spot Monitoring)
TCS OFF
(Traction Control System) DSC OFF
(Dynamic Stability Control)
Charging System
Tire Pressure
Monitoring System
Tire pressure may be low in
one or more tires.
Powertrain Malfunction/
Reduced Power
ABS
(Antilock Brake System)
Check Engine
Brake
F UEL gAU gE TAC H O M E T E R
BSM
OFF
TCS
OFF DSC
OFF
iNSTR UMENT
CLUSTER D iMMERAMB iENT
TEMPERATURE
g LOSSARY OF wARN iN g AND i NDiCATOR L igHTS
NOTE: See Owner’s Manual for more details and explanations.
189242_09c_Mazda6_SSG_112108.indd 811/21/08 3:20:05 PM
Page 9 of 26
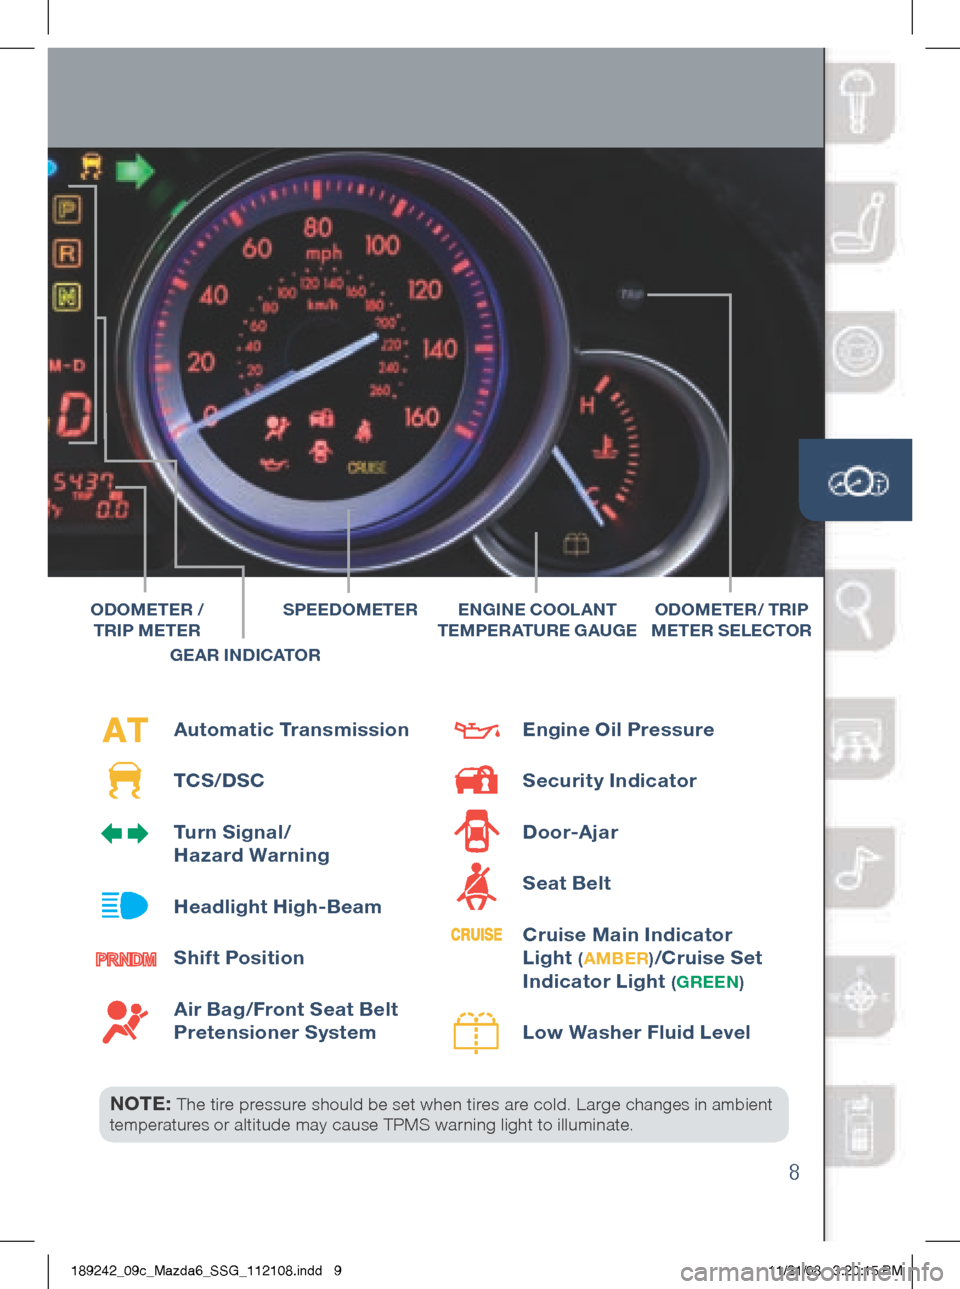
8
NOTE: The tire pressure should be set when tires are cold. Large changes in ambient
temperatures or altitude may cause TPMS warning light to illuminate.
Automatic Transmission
TCS/DSC
Turn Signal/
Hazard warning
Headlight High-Beam
Shift Position
Air Bag/Front Seat Belt
Pretensioner System Engine Oil Pressure
Security
indicator
Door-Ajar
Seat Belt
Cruise Main indicator
Light
( A MBER )/Cruise Set
i ndicator Light
(gREEN )
Low washer Fluid Level
SPEEDOMETERENgiNE COOLANT
T EMPERATURE g AUgEODOMETER / TR iP
METER SELECTORODOMETER /
TR iP METER
g EAR i NDiCATOR
189242_09c_Mazda6_SSG_112108.indd 911/21/08 3:20:15 PM
Page 10 of 26
Feature Highlights
9
PORTABLE AUDiO PL AYER iNTE gRAT iON
US iN g THE AUX JACK
Your vehicle is equipped with an AUX or auxiliary jack
that will allow you to play your portable audio player
through the vehicle’s audio system.
1 Locate the AUX jack inside the center console.
2 Plug your por table audio player into the AUX jack
and turn it on.
3 Turn the vehicle audio system on.
4 • without Navigation System: Push AUX button on audio system OR
push Mode button on steering wheel controls until “AUX” is displayed.
• with Navigation System: Push Source button on audio system,
then push AUX1 on screen OR push Mode button on steering wheel
controls until “AUX1” is displayed.
5 Use the portable audio player controls to play music.
NOTE: Set the volume level on your portable audio player to the highest level
before distortion starts. Then, adjust volume in the vehicle using the audio system
power/volume control or the steering wheel volume up and down controls.
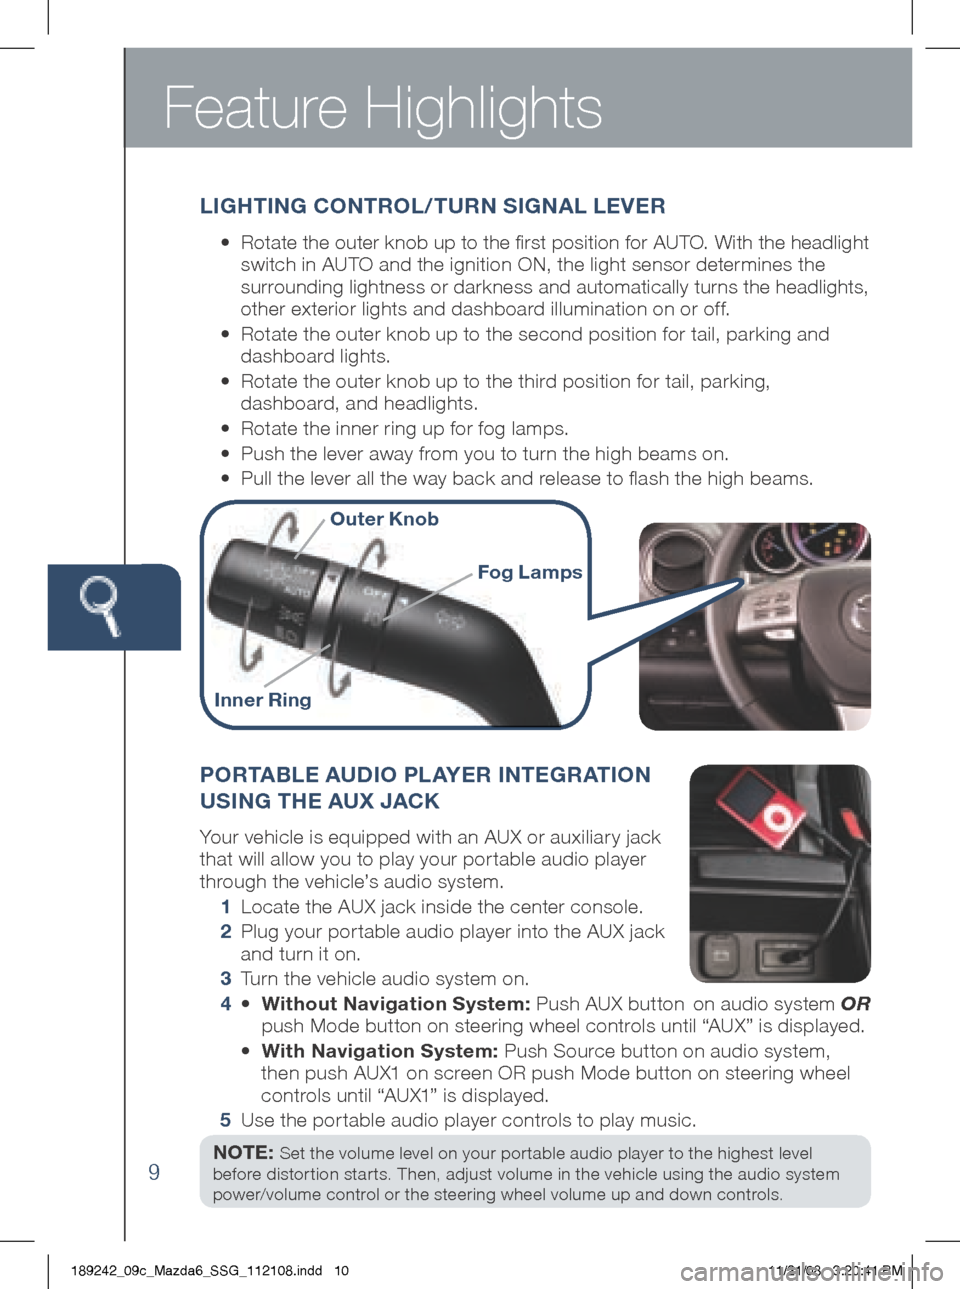
L ig HT iN g CONTROL/TURN S igNAL LEVER
•
Rotate the outer knob up to the first position for AUTO. With the headlight
switch in AUTO and the ignition ON, the light sensor determines the
surrounding lightness or darkness and automatically turns the headlights,
other exterior lights and dashboard illumination on or off.
•
Rotate the outer knob up to the second position for tail, parking and
dashboard lights.
•
Rotate the outer knob up to the third position for tail, parking,
dashboard, and headlights.
• Rotate the inner ring up for fog lamps.
• Push the lever away from you to turn the high beams on.
• Pull the lever all the way back and release to flash the high beams.
Outer Knob
i nner Ring
Fog Lamps
189242_09c_Mazda6_SSG_112108.indd 1011/21/08 3:20:41 PM
Page 12 of 26
Feature Highlights
11
NOTE: Do not rely completely on the BSM system and be sure to look over
your shoulder before changing lanes:
• The BSM system can assist the driver in confirming the safety of the surroundings,
but is not a complete substitute.
• The driver is responsible for assuring lane changes and other maneuvers.
• Always pay attention to the direction in which the vehicle is traveling and the
vehicle’s surroundings.
• The BSM system does not operate when the vehicle speed is lower than about
20 mph (32 km/h).
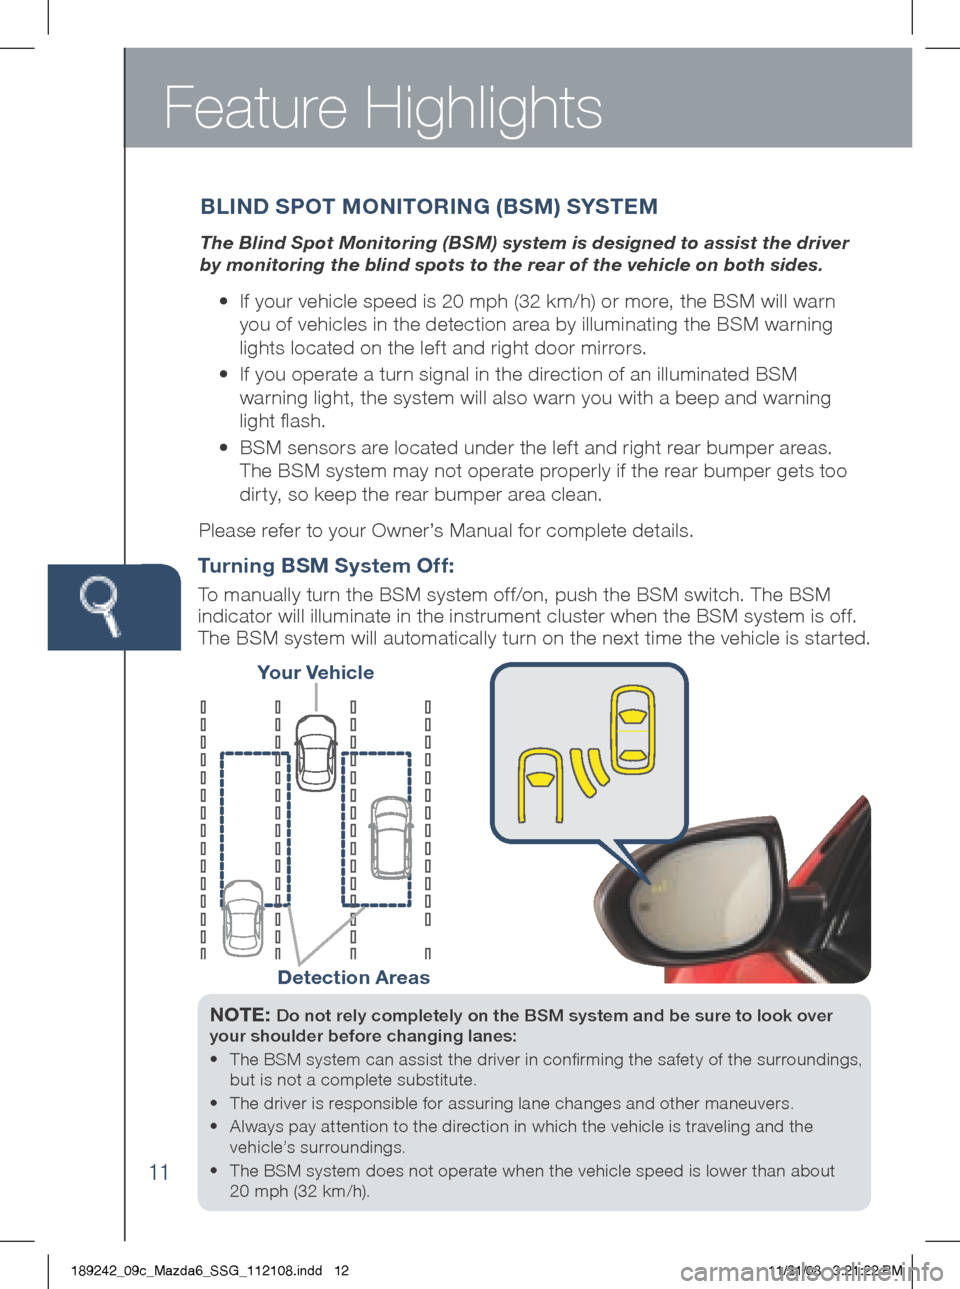
Your Vehicle
Detection Areas
Turning BSM System Off :
To manually turn the BSM system off/on, push the BSM switch. The BSM
indicator will illuminate in the instrument cluster when the BSM system is off.
The BSM system will automatically turn on the next time the vehicle is started.
B LiND S POT M ONiTOR iN g (BSM) S YSTEM
The Blind Spot Monitoring (BSM) system is designed to assist the driver
by monitoring the blind spots to the rear of the vehicle on both sides.
• If your vehicle speed is 20 mph (32 km/h) or more, the BSM will warn
you of vehicles in the detection area by illuminating the BSM warning
lights located on the left and right door mirrors.
•
If you operate a turn signal in the direction of an illuminated BSM
warning light, the system will also warn you with a beep and warning
light flash.
•
BSM sensors are located under the left and right rear bumper areas.
The BSM system may not operate properly if the rear bumper gets too
dirty, so keep the rear bumper area clean.
Please refer to your Owner’s Manual for complete details.
189242_09c_Mazda6_SSG_112108.indd 1211/21/08 3:21:22 PM
Page 15 of 26
Automatic Climate Control
14
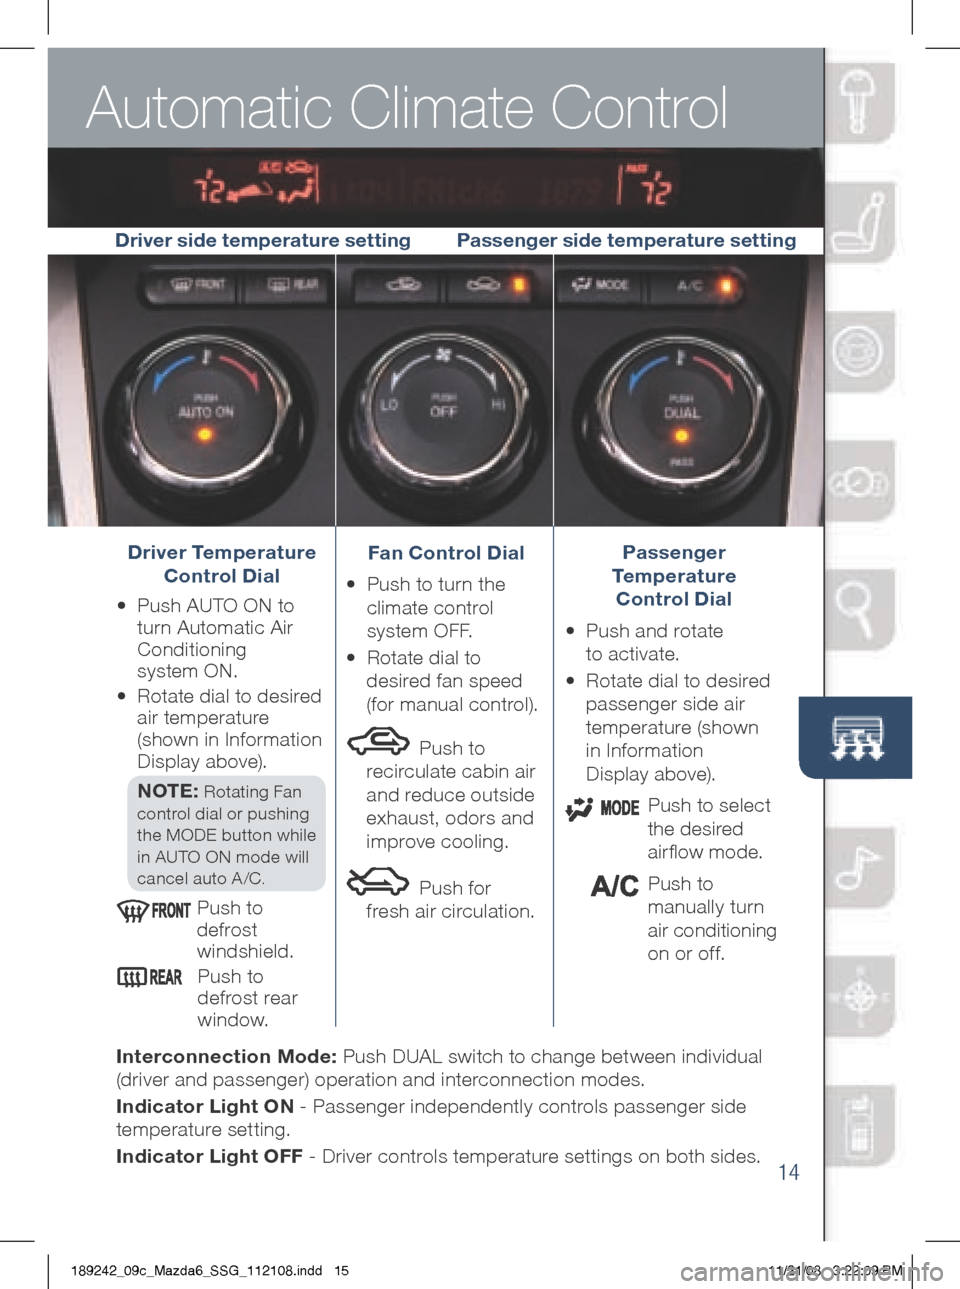
Driver Temperature
Control Dial
•
Push AUTO ON to
turn Automatic Air
Conditioning
system ON.
•
Rotate dial to desired
air temperature
(shown in Information
Display above).
NOTE:
Rotating Fan
control dial or pushing
the MODE button while
in AUTO ON mode will
cancel auto A /C.
Push to
defrost
windshield.
Push to
defrost rear
window. Fan Control Dial
• Push to turn the
climate control
system OFF.
•
Rotate dial to
desired fan speed
(for manual control).
Push to
recirculate cabin air
and reduce outside
exhaust, odors and
improve cooling.
Push for
fresh air circulation. Passenger
Temperature
Control Dial
•
Push and rotate
to activate.
•
Rotate dial to desired
passenger side air
temperature (shown
in Information
Display above).
Push to select
the desired
airflow mode.
Push to
manually turn
air conditioning
on or off.
i nterconnection Mode: Push DUAL switch to change between individual
(driver and passenger) operation and interconnection modes.
i ndicator Light ON - Passenger independently controls passenger side
temperature setting.
i ndicator Light OFF - Driver controls temperature settings on both sides.
Driver side temperature setting
Passenger side temperature setting
189242_09c_Mazda6_SSG_112108.indd 1511/21/08 3:22:09 PM
Page 18 of 26
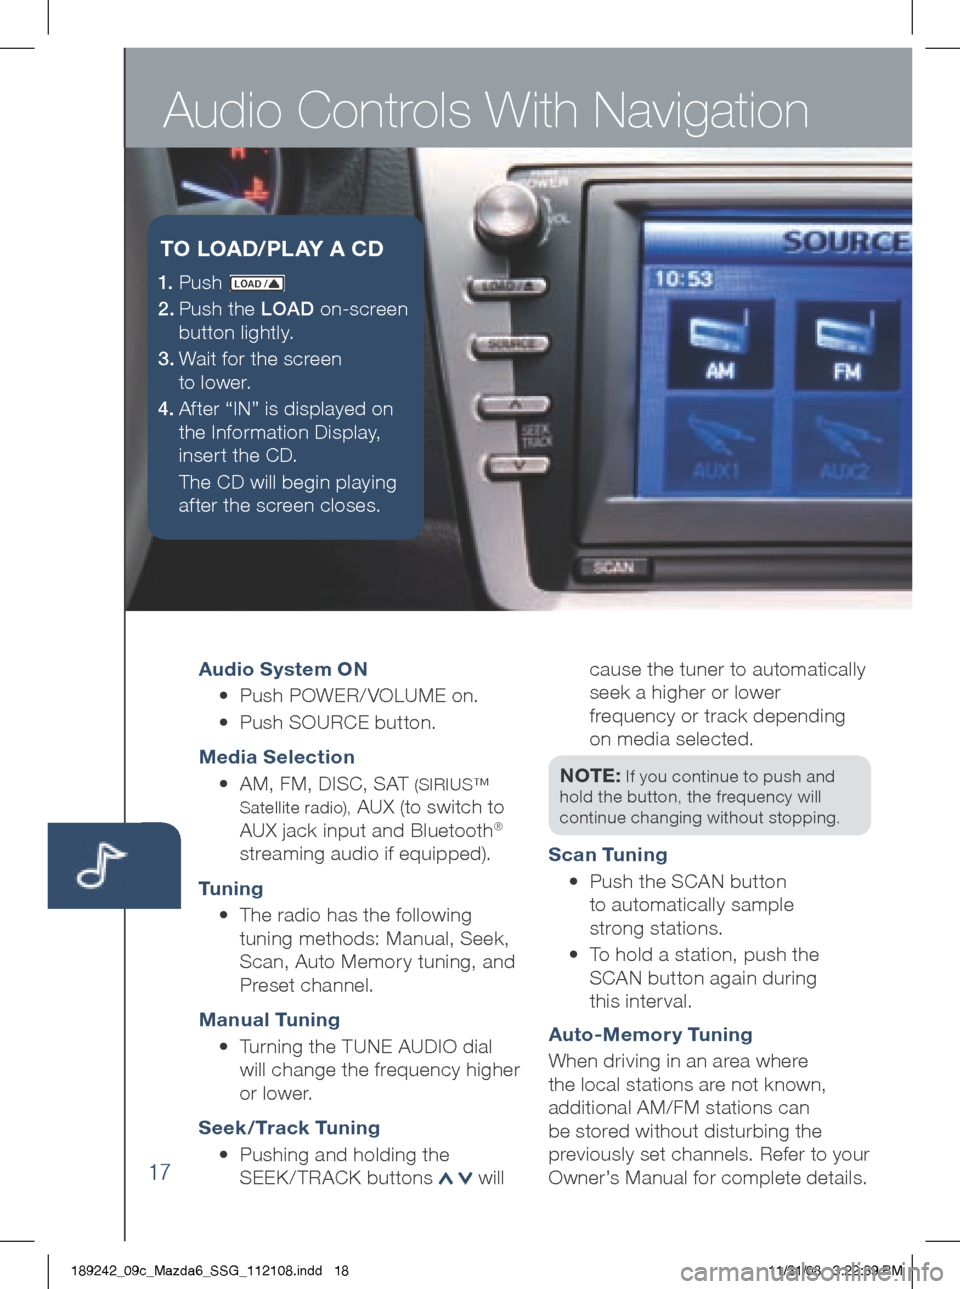
Audio Controls With Navigation
17
Audio System ON
• Push POWER/ VOLUME on.
• Push SOURCE button.
Media Selection
• AM, FM, DISC, SAT
(SIRIUS™
Satellite radio),
AUX (to switch to
AUX jack input and Bluetooth®
streaming audio if equipped).
Tu n i n g
• The radio has the following
tuning methods: Manual, Seek,
Scan, Auto Memory tuning, and
Preset channel.
Manual Tuning
• Turning the TUNE AUDIO dial
will change the frequency higher
or lower.
Seek / Track Tuning
• Pushing and holding the
SEE k/TRACk buttons
will cause the tuner to automatically
seek a higher or lower
frequency or track depending
on media selected.
NOTE:
If you continue to push and
hold the button, the frequency will
continue changing without stopping.
Scan Tuning
• Push the SCAN button
to automatically sample
strong stations.
•
To hold a station, push the
SCAN button again during
this inter val.
Auto-Memor y Tuning
When driving in an area where
the local stations are not known,
additional AM/FM stations can
be stored without disturbing the
previously set channels. Refer to your
Owner’s Manual for complete details.
1. P u s h LOAD /
2.
Push the LOAD on-screen
button lightly.
3.
Wait for the screen
to lower.
4 . Af ter “IN” is displayed on
the Information Display,
insert the CD.
The CD will begin playing
after the screen closes.
T O LOAD /PLAY A CD
189242_09c_Mazda6_SSG_112108.indd 1811/21/08 3:22:39 PM
Page 19 of 26
18
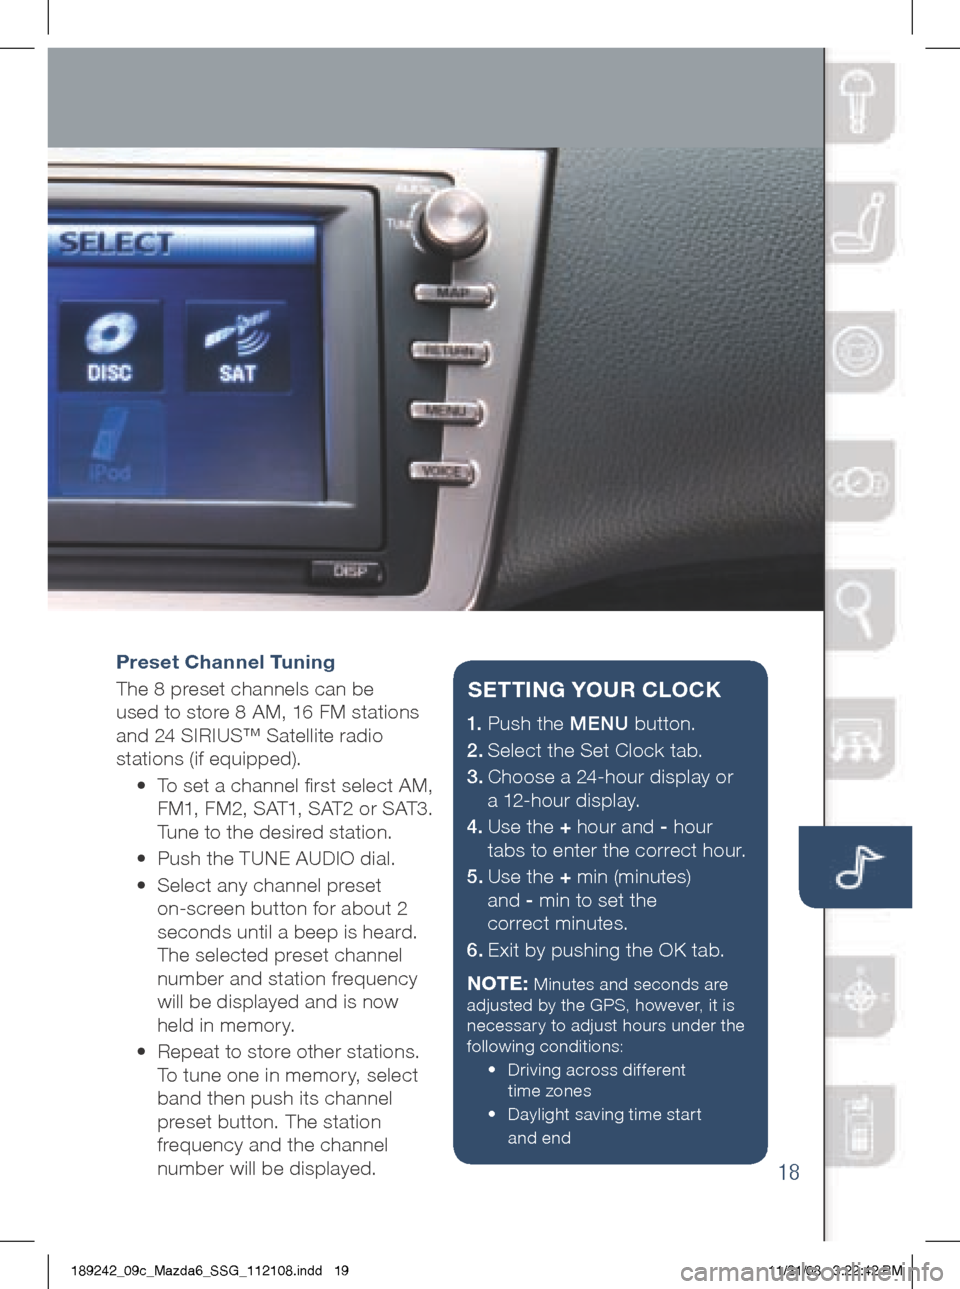
Preset Channel Tuning
The 8 preset channels can be
used to store 8 AM, 16 FM stations
and 24 SIRIUS™ Satellite radio
stations (if equipped).
• To set a channel first select AM,
FM1, FM2, SAT1, SAT2 or SAT3.
Tune to the desired station.
• Push the TUNE AUDIO dial.
•
Select any channel preset
on-screen button for about 2
seconds until a beep is heard.
The selected preset channel
number and station frequency
will be displayed and is now
held in memory.
•
Repeat to store other stations.
To tune one in memor y, select
band then push its channel
preset button. The station
frequency and the channel
number will be displayed.
1.
Push the MENU button.
2.
Select the Set Clock tab.
3.
Choose a 24-hour display or
a 12-hour display.
4.
Use the + hour and - hour
tabs to enter the correct hour.
5.
Use the + min (minutes)
and - min to set the
correct minutes.
6.
Exit by pushing the O k tab.
NOTE:
Minutes and seconds are
adjusted by the gPS, however, it is
necessary to adjust hours under the
following conditions:
•
Driving across different
time zones
•
Daylight saving time start
and end
SETT iN g YOUR CLOCK
189242_09c_Mazda6_SSG_112108.indd 1911/21/08 3:22:42 PM