ABS MAZDA MODEL 6 2010 Smart Start Guide (in English)
[x] Cancel search | Manufacturer: MAZDA, Model Year: 2010, Model line: MODEL 6, Model: MAZDA MODEL 6 2010Pages: 16, PDF Size: 4.67 MB
Page 5 of 16

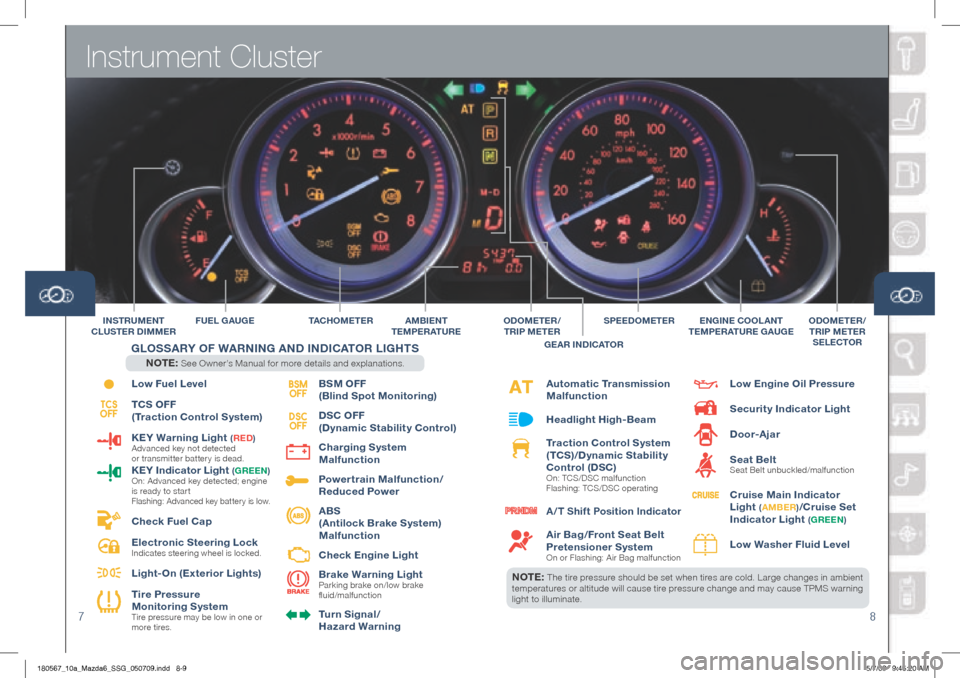
Instrument Cluster
78
NOTE: The tire pressure should be set when tires are cold. Large changes in ambient
temperatures or altitude will cause tire pressure change and may cause TPMS warning
light to illuminate.
Low Fuel Level
TCS OFF
(Traction Control System)
KEY Warning Light
( RED ) Advanced key not detected
or transmitter battery is dead.
KEY Indicator Light (gREEN )
On: Advanced key detected; engine
is ready to star t
Flashing: Advanced key battery is low.
Check Fuel Cap
Electronic Steering Lock
Indicates steering wheel is locked.
Light-On (Exterior Lights)
Tire Pressure
Monitoring System
Tire pressure may be low in one or
more tires.
BSM OFF
(Blind Spot Monitoring)
DSC OFF
(Dynamic Stability Control)
Charging System
Malfunction
Powertrain Malfunction/
Reduced Power
ABS
(Antilock Brake System)
Malfunction
Check Engine Light
Brake Warning Light
Parking brake on/low brake
fluid/malfunction
Turn Signal/
h azard Warning
FUEL gAU gE TAChO M E T E R
BSM
OFF
TCS
OFF DSC
OFF
INSTR UMENT
CLUSTER DIMMERAMBIENT
TEMPERATURE
g LOSSARY OF W ARNINg AND INDICATOR LI ghTS
NOTE: See Owner’s Manual for more details and explanations.
Automatic Transmission
Malfunction
headlight high-Beam
Traction Control System
(TCS)/Dynamic Stability
Control (DSC)
On: TCS/DSC malfunction
Flashing: TCS/DSC operating
A /T Shift Position Indicator
Air Bag/Front Seat Belt
Pretensioner System
On or Flashing: Air Bag malfunction
Low Engine Oil Pressure
Security Indicator Light
Door-Ajar
Seat Belt
Seat Belt unbuckled/malfunction
Cruise Main Indicator
Light
(A MBER )/Cruise Set
Indicator Light
( gREEN )
Low Washer Fluid Level
SPEEDOMETERENgINE COOLANT
T EMPERATURE g AUgEODOMETER /
TRIP METER
SELECTORODOMETER /
TRIP METER
g EAR INDICATOR
180567_10a_Mazda6_SSG_050709.indd 8-95/7/09 9:45:20 AM
Page 12 of 16

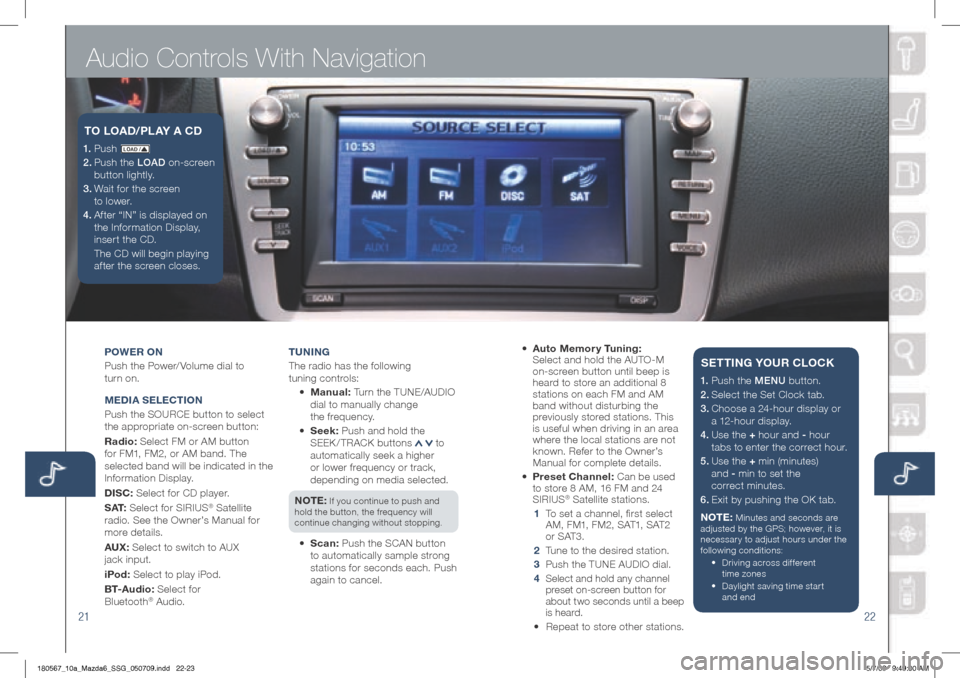
Audio Controls With Navigation
2122
POWER ON
Push the Power/ Volume dial to
turn on.
M EDIA S ELECTION
Push the SOURCE button to select
the appropriate on-screen button:
Radio: Select FM or AM button
for FM1, FM2, or AM band. The
selected band will be indicated in the
Information Display.
DISC: Select for CD player.
S AT: Select for SIRIUS
® Satellite
radio. See the Owner’s Manual for
more details.
AUX: Select to switch to AUX
jack input.
iPod: Select to play iPod.
B T- A u d i o : Select for
Bluetooth
® Audio. T
UNIN g
The radio has the following
tuning controls:
• M anual: Turn the TUNE/AUDIO
dial to manually change
the frequency.
• S eek: Push and hold the
SEEK / TRACK buttons
to
automatically seek a higher
or lower frequency or track,
depending on media selected.
NOTE:
If you continue to push and
hold the button, the frequency will
continue changing without stopping.
• Scan: Push the SCAN button
to automatically sample strong
stations for seconds each. Push
again to cancel.
1. P u s h LO AD /
2. Push the LOAD on-screen
button lightly.
3. Wait for the screen
to lower.
4 . Af ter “IN” is displayed on
the Information Display,
insert the CD.
The CD will begin playing
after the screen closes.
TO LOAD /PLAY A CD
• Auto Memor y Tuning:
Select and hold the AUTO-M
on-screen button until beep is
heard to store an additional 8
stations on each FM and AM
band without disturbing the
previously stored stations. This
is useful when driving in an area
where the local stations are not
known. Refer to the Owner’s
Manual for complete details.
• Preset Channel: Can be used
to store 8 AM, 16 FM and 24
SIRIUS
® Satellite stations.
1 To set a channel, first select
AM, FM1, FM2, SAT1, SAT2
or SAT3.
2 Tune to the desired station.
3 Push the TUNE AUDIO dial.
4
Select and hold any channel
preset on-screen button for
about two seconds until a beep
is heard.
• Repeat to store other stations.
1. Push the MENU button.
2. Select the Set Clock tab.
3.
Choose a 24-hour display or
a 12-hour display.
4. Use the + hour and - hour
tabs to enter the correct hour.
5.
Use the + min (minutes)
and - min to set the
correct minutes.
6. Exit by pushing the OK tab.
NOTE:
Minutes and seconds are
adjusted by the GPS; however, it is
necessary to adjust hours under the
following conditions:
• Driving across different
time zones
•
Daylight saving time start
and end
SETTIN g YOUR CLOCK
180567_10a_Mazda6_SSG_050709.indd 22-235/7/09 9:49:00 AM