display MAZDA MODEL 6 2013 Smart Start Guide (in English)
[x] Cancel search | Manufacturer: MAZDA, Model Year: 2013, Model line: MODEL 6, Model: MAZDA MODEL 6 2013Pages: 18, PDF Size: 5.1 MB
Page 9 of 18
Feature Highlights
1516
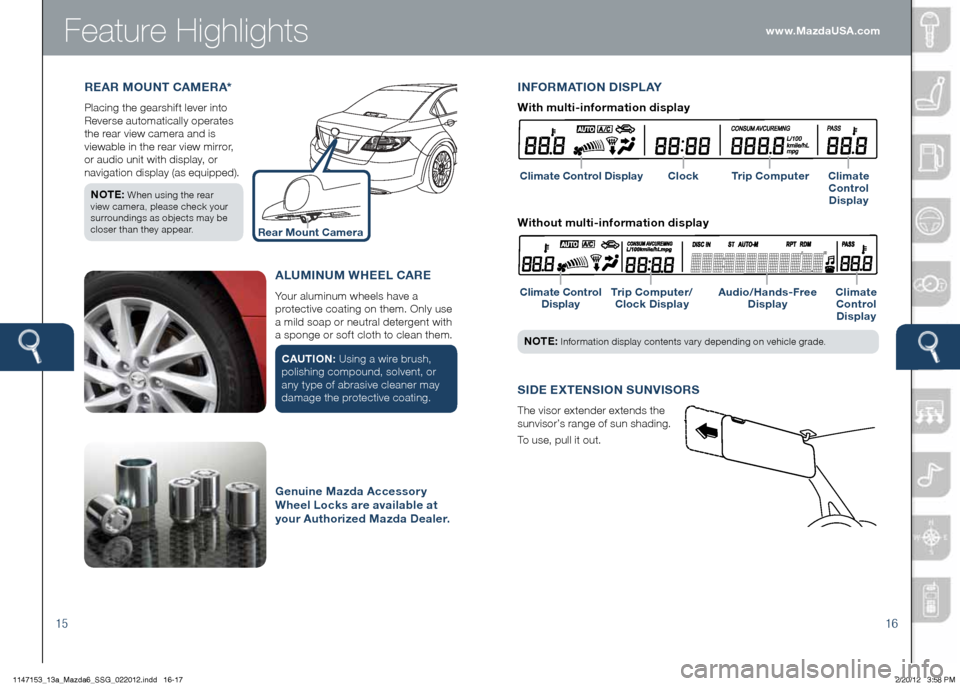
REAR MOUNT CAMERA*
Placing the gearshift lever into
Reverse automatically operates
the rear view camera and is
viewable in the rear view mirror,
or audio unit with display, or
navigation display (as equipped).
NOTE:
When using the rear
view camera, please check your
surroundings as objects may be
closer than they appear.
S IDE ExTENSION SUNVISORS
The visor extender extends the
sunvisor’s range of sun shading.
To use, pull it out. www.MazdaUSA.com
Rear Mount Camera
INFORMATION DISPLAY
Climate Control Display
Climate Control Display Trip Computer/
Clock Display Audio/Hands-Free
Display Climate
Control Display
NOTE: Information display contents vary depending on vehicle grade.
With multi-information display
Clock Trip Computer Climate
Control Display
Without multi-information display
ALUMINUM WHEEL CARE
Your aluminum wheels have a
protective coating on them. Only use
a mild soap or neutral detergent with
a sponge or soft cloth to clean them.
CAUTION: Using a wire brush,
polishing compound, solvent, or
any type of abrasive cleaner may
damage the protective coating.
Genuine Mazda Accessory
Wheel Locks are available at
your Authorized Mazda Dealer.
1147153_13a_Mazda6_SSG_022012.indd 16-172/20/12 3:58 PM
Page 10 of 18
Feature Highlights
17
NOTE: Do not rely completely on the BSM system and be sure to look over
your shoulder before changing lanes:
• The BSM system can assist the driver in confirming the safety of the surroundings,
but is not a complete substitute.
• The driver is responsible for ensuring safe lane changes and other maneuvers.
• Always pay attention to the direction in which the vehicle is traveling and the
vehicle’s surroundings.
• The BSM system does not operate when the vehicle speed is lower than about
20 mph (32 km/h).
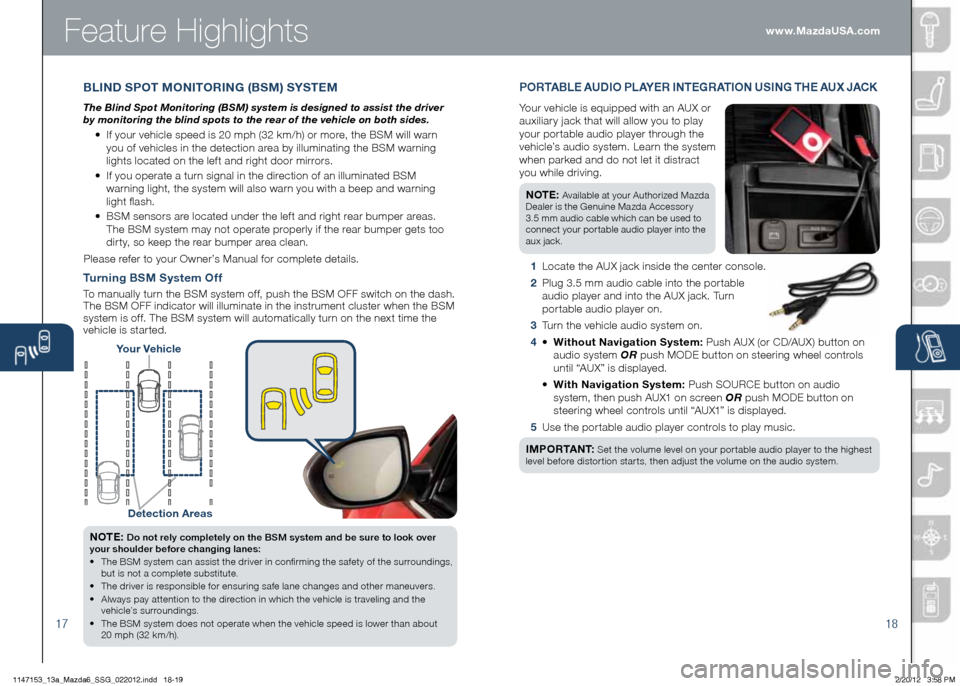
Turning BSM System Off
To manually turn the BSM system off, push the BSM OFF switch on the dash.
The BSM OFF indicator will illuminate in the instrument cluster when the BSM
system is off. The BSM system will automatically turn on the next time the
vehicle is started.
18
Your Vehicle
Detection Areas
P O R TA B L E AUDIO P L AY E R INTEGRATION USING THE AU x JACK
Your vehicle is equipped with an AUX or
auxiliary jack that will allow you to play
your portable audio player through the
vehicle’s audio system. Learn the system
when parked and do not let it distract
you while driving.
NOTE:
Available at your Authorized Mazda
Dealer is the Genuine Mazda Accessory
3.5 mm audio cable which can be used to
connect your portable audio player into the
aux jack.
1 Locate the AUX jack inside the center console.
2 Plug 3.5 mm audio cable into the portable
audio player and into the AUX jack. Turn
portable audio player on.
3 Turn the vehicle audio system on.
4 • Without Navigation System: Push AUX (or CD/AUX) button on
audio system OR push MODE button on steering wheel controls
until “AUX” is displayed.
• With Navigation System: Push SOURCE button on audio
system, then push AUX1 on screen OR push MODE button on
steering wheel controls until “AUX1” is displayed.
5 Use the portable audio player controls to play music.
I M P O R TA N T:
Set the volume level on your portable audio player to the highest
level before distortion starts, then adjust the volume on the audio system.
B LIND SPOT MONITORING (BSM) SYSTEM
The Blind Spot Monitoring (BSM) system is designed to assist the driver
by monitoring the blind spots to the rear of the vehicle on both sides.
• If your vehicle speed is 20 mph (32 km/h) or more, the BSM will warn
you of vehicles in the detection area by illuminating the BSM warning
lights located on the left and right door mirrors.
• If you operate a turn signal in the direction of an illuminated BSM
warning light, the system will also warn you with a beep and warning
light flash.
• BSM sensors are located under the left and right rear bumper areas.
The BSM system may not operate properly if the rear bumper gets too
dirty, so keep the rear bumper area clean.
Please refer to your Owner’s Manual for complete details. www.MazdaUSA.com
1147153_13a_Mazda6_SSG_022012.indd 18-192/20/12 3:58 PM
Page 11 of 18
Manual Climate Control
19
Automatic Climate Control
20
Best Cooling SettingsBest Heating Settings
Indicator ON (automatically)
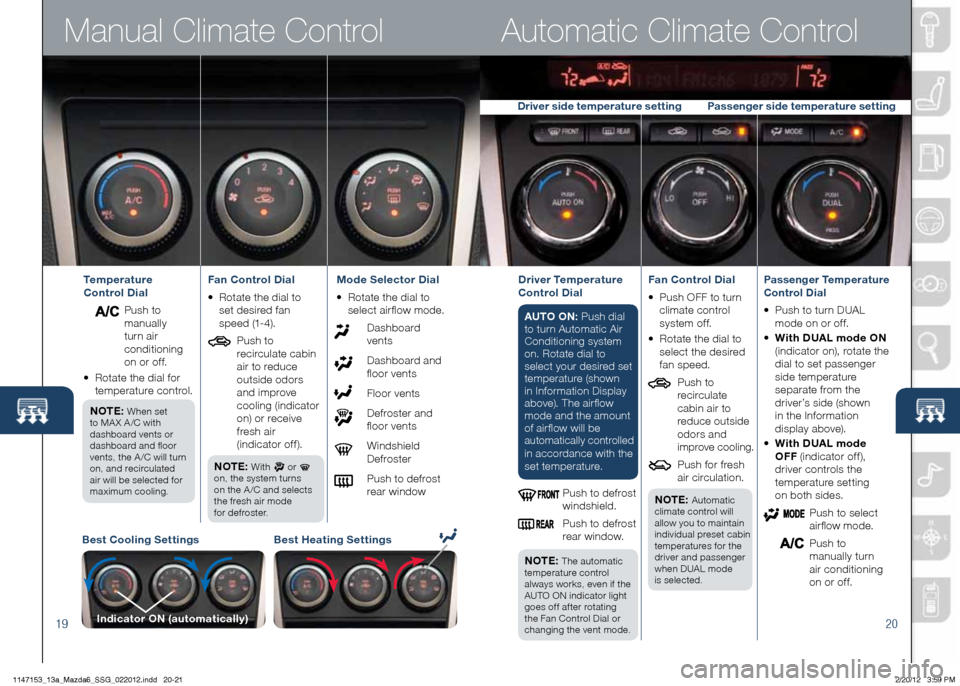
Temperature
Control Dial
Push to
manually
turn air
conditioning
on or off.
• Rotate the dial for
temperature control.
NOTE:
When set
to MA X A /C with
dashboard vents or
dashboard and floor
vents, the A /C will turn
on, and recirculated
air will be selected for
maximum cooling.
Fan Control Dial
• Rotate the dial to
set desired fan
speed (1-4).
Push to
recirculate cabin
air to reduce
outside odors
and improve
cooling (indicator
on) or receive
fresh air
(indicator off).
NOTE:
With or
on, the system turns
on the A /C and selects
the fresh air mode
for defroster.
Mode Selector Dial
• Rotate the dial to
select airflow mode.
Dashboard vents
Dashboard and
floor vents
Floor vents
Defroster and
floor vents
Windshield Defroster
Push to defrost
rear windowDriver Temperature
Control Dial
AUTO ON: Push dial
to turn Automatic Air
Conditioning system
on. Rotate dial to
select your desired set
temperature (shown
in Information Display
above). The airflow
mode and the amount
of airflow will be
automatically controlled
in accordance with th e
set temperature.
Push to defrost
windshield.
Push to defrost
rear window.
NOTE:
The automatic
temperature control
always works, even if the
AUTO ON indicator light
goes off after rotating
the Fan Control Dial or
changing the vent mode.
Fan Control Dial
• Push OFF to turn
climate control
system of f.
•
Rotate the dial to
select the desired
fan speed.
Push to
recirculate
cabin air to
reduce outside
odors and
improve cooling.
Push for fresh
air circulation.
NOTE:
Automatic
climate control will
allow you to maintain
individual preset cabin
temperatures for the
driver and passenger
when DUAL mode
is selected.
Passenger Temperature
Control Dial
• Push to turn DUAL
mode on or off.
•
With DUAL mode ON
(indicator on), rotate the
dial to set passenger
side temperature
separate from the
driver’s side (shown
in the Information
display above).
• With DUAL mode
OFF (indicator off),
driver controls the
temperature setting
on both sides.
Push to select
airflow mode.
Push to
manually turn
air conditioning
on or off.
Driver side temperature setting Passenger side temperature setting
1147153_13a_Mazda6_SSG_022012.indd 20-212/20/12 3:59 PM
Page 12 of 18
Audio Controls Without Navigation
2122
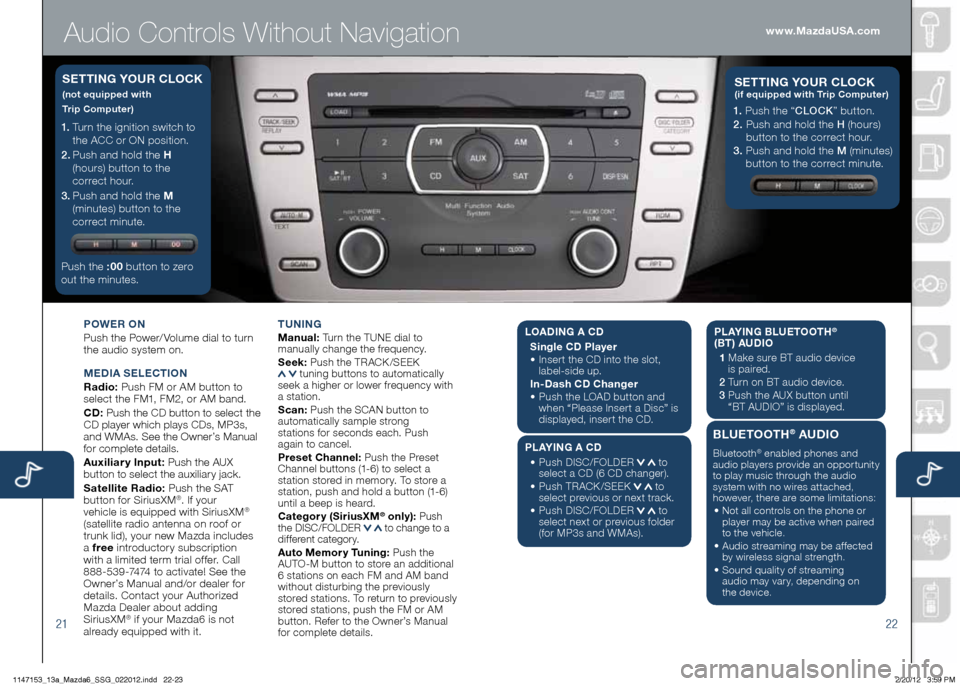
POWER ON
Push the Power/ Volume dial to turn
the audio system on.
M EDIA SELECTION
Radio: Push FM or AM button to
select the FM1, FM2, or AM band.
CD: Push the CD button to select the
CD player which plays CDs, MP3s,
and WMAs. See the Owner’s Manual
for complete details.
Auxiliary Input: Push the AUX
button to select the auxiliary jack.
Satellite Radio: Push the SAT
button for SiriusXM
®. If your
vehicle is equipped with SiriusXM®
(satellite radio antenna on roof or
trunk lid), your new Mazda includes
a free introductory subscription
with a limited term trial offer. Call
888-539-7474 to activate! See the
Owner’s Manual and/or dealer for
details. Contact your Authorized
Mazda Dealer about adding
SiriusXM
® if your Mazda6 is not
already equipped with it. T
UNING
Manual: Turn the TUNE dial to
manually change the frequency.
S eek: Push the TRACK /SEEK
tuning buttons to automatically
seek a higher or lower frequency with
a station.
S can: Push the SCAN button to
automatically sample strong
stations for seconds each. Push
again to cancel.
Preset Channel: Push the Preset
Channel buttons (1-6) to select a
station stored in memory. To store a
station, push and hold a button (1-6)
until a beep is heard.
Category (Sirius xM
® only): Push
the DISC/FOLDER to change to a
different category.
Auto Memory Tuning: Push the
AUTO-M button to store an additional
6 stations on each FM and AM band
without disturbing the previously
stored stations. To return to previously
stored stations, push the FM or AM
button. Refer to the Owner’s Manual
for complete details.
1. Turn the ignition switch to
the ACC or ON position.
2 . Push and hold the H
(hours) button to the
correct hour.
3 . Push and hold the M
(minutes) button to the
correct minute.
Push the :00 button to zero
out the minutes.
S ETTING YOUR CLOCK
(not equipped with
Trip Computer)
1. Push the “ CLOCK” button.
2. Push and hold the H (hours)
button to the correct hour.
3. Push and hold the M (minutes)
button to the correct minute.
S ETTING YOUR C LOCK (if equipped with Trip Computer)
www.MazdaUSA.com
LOADIN G A CD
Single CD Player
•
Insert the CD into the slot,
label-side up.
In-Dash CD Changer
•
Push the LOAD button and
when “Please Insert a Disc” is
displayed, insert the CD.
PLAYING A CD
•
Push DISC/FOLDER
to
select a CD (6 CD changer).
•
Push TRACK /SEEK
to
select previous or next track.
•
Push DISC/FOLDER
to
select next or previous folder
(for MP3s and WMAs). PLAYING BLUETOOTH
®
(BT) AUDIO
1 Make sure BT audio device
is paired.
2 Turn on BT audio device.
3 Push the AUX button until
“BT AUDIO” is displayed.
BLUETOOTH® AUDIO
Bluetooth® enabled phones and
audio players provide an opportunity
to play music through the audio
system with no wires attached,
however, there are some limitations:
• Not all controls on the phone or
player may be active when paired
to the vehicle.
• Audio streaming may be affected
by wireless signal strength.
• Sound quality of streaming
audio may vary, depending on
the device.
1147153_13a_Mazda6_SSG_022012.indd 22-232/20/12 3:59 PM
Page 13 of 18
Audio Controls Without Navigation
2324
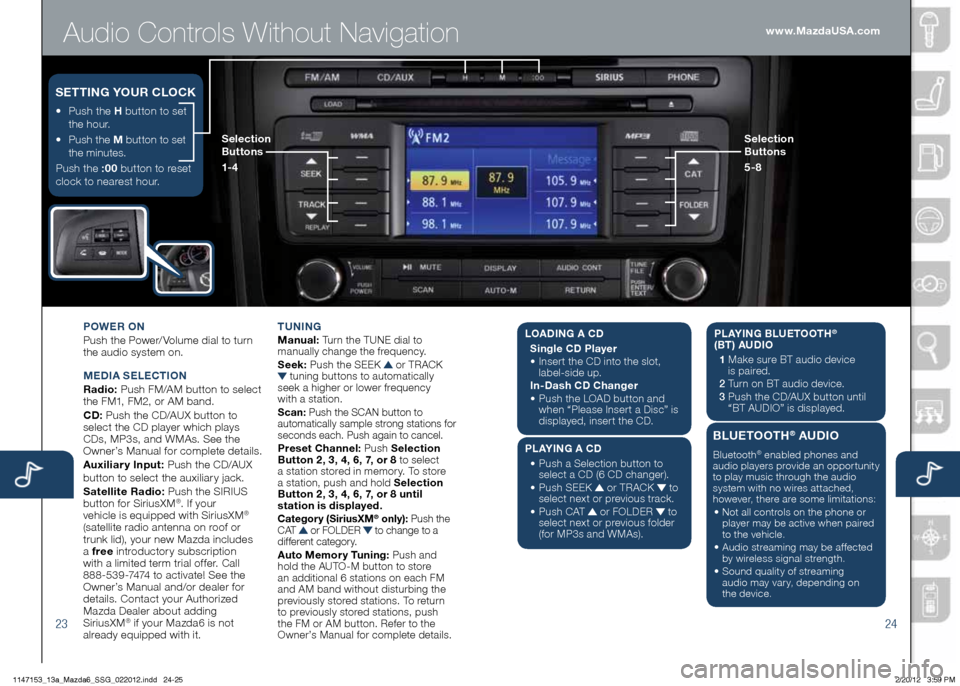
POWER ON
Push the Power/ Volume dial to turn
the audio system on.
M EDIA SELECTION
Radio: Push FM/AM button to select
the FM1, FM2, or AM band.
CD: Push the CD/AUX button to
select the CD player which plays
CDs, MP3s, and WMAs. See the
Owner’s Manual for complete details.
Auxiliary Input: Push the CD/AUX
button to se lect the auxiliary jack.
Satellite Radio: Push the SIRIUS
button for SiriusXM
®. If your
vehicle is equipped with SiriusXM®
(satellite radio antenna on roof or
trunk lid), your new Mazda includes
a free introductory subscription
with a limited term trial offer. Call
888-539-7474 to activate! See the
Owner’s Manual and/or dealer for
details. Contact your Authorized
Mazda Dealer about adding
SiriusXM
® if your Mazda6 is not
already equipped with it. T
UNING
Manual: Turn the TUNE dial to
manually change the frequency.
S eek: Push the SEEK
or TRACK tuning buttons to automatically
seek a higher or lower frequency
with a station.
S can: Push the SCAN button to
automatically sample strong stations for
seconds each. Push again to cancel.
Preset Channel: Push Selection
Button 2, 3, 4, 6, 7, or 8 to select
a station stored in memory. To store
a station, push and hold Selection
Button 2, 3, 4, 6, 7, or 8 until
station is displayed.
Category (Sirius xM® only): Push the
C AT or FOLDER to change to a
different category.
Auto Memory Tuning: Push and
hold the AUTO-M button to store
an additional 6 stations on each FM
and AM band without disturbing the
previously stored stations. To return
to previously stored stations, push
the FM or AM button. Refer to the
Owner’s Manual for complete details.
• Push the H button to set
the hour.
•
Push the M button to set
the minutes.
Push the :00 button to reset
clock to nearest hour.
S ETTING YOUR CLOCK
Selection
Buttons
1- 4 Selection
Buttons
5-8www.MazdaUSA.com
L
OADING A CD
Single CD Player
•
Insert the CD into the slot,
label-side up.
In-Dash CD Changer
•
Push the LOAD button and
when “Please Insert a Disc” is
displayed, insert the CD.
PLAYING A CD
•
Push a Selection button to
select a CD (6 CD changer).
•
Push SEEK
or TRACK to
select next or previous track.
•
Push CAT
or FOLDER to
select next or previous folder
(for MP3s and WMAs). PLAYING BLUETOOTH
®
(BT) AUDIO
1 Make sure BT audio device
is paired.
2 Turn on BT audio device.
3 Push the CD/AUX button until
“BT AUDIO” is disp layed.
BLUETOOTH® AUDIO
Bluetooth® enabled phones and
audio players provide an opportunity
to play music through the audio
system with no wires attached,
however, there are some limitations:
• Not all controls on the phone or
player may be active when paired
to the vehicle.
• Audio streaming may be affected
by wireless signal strength.
• Sound quality of streaming
audio may vary, depending on
the device.
1147153_13a_Mazda6_SSG_022012.indd 24-252/20/12 3:59 PM
Page 14 of 18
Audio Controls With Navigation
2526
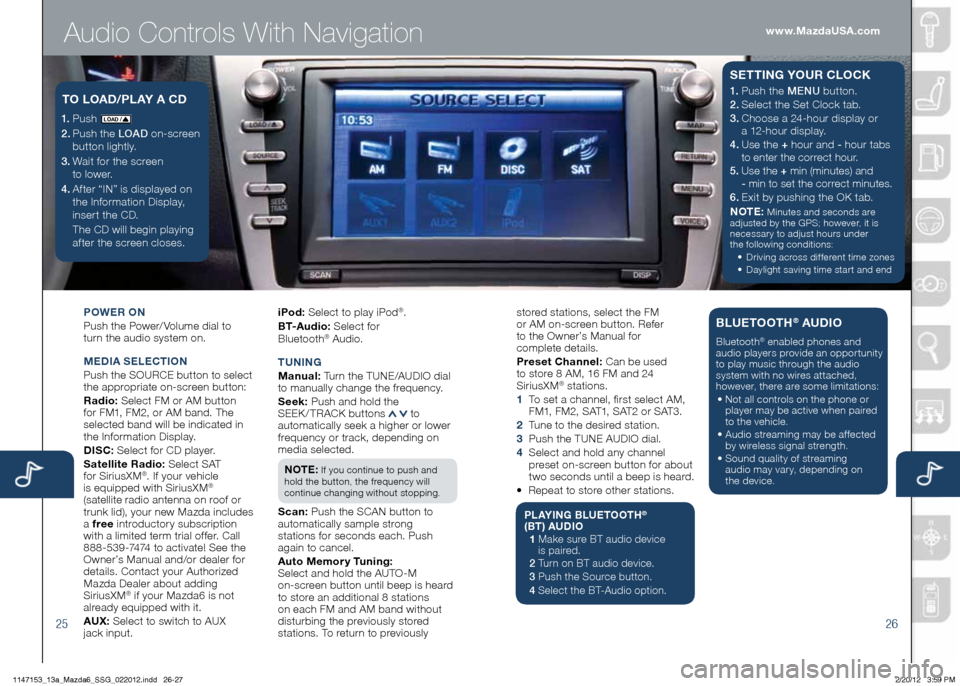
POWER ON
Push the Power/ Volume dial to
turn the audio system on.
M EDIA SELECTION
Push the SOURCE button to select
the appropriate on-screen button:
Radio: Select FM or AM button
for FM1, FM2, or AM band. The
selected band will be indicated in
the Information Display.
DISC: Select for CD player.
Satellite Radio: Select SAT
for SiriusXM
®. If your vehicle
is equipped with SiriusXM®
(satellite radio antenna on roof or
trunk lid), your new Mazda includes
a free introductory subscription
with a limited term trial offer. Call
888-539-7474 to activate! See the
Owner’s Manual and/or dealer for
details. Contact your Authorized
Mazda Dealer about adding
SiriusXM
® if your Mazda6 is not
already equipped with it.
AU x: Select to switch to AUX
jack input. iPod:
Select to play iPod
®.
B T- A u d i o : Select for
Blueto oth
® Audio.
T UNING
M anual: Turn the TUNE/AUDIO dial
to manually change the frequency.
S eek: Push and hold the
SEEK / TRACK buttons
to
automatically seek a higher or lower
frequency or track, depending on
media selected.
NOTE:
If you continue to push and
hold the button, the frequency will
continue changing without stopping.
S can: Push the SCAN button to
automatically sample strong
stations for seconds each. Push
again to cancel.
Auto Memory Tuning:
Select and hold the AUTO-M
on-screen button until beep is heard
to store an additional 8 stations
on each FM and AM band without
disturbing the previously stored
stations. To return to previously
1. Push LO AD /
2. Push the LOAD on-screen
button lightly.
3. Wait for the screen
to lower.
4 . After “IN” is displayed on
the Information Display,
insert the CD.
The CD will begin playing
after the screen closes.
TO LOAD /PLAY A CD1. Push the MENU button.
2. Select the Set Clock tab.
3.
Choose a 24-hour display or
a 12-hour display.
4. Use the + hour and - hour
tabs
to enter the correct hour.
5. Use the + min (minutes) and
- min to set the correct minutes.
6.
Exit by pushing the OK tab.
NOTE:
Minutes and seconds are
adjusted by the GPS; however, it is
necessary to adjust hours under
the following conditions:
•
Driving across different time zones
•
Daylight saving time start and end
SETTING YOUR CLOCK
stored stations, select the FM
or AM on-screen button. Refer
to the Owner’s Manual for
complete details.
Preset Channel: Can be used
to store 8 AM, 16 FM and 24
SiriusXM
® stations.
1 To set a channel, first select AM,
FM1, FM2, SAT1, SAT2 or SAT3.
2 Tune to the desired station.
3 Push the TUNE AUDIO dial.
4 Select and hold any channel
preset on-screen button for about
two seconds until a beep is heard.
• Repeat to store other stations.
PLAYING BLUETOOTH®
(BT) AUDIO
1 Make sure BT audio device
is paired.
2 Turn on BT audio device.
3 Push the Source button.
4 Select the BT-Audio option.
BLUETOOTH® AUDIO
Bluetooth® enabled phones and
audio players provide an opportunity
to play music through the audio
system with no wires attached,
however, there are some limitations:
• Not all controls on the phone or
player may be active when paired
to the vehicle.
• Audio streaming may be affected
by wireless signal strength.
• Sound quality of streaming
audio may vary, depending on
the device.
www.MazdaUSA.com
1147153_13a_Mazda6_SSG_022012.indd 26-272/20/12 3:59 PM
Page 15 of 18
Navigation System
27
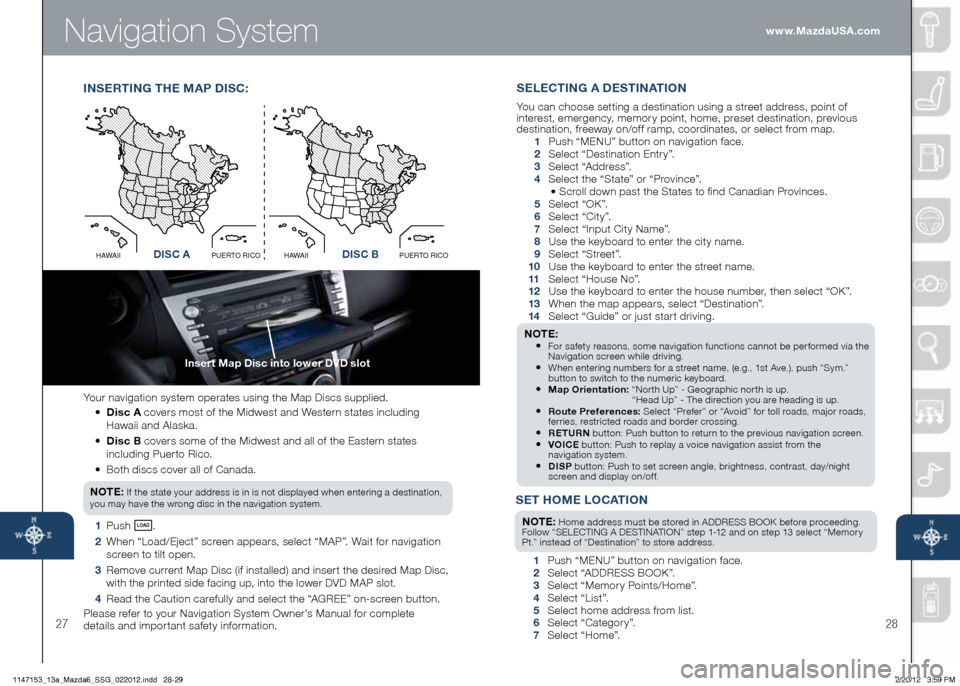
Insert Map Disc into lower DVD slot
28
Your navigation system operates using the Map Discs supplied.
• Disc A covers most of the Midwest and Western states including
Hawaii and Alaska.
•
Disc B covers some of the Midwest and all of the Eastern states
including Puerto Rico.
• Both discs cover all of Canada.
NO TE:
If the state your address is in is not displayed when entering a destination,
you may have the wrong disc in the navigation system.
1 Push LO AD .
2 When “Load/Eject” screen appears, select “MAP”. Wait for navigation
screen to tilt open.
3 Remove current Map Disc (if installed) and insert the desired Map Disc,
with the printed side facing up, into the lower DVD MAP slot.
4 Read the Caution carefully and select the “AGREE” on-screen button.
Please refer to your Navigation System Owner’s Manual for complete
details and important safety information.
I NSERTING THE M AP DISC:
Disc AO
C
I
R
O
T
R
E
U
P
I
I
A
W
A
HDisc B
O
C
I
R
O
T
R
E
U
P
I
I
A
W
A
HDISC ADISC B
SET HOME LOCATION
NOTE: Home address must be stored in ADDRESS BOOK before proceeding.
Follow “SELECTING A DESTINATION” step 1-12 and on step 13 select “Memory
Pt.” instead of “Destination” to store address.
1 Push “MENU” button on navigation face.
2 Select “ADDRESS BOOK”.
3 Select “Memory Points/Home”.
4 Select “List”.
5 Select home address from list.
6 Select “Category”.
7 Select “Home”.
SELECTING A DESTINATION
You can choose setting a destination using a street address, point of
interest, emergency, memory point, home, preset destination, previous
destination, freeway on/off ramp, coordinates, or select from map.
1 Push “ MENU ” button on navigation face.
2 Select “Destination Entry”.
3 Select “Address”.
4 Select the “State” or “Province”.
• Scroll down past the States to find Canadian Provinces.
5 Select “OK”.
6 Select “City”.
7 Select “Input City Name”.
8 Use the keyboard to enter the city name.
9 Select “Street”.
10 Use the keyboard to enter the street name.
11 Select “House No”.
12 Use the keyboard to enter the house number, then select “OK”.
13 When the map appears, select “Destination”.
14 Select “Guide” or just start driving.
NOTE: • For safety reasons, some navigation functions cannot be performed via the
Navigation screen while driving.
• When entering numbers for a street name, (e.g., 1st Ave.), push “Sym.”
button to switch to the numeric keyboard.
• Map Orientation: “North Up” - Geographic north is up.
“Head Up” - The direction you are heading is up.
• Route Preferences: Select “Prefer” or “Avoid” for toll roads, major roads,
ferries, restricted roads and border crossing.
• RETURN button: Push button to return to the previous navigation screen.• VOICE button: Push to replay a voice navigation assist from the
navigation system.
• DISP button: Push to set screen angle, brightness, contrast, day/night
screen and display on/off.
www.MazdaUSA.com
1147153_13a_Mazda6_SSG_022012.indd 28-292/20/12 3:59 PM