ignition MAZDA MODEL 6 2015 Smart Start Guide (in English)
[x] Cancel search | Manufacturer: MAZDA, Model Year: 2015, Model line: MODEL 6, Model: MAZDA MODEL 6 2015Pages: 42, PDF Size: 6.01 MB
Page 4 of 42

3
STARTING THE ENGINE WITH
ACCELERATED WARM-UP SYSTEM (AWS)
The Mazda6 is equipped with SKYACTIV combustion technology. This
technology includes AWS (Accelerated Warm-up System) for optimal
emission performance during cold starting conditions.
While Carrying the Key…
• Start the engine by pushing the START/STOP ENGINE button while
p ushing the clutch pedal (M/ T) or the brake pedal (A / T).
Wh
at you will notice? On start-up, the engine speed and sound are
higher (1500 RPM) for less than 1 minute to quickly bring the catalyst
to efficient operating temperature. The RPM will reduce to idle once the
temperature is achieved. This is normal engine operation under cold
start conditions.
Wh
at this does? This heats up the catalytic converter faster to reduce
emissions and allows Mazda to use an exhaust header on the engine (to
improve efficiency and horsepower).
NOT
E:
Yo u can drive the vehicle during AWS activation, no need to wait.
Key
• Shut the engine OFF by setting the parking brake/placing the
v
ehicle in Park (A / T), then push the START/STOP ENGINE button.
•
Ac
tivate Accessories (ACC) by pushing the START/STOP
ENGINE button once without pushing the clutch or brake pedal.
•
Tu
rn the ignition to the ON position by pushing the START/STOP
ENGINE button twice without pushing the clutch or brake pedal.
The key indicator light
in the instrument cluster will show GREEN
(engine ready to start) when the key is detected and the clutch pedal (M/ T)
or the brake pedal (A / T) is pushed. If the KEY warning light illuminates
RED , or the START/STOP ENGINE button indicator light flashes AMBER ,
this could indicate a problem with the engine starting system and the
inability to start the engine or switch the ignition to ACC or ON. Have your
vehicle inspected at an Authorized Mazda Dealer as soon as possible.
N
OTE:
RED Key Indicator Light may flash if the key is placed in the cup holder.
The key may not be detected in the cup holder .
1660320_15b_Mazda6_SSG_021714.indd 32/17/14 11:10 AM
Page 6 of 42

5
Folding Rear Seatbacks DownReturning rear seats to
upright position
1 Raise seatbacks until they lock into position.
2 Pu
ll on the top of the seatbacks from inside
the vehicle to make sure they are locked.
3 Ch
eck that all seat belts are routed properly for passenger use.
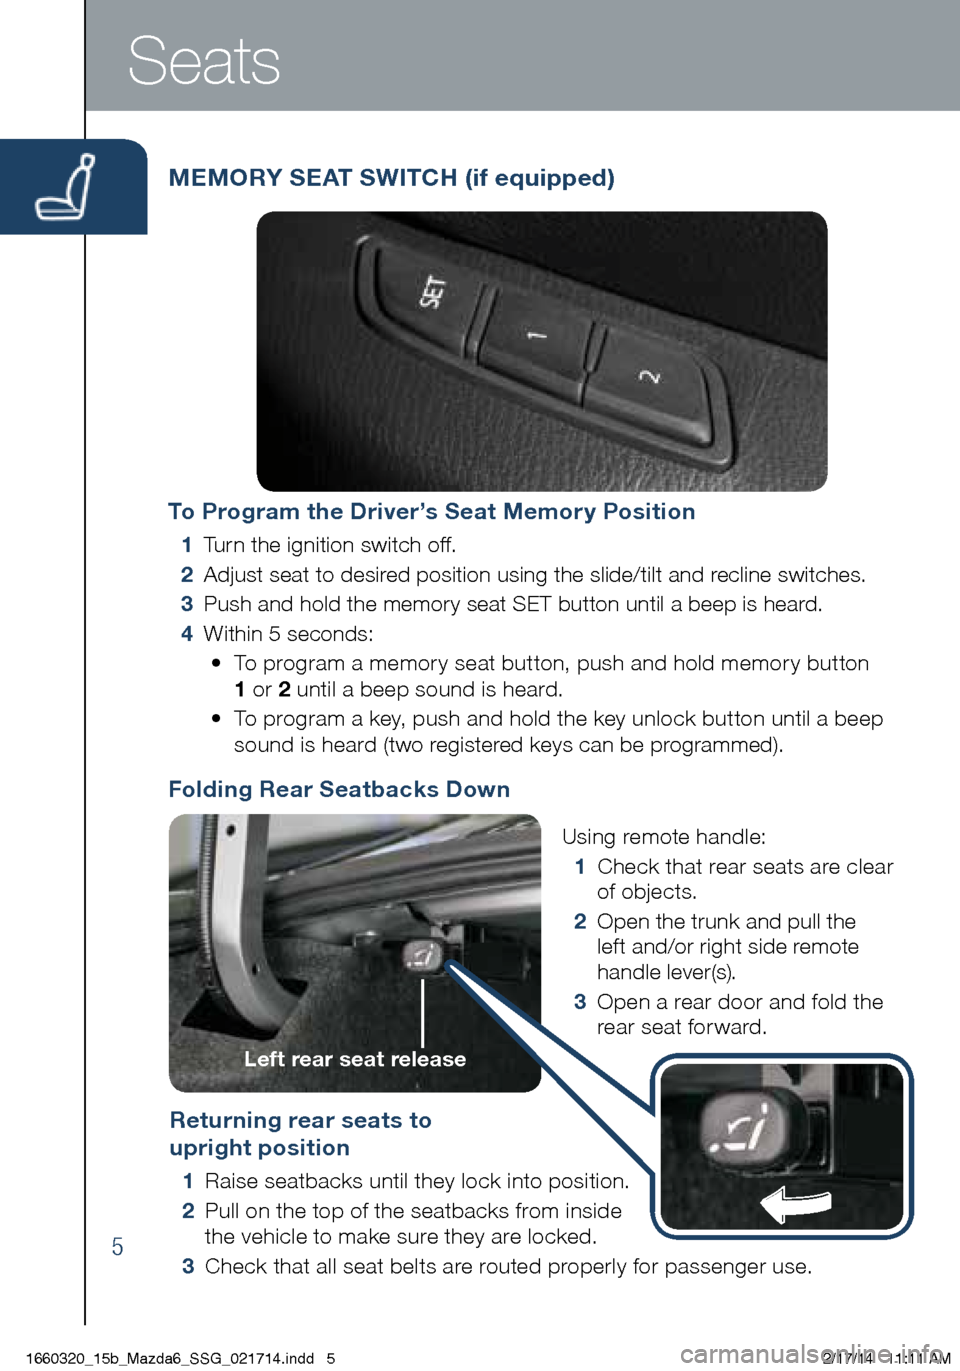
MEMORY SEAT SWITCH (if equipped)
Seats
To Program the Driver’s Seat Memory Position
1 Turn the ignition switch off.
2 Adjust seat to desired position using the slide/tilt and r
ecline switches.
3 Push and hold the memory seat SET button until a beep is heard.
4 Within 5 seconds:•
To p
rogram a memory seat button, push and hold memory button
1 or 2 until a beep sound is heard.
•
To p
rogram a key, push and hold the key unlock button until a beep
sound is heard (two registered keys can be programmed).
Using remote handle:
1 Ch
eck that rear seats are clear
of objects.
2
Op
en the trunk and pull the
left and/or right side remote
handle lever(s).
3 Op
en a rear door and fold the
rear seat forward.
Left rear seat release
1660320_15b_Mazda6_SSG_021714.indd 52/17/14 11:11 AM
Page 12 of 42

11
Lights
LIGHTING CONTROL/TURN SIGNAL LEVER
: Turns tail, parking, dashboard,
a nd headlights on.
: Turns tail,
p
arking, and
dashboard
lights on.
Pull
to Flash
High BeamsPush for
High Beams
NOTE: The DRL (Daytime Running Lights) automatically turn on when the ignition is
switched ON. To disable/enable this feature see your Authorized Mazda Dealer.
AUTO: The light sensor
automatically determines
when to turn the headlights
on or off.: Turns fog lights
on
only when
headlights
are on.
Smart Turn: To signal a lane
change, push the turn signal lever
up or down halfway and release.
After releasing the lever, the turn
signal indicator will flash three times.
(Refer to page 6 or Owner’s Manual
for “Personalization Features”)
1660320_15b_Mazda6_SSG_021714.indd 112/17/14 11:12 AM
Page 13 of 42

12
Wiperswww.MazdaUSA.com
WINDSHIELD WIPER/WASHER CONTROL LEVER
AUTO: The rain sensor senses the amount of rainfall and turns the wipers
on or off. Rotate inner ring away from you (clockwise) for more sensitivity
(requires less rain to turn wipers on) and toward you (counterclockwise)
for less sensitivity (requires more rain to turn wipers on).
CAUTION: When the ignition is ON, turn the AUTO wipers OFF when
going through a car wash, or while cleaning or touching the windshield.
NOTE: Vehicles not equipped with
AUTO wipers will have INT wipers.
Set the lever to INT and choose an
interval timing by rotating the ring
between fast and slow.
Pull lever
to dispense
windshield
washer fluid
More sensitive Less sensitive
1
2
3HILO
AUTO
OFF
MIST
1660320_15b_Mazda6_SSG_021714.indd 122/17/14 11:12 AM
Page 15 of 42

14
NOTE:
• With AFS, it is normal to see the headlights move and hear the sound of the
h
eadlight leveling motors at the front of the vehicle when the ignition is ON.
•
Th
e system will need to be reset if the vehicle battery has been disconnected
or the system fuse has been replaced. Please refer to your Owner’s Manual
for easy to follow resetting instructions.
Headlightswww.MazdaUSA.com
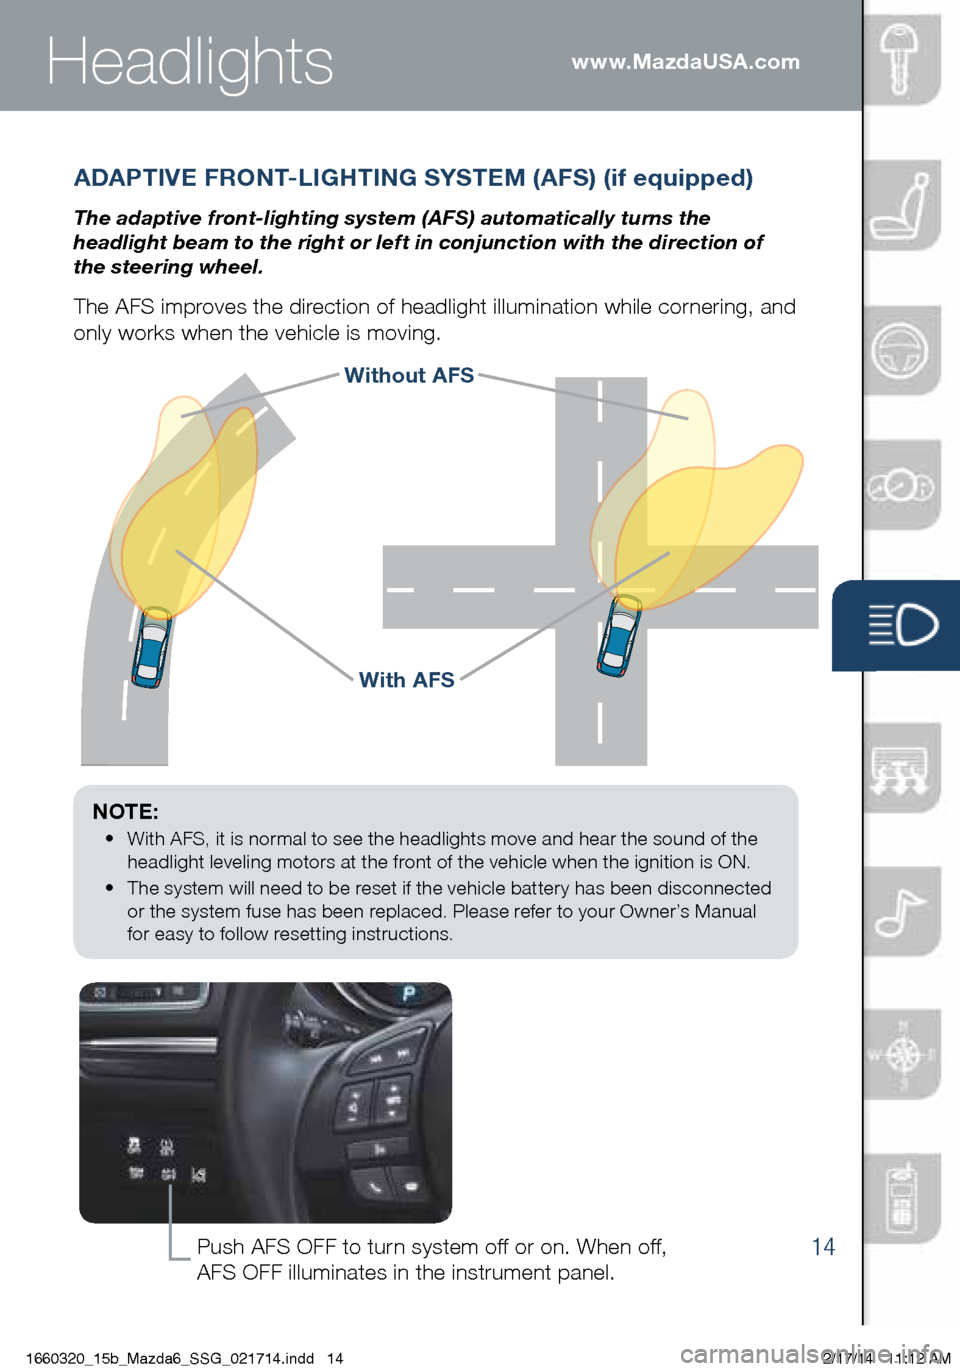
With AFS
Without AFS
ADAPTIVE FRONT-LIGHTING SYSTEM (AFS) (if equipped)
The adaptive front-lighting system (AFS) automatically turns the
headlight beam to the right or left in conjunction with the direction of
the steering wheel.
The AFS improves the direction of headlight illumination while cornering, and
only works when the vehicle is moving.
Push AFS OFF to turn system off or on. When off,
AFS OFF illuminates in the instrument panel.
1660320_15b_Mazda6_SSG_021714.indd 142/17/14 11:12 AM
Page 19 of 42

18
Tireswww.MazdaUSA.com
TIRE PRESSURE MONITORING SYSTEM (TPMS)
Your vehicle is equipped with a Tire Pressure Monitoring System (TPMS)
that detects low tire pressure in one or more tires. Under the following
cases, the TPMS must be “initialized” so the system can operate normally.
• The tire pressure is adjusted (up or down) in one or more tires.
•
A ti
re rotation is performed.
•
An
y tire or wheel is replaced.
•
The
vehicle’s battery is disconnected, replaced or completely dead.
Initialization Process (TPMS Warning Light is Illuminated):
1 Park the vehicle in a safe place and firmly apply the parking brake.
2 Le
t the tires cool, then adjust the tire pressure to the specified
pressure (See tire label located on the driver’s side B-pillar or edge
of driver’s door frame for
specification) on all four
(4) tires.
3 Sw
itch the ignition ON, but
leave the vehicle parked.
4 Pu
sh and hold the TPMS
“Set Switch” (left side of dash)
until the TPMS warning light
in the instrument cluster flashes
twice and a beep sound is
heard once.
PERSONALIZE YOUR MAZDA6
WITH GENUINE MAZDA ACCESSORIES
Go to www.MyMazda.com, then select “Accessories” below the MyMazda
Home header for a complete listing of available accessories for your Maz\
da6.
NOTE: See Page 7 for TPMS switch location.
CAUTION: If the TPMS “Set Switch” is pushed without adjusting the tire
pressure, the system cannot detect the normal tire pressure. The TPMS
warning light may not illuminate, even if the tire pressure is low, or it may
illuminate if the tire pressure is normal.
1660320_15b_Mazda6_SSG_021714.indd 182/17/14 11:12 AM
Page 36 of 42

35
Navigation System
TO REMOVE OR INSERT THE MAP SD CARD:
1 Tur
n the vehicle ignition OFF.
2 Lo
cate the sliding door on the lower left side
of t
he dash (see page 5) and slide it open (right).
• Re
move card: Push the card once, then pull it out.
• In
sert card: Push the card in (label-side up), then slide door closed (left).
NOTE:
• Visit www.mazdausa.com/navigation within 60 days of vehicle delivery and
download the most recent map available for your device for free. In order
to download or upgrade your map, the TomTom Home software must be
downloaded. Please refer to the Navigation System Owners Manual section of
www.mazdausa.com/navigation for additional information.
• Only use your MAP SD card for operating and updating your navigation system.
Do not insert the MAP SD card into another vehicle or into any other device such
as a camera.
• If your vehicle is not equipped with a factory navigation system, your audio system
can be upgraded to include navigation. Contact your Authorized Mazda Dealer for
more details.
SD Card
PLANNING A ROUTE USING THE TOUCH-SCREEN
To plan a route on your Navigation system,
do the following:
1
Pu
sh the NAV button to access the Navigation System.
2 T
ap the screen (above) to open the MAIN MENU (below).
3 To u
c h Navigate to .
4 To
u c h Address .
NOTE: Factory Navigation System is available if the vehicle is equipped with the
5.8” LCD screen. Contact your Authorized Mazda Dealer for more details.
NOTE: You can change the country or state
setting by touching the flag before you select
a city.
Navigation SystemI M P O R TA N T:
• In the interest of safety and to reduce
distractions while you are driving, you should
always plan a route before you start driving.
• Navigation route controls are disabled while
driving. Voice Commands can be
used to navigate while driving.
1660320_15b_Mazda6_SSG_021714.indd 352/17/14 11:13 AM