change time MAZDA MODEL 6 2020 (in English) User Guide
[x] Cancel search | Manufacturer: MAZDA, Model Year: 2020, Model line: MODEL 6, Model: MAZDA MODEL 6 2020Pages: 702
Page 174 of 702

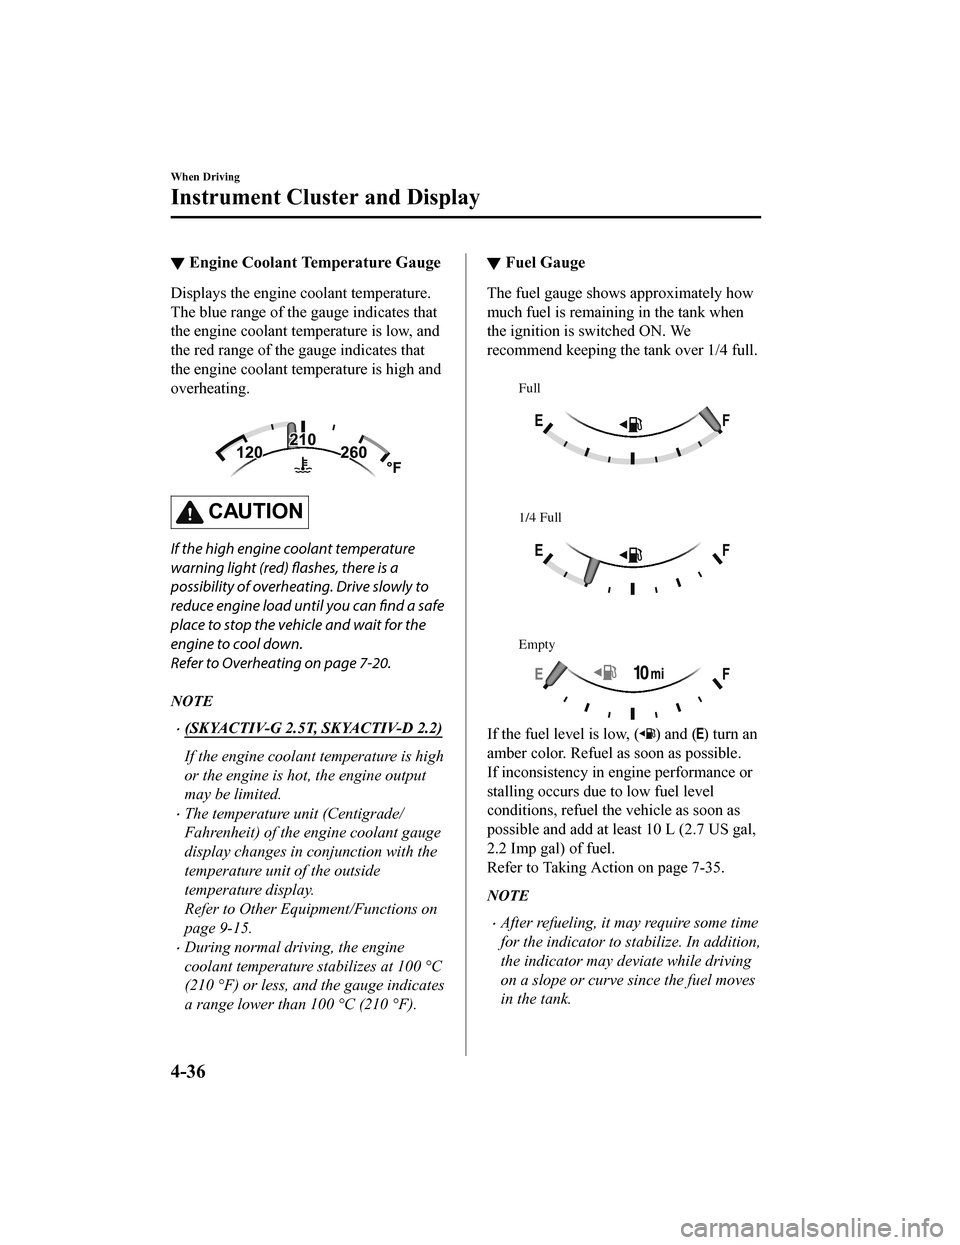
▼Engine Coolant Temperature Gauge
Displays the engine coolant temperature.
The blue range of the gauge indicates that
the engine coolant temperature is low, and
the red range of the
gauge indicates that
the engine coolant temperature is high and
overheating.
CAUTION
If the high engine coolant temperature
warning light (red) flashes, there is a
possibility of overheating. Drive slowly to
reduce engine load until you can find a safe
place to stop the vehicle and wait for the
engine to cool down.
Refer to Overheating on page 7-20.
NOTE
(SKYACTIV-G 2.5T, SKYACTIV-D 2.2)
If the engine coolant temperature is high
or the engine is hot, the engine output
may be limited.
The temperature unit (Centigrade/
Fahrenheit) of the engine coolant gauge
display changes in conjunction with the
temperature unit of the outside
temperature display.
Refer to Other Equipment/Functions on
page 9-15.
During normal driving, the engine
coolant temperature stabilizes at 100 °C
(210 °F) or less, and the gauge indicates
a range lower than 100 °C (210 °F).
▼ Fuel Gauge
The fuel gauge shows approximately how
much fuel is remaining in the tank when
the ignition is switched ON. We
recommend keeping the tank over 1/4 full.
Full
1/4 Full
Empty
If the fuel level is low, () and () turn an
amber color. Refuel as soon as possible.
If inconsistency in e ngine performance or
stalling occurs due to low fuel level
conditions, refuel the vehicle as soon as
possible and add at least 10 L (2.7 US gal,
2.2 Imp gal) of fuel.
Refer to Taking Action on page 7-35.
NOTE
After refueling, it may require some time
for the indicator to st abilize. In addition,
the indicator may deviate while driving
on a slope or curve since the fuel moves
in the tank.
When Driving
Instrument Cluster and Display
4-36
Mazda6_8HX3-EA-19I_Edition1_old 2019-6-18 9:25:17
Page 191 of 702

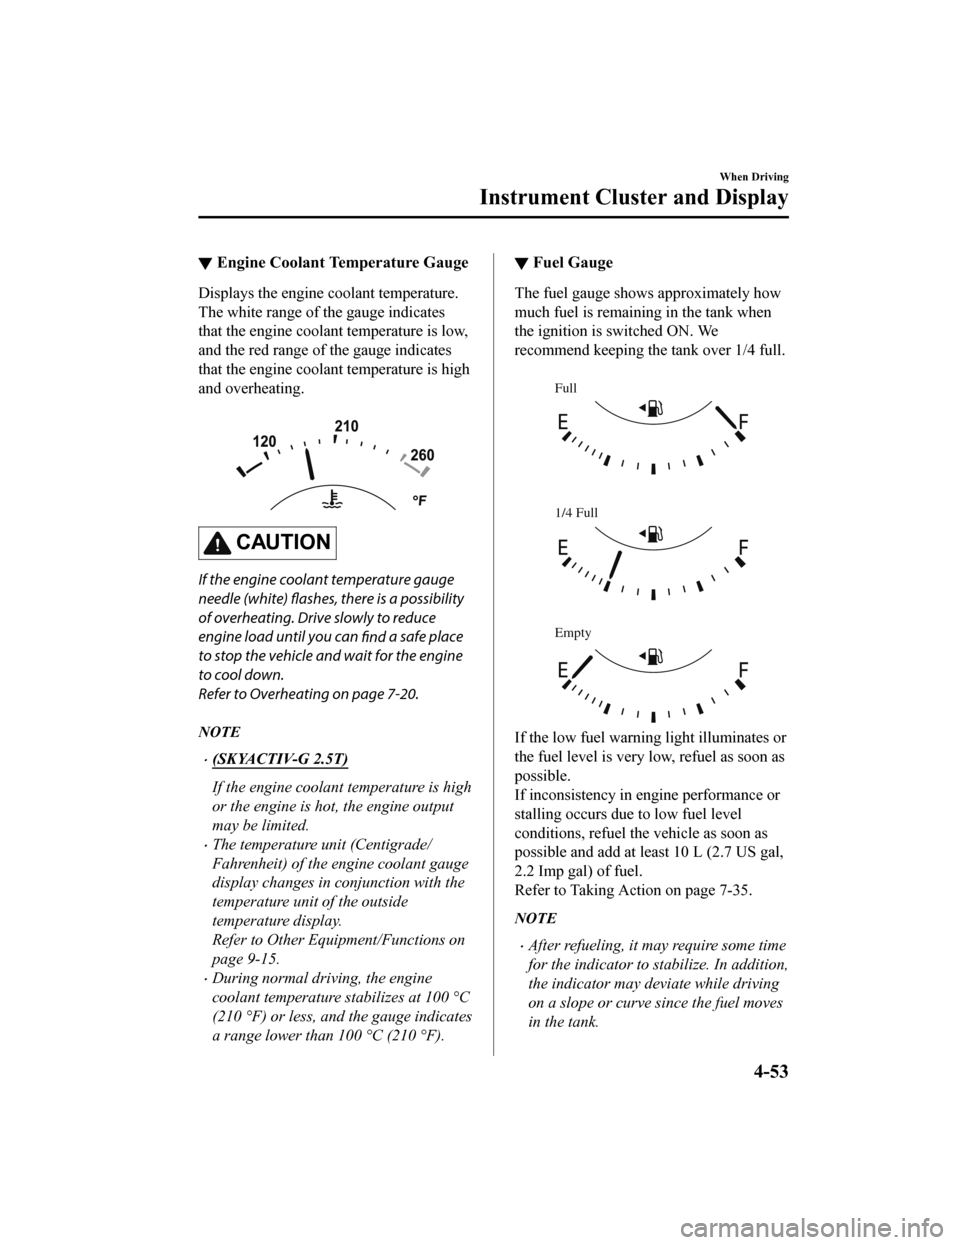
▼Engine Coolant Temperature Gauge
Displays the engine coolant temperature.
The white range of the gauge indicates
that the engine coolant temperature is low,
and the red range of the gauge indicates
that the engine coolant temperature is high
and overheating.
CAUTION
If the engine coolant temperature gauge
needle (white) flashes, there is a possibility
of overheating. Drive slowly to reduce
engine load until you can
find a safe place
to stop the vehicle and wait for the engine
to cool down.
Refer to Overheating on page 7-20.
NOTE
(SKYACTIV-G 2.5T)
If the engine coolant temperature is high
or the engine is hot, the engine output
may be limited.
The temperature unit (Centigrade/
Fahrenheit) of the engine coolant gauge
display changes in conjunction with the
temperature unit of the outside
temperature display.
Refer to Other Equipment/Functions on
page 9-15.
During normal driving, the engine
coolant temperature stabilizes at 100 °C
(210 °F) or less, and the gauge indicates
a range lower than 100 °C (210 °F).
▼ Fuel Gauge
The fuel gauge shows approximately how
much fuel is remaining in the tank when
the ignition is switched ON. We
recommend keeping the tank over 1/4 full.
Full
1/4 Full
Empty
If the low fuel warni
ng light illuminates or
the fuel level is very low, refuel as soon as
possible.
If inconsistency in engine performance or
stalling occurs due to low fuel level
conditions, refuel the vehicle as soon as
possible and add at least 10 L (2.7 US gal,
2.2 Imp gal) of fuel.
Refer to Taking Action on page 7-35.
NOTE
After refueling, it may require some time
for the indicator to stabilize. In addition,
the indicator may deviate while driving
on a slope or curve since the fuel moves
in the tank.
When Driving
Instrument Cluster and Display
4-53
Mazda6_8HX3-EA-19I_Edition1_old 2019-6-18 9:25:17
Page 214 of 702

Direct Mode*
Direct mode can be used for temporarily
switching gears by operating the steering
shift switch while the vehicle is being
driven with the selector lever in the D
position.
While in direct mode, the D and M
indication illuminate a nd the gear position
in use is illuminated.
Direct mode is canceled (released) under
the following conditions.
The UP switch () is pulled
rearward for a certain amount of time or
longer.
The vehicle is driven for a certain
amount of time or longer (time differs
depending on the driving conditions
while operating).
The vehicle is stopped or moving at a
slow speed.
Direct mode
indicationGear position
indication
NOTE
Shifting up and down while in direct mode
may not be possible depending on the
vehicle speed. In addition, because direct
mode is canceled (released) depending on
the rate of acceleration or if the
accelerator is fully depressed, use of the
manual shift mode is recommended if you
need to drive the vehicle in a particular
gear for long periods.
Driving Tips
WA R N I N G
Do not let the vehicle move in a direction
opposite to the direction selected by the
selector lever:
Do not let the vehicle move backward with
the selector lever in a forward position, or
do not let the vehicle move forward with
the selector lever in the reverse position.
Otherwise, the engine may stop, causing
the loss of the power brake and power
steering functions, and make it difficult to
control the vehicle which could result in an
accident.
Passing
For extra power when passing another
vehicle or climbing steep grades, depress
the accelerator fully. The transaxle will
shift to a lower gear, depending on vehicle
speed.
NOTE
The accelerator peda l may initially feel
heavy as it is being depressed, then feel
lighter as it is depressed further. This
change in pedal force aids the engine
control system in determining how much
the accelerator pedal has been
depressed for performing kickdown, and
functions to control whether or not
kickdown should be performed.
While the selector lever is in the M
position and the DSC is turned off,
manual shift mode does not switch to
automatic shift mode even if the
accelerator pedal is completely
depressed. Operate the selector lever.
When Driving
Automatic Transaxle
4-76*Some models.
Mazda6_8HX3-EA-19I_Edition1_old 2019-6-18 9:25:17
Page 216 of 702

Lighting Control
▼Headlights
Turn the headlight switch to tur
n the headlights and other exterior lights on or off.
When the lights are turned on, the lights-on indicator light in the instrument cluster turns on.
NOTE
If the light switch is left on, the lights will automatically switch off approximately 30
seconds after switching the ignition off.
The time setting can be changed.
Refer to Vehicle Equipment on page 9-14.
To prevent discharging the battery, do not leave the lights on while th e engine is off unless
safety requires them.
Without auto-light control
Switch Position OFF
Ignition PositionONACC or
OFF ONACC or
OFF ONACC or
OFF
Headlights Off Off Off Off On
On
*2
Daytime running lightsOn*1OffOn*1Off Off Off
Taillights
Parking lights
License plate lights
Side-marker lights Off Off On
On
*2OnOn*2
*1 The lights are turned on wh ile the vehicle is driven.*2 The lights are turned on for th e specified period by the auto headlight off function.
When Driving
Switches and Controls
4-78
Mazda6_8HX3-EA-19I_Edition1_old 2019-6-18 9:25:17
Page 218 of 702

CAUTION
Do not shade the light sensor by adhering a st icker or a label on the windshield. Otherwise
the light sensor will not operate correctly.
The light sensor also works as a rain sensor for the auto-wiper control. Keep hands and
scrapers clear of the windshield when the wiper lever is in the AUTO position and the
ignition is switched ON as fingers could be pinched or the wipers and wiper blades could be
damaged when the wipers activate automaticall y. If you are going to clean the windshield,
be sure the wipers are turned off completely when it is partic
ularly tempting to leave the
engine running. This is particularly important when clearing ice and snow.
NOTE
The headlights and other exterior lights may not turn off immediately even if the
surrounding area becomes well-lit because the light sensor determines that it is night time
if the surrounding area is continuously dark for several minutes such as inside long
tunnels, traffic jams inside tunnels, or in indoor parking lots.
In this case, the lights turn off if the li ght switch is turned to the OFF position.
If the headlight switch and the windshield wiper switch are in AUTO, and the wipers are
operated at low or high speed by the auto wiper control for several seconds, bad weather
conditions are determined and the headlights may be turned on.
The sensitivity of the auto-light control may be changed.
Refer to Vehicle Equipment on page 9-14.
When Driving
Switches and Controls
4-80
Mazda6_8HX3-EA-19I_Edition1_old 2019-6-18 9:25:17
Page 219 of 702

▼Headlight High-Low Beam
The headlights switch between high and
low beams by moving the lever forward or
backward.
High beam
Low beam
When the headlight high-beams are on, the
headlight high-beam indicator light is
turned on.
▼ Flashing the Headlights
Can be used when the ignition is switched
ON.
To flash the headlight
s, pull the lever fully
towards you (th e headlight switch does not
need to be on).
OFF
Headlight
flashing
The headlight high-beam indicator light in
the instrument cluster illuminates
simultaneously. The lever will return to
the normal position when released.
▼ Coming Home Light
The coming home light turns on the
headlights (low beams) when the lever is
operated.
To turn on the lights
When the lever is pulled with the ignition
switched to ACC or OFF, the low beam
headlights turn on.
The headlights turn off after a certain
period of time has elapsed after all of the
doors are closed.
NOTE
The time until the headlights turn off
after all of the doors are closed can be
changed.
Refer to Vehicle Equipment on page
9-14.
If no operations are done for 3 minutes
after the lever is pulled, the headlights
turn off.
The headlights turn off if the lever is
pulled again while the headlights are
illuminated.
When Driving
Switches and Controls
4-81
Mazda6_8HX3-EA-19I_Edition1_old
2019-6-18 9:25:17
Page 220 of 702

▼Leaving Home Light
The leaving home light turns on the lights
when the transmitte
r unlock button is
pressed while away from the vehicle.
The following light s turn on when the
leaving home light is operated.
Low beams, Parking lights, Taillights,
License plate lights.
To turn on the lights
When the ignition switch and the headlight
switch are in the following conditions, the
headlights will il luminate when the
transmitter unlock button is pressed and
the vehicle receives the transmitter signal.
The headlights turn off after a certain
period of time has elapsed (30 seconds).
Ignition switch: off
Headlight switch: AUTO, , or
Unlock button Lock button
Type B Type A
Unlock button Lock button
NOTE
Operation of the leaving home light can
be turned on or off.
Refer to Vehicle Equipment on page
9-14.
When the transmitter lock button is
pressed and the vehicle receives the
transmitter signal, the headlights turn
off.
When the headlight switch is turned to
the OFF position, the headlights turn
off.
▼
Headlight Leveling
The number of passengers and weight of
cargo in the luggage compartment change
the angle of the headlights.
The angle of the headlights will be
automatically adjusted when turning on
the headlights.
▼Daytime Running Lights
Some countries requir
e moving vehicles to
have their lights on (daytime running
lights) during the daytime.
The daytime running lights turn on when
the vehicle is driven and turn off when the
parking brake is operated or the selector
lever is shifted to th e P position (automatic
vehicle).
NOTE
(Except Canada)
The daytime running lights can be
deactivated.
Refer to Other Equipment/Functions on
page 9-15.
When Driving
Switches and Controls
4-82
Mazda6_8HX3-EA-19I_Edition1_old 2019-6-18 9:25:17
Page 221 of 702

Turn and Lane-ChangeSignals
The ignition must be switched ON to use
the turn and lane-change signals.
▼Tu r n S i g n a l s
Move the signal lever down (for a left
turn) or up (for a right turn) to the stop
position. The signal will self-cancel after
the turn is completed.
If the indicator light continues to flash
after a turn, ma
nually return the lever to its
original position.
Right turn
Left turn
Right lane change
Left lane change OFF
The turn signal indicators in the
instrument cluster flash according to the
operation of the turn
signal lever to show
which signal is working.
NOTE
There may be a problem with the turn
signal lights if they do not flash but
remain turned on, or they flash
abnormally. Have your vehicle inspected
by an Authorized Mazda Dealer.
A personalized function is available to
change the turn indicator sound volume.
(page 9-14)
▼ Lane-Change Signals
Move the lever halfway toward the
direction of the lane change―until the
indicator flashes― and hold it there. It
will return to the off position when
released.
▼Three-Flash Turn Signal
After releasing the turn signal lever, the
turn signal indicator flashes 3 times. The
operation can be canceled by moving the
lever in the direction opposite to which it
was operated.
NOTE
The three-flash turn signal function can be
switched to operable/inoperable using the
personalization function.
Refer to Vehicle Equipment on page 9-14.
When Driving
Switches and Controls
4-83
Mazda6_8HX3-EA-19I_Edition1_old
2019-6-18 9:25:17
Page 229 of 702

▼Programming the HomeLink
System
CAUTION
When programming a garage door opener
or a gate, disconnect the power to these
devices before performing programming.
Continuous operation of the devices could
damage the motor.
The HomeLink system provides 3 buttons
which can be individually selected and
programmed using t
he transmitters for
current, on-market d evices as follows:
1. Disconnect the power to the garage door opener or gate programmed to the
hand-held transmitter.
2. Position the end of your hand-held transmitter 2.5―7.5 cm (1―3 inches)
away from the HomeLink button you
wish to program while keeping the
indicator light in view.
3. Simultaneously press and hold both the chosen HomeLink and hand-held
transmitter buttons. Do not release the
buttons until step 3 has been
completed.
NOTE
Some gate operators and garage door
openers may require you to replace
this Programming Step 2 with
procedures noted in the “Gate
Operator/Canadian Programming”
section.
4. After the HomeLink indicator light changes from a slow to a rapidly
blinking light, release both the
HomeLink and hand-held transmitter
buttons.
NOTE
If the HomeLink indicator light does
not change to a rapidly blinking light,
contact HomeLink at
www.homelink.com or call
1-800-355-3515 for assistance.
5. Connect the power to the garage door
opener or gate programmed to the
hand-held transmitter.
6. Firmly press and hold the programmed
HomeLink button for five seconds, and
then release it. Perf orm this operation
two times to activate the door or gate.
If the door or gate does not activate,
press and hold the just-trained
HomeLink button and observe the
indicator light.
If the indicator light stays on
constantly, programming is complete
and your device should activate when
the HomeLink button is pressed and
released.
NOTE
To program the remaining two
HomeLink buttons, begin with
“Programming” ― step 1
If the indicator light blinks rapidly for
two seconds and then turns to a
constant light, continue with
“Programming” steps 7―9 to
complete the progra mming of a rolling
code equipped device (most commonly
a garage door opener).
7. At the garage door opener receiver (motor-head unit) in the garage, locate
the “learn” or “smart” button. This can
usually be found where the hanging
antenna wire is attached to the
motor-head unit.
When Driving
Switches and Controls
4-91
Mazda6_8HX3-EA-19I_Edition1_old 2019-6-18 9:25:17
Page 234 of 702

▼Gate operator/Canadian
Programming
Canadian radio-frequency laws require
transmitter signals to “time-out” (or quit)
after several seconds of transmission ―
which may not be long enough for
HomeLink to pick up
the signal during
programming. Similar to this Canadian
law, some U.S. gate operators are designed
to “time-out” in the same manner.
If you live in Canada or are having
difficulties programming a gate operator
by using the programming procedures
(regardless of where you live), replace
Step 3 of Programming the HomeLink
System with the following:
NOTE
If programming a garage door opener or
gate operator, it is advised to unplug the
device during the “cycling” process to
prevent possible overheating.
While the indicator light is flashing in
amber, press the button on the hand-held
transmitter for 2 sec onds and release it
repeatedly until the indicator light changes
from amber to green.
Go back to Step 4 of Programming the
HomeLink System to complete the
procedure.
▼ Operating the HomeLink System
Press the programmed HomeLink button
to operate a programmed device.
▼Reprogramming the HomeLink
system
To program a device to HomeLink using a
HomeLink button previously trained,
follow these steps:
1. Press and hold the desired HomeLink
button. DO NOT release the button.
2. After 20 seconds, the indicator light flashes in amber. After the indicator
light flashes, release the HomeLink
button.
3. Go back to Step 2 of Programming the HomeLink System to complete the
procedure.
NOTE
If the programming has not been
completed, the syst em returns to the
previous programming.
▼ Erasing Programmed HomeLink
Buttons
NOTE
All of the programmed HomeLink
buttons are reset.
Individual buttons
cannot be reset, however, individual
buttons can be reprogrammed. For
individual button reprogramming, refer
to Reprogramming the HomeLink
System (page 4-96).
Verify that the programming has been
erased if you resell the vehicle.
When Driving
Switches and Controls
4-96
Mazda6_8HX3-EA-19I_Edition1_old 2019-6-18 9:25:17