weight MAZDA MODEL CX-3 2021 Owners Manual
[x] Cancel search | Manufacturer: MAZDA, Model Year: 2021, Model line: MODEL CX-3, Model: MAZDA MODEL CX-3 2021Pages: 618, PDF Size: 64.58 MB
Page 47 of 618

Child-Restraint System Installation
▼Categories of Child-Restraint Systems
NOTE
When purchasing, ask the manufacturer of the child-restraint system which type of
child-restraint system is appropriate for your child and vehicle.
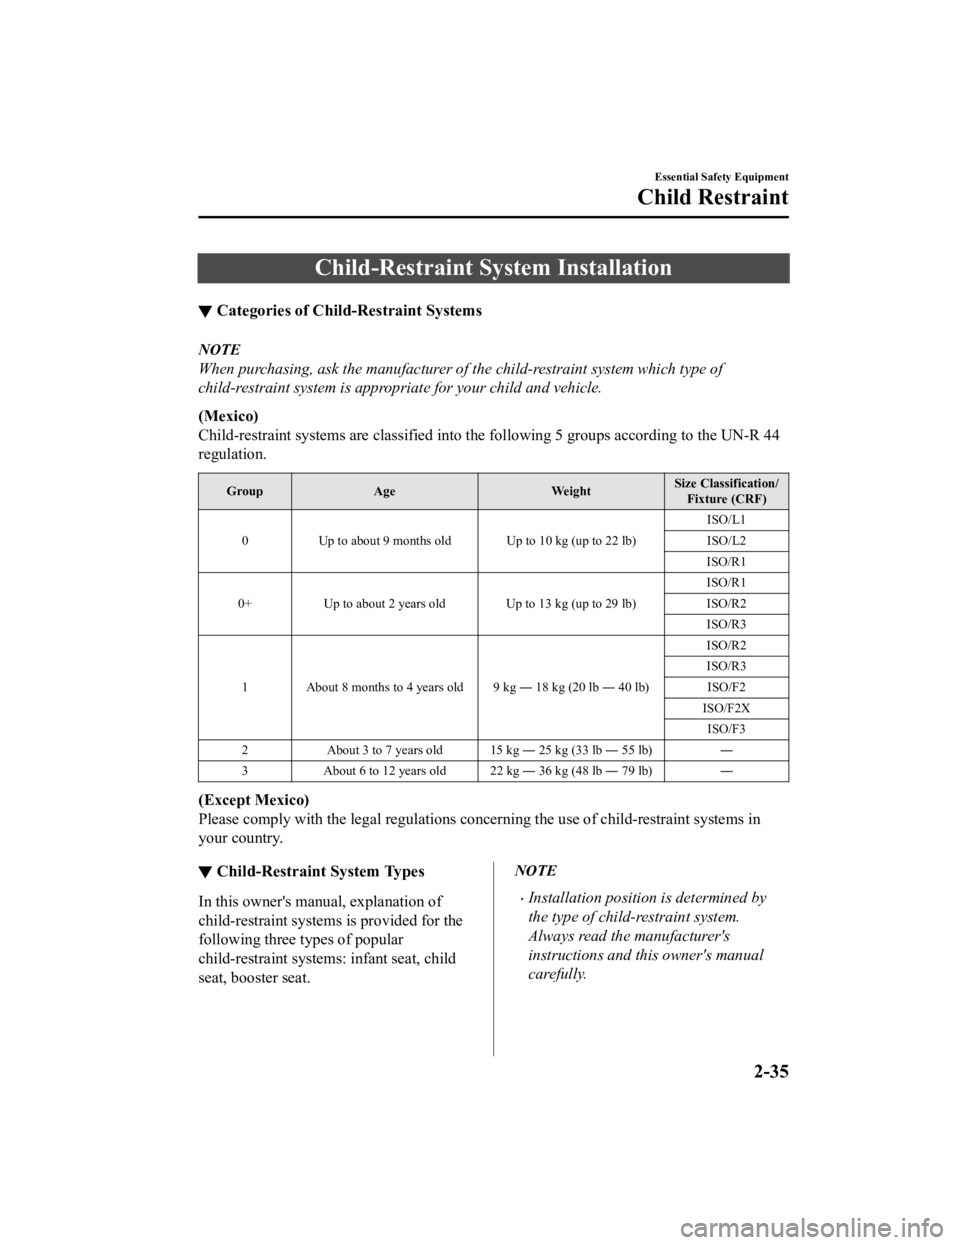
(Mexico)
Child-restraint systems are clas
sified into the following 5 groups according to the UN-R 44
regulation.
Group Age WeightSize Classification/
Fixture (CRF)
0 Up to about 9 months old Up to 10 kg (up to 22 lb) ISO/L1
ISO/L2
ISO/R1
0+ Up to about 2 years old Up to 13 kg (up to 29 lb) ISO/R1
ISO/R2
ISO/R3
1 About 8 months to 4 years old 9 kg ― 18 kg (20 lb ― 40 lb) ISO/R2
ISO/R3
ISO/F2
ISO/F2X ISO/F3
2 About 3 to 7 years old 15 kg ― 25 kg (33 lb ― 55 lb) ―
3 About 6 to 12 years old 22 kg ― 36 kg (48 lb ― 79 lb) ―
(Except Mexico)
Please comply with the legal regulations concerning the use of child-restraint systems in
your country.
▼ Child-Restraint System Types
In this owner's manual, explanation of
child-restraint systems is provided for the
following three types of popular
child-restraint systems: infant seat, child
seat, booster seat.
NOTE
Installation position is determined by
the type of child-restraint system.
Always read the manufacturer's
instructions and this owner's manual
carefully.
Essential Safety Equipment
Child Restraint
2-35
CX-3_8JL1-EA-20G_Edition1_old
2020-5-22 15:31:00
Page 57 of 618

Always remove the head restraint and
install child-restraint system (except when
installing a backless booster seat):
Installing a child-restraint system without
removing the head restraint is dangerous.
The child-restraint system cannot be
installed correctly which may result in
death or injury to the child in a collision.
Always install the head restraint and adjust
it to the appropriate position after
removing the child-restraint system:
Driving with the head restraint removed is
dangerous as impact to the occupant's
head cannot be prevented during
emergency braking or in a collision, which
could result in a serious accident, injury or
death.
Refer to Head Restraints on page 2-17.
Front Passenger's Seat Child-Restraint
System Installation (With Front
Passenger Occupant Classification
System)
1. Make sure the ignition is switched off.
2. Slide the seat as far back as possible.
3. Remove the head restraint. However,when installing a backless booster seat,
always install the vehicle head restraint
to the seat where the backless booster
seat is installed.
4. Place the child-restraint system on theseat without putting your weight on the
seat and fasten the seat belt. See the
manufacturer's instructions on the
child-restraint system for belt routing
instructions.
5. To get the retractor into the automatic locking mode, pull the shoulder belt
portion of the seat belt until the entire
length of the belt is out of the retractor.
6. Push the child-rest raint system firmly
into the vehicle seat. Be sure the belt
retracts as snugly as possible. A
clicking noise from the retractor will
be heard during retraction if the system
is in automatic lo cking mode. If the
belt does not lock the seat down tight,
repeat the previous step and also this
one.
NOTE
Inspect this function before each use
of the child-restraint system. You
should not be able to pull the
shoulder belt out of the retractor
while the system is in the automatic
locking mode. When you remove the
child-restraint system, be sure the
belt fully retracts to return the
system to emergency locking mode
before occupants use the seat belts.
Follow the child-restraint system
manufacturer's instructions
carefully.
Depending on the type of
child-restraint system, it may not
employ seat belts which are in
automatic locking mode.
7. Seat your child safely in the child-restraint system and secure the
child according to the instructions
Essential Safety Equipment
Child Restraint
2-45
CX-3_8JL1-EA-20G_Edition1_old 2020-5-22 15:31:00
Page 67 of 618

Use of any tire or wheel other than those specified for your Mazda (page 9-7) is
dangerous. Use of such wheels will prevent the vehicle's accident detections system from
accurately detecting a collision or roll-over accident resulting in incorrect or unexpected air
bag deployment and the possibility of serious injuries.
Do not overload your vehicle:
Overloading your vehicle is dangerous as it could prevent the air bag crash sensor system
from accurately detecting a collision or roll-over accident resulting in incorrect or
unexpected air bag deployment and the possibility of serious injuries. The gross axle weight
rating (GAWR) and the gross vehicle weight rati ng (GVWR) for your vehicle are on the Motor
Vehicle Safety Standard Label on the driver's door frame. Do not exceed these ratings.
Do not drive the vehicle off-road:
Driving your Mazda off-road is dangerous beca use the vehicle has not been designed to do
so. Driving the vehicle off-road could prev ent the air bag crash sensor system from
accurately detecting a collision or roll-over acci dent resulting in incorrect or unexpected air
bag deployment and the possibility of serious injuries.
Do not modify a front door or leave any damage unrepaired. Always have an Authorized
Mazda Dealer inspect a damaged front door:
Modifying a front door or leaving any damage unrepaired is dangerous. Each front door has a
side crash sensor as a component of the supplemental restraint system. If holes are drilled in a
front door, a door speaker is le ft removed, or a damaged door is left unrepaired, the sensor
could be adversely affected causing it to not detect the pressure of an impact correctly during
a side collision. If a sensor does not detect a side impact correctly, the side and curtain air
bags and the front seat belt pretensioner may not operate normally which could result in
serious injury to occupants.
Do not modify the supplemental restraint system:
Modifying the components or wiri ng of the supplemental restraint system is dangerous. You
could accidentally activate it or make it inoperable. Do not make any modifications to the
supplemental restraint system. This includes inst alling trim, badges, or anything else over the
air bag modules. It also includes installing extra electrical equipment on or near system
components or wiring. An Authorized Mazda Dealer can provide the special care needed in
the removal and installation of front seats. It is important to protect the air bag wiring and
connections to assure that the bags do not accidentally deploy, and that the front passenger
occupant classification system and the seats retain an undamaged air bag connection.
Do not place luggage or other objects under the front seats:
Placing luggage or other objects under th e front seats is dangerous. The components
essential to the supplemental restraint system could be damaged, and in the event of a side
collision, the appropriate air bags may not de ploy, which could result in death or serious
injury. To prevent damage to the components essential to the supplemental restraint system,
do not place luggage or other objects under the front seats.
Essential Safety Equipment
SRS Air Bags
2-55
CX-3_8JL1-EA-20G_Edition1_old 2020-5-22 15:31:00
Page 101 of 618

▼Rear Door Child Safety Locks
These locks are intended to help prevent
children from acciden
tally opening the
rear doors. Use them on both rear doors
whenever a child rides in the rear seat of
the vehicle.
If you slide the child safety lock to the
lock position before closing that door, the
door cannot be opened from the inside.
The door can only be opened by pulling
the outside handle.
Lock Unlock
Liftgate
WA R N I N G
Never allow a person to ride in the luggage
compartment:
Allowing a person to ride in the luggage
compartment is dangerous. The person in
the luggage compartment could be
seriously injured or
killed during sudden
braking or a collision.
Do not drive with the liftgate open:
Exhaust gas in the cabin of a vehicle is
dangerous. An open liftgate in a moving
vehicle will cause exhaust gas to be drawn
into the cabin. This gas contains CO
(carbon monoxide), which is colorless,
odorless, and highly poisonous, and it can
cause loss of consciousness and death.
Moreover, an open liftgate could cause
occupants to fall out in an accident.
Do not stack or leave loaded luggage
unsecured in the luggage compartment:
Otherwise, the luggage may move or
collapse, resulting in injury or an accident.
In addition, do not load luggage higher
than the seatbacks. It may affect the side or
rear field of view.
CAUTION
Before opening the liftgate, remove any
snow and ice accumulation on it.
Otherwise, the liftgate could close under
the weight of the snow and ice resulting
in injury.
Before Driving
Doors and Locks
3-19
CX-3_8JL1-EA-20G_Edition1_old 2020-5-22 15:31:00
Page 122 of 618

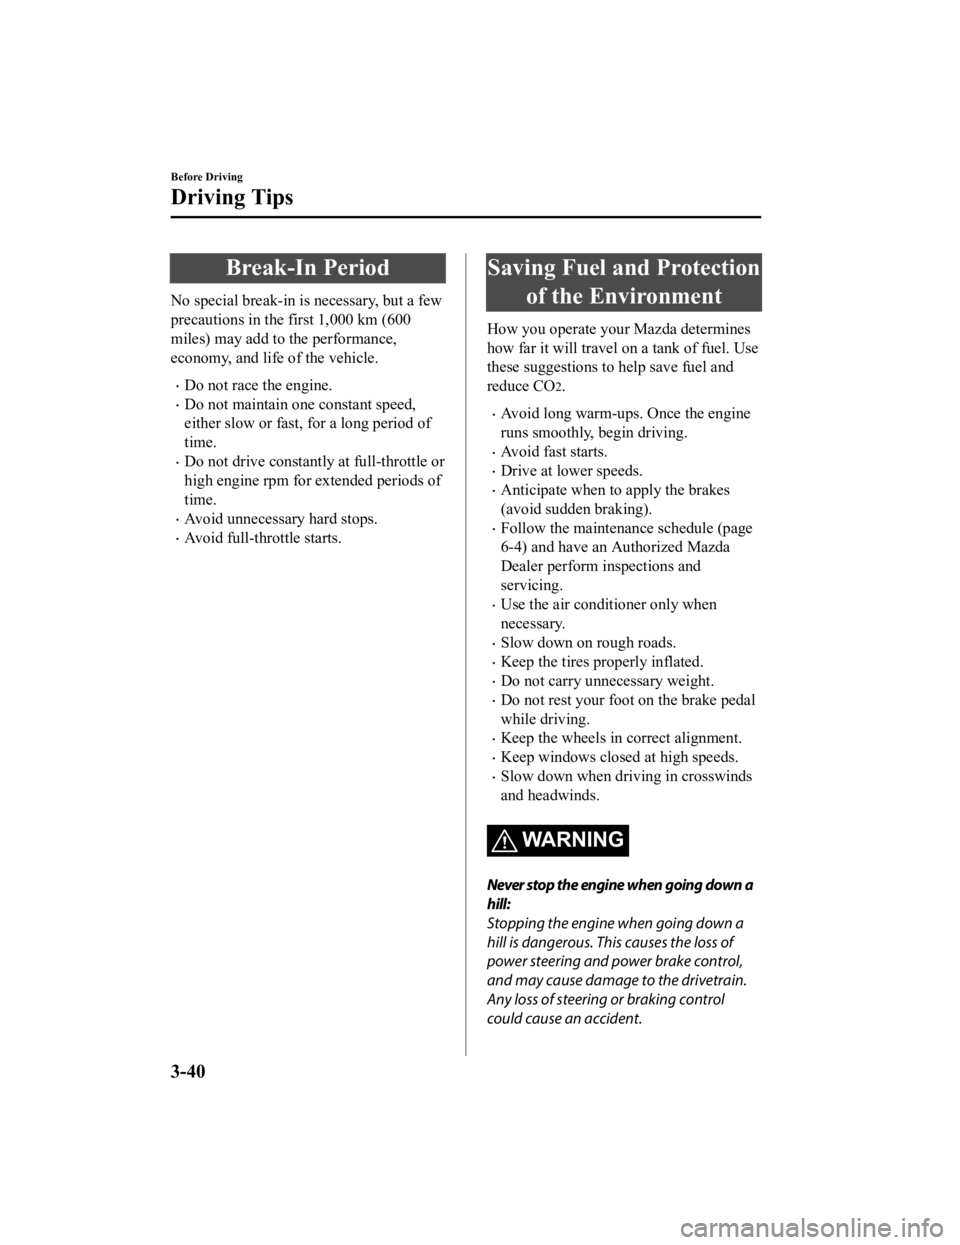
Break-In Period
No special break-in is necessary, but a few
precautions in the first 1,000 km (600
miles) may add to the performance,
economy, and life of the vehicle.
Do not race the engine.
Do not maintain one constant speed,
either slow or fast, for a long period of
time.
Do not drive constantly at full-throttle or
high engine rpm for extended periods of
time.
Avoid unnecessary hard stops.
Avoid full-throttle starts.
Saving Fuel and Protectionof the Environment
How you operate your Mazda determines
how far it will travel on a tank of fuel. Use
these suggestions to help save fuel and
reduce CO
2.
Avoid long warm-ups. Once the engine
runs smoothly, begin driving.
Avoid fast starts.
Drive at lower speeds.
Anticipate when to apply the brakes
(avoid sudden braking).
Follow the maintenance schedule (page
6-4) and have an Authorized Mazda
Dealer perform inspections and
servicing.
Use the air conditioner only when
necessary.
Slow down on rough roads.
Keep the tires properly inflated.
Do not carry unnecessary weight.
Do not rest your foot on the brake pedal
while driving.
Keep the wheels in correct alignment.
Keep windows closed at high speeds.
Slow down when driving in crosswinds
and headwinds.
WA R N I N G
Never stop the engine when going down a
hill:
Stopping the engine when going down a
hill is dangerous. This causes the loss of
power steering and power brake control,
and may cause damage to the drivetrain.
Any loss of steering or braking control
could cause an accident.
Before Driving
Driving Tips
3-40
CX-3_8JL1-EA-20G_Edition1_old 2020-5-22 15:31:00
Page 127 of 618

Overloading
WARNING
Be careful not to overload your vehicle:
The gross axle weight rating (GAWR) and
the gross vehicle weight rating (GVWR) of
the vehicle are on the Motor Vehicle Safety
Standard Label on the driver's door frame.
Exceeding these ratings can cause an
accident or vehicle damage. You can
estimate the weight of the load by
weighing the items (or people) before
putting them in the vehicle.
Before Driving
Driving Tips
3-45
CX-3_8JL1-EA-20G_Edition1_old2020-5-22 15:31:00
Page 169 of 618

Driving Tips
WARNING
Do not let the vehicle move in a direction
opposite to the direction selected by the
selector lever:
Do not let the vehicle move backward with
the selector lever in a forward position, or
do not let the vehicle move forward with
the selector lever in the reverse position.
Otherwise, the engine may stop, causing
the loss of the power brake and power
steering functions, and make it difficult to
control the vehicle which could result in an
accident.
Passing
For extra power when passing another
vehicle or climbing steep grades, depress
the accelerator fully. The transaxle will
shift to a lower gear, depending on vehicle
speed.
NOTE
(Some models)
The accelerator pedal may initially feel
heavy as it is being depressed, then feel
lighter as it is depressed further. This
change in pedal force aids the engine
control system in determining how much
the accelerator pedal has been
depressed for performing kickdown, and
functions to control whether or not
kickdown should be performed.
While the selector lever is in the M
position and the TCS is turned off,
manual shift mode does not switch to
automatic shift mode even if the
accelerator pedal is completely
depressed. Operate the selector lever.
Climbing steep grades from a stop
To climb a steep grade from a stopped
position:
1. Depress the brake pedal.
2. Shift to D or M1, depending on the load weight and grade steepness.
3. Release the brake pedal while gradually accelerating.
Descending steep grades
When descending a steep grade, shift to
lower gears, depending on load weight and
grade steepness. Descend slowly, using the
brakes only occasionally to prevent them
from overheating.
When Driving
Automatic Transaxle
4-39
CX-3_8JL1-EA-20G_Edition1_old 2020-5-22 15:31:00
Page 175 of 618

If no operations are done for 3 minutes
after the lever is pulled, the headlights
turn off.
The headlights turn off if the lever is
pulled again while the headlights are
illuminated.
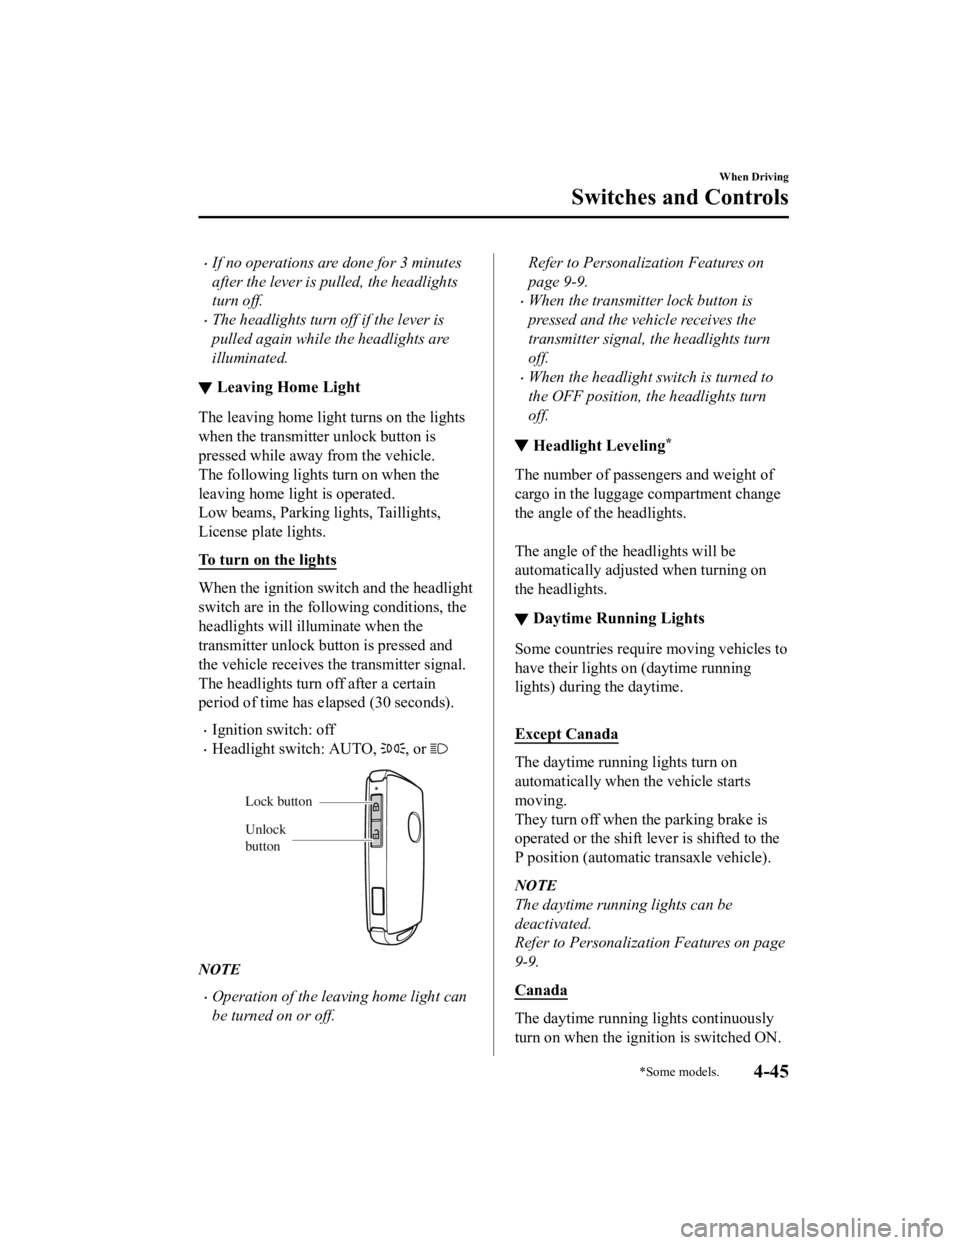
▼Leaving Home Light
The leaving home light turns on the lights
when the transmitter unlock button is
pressed while away from the vehicle.
The following lights turn on when the
leaving home light is operated.
Low beams, Parking
lights, Taillights,
License plate lights.
To turn on the lights
When the ignition switch and the headlight
switch are in the following conditions, the
headlights will illuminate when the
transmitter unlock button is pressed and
the vehicle receives the transmitter signal.
The headlights turn off after a certain
period of time has elapsed (30 seconds).
Ignition switch: off
Headlight switch: AUTO, , or
Unlock
button Lock button
NOTE
Operation of the leaving home light can
be turned on or off.
Refer to Personalization Features on
page 9-9.
When the transmitter lock button is
pressed and the vehicle receives the
transmitter signal, the headlights turn
off.
When the headlight switch is turned to
the OFF position, the headlights turn
off.
▼ Headlight Leveling*
The number of passengers and weight of
cargo in the luggage compartment change
the angle of the headlights.
The angle of the headlights will be
automatically adjusted when turning on
the headlights.
▼Daytime Running Lights
Some countries require moving vehicles to
have their lights on (daytime running
lights) during the daytime.
Except Canada
The daytime running lights turn on
automatically when the vehicle starts
moving.
They turn off when the parking brake is
operated or the shift lever is shifted to the
P position (automatic transaxle vehicle).
NOTE
The daytime running lights can be
deactivated.
Refer to Personalization Features on page
9-9.
Canada
The daytime running
lights continuously
turn on when the ign ition is switched ON.
When Driving
Switches and Controls
*Some models.4-45
CX-3_8JL1-EA-20G_Edition1_old 2020-5-22 15:31:00
Page 279 of 618

NOTE
If the parking space has division lines, straighten the wheels when the vehicle width
guide lines are parallel to them.
Because there may be a difference between the displayed image, such as indicated
below, and the actual conditions when parking, always verify the safety at the rear of
the vehicle and the surrounding area directly with your eyes.
In the image of the parking space (or garage) displayed on the screen, the back end
and distance guide lines may appear aligned in the monitor, but they may not
actually be aligned on the ground.
When parking in a space with a division li ne on only one side of the parking space,
the division line and the vehicle width guide line appear aligned in the monitor, but
they may not actually be aligned on the ground.
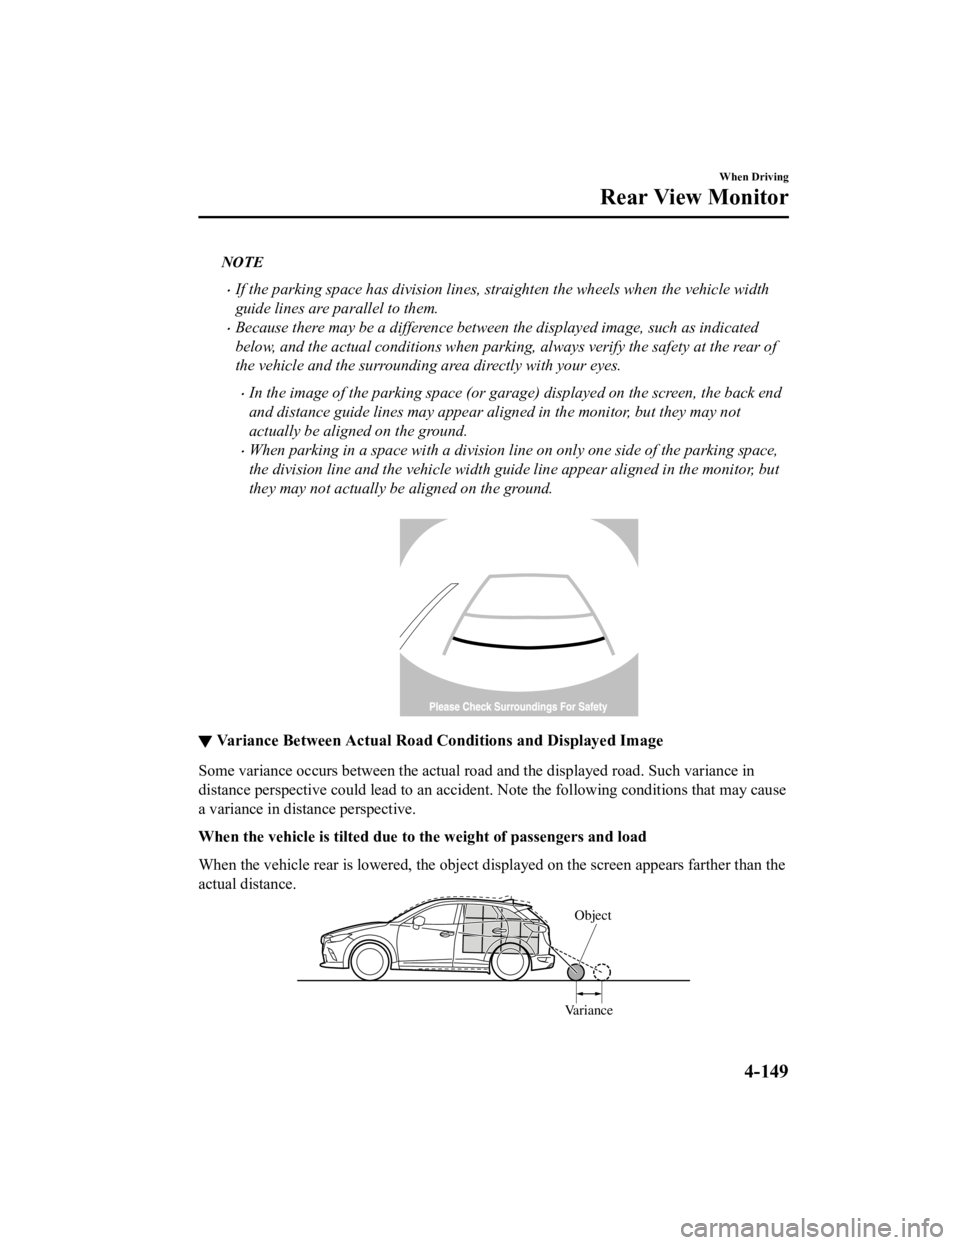
▼ Variance Between Actual Road Conditions and Displayed Image
Some variance occurs between the actual road
and the displayed road. Such variance in
distance perspective could lead to an accident. Note the following conditions that may cause
a variance in distance perspective.
When the vehicle is tilted due to the weight of passengers and load
When the vehicle rear is lowered, the object displayed on the screen appears farther than the
actual distance.
Variance Object
When Driving
Rear View Monitor
4-149
CX-3_8JL1-EA-20G_Edition1_old
2020-5-22 15:31:00
Page 452 of 618

2. Lift the hood, grasp the padded area onthe support rod, and secure the support
rod in the clip. Verify that the support
rod is secured in the clip before closing
the hood.
Clip
Clip
Clip
3. Lower the hood slowly to a height of
about 20 cm (7.9 in) above its closed
position and then let it drop.
CAUTION
When closing the hood, do not push it
excessively such as by applying your
weight. Otherwise, the hood could be
deformed.
Maintenance and Care
Owner Maintenance
6-20
CX-3_8JL1-EA-20G_Edition1_old 2020-5-22 15:31:00