ignition MAZDA MODEL CX-30 2019 (in English) Owner's Manual
[x] Cancel search | Manufacturer: MAZDA, Model Year: 2019, Model line: MODEL CX-30, Model: MAZDA MODEL CX-30 2019Pages: 683, PDF Size: 15.21 MB
Page 101 of 683

▼Auto Lock/Unlock Function
WARNING
Do not pull the inner handle on a
front door:
Pulling the inner handle on a front
door while the vehicle is moving is
dangerous. Passengers can fall out of
the vehicle if the door opens
accidentally , which could result in
death or serious injury.
�xWhen the vehicle speed exceeds 20
km/h (12 mph), all the doors,
fuel-filler flap, and liftgate lock
automatically.
�xWhen the ignition is switched off, all
the doors, fuel-filler flap, and liftgate
unlock automatically.
The auto lock/unlock function settings
can be changed.
Refer to the Settings section in the
Mazda Connect Owner's Manual.
▼Locking , Unlocking with
Door-Lock Knob
Operation from inside
To lock any door from the inside, press
the door-lock knob.
To unlock, pull it outward.
This does not operate the other door
locks.
1. Unlocked: Red indicator
2. Lock
3. Unlock
Operation from outside
To lock any door using its door-lock
knob from the outside, press the
door-lock knob to the lock position
and close the door (holding the door
handle in the open position is not
required).
This does not operate the other door
locks.
NOTE
When locking the door this way:
�xBe careful not to leave the key inside
the vehicle.
�xThe doors cannot be locked using
the driver's door lock knob if any
door or liftgate is open when the
ignition is switched to ACC or ON.
Before Driving
Doors and Locks
3-19
Page 106 of 683
Operation using the transmitter
When the power liftgate button on the
transmitter is pressed and held for
about 1 second or longer with all of
the following conditions met, the
hazard warning lights flash 2 times, a
beep sound is activated, and the
liftgate automatically opens/closes
fully.
�xThe ignition is switched OFF.�xThe vehicle is stopped.
Refer to Transmitter on page 3-5.
NOTE
�xWhen opening the liftgate by
pressing the power liftgate button on
the transmitter, the liftgate can be
opened even when it is locked.
�xIf the power liftgate button on the
transmitter is pressed while the
liftgate is opening/closing
electrically, the beep is activated and
the liftgate stops. When pressing the
power liftgate button again, the
liftgate moves in the reverse
direction.
Operation using switch only for
power liftgate
Operation conditions
Opening the liftgate
If the vehicle has satisfied all the
following operation conditions, the
power liftgate can be opened using the
power function.
�xAll doors and the liftgate are
unlocked.
�xThe vehicle is stopped.�x(Manual transmission)
The ignition is switched to a position
other than ON, or when the parking
brake is applied with the shift lever in
N and the ignition switched ON.
�x(Automatic transmission)
The ignition is switched to a position
other than ON, or the selector lever
is in P with the ignition switched ON.
Closing the liftgate
�xThe vehicle is stopped.�x(Manual transmission)
The ignition is switched to a position
other than ON, or when the parking
brake is applied with the shift lever in
N and the ignition switched ON.
�x(Automatic transmission)
The ignition is switched to a position
other than ON, or the selector lever
is in P with the ignition switched ON.
NOTE
If the shift lever/selector lever is shifted
to another position and the vehicle is
moved while the liftgate is opening/
closing automatically, the liftgate
operates as follows:
�xWhen the liftgate is opening
A beep sound is activated, and the
liftgate moves in the reverse
direction automatically and closes.
�xWhen the liftgate is closing
A beep sound is activated, but the
liftgate continues to close.
Operation from the driver's seat (To
open/close)
Press the power liftgate switch for
about 1 second or longer while the
liftgate is in the fully closed/open
position. The hazard warning lights
Before Driving
Doors and Locks
3-24
Page 114 of 683
▼Emission Control System
(SKYACTIV-G 2.0, SKYACTIV-G
2.5, SKYACTIV-X 2.0)
This vehicle is equipped with an
emission control system (the catalytic
converter is part of this system) that
enables the vehicle to comply with
existing exhaust emissions
requirements.
WARNING
Never park over or near anything
flammable:
Parking over or near anything
flammable, such as dry grass, is
dangerous. Even with the engine
turned
off, the exhaust system remains
very hot after normal use and could
ignite anything
flammable. A resulting
fire could cause serious injury or death.
CAUTION
Ignoring the following precautions
could cause lead to accumulate on the
catalyst inside the converter or cause
the converter to get very hot. Either
condition will damage the converter
and cause poor performance.
�¾USE ONLY UNLEADED FUEL.
�¾Do not drive your Mazda with any
sign of engine malfunction.
�¾Do not coast with the ignition
switched off.
�¾Do not descend steep grades in gear
with the ignition switched off.
�¾Do not operate the engine at high
idle for more than 2 minutes.
�¾Do not tamper with the emission
control system. All inspections and
adjustments must be made by a
qualified technician.
�¾Do not push-start or pull-start this
vehicle.
▼Emission Control System
(SKYACTIV-D 1.8)
This vehicle is equipped with an
emission control system (the catalytic
converter is part of this system) that
enables the vehicle to comply with
existing exhaust emissions
requirements.
WARNING
Never park over or near anything
flammable:
Parking over or near anything
flammable, such as dry grass, is
dangerous. Even with the engine
turned
off, the exhaust system remains
very hot after normal use and could
ignite anything
flammable. A resulting
fire could cause serious injury or death.
CAUTION
Ignoring the following precautions
could cause lead to accumulate on the
catalyst inside the converter or cause
the converter to get very hot. Either
condition will damage the converter
and cause poor performance.
�¾Do not drive your Mazda with any
sign of engine malfunction.
�¾Do not coast with the ignition
switched off.
�¾Do not descend steep grades in gear
with the ignition switched off.
�¾Do not operate the engine at high
idle for more than 2 minutes.
�¾Do not tamper with the emission
control system. All inspections and
adjustments must be made by a
qualified technician.
�¾Do not push-start or pull-start this
vehicle.
Before Driving
Fuel and Emission
3-32
Page 116 of 683
Fuel-Filler Flap and Cap
▼Fuel-Filler Flap and Cap
WARNING
When removing the fuel-filler cap,
loosen the cap slightly and wait for
any hissing to stop, then remove it:
Fuel spray is dangerous. Fuel can burn
skin and eyes and cause illness if
ingested. Fuel spray is released when
there is pressure in the fuel tank and
the fuel-filler cap is removed too
quickly.
Before refuelling, stop the engine,
and always keep sparks and flames
away from the filler neck:
Fuel vapour is dangerous. It could be
ignited by sparks or flames causing
serious burns and injuries.
Additionally, use of the incorrect
fuel-filler cap or not using a fuel-filler
cap may result in a fuel leak, which
could result in serious burns or death
in an accident.
Do not continue refuelling after the
fuel pump nozzle shuts off
automatically:
Continuing to add fuel after the fuel
pump nozzle has shut off automatically
is dangerous because
overfilling the
fuel tank may cause fuel overflow or
leakage. Fuel overflow and leakage
could damage the vehicle and if the
fuel ignites it could cause a fire and
explosion resulting in serious injury or
death.
CAUTION
�¾Always use only a designated Mazda
fuel-filler cap or an approved
equivalent, available at an expert
repairer (we recommend an
Authorised Mazda Repairer). The
wrong cap can result in a serious
malfunction of the fuel and emission
control systems.
�¾When using an automatic car wash
or a high water pressure car washer,
lock the driver's door. Otherwise,
the
fuel-filler
flap may open
unexpectedly and could be
damaged.
▼Refuelling
Before refuelling, close all the doors,
windows, and liftgate, and switch the
ignition OFF.
1. Using the following , unlock the
driver’s door.
�xTransmitter (page 3-16)�xTouch sensor (page 3-13)�xDoor-lock switch (page 3-16)�xAuto lock/unlock function (page
3-19)
NOTE
�xWhen the driver's door is locked/
unlocked, the fuel flap is also
locked/unlocked at the same
time.
�xThe time until the fuel flap is
locked after locking the driver's
door can be changed.
Refer to the Settings section in
the Mazda Connect Owner's
Manual.
�xHowever, if you change the time
until the fuel flap is locked,
locking of the fuel flap using the
following functions is not
applicable.
Before Driving
Fuel and Emission
3-34
Page 118 of 683

Mirrors
▼Mirrors
Before driving , adjust the inside and
outside mirrors.
▼Outside Mirrors
WARNING
Be sure to look over your shoulder
before changing lanes:
Changing lanes without taking into
account the actual distance of the
vehicle in the convex mirror is
dangerous. You could have a serious
accident. What you see in the convex
mirror is closer than it appears.
NOTE
(Driver's Side Wide Angle Mirror*)
�xThe wide angle mirror has 2
curvatures on its surface separated by
a region line into outer and inner
regions. The inner region is a
standard convex mirror whereas the
outer region allows for a wider range
of visibility within the same sweep.
This combination allows for better
assurance when making lane
changes.
1. Region line
�xThe perceived distance of objects in
the outer and inner regions of the
wide angle mirror is different.
Objects appearing in the outer
region are actually further away than
they are in the inner region.
Power mirror adjustment
The ignition must be switched to ACC
or ON position.
To adjust:
1. Press the select switch for the
outside mirror to be adjusted to
turn on the indicator light.
2. Press the adjustment switch to
adjust the angle of the outside
mirror.
1. Indicator light
2. Select switch
3. Adjustment switch
After adjusting the angle of the outside
mirror, press the select switch for the
outside mirror to be adjusted to turn
off the indicator light.
Before Driving
Mirrors
3-36*Some models.
Page 119 of 683

NOTE
(With driving position memory
function)
The on-road outside mirror position
can be programmed in conjunction
with the driving position memory
function.
Refer to Driving Position Memory on
page 2-10.
Power mirrors with reverse tilt down
function*
The outside mirrors tilt downward to
facilitate the view of the lower area on
each side of the vehicle.
1. Switch the ignition ON.
2. Press the select switch for the
outside mirror to be tilted
downward to turn on the indicator
light of the select switch.
3. Shift the shift lever/selector lever to
the R position to tilt the outer
mirror on the side where the select
button was pressed downward.
NOTE
When any of the following condition is
met, the outer mirrors return to their
normal positions.
�xThe ignition is switched to a position
other than ON.
�xThe shift lever/selector lever is
shifted to a position other than R.
�xThe select switch is pressed again.
Folding outside mirror
WARNING
Always return the outside mirrors to
the driving position before you start
driving:
Driving with the outside mirrors folded
in is dangerous. Your rear view will be
restricted, and you could have an
accident.
Manual folding outside mirror
Fold the outside mirror rearward until
it is flush with the vehicle.
Power folding outside mirror
WARNING
Do not touch a power folding outside
mirror while it is moving:
Touching the power folding outside
mirror when it is moving is dangerous.
Your hand could be pinched and
injured or the mirror could be
damaged.
Use the switch to set the mirror to the
on-road position:
Setting the power folding outside
mirror to the on-road position by hand
is dangerous. The mirror will not lock
in position and will prevent effective
rearview visibility.
Before Driving
Mirrors
*Some models.3-37
Page 120 of 683
Only operate the power folding
outside mirror with the vehicle safely
parked:
Operating the power folding outside
mirror while the vehicle is moving is
dangerous. Wind blast on the mirror
will cause them to collapse and you
will be unable to return it to the
on-road position, preventing rearview
visibility.
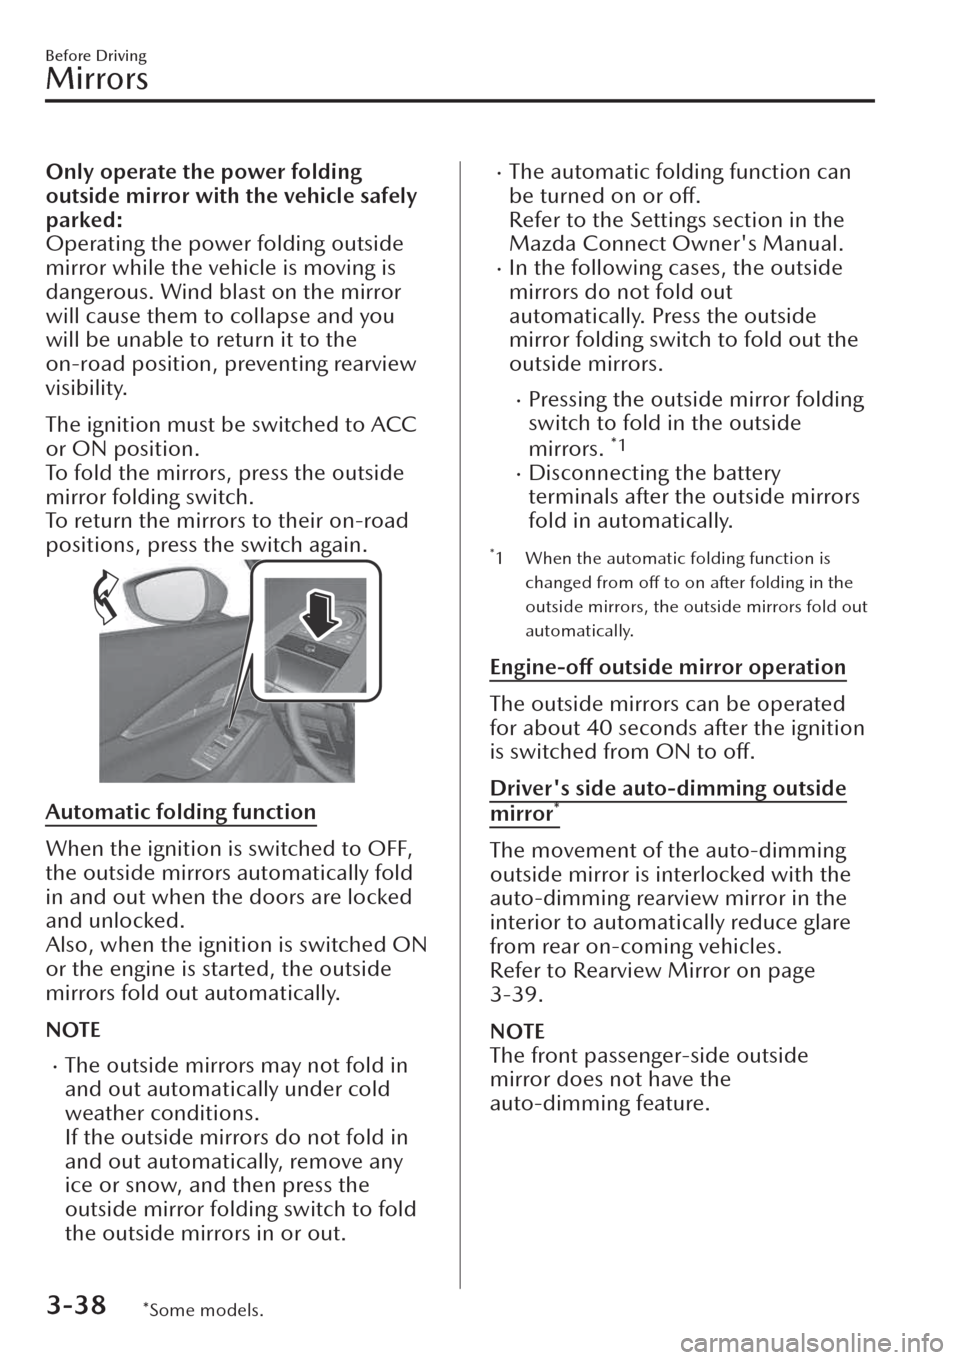
The ignition must be switched to ACC
or ON position.
To fold the mirrors, press the outside
mirror folding switch.
To return the mirrors to their on-road
positions, press the switch again.
Automatic folding function
When the ignition is switched to OFF,
the outside mirrors automatically fold
in and out when the doors are locked
and unlocked.
Also, when the ignition is switched ON
or the engine is started, the outside
mirrors fold out automatically.
NOTE
�xThe outside mirrors may not fold in
and out automatically under cold
weather conditions.
If the outside mirrors do not fold in
and out automatically, remove any
ice or snow, and then press the
outside mirror folding switch to fold
the outside mirrors in or out.
�xThe automatic folding function can
be turned on or off.
Refer to the Settings section in the
Mazda Connect Owner's Manual.
�xIn the following cases, the outside
mirrors do not fold out
automatically. Press the outside
mirror folding switch to fold out the
outside mirrors.
�xPressing the outside mirror folding
switch to fold in the outside
mirrors.
*1
�xDisconnecting the battery
terminals after the outside mirrors
fold in automatically.
*1 When the automatic folding function is
changed from off to on after folding in the
outside mirrors, the outside mirrors fold out
automatically.
Engine-off outside mirror operation
The outside mirrors can be operated
for about 40 seconds after the ignition
is switched from ON to off.
Driver's side auto-dimming outside
mirror*
The movement of the auto-dimming
outside mirror is interlocked with the
auto-dimming rearview mirror in the
interior to automatically reduce glare
from rear on-coming vehicles.
Refer to Rearview Mirror on page
3-39.
NOTE
The front passenger-side outside
mirror does not have the
auto-dimming feature.
Before Driving
Mirrors
3-38*Some models.
Page 121 of 683
▼Rearview Mirror
WARNING
Do not stack cargo or objects higher
than the seatbacks:
Cargo stacked higher than the
seatbacks is dangerous. It can block
your view in the rearview mirror, which
might cause you to hit another car
when changing lanes.
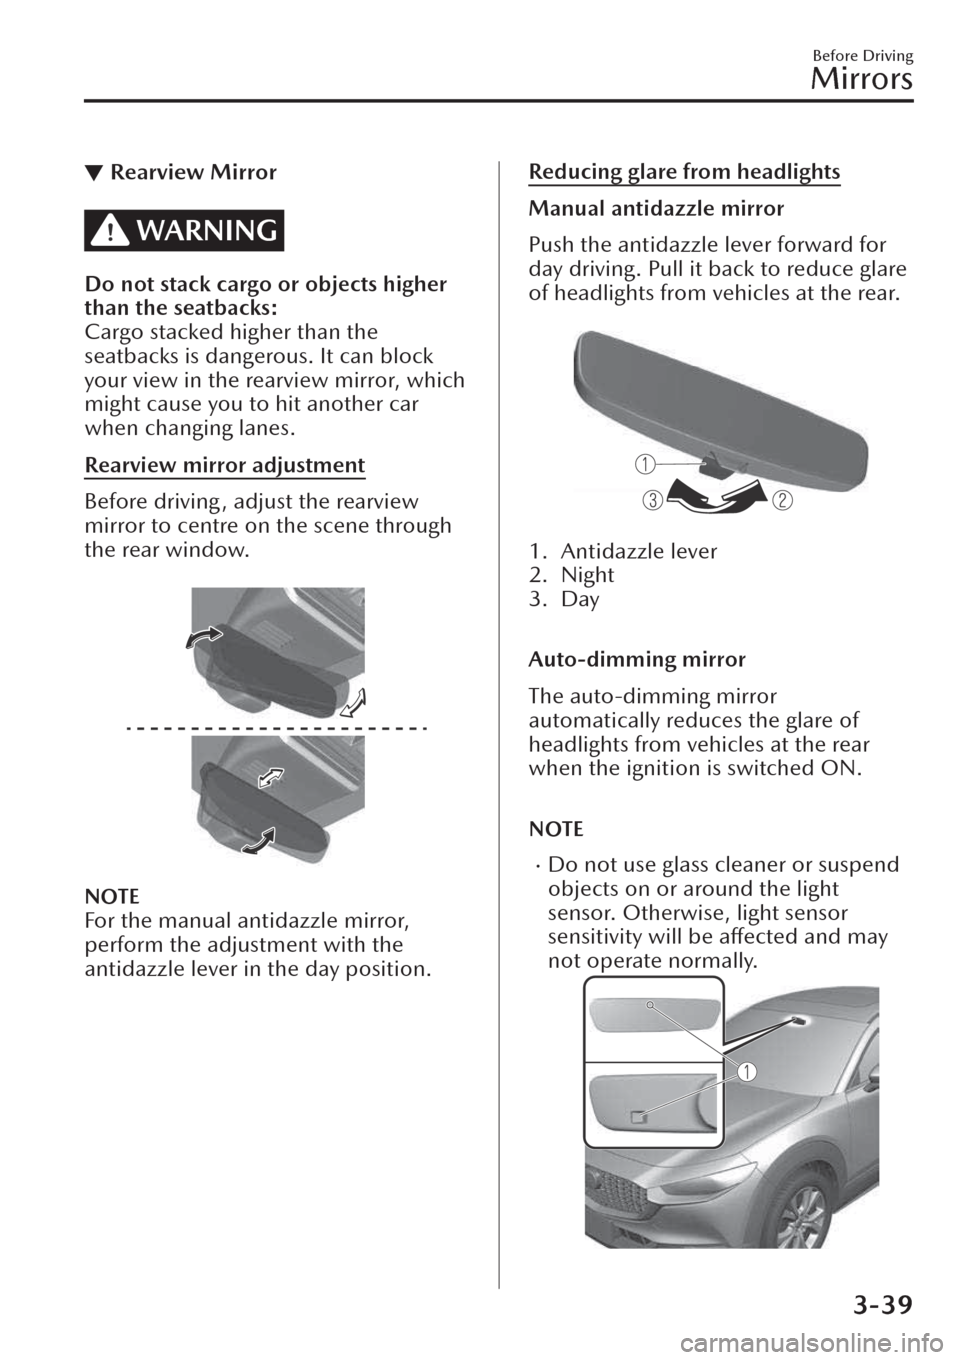
Rearview mirror adjustment
Before driving, adjust the rearview
mirror to centre on the scene through
the rear window.
NOTE
For the manual antidazzle mirror,
perform the adjustment with the
antidazzle lever in the day position.
Reducing glare from headlights
Manual antidazzle mirror
Push the antidazzle lever forward for
day driving. Pull it back to reduce glare
of headlights from vehicles at the rear.
1. Antidazzle lever
2. Night
3. Day
Auto-dimming mirror
The auto-dimming mirror
automatically reduces the glare of
headlights from vehicles at the rear
when the ignition is switched ON.
NOTE
�xDo not use glass cleaner or suspend
objects on or around the light
sensor. Otherwise, light sensor
sensitivity will be affected and may
not operate normally.
Before Driving
Mirrors
3-39
Page 122 of 683

1. Light sensor
�xThe auto-dimming function is
cancelled when the ignition is
switched ON and the shift lever/
selector lever is in the R position.
Before Driving
Mirrors
3-40
Page 123 of 683
Powe r Wi n d ow s
▼Power Windows
The windows can be opened/closed
by operating the power window
switches.
WARNING
Make sure the opening is clear before
closing a window:
Closing a power window is dangerous.
A person's hands, head, or even neck
could be caught by the window and
result in serious injury or even death.
This warning applies especially to
children.
Never allow children to play with
power window switches:
Power window switches that are not
locked with the power window lock
switch would allow children to operate
power windows unintentionally, which
could result in serious injury if a child's
hands, head or neck becomes caught
by the window.
Make sure nothing blocks the window
just before it reaches the fully closed
position or while fully holding up the
power window switch:
Blocking the power window just before
it reaches the fully closed position or
while fully holding up the power
window switch is dangerous.
In this case, the jam-safe function may
not prevent the window from closing
all the way. If
fingers are caught,
serious injuries could occur.
Do not let a child put a hand or head
out of the window while driving the
vehicle:
If the person's hand or head hits
something outside the vehicle, or
sudden braking is applied, it could
result in serious injury or death.
NOTE
When driving with only 1 of the rear
windows open, your ears might
experience a resonating sound.
However, this does not indicate a
problem. The sound can be reduced
by slightly opening a front window or
by changing the size of the rear
window opening.
▼Opening/Closing Windows
The window opens while the switch is
pressed and it closes while the switch
is pulled up with the ignition switched
ON. Do not open or close 3 or more
windows at the same time.
The front passenger's window and rear
windows can be opened/closed when
the power window lock switch on the
driver's door is in the unlocked
position. Keep this switch in the locked
Before Driving
Windows
3-41