Program MAZDA MODEL CX-50 2023 Owners Manual
[x] Cancel search | Manufacturer: MAZDA, Model Year: 2023, Model line: MODEL CX-50, Model: MAZDA MODEL CX-50 2023Pages: 583, PDF Size: 85.63 MB
Page 27 of 583
2. Adjust the steering wheel height sothat the gauges can be viewed
easily.
3. Raise the lever to securely lock the steering wheel.
Adjusting the head restraint position
To prevent shock to the head and
neck, adjust the head restraints to their
correct positions.
Refer to Height Adjustment on page
2-15.
▼Driving Position Memory (Power
Seat)*
The desired driving position can be
called up after programming the
position.
The following driving positions can be
programmed.
Driver’s seat position (seat slide,
height adjustment, front edge of seat
bottom, seat recline)
Refer to Adjusting the Driver's Seat
on page 2-4.
Active driving display (display
position, brightness level, display
information)
Refer to Active
Driving Display on
page 4-35.
Outside mirror angle
Refer to Outside Mirrors on page
3-32.
A driving position can be programmed
to the following parts.
Position memory button
Transmitter used for vehicle
NOTE
Lumbar support adjustment cannot
be programmed.
Programming
1. Make sure the parking brake is on.
2. Make sure the selector lever is in the P position.
3. Switch the ignition ON.
4. Adjust the following parts to the desired conditions.
Driver's seatActive driving displayOutside mirrors
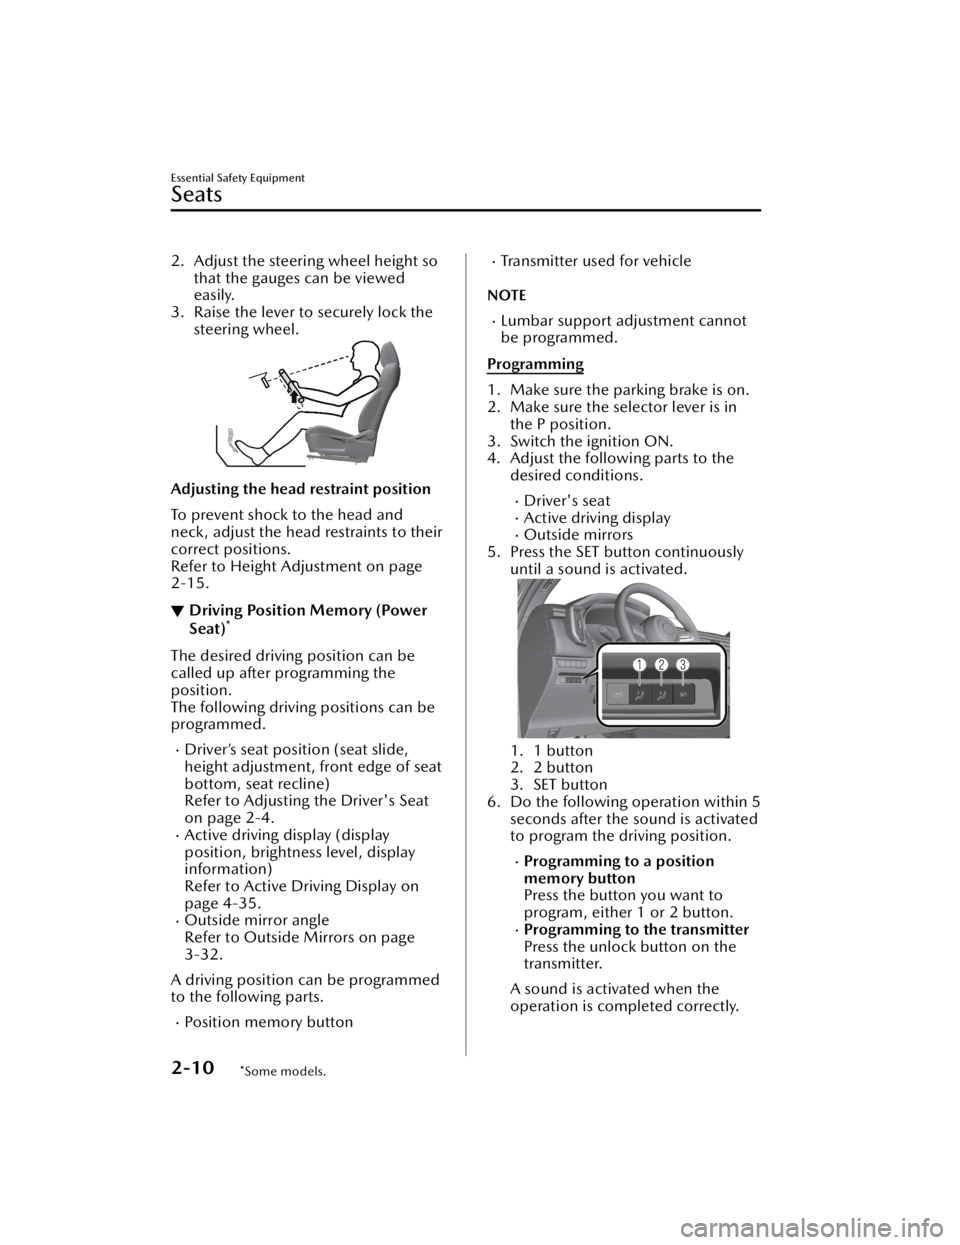
5. Press the SET button continuously until a sound is activated.
1. 1 button
2. 2 button
3. SET button
6. Do the following operation within 5 seconds after the sound is activated
to program the driving position.
Programming to a position
memory button
Press the button you want to
program, either 1 or 2 button.
Programming to the transmitter
Press the unlock button on the
transmitter.
A sound is activated when the
operation is completed correctly.
Essential Safety Equipment
Seats
2-10*Some models.
CX-50_8KB8-EA-22A_Edition2_new 2022-1-6 14:55:18
Page 28 of 583

NOTE
If you do not perform the operation
correctly, a sound indicating that the
programming has failed is activated.
If the angle of the outer mirrors only
changes a little, the angle of the
outer mirrors may not have been
programmed correctly.
If the angle of the outer mirrors is
adjusted close to the limits of its
range of motion, the driving position
can be successfully programmed, but
it may fail when calling up the
programmed driving position.
Calling up the programmed driving
position
CAUTION
Do not place fingers or hands around
the bottom of the seat while the seat
memory function is operating. The seat
moves automatically while the seat
memory function is operating and
fingers or hands could get pinched and
injured.
Using the position memory button
1. Make sure the parking brake is on.
2. Make sure the selector lever is in
the P position.
3. Switch the ignition ON.
4. Press the programming button for
the driving position you want to call
up (button 1 or 2).
5. A sound is activated when the adjustment to the programmed
driving position is completed.
NOTE
When adjustment of the driving
position is not necessary, a sound is
not activated.
The driving position adjustment is
canceled in the following cases:
The seat adjustment switch on the
driver's seat is operated.
The angle of the outer mirrors is
adjusted.
The SET button is pressed.Programming button 1 or 2 is
pressed.
The lock button or unlock button
on the transmitter is pressed.
The vehicle starts moving.The active driving display is
adjusted.
The selector lever is shifted to a
position other than P.
Using the transmitter
1. Unlock the driver's door using one of the following methods.
Touch the sensing area of the
door release touch sensor.
Press the unlock button on the
transmitter.
2. When you open the driver's door within 90 seconds after unlocking
the doors, the adjustment of the
following parts starts.
Driver's seatActive driving display (When the
ignition is switched ON, the
adjusted active driving display is
activated.)
Outside mirrors
A sound is activated when the
adjustment is completed.
Essential Safety Equipment
Seats
2-11
CX-50_8KB8-EA-22A_Edition2_new 2022-1-6 14:55:18
Page 29 of 583
NOTE
When adjustment of the driving
position is not necessary, a sound is
not activated.
The driving position adjustment is
canceled in the following cases:
The seat adjustment switch on the
driver's seat is operated.
The angle of the outer mirrors is
adjusted.
The SET button is pressed.Programming button 1 or 2 is
pressed.
The lock button or unlock button
on the transmitter is pressed.
The vehicle starts moving.The active driving display is
adjusted.
The selector lever is shifted to a
position other than P.
Erasing programmed driving positions
Erasing the driving positions
programmed to the key
1. Switch the ignition OFF.
2. Press the SET button continuously until a sound is activated.
3. Press the lock button on the transmitter within 5 seconds after
the sound is activated.
NOTE
If you do not perform the operation
correctly, a sound indicating that the
programming has failed is activated.
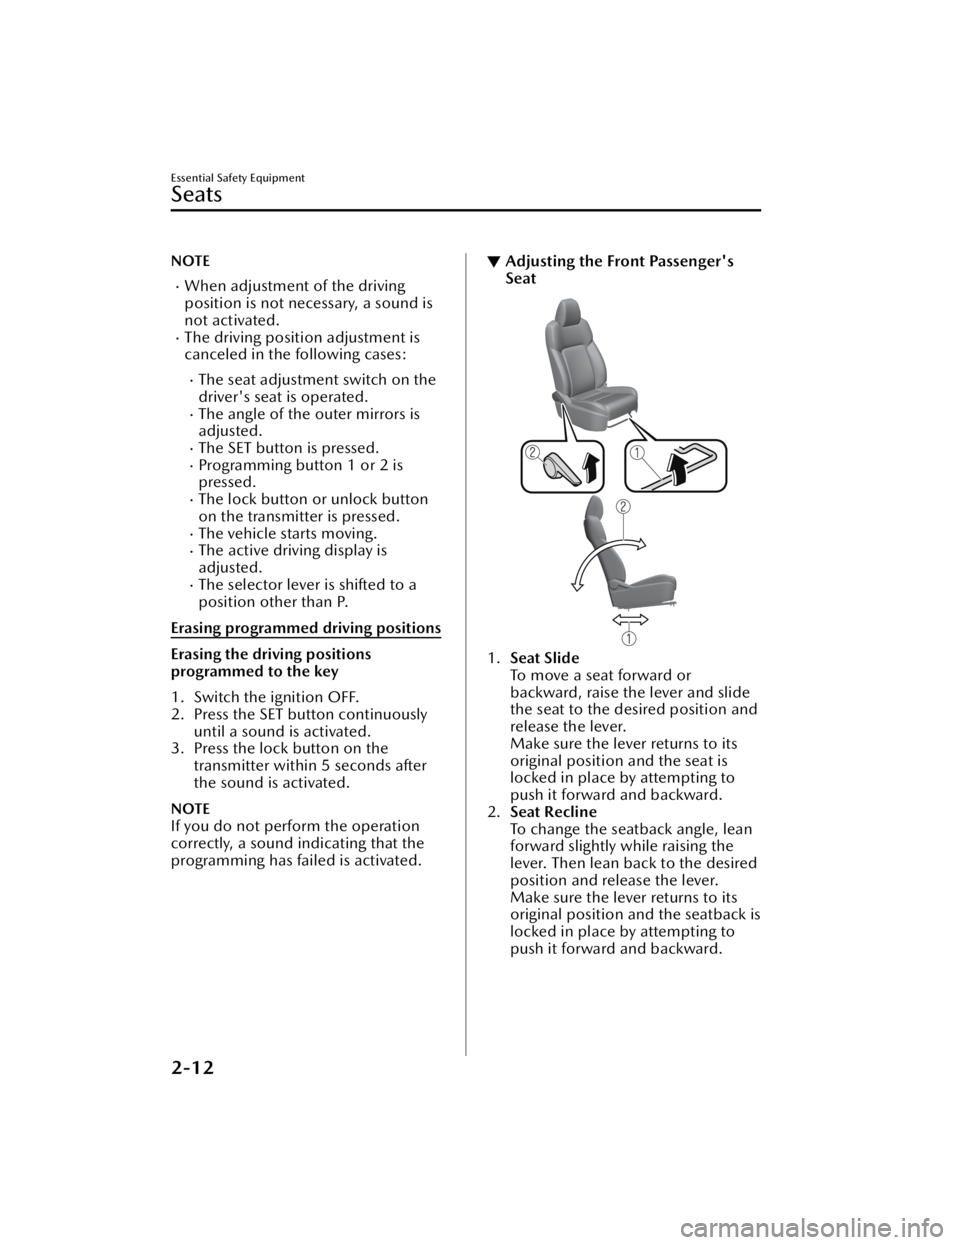
▼Adjusting the Front Passenger's
Seat
1.
Seat Slide
To move a seat forward or
backward, raise the lever and slide
the seat to the desired position and
release the lever.
Make sure the lever returns to its
original position and the seat is
locked in place by attempting to
push it forward and backward.
2. Seat Recline
To change the seatback angle, lean
forward slightly while raising the
lever. Then lean back to the desired
position and release the lever.
Make sure the lever returns to its
original position and the seatback is
locked in place by attempting to
push it forward and backward.
Essential Safety Equipment
Seats
2-12
CX-50_8KB8-EA-22A_Edition2_new 2022-1-6 14:55:18
Page 122 of 583

NOTE
(With driving position memory
function)
The on-road outside mirror position
can be programmed in conjunction
with the driving position memory
function.
Refer to Driving Position Memory on
page 2-10.
Power mirrors with reverse tilt down
function*
The outside mirrors tilt downward to
facilitate the view of the lower area on
each side of the vehicle.
1. Switch the ignition ON.
2. Press the select switch for theoutside mirror to be tilted
downward to turn on the indicator
light of the select switch.
3. Shift the shift lever/selector lever to the R position to tilt the outer
mirror on the side where the select
button was pressed downward.
NOTE
When any of the following condition is
met, the outer mirrors return to their
normal positions.
The ignition is switched to a position
other than ON.
The shift lever/selector lever is
shifted to a position other than R.
The select switch is pressed again.
Folding outside mirror
WARNING
Always return the outside mirrors to
the driving position before you start
driving:
Driving with the outside mirrors folded
in is dangerous. Your rear view will be
restricted, and you could have an
accident.
Manually fold the outside mirror
rearward until it is flush with the
vehicle.
Engine-off outside mirror operation
The outside mirrors can be operated
for about 40 seconds after the ignition
is switched from ON to off.
Driver's side auto-dimming outside
mirror*
The movement of the auto-dimming
outside mirror is interlocked with the
auto-dimming rearview mirror in the
interior to automatically reduce glare
from rear on-coming vehicles.
Refer to Rearview Mirror on page
3-34.
NOTE
The front passenger-side outside
mirror does not have the
auto-dimming feature.
Before Driving
Mirrors
*Some models.3-33
CX-50_8KB8-EA-22A_Edition2_new 2022-1-6 14:55:18
Page 132 of 583

NOTE
The keys carry a unique electronic
code. For this reason, and to assure
your safety, obtaining a replacement
key requires security validation, this
will add some delays in supplying a
replacement key. They are only
available through an Authorized
Mazda Dealer.
Always keep a spare key in case one
is lost. If a key is lost, consult an
Authorized Mazda Dealer as soon as
possible.
If you lose a key, an Authorized
Mazda Dealer will reset the
electronic codes of your remaining
keys and immobilizer system. Bring
all the remaining keys to an
Authorized Mazda Dealer to reset.
Starting the vehicle with a key that
has not been reset is not possible.
▼Operation
NOTE
The engine may not start and security
indicator light may illuminate or flash
if the key is placed in an area where
it is difficult for the system to detect
the signal, such as on the dashboard
or in the glove compartment. Move
the key to a location within the signal
range, switch the ignition
off, and
then restart the engine.
Signals from a TV or radio station, or
from a transceiver or mobile
telephone could interfere with your
immobilizer system. If you are using
the proper key and the engine fails to
start, check the security indicator
light.
Arming
The system is armed when the ignition
is switched from ON to off.
The security indicator light in the
instrument cluster flashes every 2
seconds until the system is disarmed.
Disarming
The system is disarmed when the
ignition is switched ON with the
correct programmed key. The security
indicator light illu minates for about 3
seconds and then turns off.
If the engine does not start with the
correct key, and the security indicator
light remains illuminated or flashing,
try the following:
Make sure the key is within the
operational range for signal
transmission. Switch the ignition off,
and then restart the engine. If the
engine does not start after 3 or more
tries, contact an Authorized Mazda
Dealer.
Before Driving
Security System
3-43
CX-50_8KB8-EA-22A_Edition2_new 2022-1-6 14:55:18
Page 187 of 583

Blind Spot Monitoring (BSM) Operation Conditions and Warnings*
Refer to Blind Spot Monitoring (BSM) on page 4-99.Traffic Sign Recognition System (TSR) traffic signs and Warnings*
Refer to Traffic Sign Recognition System (TSR) on page 4-104.Mazda Radar Cruise Control with Stop & Go function (MRCC with Stop & Go
function) Operation Conditions and Warnings*
Refer to Mazda Radar Cruise Control with Stop & Go function (MRCC with Stop
& Go function) on page 4-117.
Traffic Jam Assist (TJA) Operation Conditions and Warnings*
Refer to Traffic Jam Assist (TJA) on page 4-124.Lane-keep Assist System (LAS) Warnings*
Refer to Lane-keep Assist System (LAS) on page 4-137.Emergency Lane Keeping (ELK) Warnings*
Refer to Emergency Lane Keeping (ELK) on page 4-141.Smart Brake Support (SBS) Operation Conditions and Warnings
Refer to Smart Brake Support (SBS) on page 4-148.
Cruise Control Operation Conditions
Refer to Cruise Control on page 4-198.
Navigation Guidance (vehicles with navigation system)Intersection Name (vehicles with navigation system)Street name (vehicles with navigation system)Lane Guidance (vehicles with navigation system)Speed limit indicator (vehicles with navigation system)Vehicle Speed
The active driving display settin gs can be changed or adjusted.
Refer to the Settings section in the Mazda Connect Owner's Manual.
NOTE
The desired driving position (display position, brightness level, display
information) can be called up after programming the position.
Refer to Driving Position Memory on page 2-10.
The street name may not be displayed depending on the market and region.
When Driving
Instrument Cluster and Display
4-36*Some models.
CX-50_8KB8-EA-22A_Edition2_new 2022-1-6 14:55:18
Page 213 of 583
HomeLink WirelessControl System
*
▼ HomeLink Wireless Control
System
NOTE
HomeLink and HomeLink house are
registered trademarks of Gentex
Corporation.
The HomeLink system replaces up to 3
hand-held transmitters with a single
built-in component in the
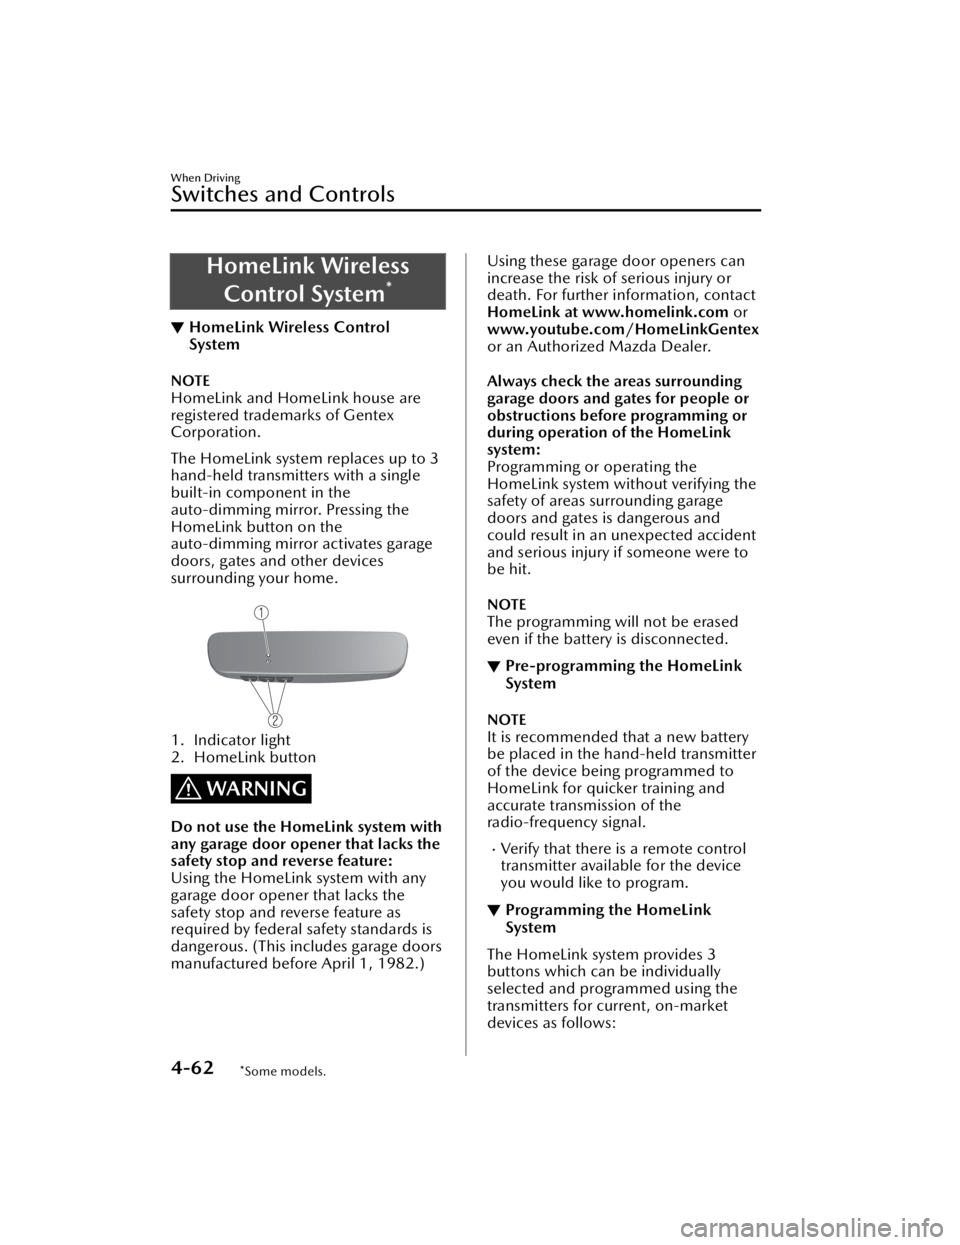
auto-dimming mirror. Pressing the
HomeLink button on the
auto-dimming mirror activates garage
doors, gates and other devices
surrounding your home.
1. Indicator light
2. HomeLink button
WARNING
Do not use the HomeLink system with
any garage door opener that lacks the
safety stop and reverse feature:
Using the HomeLink system with any
garage door opener that lacks the
safety stop and reverse feature as
required by federal safety standards is
dangerous. (This includes garage doors
manufactured before April 1, 1982.)
Using these garage door openers can
increase the risk of serious injury or
death. For further in
formation, contact
HomeLink at www.homelink.com or
www.youtube.com/HomeLinkGentex
or an Authorized Mazda Dealer.
Always check the areas surrounding
garage doors and gates for people or
obstructions before programming or
during operation of the HomeLink
system:
Programming or operating the
HomeLink system without verifying the
safety of areas surrounding garage
doors and gates is dangerous and
could result in an unexpected accident
and serious injury if someone were to
be hit.
NOTE
The programming will not be erased
even if the battery is disconnected.
▼ Pre-programming the HomeLink
System
NOTE
It is recommended that a new battery
be placed in the hand-held transmitter
of the device being programmed to
HomeLink for quicker training and
accurate transmission of the
radio-frequency signal.
Verify that there is a remote control
transmitter available for the device
you would like to program.
▼Programming the HomeLink
System
The HomeLink system provides 3
buttons which can be individually
selected and programmed using the
transmitters for current, on-market
devices as follows:
When Driving
Switches and Controls
4-62*Some models.
CX-50_8KB8-EA-22A_Edition2_new
2022-1-6 14:55:18
Page 214 of 583
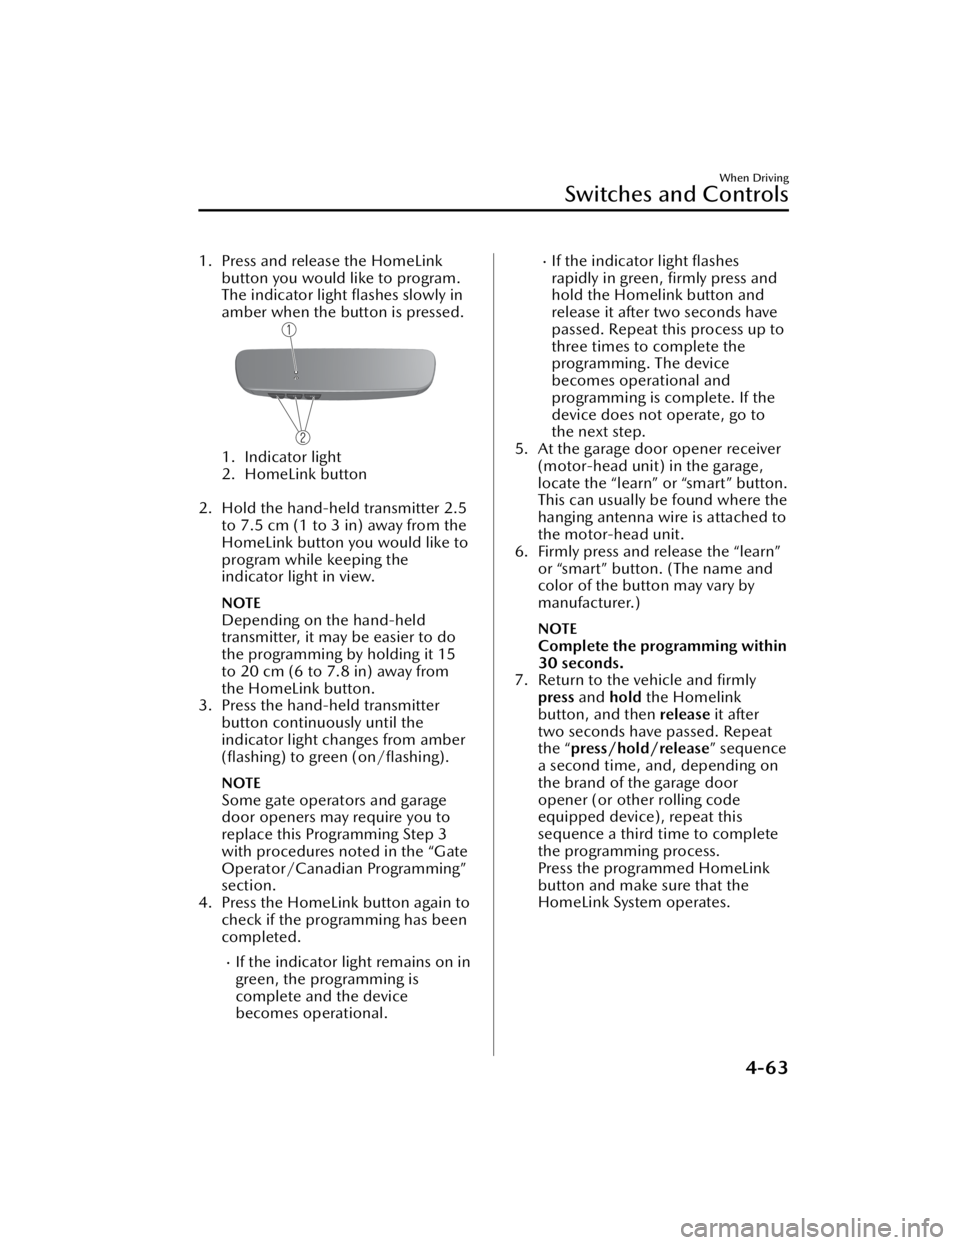
1. Press and release the HomeLinkbutton you would like to program.
The indicator light flashes slowly in
amber when the button is pressed.
1. Indicator light
2. HomeLink button
2. Hold the hand-held transmitter 2.5 to 7.5 cm (1 to 3 in) away from the
HomeLink button you would like to
program while keeping the
indicator light in view.
NOTE
Depending on the hand-held
transmitter, it may be easier to do
the programming by holding it 15
to 20 cm (6 to 7.8 in) away from
the HomeLink button.
3. Press the hand-held transmitter button continuously until the
indicator light changes from amber
(flashing) to green (on/flashing).
NOTE
Some gate operators and garage
door openers may require you to
replace this Programming Step 3
with procedures noted in the “Gate
Operator/Canadian Programming”
section.
4. Press the HomeLink button again to check if the programming has been
completed.
If the indicator light remains on in
green, the programming is
complete and the device
becomes operational.
If the indicator light flashes
rapidly in green, firmly press and
hold the Homelink button and
release it after two seconds have
passed. Repeat this process up to
three times to complete the
programming. The device
becomes operational and
programming is complete. If the
device does not operate, go to
the next step.
5. At the garage door opener receiver (motor-head unit) in the garage,
locate the “learn” or “smart” button.
This can usually be found where the
hanging antenna wire is attached to
the motor-head unit.
6. Firmly press and release the “learn” or “smart” button. (The name and
color of the button may vary by
manufacturer.)
NOTE
Complete the programming within
30 seconds.
7. Return to the vehicle and firmly press and hold the Homelink
button, and then release it after
two seconds have passed. Repeat
the “ press/hold/release ” sequence
a second time, and, depending on
the brand of the garage door
opener (or other rolling code
equipped device), repeat this
sequence a third time to complete
the programming process.
Press the programmed HomeLink
button and make sure that the
HomeLink System operates.
When Driving
Switches and Controls
4-63
CX-50_8KB8-EA-22A_Edition2_new 2022-1-6 14:55:18
Page 215 of 583

8. If the status indicator arrows areflashing , refer to Garage Door
Two-Way Communication.
1. Indicator light
NOTE
To program the remaining two
HomeLink buttons, go back to Step 1
of Programming the HomeLink System
and repeat the procedure.
For questions or comments, please
contact HomeLink at
www.homelink.com or
www.youtube.com/
HomeLinkGentex , or the HomeLink
toll-free hotline at 1-800-355-3515
(for calls placed outside of the USA,
Canada, and Puerto Rico, international
rates will apply and may differ based
on landline or mobile phone).
▼ Gate operator/Canadian
Programming
Canadian radio-frequency laws require
transmitter signals to “time-out” (or
quit) after several seconds of
transmission
― which may not be long
enough for HomeLink to pick up the
signal during programming. Similar to
this Canadian law, some U.S. gate
operators are designed to “time-out”
in the same manner.
If you live in Canada or are having
difficulties programming a gate
operator by using the programming
procedures (regardless of where you
live), replace Step 3 of Programming
the HomeLink System with the
following:
NOTE
If programming a garage door opener
or gate operator, it is advised to unplug
the device during the “cycling” process
to prevent possible overheating.
While the indicator light is flashing in
amber, press the button on the
hand-held transmitter for 2 seconds
and release it repeatedly until the
indicator light changes from amber to
green.
Go back to Step 4 of Programming the
HomeLink System to complete the
procedure.
▼ Operating the HomeLink System
Press the programmed HomeLink
button to operate a programmed
device.
▼Reprogramming the HomeLink
system
To program a device to HomeLink
using a HomeLink button previously
trained, follow these steps:
1. Press and hold the desired
HomeLink button. DO NOT release
the button.
2. After 20 seconds, the indicator light
flashes in amber. After the indicator
light flashes, release the HomeLink
button.
3. Go back to Step 2 of Programming the HomeLink System to complete
the procedure.
NOTE
If the programming has not been
completed, the system returns to the
previous programming.
When Driving
Switches and Controls
4-64
CX-50_8KB8-EA-22A_Edition2_new 2022-1-6 14:55:18
Page 216 of 583
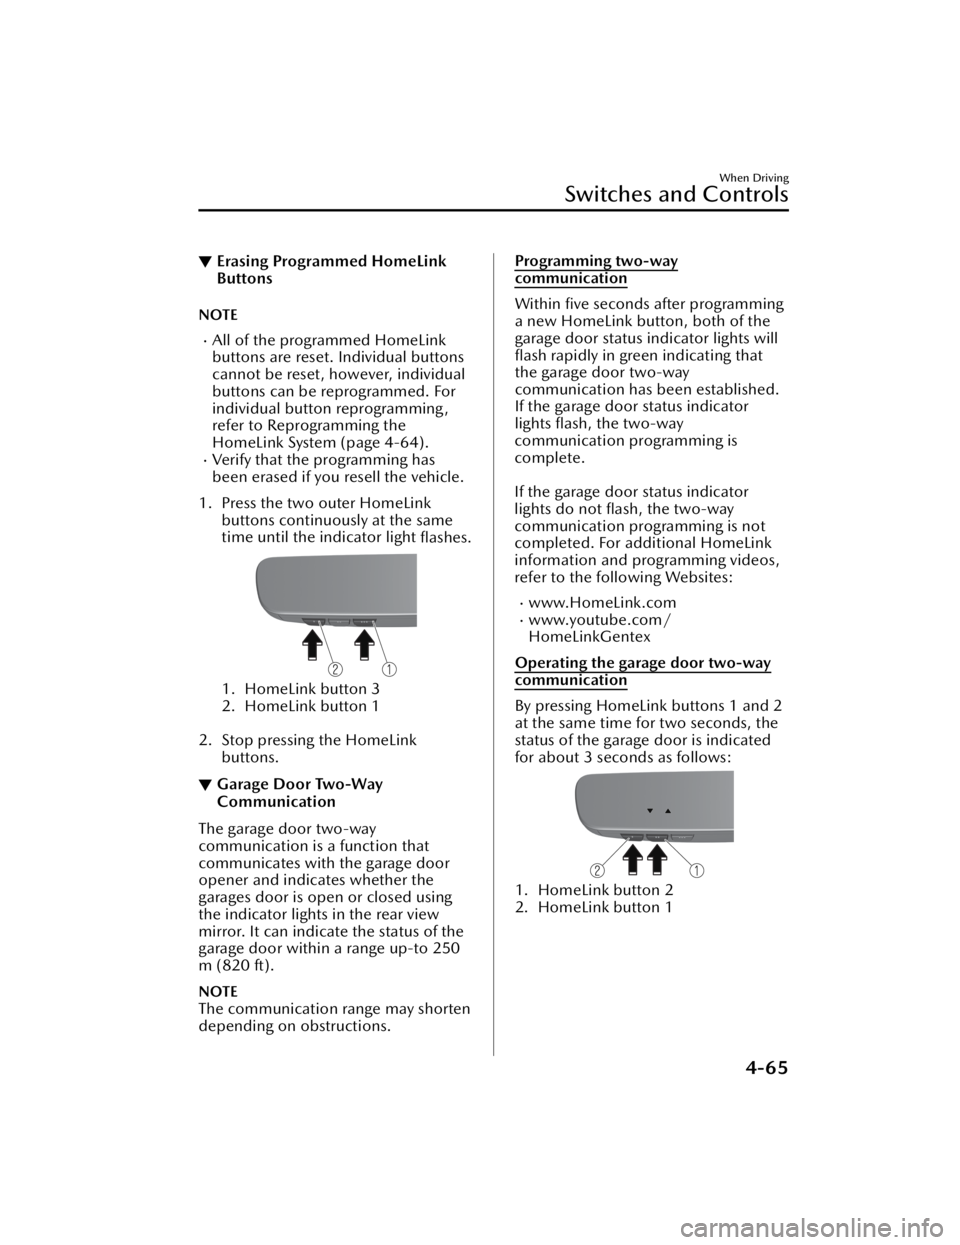
▼Erasing Programmed HomeLink
Buttons
NOTE
All of the programmed HomeLink
buttons are reset. Individual buttons
cannot be reset, however, individual
buttons can be reprogrammed. For
individual button reprogramming,
refer to Reprogramming the
HomeLink System (page 4-64).
Verify that the programming has
been erased if you resell the vehicle.
1. Press the two outer HomeLink buttons continuously at the same
time until the indicator light flashes.
1. HomeLink button 3
2. HomeLink button 1
2. Stop pressing the HomeLink buttons.
▼Garage Door Two-Way
Communication
The garage door two-way
communication is a function that
communicates with the garage door
opener and indicates whether the
garages door is open or closed using
the indicator lights in the rear view
mirror. It can indicate the status of the
garage door within a range up-to 250
m (820 ft).
NOTE
The communication range may shorten
depending on obstructions.
Programming two-way
communication
Within five seconds after programming
a new HomeLink button, both of the
garage door status indicator lights will
flash rapidly in green indicating that
the garage door two-way
communication has been established.
If the garage door status indicator
lights
flash, the two-way
communication programming is
complete.
If the garage door status indicator
lights do not flash, the two-way
communication programming is not
completed. For additional HomeLink
information and programming videos,
refer to the following Websites:
www.HomeLink.comwww.youtube.com/
HomeLinkGentex
Operating the garage door two-way
communication
By pressing HomeLink buttons 1 and 2
at the same time for two seconds, the
status of the garage door is indicated
for about 3 seco nds as follows:
1. HomeLink button 2
2. HomeLink button 1
When Driving
Switches and Controls
4-65
CX-50_8KB8-EA-22A_Edition2_new 2022-1-6 14:55:18