change time MAZDA MODEL CX-7 2010 (in English) Owner's Manual
[x] Cancel search | Manufacturer: MAZDA, Model Year: 2010, Model line: MODEL CX-7, Model: MAZDA MODEL CX-7 2010Pages: 510, PDF Size: 8.55 MB
Page 279 of 510

Black plate (279,1)
Highest category→Category all→
Lowest category
NOTE
While in“CATEGORY ALL”mode, all
channels covering a category can be accessed
(Category off condition).
Channel selection within a category
If category is not in“ALL”and the
channel number is displayed, turning the
manual tuning dial moves the channel
number up/down in the present category.
lTurn the manual tuning dial clockwise:
Channel Up
lTurn the manual tuning dial
counterclockwise: Channel Down
NOTE
The channel number needs to be indicated in
the display to use manual tuning dial for this
function.
Channel number, channel name,
category, artist, song titles and info
display
Each time the display button is pressed
during SIRIUS reception, the display of
the text data is changed over in the order
shown below.
Channel number Channel name
Category
name
Artist name
Info
Song title
NOTElEight characters are displayed on one
screen.
lTo display the rest of the characters of a
long title, press the text button (
).
The display scrolls the next eight
characters. Press the text button (
)
again after the last eight characters have
been displayed to return to the beginning of
the title.
(Channel number display)lWhen the display button is pressed
while in info display mode, the mode
changes to the channel number display
mode.
(Channel name display)
lWhen the display button is pressed
while in channel number display mode,
it changes to channel name display
mode.
lThere are short (eight fixed characters)
and long names for the channel name.
lThe long name is displayed first, and
three seconds later the short name is
displayed. If there is no short name, the
long name is displayed.
lTo display the rest of the characters of
the channel name, press the text button
(
). The display scrolls the next
eight characters. Press the text button
(
) again after the last eight
characters have been displayed to
return to the beginning of the title.
lPress the text button while the short
name is displayed to switch the display
to the long name.
lThree seconds after scrolling the long
name, the display automatically returns
to the first part of the long name. Three
more seconds and the short name
appears.
Interior Comfort
Audio System
6-39
CX-7_8AS7-EA-09E_Edition2 Page279
Friday, June 5 2009 2:26 PM
Form No.8AS7-EA-09E
Page 282 of 510

Black plate (282,1)
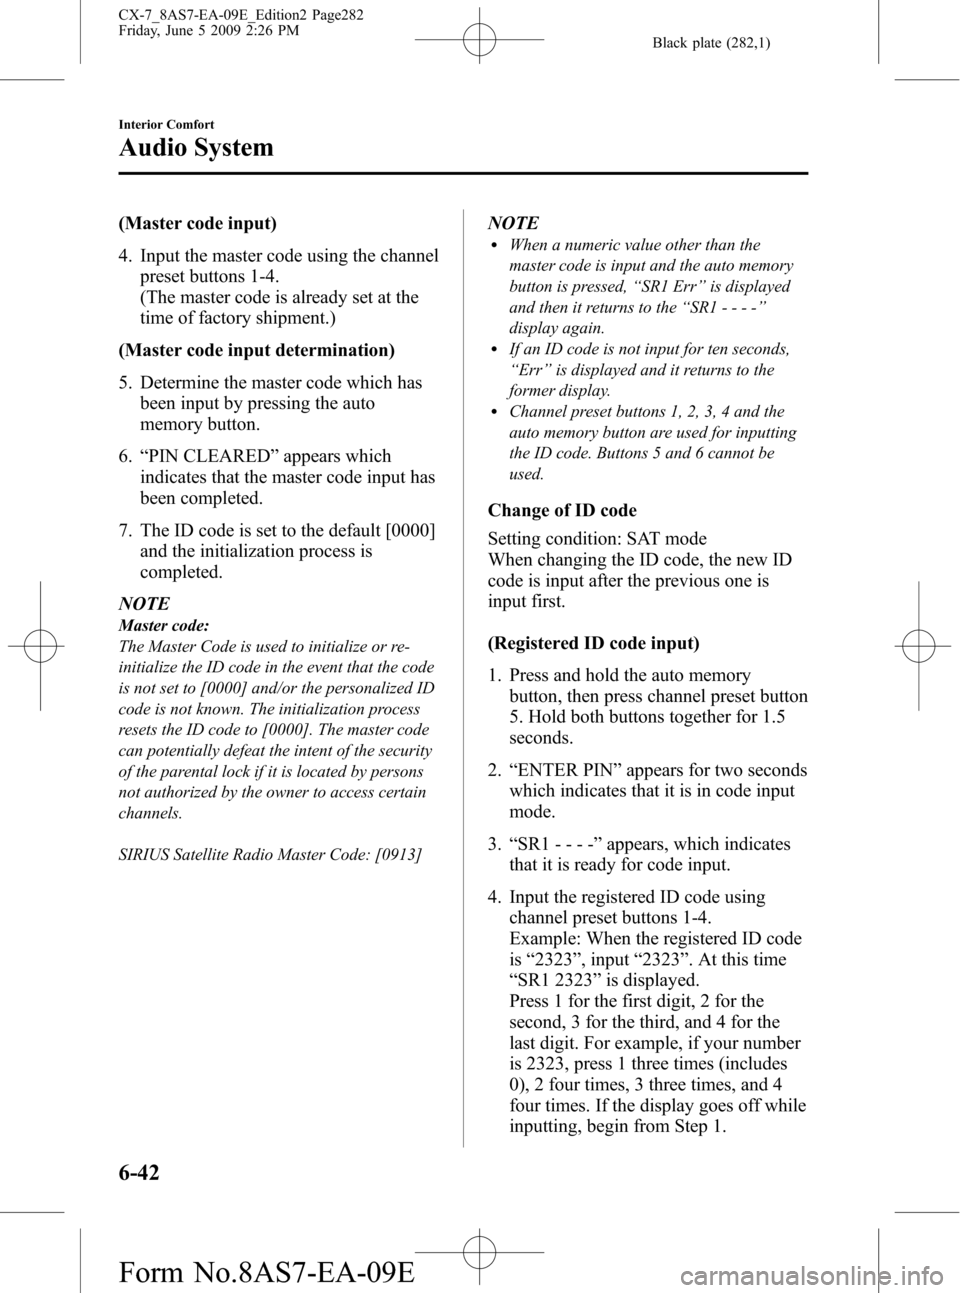
(Master code input)
4. Input the master code using the channel
preset buttons 1-4.
(The master code is already set at the
time of factory shipment.)
(Master code input determination)
5. Determine the master code which has
been input by pressing the auto
memory button.
6.“PIN CLEARED”appears which
indicates that the master code input has
been completed.
7. The ID code is set to the default [0000]
and the initialization process is
completed.
NOTE
Master code:
The Master Code is used to initialize or re-
initialize the ID code in the event that the code
is not set to [0000] and/or the personalized ID
code is not known. The initialization process
resets the ID code to [0000]. The master code
can potentially defeat the intent of the security
of the parental lock if it is located by persons
not authorized by the owner to access certain
channels.
SIRIUS Satellite Radio Master Code: [0913]
NOTElWhen a numeric value other than the
master code is input and the auto memory
button is pressed,“SR1 Err”is displayed
and then it returns to the“SR1----”
display again.
lIf an ID code is not input for ten seconds,
“Err”is displayed and it returns to the
former display.
lChannel preset buttons 1, 2, 3, 4 and the
auto memory button are used for inputting
the ID code. Buttons 5 and 6 cannot be
used.
Change of ID code
Setting condition: SAT mode
When changing the ID code, the new ID
code is input after the previous one is
input first.
(Registered ID code input)
1. Press and hold the auto memory
button, then press channel preset button
5. Hold both buttons together for 1.5
seconds.
2.“ENTER PIN”appears for two seconds
which indicates that it is in code input
mode.
3.“SR1 - - - -”appears, which indicates
that it is ready for code input.
4. Input the registered ID code using
channel preset buttons 1-4.
Example: When the registered ID code
is“2323”, input“2323”. At this time
“SR1 2323”is displayed.
Press 1 for the first digit, 2 for the
second, 3 for the third, and 4 for the
last digit. For example, if your number
is 2323, press 1 three times (includes
0), 2 four times, 3 three times, and 4
four times. If the display goes off while
inputting, begin from Step 1.
6-42
Interior Comfort
Audio System
CX-7_8AS7-EA-09E_Edition2 Page282
Friday, June 5 2009 2:26 PM
Form No.8AS7-EA-09E
Page 283 of 510
![MAZDA MODEL CX-7 2010 (in English) Owners Manual Black plate (283,1)
NOTE
The registered ID code is the default [0000] at
the time of factory shipment. If [0000] results
in“Err”on the display, go to the
“INITIALIZATION OF ID CODE”section to
MAZDA MODEL CX-7 2010 (in English) Owners Manual Black plate (283,1)
NOTE
The registered ID code is the default [0000] at
the time of factory shipment. If [0000] results
in“Err”on the display, go to the
“INITIALIZATION OF ID CODE”section to](/img/28/13897/w960_13897-282.png)
Black plate (283,1)
NOTE
The registered ID code is the default [0000] at
the time of factory shipment. If [0000] results
in“Err”on the display, go to the
“INITIALIZATION OF ID CODE”section to
reset to [0000].
(Verification with the registered ID
code)
5. Determine the input code by pressing
the auto memory button.
6. If it does not match with the previously
registered code,“SR1 Err”is displayed
and then it returns to“SR1 - - - -”.
7. If it matches with the previously
registered code,“ENTER PIN”appears
again and it switches to code input
mode.
8.“SR1 - - - -”appears, and it is ready for
input of the new ID code.
(New ID code input)
9. Input the new ID code using channel
preset buttons 1-4.
Example: If“1234”is input as the new
code,“SR1 1234”is displayed.
(New ID code input determination)
10. Determine the new ID code which
has been input by pressing the auto
memory button.
11.“PIN CHANGED”appears for three
seconds which indicates that the new
ID code input has been completed.
12. It returns to the former display.NOTE
lIf an ID code is not input for ten seconds,
“Err”is displayed and it returns to the
former display.
lChannel preset buttons 1, 2, 3, 4 and the
auto memory button are used for input of
the ID code. Buttons 5 and 6 cannot be
used.
Individual channel locking
If a channel is locked, the channel is
muted.
NOTE
If the registered ID code is forgotten, return
the ID code to the default [0000]. (See
“INTIALIZATION OF ID CODE”section)
(Locking a channel)
1. Select a channel to be locked by
turning the manual tuning dial.
Example: Select channel 100
(Registered ID code input preparation)
2. Press and hold the auto memory
button, then press channel preset button
6. Hold both buttons together for 1.5
seconds.
3.“ENTER PIN”appears for two seconds
which indicates that it is in code input
mode.
4.“SR1 - - - -”appears which indicates
that it is ready for code input.
(Registered ID code input)
5. Input the registered ID code using
channel preset buttons 1-4. Example: If
the registered ID code is“2323”, input
“2323”. At this time“SR1 2323”is
displayed.
Interior Comfort
Audio System
6-43
CX-7_8AS7-EA-09E_Edition2 Page283
Friday, June 5 2009 2:26 PM
Form No.8AS7-EA-09E
Page 288 of 510

Black plate (288,1)
(CD random)
1. Press the random button (
) during
playback, and then press the button
again within 3 seconds to play the
tracks on the CD randomly.
“DISC RDM”is displayed.
2. Press the button again to cancel the
random playback.
Switching the display
For files with a file name or other name
that have been input, the display changes
in the order of the file names or other
names each time the display button (
)
is pressed during playback.
Music CD
Track number/Elapsed
time display
Track name display
*
Album name display*
Artist name display*
*
Depending on the CD, this information
may not be available.
MP3/WMA CD
Folder number/File number
File number/Elapsed
time display
File name
Folder name
Album name (ID3 Tag)
Song name (ID3 Tag)
Artist name (ID3 Tag)
NOTE
(MP3/WMA CD)
This unit can only read English (including
numerals) one-byte characters. Depending on
the CD writing software used, proper display
may not be possible.
Display scroll
Only 8 characters (File name) or 12
characters (Except file name) can be
displayed at one time. To display the rest
of the characters of a long title, press the
text button (
). The display scrolls
the next 12 characters. Press the text
button (
) again after the last 12
characters have been displayed to return
to the beginning of the title.
6-48
Interior Comfort
Audio System
CX-7_8AS7-EA-09E_Edition2 Page288
Friday, June 5 2009 2:26 PM
Form No.8AS7-EA-09E
Page 290 of 510

Black plate (290,1)
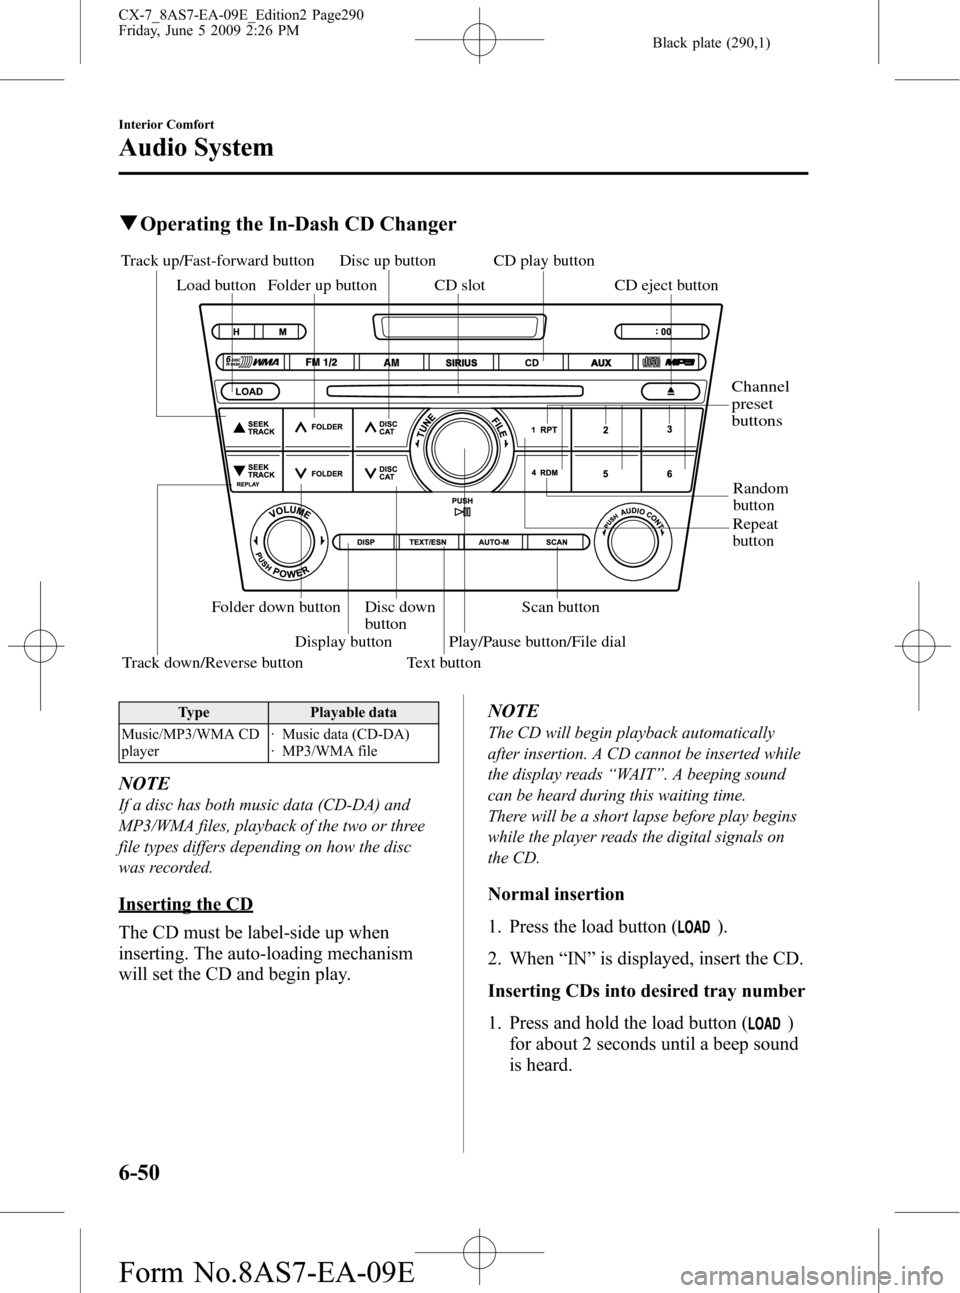
qOperating the In-Dash CD Changer
Scan button
Random
button
Track down/Reverse button Track up/Fast-forward button
Load button
Repeat
button CD play button
CD eject button
Folder up button CD slot
Disc up button
Disc down
button Folder down button
Display button
Text buttonPlay/Pause button/File dial
Channel
preset
buttons
Type Playable data
Music/MP3/WMA CD
player· Music data (CD-DA)
· MP3/WMA file
NOTE
If a disc has both music data (CD-DA) and
MP3/WMA files, playback of the two or three
file types differs depending on how the disc
was recorded.
Inserting the CD
The CD must be label-side up when
inserting. The auto-loading mechanism
will set the CD and begin play.NOTE
The CD will begin playback automatically
after insertion. A CD cannot be inserted while
the display reads“WAIT”. A beeping sound
can be heard during this waiting time.
There will be a short lapse before play begins
while the player reads the digital signals on
the CD.
Normal insertion
1. Press the load button (
).
2. When“IN”is displayed, insert the CD.
Inserting CDs into desired tray number
1. Press and hold the load button (
)
for about 2 seconds until a beep sound
is heard.
6-50
Interior Comfort
Audio System
CX-7_8AS7-EA-09E_Edition2 Page290
Friday, June 5 2009 2:26 PM
Form No.8AS7-EA-09E
Page 293 of 510

Black plate (293,1)
During MP3/WMA CD playback
(Folder random)
1. Press the random button (
) during
playback to play the tracks in the folder
randomly.“FOLDER RDM”is
displayed.
2. To cancel the random playback, press
the button again after 3 seconds.
(CD random)
1. Press the random button (
) during
playback, and then press the button
again within 3 seconds to play the
tracks on the CD randomly.
“DISC RDM”is displayed.
2. Press the button again to cancel the
random playback.
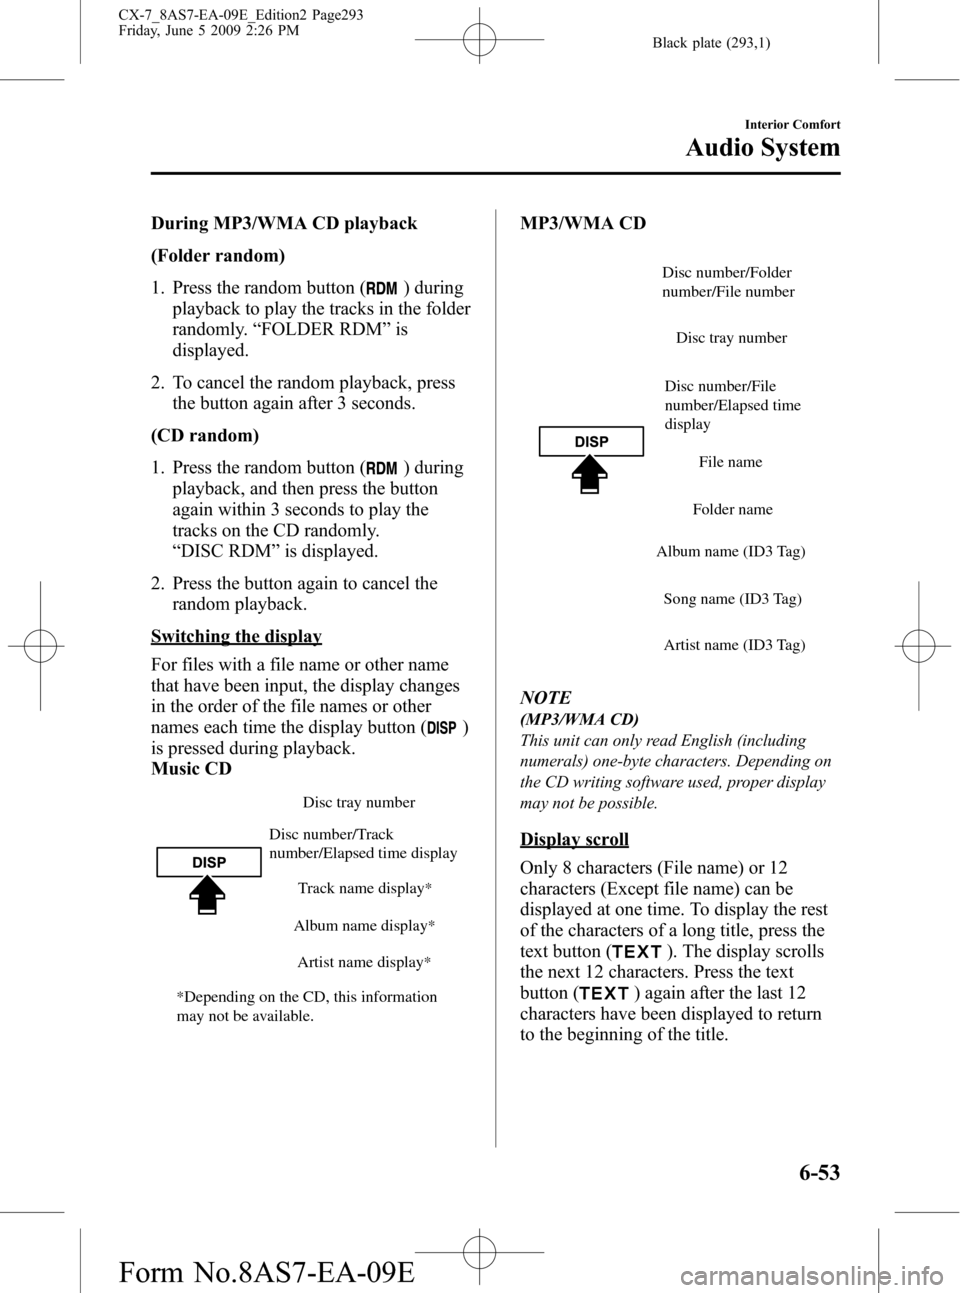
Switching the display
For files with a file name or other name
that have been input, the display changes
in the order of the file names or other
names each time the display button (
)
is pressed during playback.
Music CD
Disc tray number
Track name display
*
Album name display*
Artist name display*
Disc number/Track
number/Elapsed time display
*Depending on the CD, this information
may not be available.
MP3/WMA CD
Disc number/File
number/Elapsed time
displayDisc tray number
File name
Folder name
Album name (ID3 Tag)
Song name (ID3 Tag)
Artist name (ID3 Tag)
Disc number/Folder
number/File number
NOTE
(MP3/WMA CD)
This unit can only read English (including
numerals) one-byte characters. Depending on
the CD writing software used, proper display
may not be possible.
Display scroll
Only 8 characters (File name) or 12
characters (Except file name) can be
displayed at one time. To display the rest
of the characters of a long title, press the
text button (
). The display scrolls
the next 12 characters. Press the text
button (
) again after the last 12
characters have been displayed to return
to the beginning of the title.
Interior Comfort
Audio System
6-53
CX-7_8AS7-EA-09E_Edition2 Page293
Friday, June 5 2009 2:26 PM
Form No.8AS7-EA-09E
Page 304 of 510

Black plate (304,1)
NOTElIt may not be possible to play a Bluetooth
audio device if it is placed anywhere
transmission is compromised, such as
inside a metal container or the trunk. Move
the Bluetooth audio device to a location
where transmission is possible.
lBattery consumption of Bluetooth audio
devices is higher while Bluetooth-
connected.
lIf a non-Bluetooth device is to be used, a
commercially-available Bluetooth adapter
is required. When playing an audio device
with a Bluetooth adapter installed,
programming of the audio device may not
be possible or audio may not be heard from
the vehicle speakers if the connection of the
adapter and the device is poor. If this
happens, check if the Bluetooth adapter is
properly connected.
qBluetooth Audio Preparation
Bluetooth audio device set-up
Bluetooth audio programming, changes,
deletions, and display of programmed
device information can be performed.
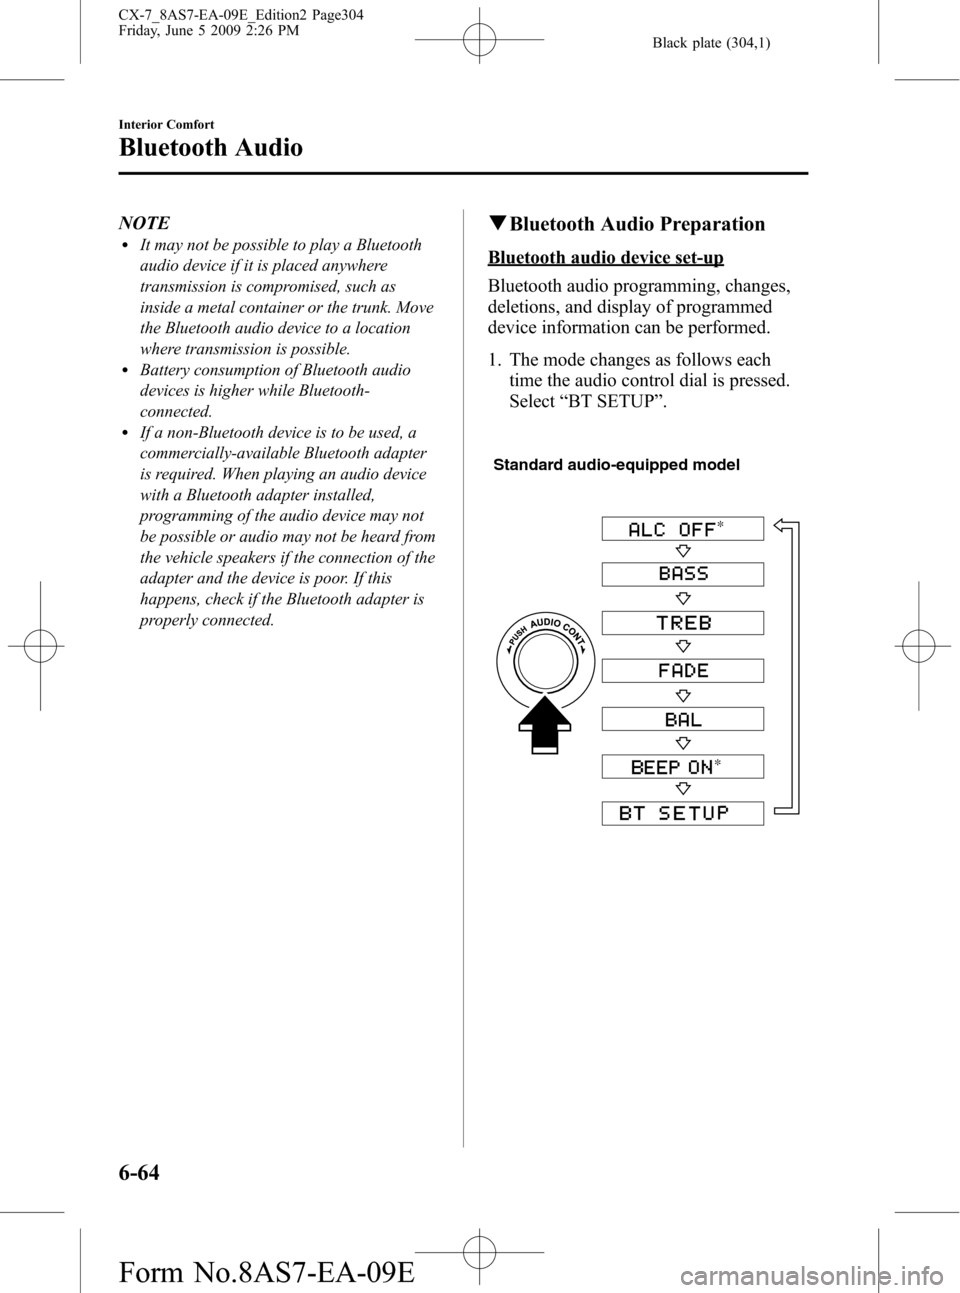
1. The mode changes as follows each
time the audio control dial is pressed.
Select“BT SETUP”.
Standard audio-equipped model
*
*
6-64
Interior Comfort
Bluetooth Audio
CX-7_8AS7-EA-09E_Edition2 Page304
Friday, June 5 2009 2:26 PM
Form No.8AS7-EA-09E
Page 307 of 510

Black plate (307,1)
NOTElSome Bluetooth audio devices need a
certain amount of time before the“
”
symbol is displayed.
lIf the programming failed,“Err”flashes
for three seconds.
lProgramming cannot be performed while
the vehicle is moving. If you attempt to
perform programming while the vehicle is
moving,“PAIR DISABLE”is displayed.
lIf seven Bluetooth audio devices have
already been programmed to the vehicle,
programming cannot be performed and
“MEMORY FULL”is displayed. Delete
one programmed device to program
another one.
Programming a Bluetooth audio device
which does not have a PIN code (4
digits)
1. Using the audio control dial, select the
pairing program mode
“PAIR DEVICE”in the“BT SETUP”
mode. (Refer to
“Bluetooth audio set up”for details.)
2. Press the audio control dial to
determine the mode.
After“ENTER PIN”is displayed on
the information display for two
seconds,“PIN 0000”is displayed and
the PIN code can be input.
3. Press the audio control dial while
“PIN 0000”is displayed.
“PAIRING”flashes on the display.
4. Operate the Bluetooth audio device and
set it to the program mode while
“PAIRING”is flashing.
5. As the Bluetooth audio device requires
a PIN code, input“0000”.6. When the programming is completed,
“
”and“PAIR SUCCESS”are
displayed after about 10-30 seconds,
after which“PAIR SUCCESS”
continues to be displayed for three
seconds, and then the unit returns to the
normal display.
NOTE
lIf pairing cannot be completed, try“1234”
instead. Refer to the owner's manual of
your mobile device for the right PIN code.
lSome Bluetooth audio devices need a
certain amount of time before the“
”
symbol is displayed.
lIf the programming failed,“Err”flashes
for three seconds.
lProgramming cannot be performed while
the vehicle is moving. If you attempt to
perform programming while the vehicle is
moving,“PAIR DISABLE”is displayed.
lIf seven Bluetooth audio devices have
already been programmed to the vehicle,
programming cannot be performed and
“MEMORY FULL”is displayed. Delete
one programmed device to program
another one.
Changing the link to a Bluetooth audio
device
If several devices have been programmed,
the Bluetooth unit links the device last
programmed. If you would like to link a
different programmed device, it is
necessary to change the link. The order of
device priority after the link has been
changed is maintained even when the
ignition switch is turned off.
1. Using the audio control dial, select the
link change mode“LINK CHANGE”
in the“BT SETUP”mode. (Refer to
“Bluetooth audio device set-up”for
details.)
Interior Comfort
Bluetooth Audio
6-67
CX-7_8AS7-EA-09E_Edition2 Page307
Friday, June 5 2009 2:26 PM
Form No.8AS7-EA-09E
Page 308 of 510

Black plate (308,1)
2. Press the audio control dial to
determine the mode.
3. The name of the currently linked
Bluetooth audio device is displayed.
If no Bluetooth audio device is
currently linked, the name of the first
device among the programmed devices
is displayed.
4. Turn the audio control dial to select the
name of the device you would like to
link.
Device name 1
Device name 2
Device name 3
Device name 4
Device name 5
Device name 6
Device name 7
5. Press the audio control dial to select the
device you would like to link.
The“
”symbol disappears, and
“PAIRING”flashes in the display.
NOTE
When“GO BACK”is selected and the audio
control dial is pressed, the display returns to
“LINK CHANGE”.
6. If the link to the desired device is
successful, the“
”symbol is
displayed again, together with
“LINK CHANGED”.
“LINK CHANGED”is displayed for
three seconds, then it returns to the
normal display.
NOTE
lSome Bluetooth audio devices need a
certain amount of time before the“
”
symbol is displayed.
lIf a hands-free type mobile phone has been
the most recently programmed device, the
Bluetooth unit links this device. If you
would like to use a Bluetooth audio type
device which has been previously
programmed to the Bluetooth unit, the link
must be changed to this device.
lIf an error occurs while trying to link a
device,“Err”flashes in the display for
three seconds, and the display returns to
“LINK CHANGE”. If this occurs, check the
programming status of the Bluetooth audio
device and the location of the device in the
vehicle (not in the trunk or a metal-type
box), and then try the link operation again.
lDevice selection can also be done using
voice recognition (page 6-88).
How to confirm the device currently
linked
Switch to the link-change mode. (Refer to
“Changing the link to a Bluetooth audio
device”)
The device name displayed first is the
device which is currently linked.
6-68
Interior Comfort
Bluetooth Audio
CX-7_8AS7-EA-09E_Edition2 Page308
Friday, June 5 2009 2:26 PM
Form No.8AS7-EA-09E
Page 343 of 510

Black plate (343,1)
Switch Function
Enter (up/down) switch Used to select a menu and change numbers. Select up or down and press enter.
Right switch/Left
switchUsed to select digits when setting numbers.
Navi switch
(With navigation sys-
tem)Press to switch the system to the navigation system screen.
BACK switch Press during SETTINGS to return to the previous screen.
INFO switch Press to switch to the multi information display.
Switches the setting display in the order of Trip computer
(average fuel economy/average vehicle speed)→Trip computer
(current fuel economy/distance-to-empty)→Audio display→Settings
(reset averages/maintenance/preferences). Each time the switch is pressed, the multi
information display cycles through.
qMulti Information Display Functions
Function name Details See page
Clock Constant display of time. 6-104
Outside temperature
displayConstant display of ambient temperature. 6-105
Audio display Displays the audio operation status. Displayed when the INFO switch is
pressed.6-105
Trip computer Displays the average fuel economy, average vehicle speed, current fuel
economy, and distance-to-empty. Displayed when the INFO switch is
pressed.6-105
Maintenance monitor Notification of periodic inspection and tire rotation period 6-107
Warning indicator Notification of the need to take caution 6-111
Settings Used to change the multi information display settings. Displayed when the
INFO switch is pressed.6-111
Rear view monitor The rear view monitor is a visual assist system when reversing the vehicle
that provides images from the rear of the vehicle.6-113
Navigation system Refer to the separate manual
Interior Comfort
Interior Equipment
6-103
CX-7_8AS7-EA-09E_Edition2 Page343
Friday, June 5 2009 2:26 PM
Form No.8AS7-EA-09E